iOS自动打包主要用xcodebuild命令, 在终端输入xcodebuild --help可以查看xcodebuild的参数。
xcodebuild具体语法:
无workspace的工程
xcodebuild [-project name.xcodeproj] [[-target targetname] … | -alltargets] [-configuration configurationname] [-sdk [sdkfullpath | sdkname]] [action …] [buildsetting=value …] [-userdefault=value …]
xcodebuild [-project name.xcodeproj] -scheme schemename [[-destination destinationspecifier] …] [-destination-timeout value] [-configuration configurationname] [-sdk [sdkfullpath | sdkname]] [action …] [buildsetting=value …] [-userdefault=value …]
命令中可以添加一些参数实现在命令执行时配置不同的环境。比如,如果想archive 出Debug环境的包,那么就可以在命令中添加-configuration Debug 参数。还可以通过添加PROVISIONING_PROFILE参数来指定签名所用的 Profile 文件的UUID。
对于基于workspace的工程,比如cocoapods项目,脚本格式如下:
xcodebuild -workspace name.xcworkspace -scheme schemename [[-destination destinationspecifier] …] [-destination-timeout value] [-configuration configurationname] [-sdk [sdkfullpath | sdkname]] [action …] [buildsetting=value …] [-userdefault=value …]
当然还有很多可选参数,在这就不一一列举了,如果有兴趣可以通过xcodebuild --help查看。
shell脚本(工程不是WorkSpace)
脚本下载路径:github下载地址
#author by 得力
#注意:脚本目录和xxxx.xcodeproj要在同一个目录,如果放到其他目录,请自行修改脚本。
#工程名字(Target名字)
Project_Name="Target名字,系统默认和工程名字一样"
#配置环境,Release或者Debug
Configuration="Release"
#AdHoc版本的Bundle ID
AdHocBundleID="com.xxx"
#AppStore版本的Bundle ID
AppStoreBundleID="com.xxx"
#enterprise的Bundle ID
EnterpriseBundleID="com.xxx"
# ADHOC
#证书名#描述文件
ADHOCCODE_SIGN_IDENTITY="iPhone Distribution: xxxx"
ADHOCPROVISIONING_PROFILE_NAME="xxxx-xxxx-xxxx-xxxx"
#AppStore证书名#描述文件
APPSTORECODE_SIGN_IDENTITY="iPhone Distribution: xxxx"
APPSTOREROVISIONING_PROFILE_NAME="xxxx-xxxx-xxxx-xxxx"
#企业(enterprise)证书名#描述文件
ENTERPRISECODE_SIGN_IDENTITY="iPhone Distribution: xxxxx"
ENTERPRISEROVISIONING_PROFILE_NAME="xxxx-xxxx-xxxx-xxxx"
#加载各个版本的plist文件
ADHOCExportOptionsPlist=./ADHOCExportOptionsPlist.plist
AppStoreExportOptionsPlist=./AppStoreExportOptionsPlist.plist
EnterpriseExportOptionsPlist=./EnterpriseExportOptionsPlist.plist
ADHOCExportOptionsPlist=${ADHOCExportOptionsPlist}
AppStoreExportOptionsPlist=${AppStoreExportOptionsPlist}
EnterpriseExportOptionsPlist=${EnterpriseExportOptionsPlist}
echo"~~~~~~~~~~~~选择打包方式(输入序号)~~~~~~~~~~~~~~~"
echo" 1 appstore"
echo" 2 adhoc"
echo" 3 enterprise"
# 读取用户输入并存到变量里
readparameter
sleep 0.5
method="$parameter"
# 判读用户是否有输入
if[ -n"$method"]
then
#clean下
xcodebuild clean -xcodeproj ./$Project_Name/$Project_Name.xcodeproj -configuration$Configuration-alltargets
if["$method"="1"]
then
#appstore脚本
xcodebuild -project$Project_Name.xcodeproj -scheme$Project_Name-configuration$Configuration-archivePath build/$Project_Name-appstore.xcarchive clean archive build CODE_SIGN_IDENTITY="${APPSTORECODE_SIGN_IDENTITY}"PROVISIONING_PROFILE="${APPSTOREROVISIONING_PROFILE_NAME}"PRODUCT_BUNDLE_IDENTIFIER="${AppStoreBundleID}"
xcodebuild -exportArchive -archivePath build/$Project_Name-appstore.xcarchive -exportOptionsPlist$AppStoreExportOptionsPlist-exportPath ~/Desktop/$Project_Name-appstore.ipa
elif["$method"="2"]
then
#adhoc脚本
xcodebuild -project$Project_Name.xcodeproj -scheme$Project_Name-configuration$Configuration-archivePath build/$Project_Name-adhoc.xcarchive clean archive build CODE_SIGN_IDENTITY="${ADHOCCODE_SIGN_IDENTITY}"PROVISIONING_PROFILE="${ADHOCPROVISIONING_PROFILE_NAME}"PRODUCT_BUNDLE_IDENTIFIER="${AdHocBundleID}"
xcodebuild -exportArchive -archivePath build/$Project_Name-adhoc.xcarchive -exportOptionsPlist$ADHOCExportOptionsPlist-exportPath ~/Desktop/$Project_Name-adhoc.ipa
elif["$method"="3"]
then
#企业打包脚本
xcodebuild -project$Project_Name.xcodeproj -scheme$Project_Name-configuration$Configuration-archivePath build/$Project_Name-enterprise.xcarchive clean archive build CODE_SIGN_IDENTITY="${ENTERPRISECODE_SIGN_IDENTITY}"PROVISIONING_PROFILE="${ENTERPRISEROVISIONING_PROFILE_NAME}"PRODUCT_BUNDLE_IDENTIFIER="${EnterpriseBundleID}"
xcodebuild -exportArchive -archivePath build/$Project_Name-enterprise.xcarchive -exportOptionsPlist$EnterpriseExportOptionsPlist-exportPath ~/Desktop/$Project_Name-enterprise.ipa
else
echo"参数无效...."
exit1
fi
fi
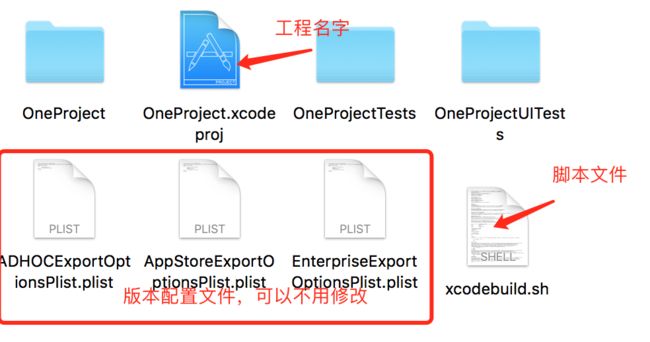
注意:1.由于脚本配置的路径问题,所以xcodebuild.sh和xxx.xcodeproj放到同一个目录下,否则会出现路径问题。如图所示:
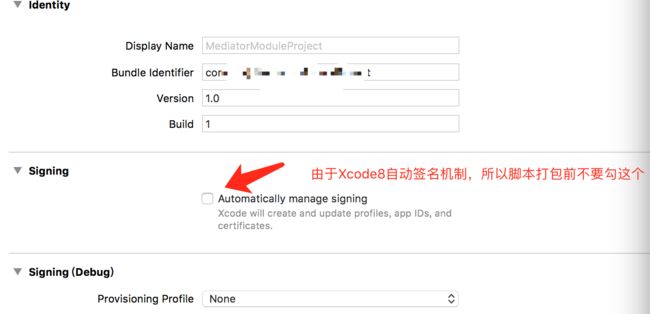
2.由于Xcode8可以在Project->General中自动配置证书,所以用脚本打包前先去掉该功能。如图所示:
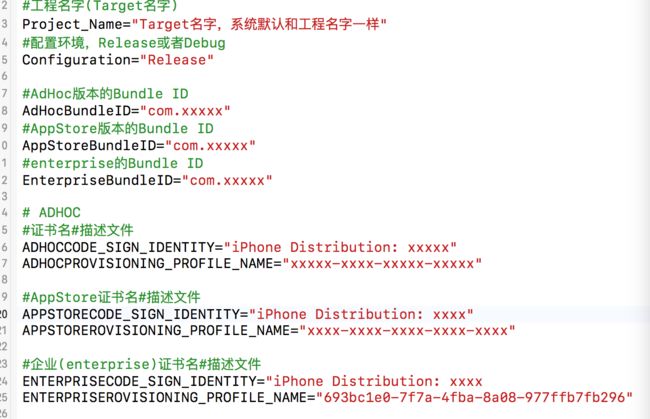
3.配置脚本,需要配置的信息如下图,不需要的版本可以不用配置。比如只需要AppStore的ipa,则只需要配置AppStore版本相关的配置。
4.如果是Xcode9或者以上版本, 则需要把描述文件的UUID添加到对应的plist文件中。配置如下:
5.执行脚本,打开终端,cd到当前脚本所在路径,然后执行: ./xcodebuild.sh即可。
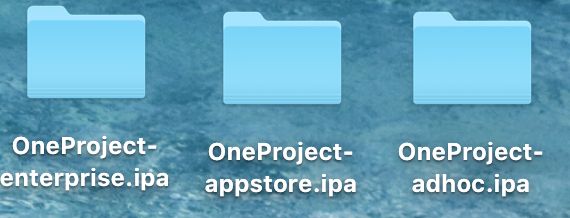
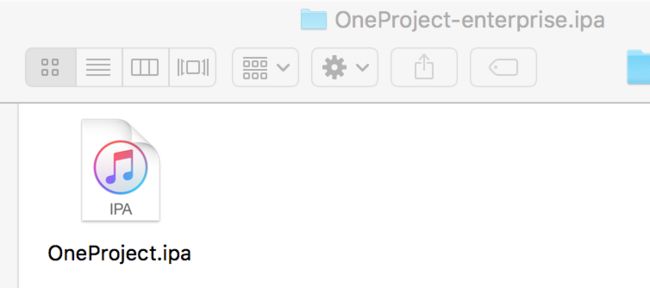
6.导出的ipa包默认保存到桌面,当前保存目录如果需要修改,可以自己修改脚本。如图所示,比如我项目名字是OneProject,则导出的包如下图:
打开文件夹就是ipa包了,如图:
7.如何查看证书名字和配置文件的UUID呢?
打开钥匙串访问,找到证书,点击显示简介,里面有个常用名字,复制到脚本中即可,如图所示:
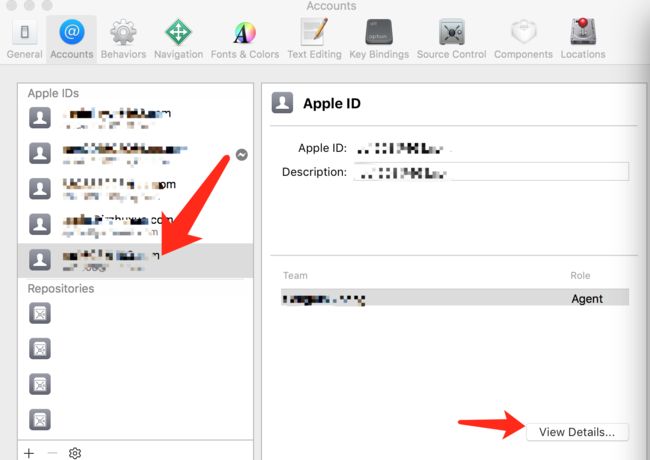
配置文件UUID可以在Xcode中查看,Xcode->Preferences...->Accounts,如下图:
点击View Details
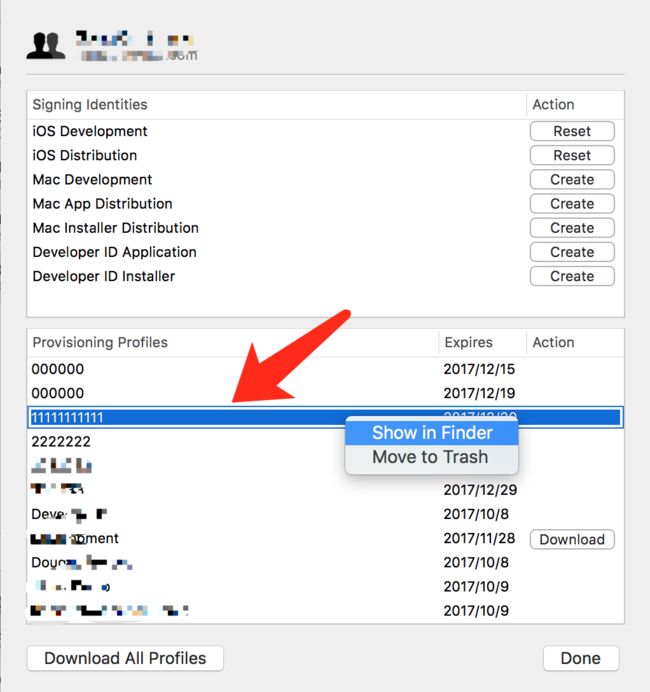
点击Show in Finder
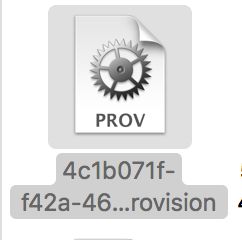
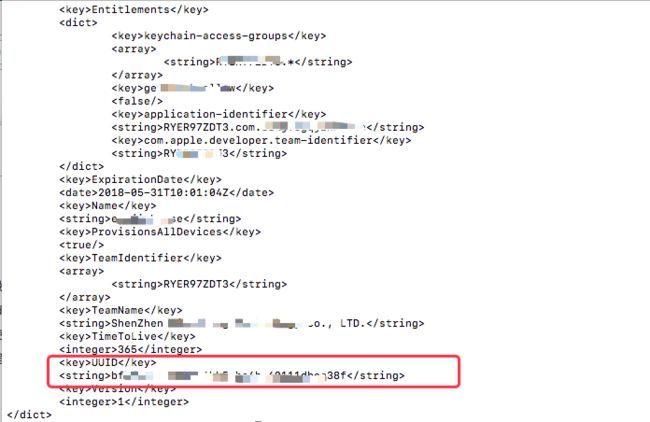
上面的配置文件的名字是6994F55C-1960-4EF9-AA7E-9C1FABDBA7A8.mobileprovision。则配置的文件的UUID就是6994F55C-1960-4EF9-AA7E-9C1FABDBA7A8。所以复制6994F55C-1960-4EF9-AA7E-9C1FABDBA7A8到脚本中。
当然,如果感觉上面的方法比较麻烦,或者新系统找不到View Details,则我们可以在终端查看描述文件的UUID。首先打开终端,cd到描述文件的根目录,输入指令security cms -D -i XXX.mobileprovision即可。如下图:
执行脚本
打开终端,cd到当前脚本所在路径,在终端输入:./xcodebuild.sh,点击回车即可。
WorkSpace脚本
如果你的项目用的workspace,或者cocoapods,则上面的脚本不适用了,具体脚本如下,脚本配置和上面一样。
脚本下载路径:github下载地址
#author by 得力
#注意:脚本目录和WorkSpace目录在同一个目录
#工程名字(Target名字)
Project_Name="Target名字,系统默认等于工程名字"
#workspace的名字
Workspace_Name="WorkSpace名字"
#配置环境,Release或者Debug,默认release
Configuration="Release"
#AdHoc版本的Bundle ID
AdHocBundleID="com.xxxx"
#AppStore版本的Bundle ID
AppStoreBundleID="com.xxxx"
#enterprise的Bundle ID
EnterpriseBundleID="com.xxxx"
# ADHOC证书名#描述文件
ADHOCCODE_SIGN_IDENTITY="iPhone Distribution: xxxx"
ADHOCPROVISIONING_PROFILE_NAME="xxxxx-xxxx-xxxx-xxxx-xxxxxx"
#AppStore证书名#描述文件
APPSTORECODE_SIGN_IDENTITY="iPhone Distribution: xxxxx"
APPSTOREROVISIONING_PROFILE_NAME="xxxxx-xxxx-xxxx-xxxx-xxxxxx"
#企业(enterprise)证书名#描述文件
ENTERPRISECODE_SIGN_IDENTITY="iPhone Distribution: xxxx"
ENTERPRISEROVISIONING_PROFILE_NAME="xxxxx-xxxx-xxx-xxxx"
#加载各个版本的plist文件
ADHOCExportOptionsPlist=./ADHOCExportOptionsPlist.plist
AppStoreExportOptionsPlist=./AppStoreExportOptionsPlist.plist
EnterpriseExportOptionsPlist=./EnterpriseExportOptionsPlist.plist
ADHOCExportOptionsPlist=${ADHOCExportOptionsPlist}
AppStoreExportOptionsPlist=${AppStoreExportOptionsPlist}
EnterpriseExportOptionsPlist=${EnterpriseExportOptionsPlist}
echo"~~~~~~~~~~~~选择打包方式(输入序号)~~~~~~~~~~~~~~~"
echo" 1 adHoc"
echo" 2 AppStore"
echo" 3 Enterprise"
# 读取用户输入并存到变量里
readparameter
sleep 0.5
method="$parameter"
# 判读用户是否有输入
if[ -n"$method"]
then
if["$method"="1"]
then
#adhoc脚本
xcodebuild -workspace$Workspace_Name.xcworkspace -scheme$Project_Name-configuration$Configuration-archivePath build/$Project_Name-adhoc.xcarchive clean archive build CODE_SIGN_IDENTITY="${ADHOCCODE_SIGN_IDENTITY}"PROVISIONING_PROFILE="${ADHOCPROVISIONING_PROFILE_NAME}"PRODUCT_BUNDLE_IDENTIFIER="${AdHocBundleID}"
xcodebuild -exportArchive -archivePath build/$Project_Name-adhoc.xcarchive -exportOptionsPlist${ADHOCExportOptionsPlist}-exportPath ~/Desktop/$Project_Name-adhoc.ipa
elif["$method"="2"]
then
#appstore脚本
xcodebuild -workspace$Workspace_Name.xcworkspace -scheme$Project_Name-configuration$Configuration-archivePath build/$Project_Name-appstore.xcarchive archive build CODE_SIGN_IDENTITY="${APPSTORECODE_SIGN_IDENTITY}"PROVISIONING_PROFILE="${APPSTOREROVISIONING_PROFILE_NAME}"PRODUCT_BUNDLE_IDENTIFIER="${AppStoreBundleID}"
xcodebuild -exportArchive -archivePath build/$Project_Name-appstore.xcarchive -exportOptionsPlist${AppStoreExportOptionsPlist}-exportPath ~/Desktop/$Project_Name-appstore.ipa
elif["$method"="3"]
then
#企业打包脚本
xcodebuild -workspace$Workspace_Name.xcworkspace -scheme$Project_Name-configuration$Configuration-archivePath build/$Project_Name-enterprise.xcarchive archive build CODE_SIGN_IDENTITY="${ENTERPRISECODE_SIGN_IDENTITY}"PROVISIONING_PROFILE="${ENTERPRISEROVISIONING_PROFILE_NAME}"PRODUCT_BUNDLE_IDENTIFIER="${EnterpriseBundleID}"
xcodebuild -exportArchive -archivePath build/$Project_Name-enterprise.xcarchive -exportOptionsPlist${EnterpriseExportOptionsPlist}-exportPath ~/Desktop/$Project_Name-enterprise.ipa
else
echo"参数无效...."
exit1
fi
fi
可能出现的问题
1.如果配置的证书名字、BundleID、配置文件UUID不一致,脚本就会报错,这个可以看脚本提示错误,由于错误非常明显,所以就不在截图了。
2.如果执行脚本的过程出现如下错误,在终端输入:rvm system,回车即可。
3.如果执行脚本的过程出现-bash: ./xx.sh: Permission denied,表示权限问题,所以在终端执行:chmod 777 xx.sh,然后回车即可,但是要注意: chmod 777后面是脚本路径。
补充
上面脚本默认启动Bitcode,如果你的项目中没有开启Bitcode,则可以在上面几个plist文件中加上两个键值对,分别是:uploadBitcode=NO,compileBitcode=NO
