1. iOS 坐标系
NSView坐标系 : 左手坐标系 原点左上角
UIView坐标系 : 左手坐标系 原点左上角
Quartz(Core Graphics)坐标系 : 右手坐标系 原点左下角
CALayer:在Mac中CALayer使用的是右手坐标系,其原点在左下角;iOS中使用的左手坐标系,其原点在左上角。
2. iOS scale
iphone屏幕是用点坐标来描述的,不同于像素。
[UIScreen mainScreen].scale可以获得scale,scale代表Scale Factor,每个点内像素,retain屏一个坐标点内像素不等于1的。
具体参照 : http://blog.csdn.net/phunxm/article/details/42174937
3. CGContextRef上下文
我们拿到上下文才可以使用coreGraphics和quatz的api进行绘图。
1.UIView中
- (void) drawRect: (CGRect) rect {

CGContextRef con = UIGraphicsGetCurrentContext();

CGContextAddEllipseInRect(con, CGRectMake(0,0,100,100));

CGContextSetFillColorWithColor(con, [UIColor blueColor].CGColor);

CGContextFillPath(con);

}
2 UIGraphicsBeginImageContextWithOptions
void UIGraphicsBeginImageContextWithOptions(CGSize size, BOOL opaque, CGFloat scale);

缩放因子越大,转化出来的图片越大,清晰度越高,

BOOL opaque:默认为YES,不透明,位图中没有绘制的区域会以黑色显示;NO代表透明,
位图中没有绘制的区域会以透明显示;主要是用于绘图时进行性能优化的开关。

   CGFloat scale:代表缩放,0代表系统会自动设置根据当前设备的屏幕因数设置缩放因数。

   UIGraphicsBeginImageContextWithOptions(CGSizeMake(sz.width, sz.height), NO, 2);
    CGContextRef ctx = UIGraphicsGetCurrentContext();

    CGContextSetRGBFillColor(ctx, 250.0/255, 250.0/255, 210.0/255, 1.0);
    CGContextFillRect(ctx,rec);

    CGContextDrawImage(ctx,CGRectMake(0, 0, sz.width, sz.height), img.CGImage);
    UIImage* im = UIGraphicsGetImageFromCurrentImageContext();
    UIGraphicsEndImageContext();
3 CGBitmapContextCreate
CGContextRef CGBitmapContextCreate (
    void *data,
    size_t width,
    size_t height,
    size_t bitsPerComponent,
    size_t bytesPerRow,
    CGColorSpaceRef colorspace,
    CGBitmapInfo bitmapInfo
);

   data     指向要渲染的绘制内存的地址。这个内存块的大小至少是(bytesPerRow*height)个字节。使用时可填NULL或unsigned char类型的指针。
   width    bitmap的宽度,单位为像素
   height    bitmap的高度,单位为像素
   bitsPerComponent     内存中像素的每个组件的位数.例如对于32位像素格式和RGB 颜色空间你应该将这个值设为8。
   bytesPerRow       bitmap的每一行在内存所占的比特数,一个像素一个byte。
   colorspace      bitmap上下文使用的颜色空间。
   bitmapInfo     指定bitmap是否包含alpha通道,像素中alpha通道的相对位置,像素组件是整形还是浮点型等信息的字符串。


    CGColorSpaceRef colorSpace = CGColorSpaceCreateDeviceRGB();
    CGContextRef contextRef = CGBitmapContextCreate(NULL, img.size.width, img.size.height, 8, img.size.width * 4, colorSpace ,kCGImageAlphaPremultipliedLast|kCGBitmapByteOrderDefault);
    CGContextDrawImage(contextRef, CGRectMake(0, 0, img.size.width, img.size.height), img.CGImage);

    CGImageRef imageReff = CGBitmapContextCreateImage(contextRef);
    UIImage* imageDst = [UIImage imageWithCGImage:imageReff scale:2 orientation:UIImageOrientationUp];
    CGContextRelease(contextRef);
    CGColorSpaceRelease(colorSpace);

    NSData *imageData = UIImagePNGRepresentation(imageDst);
4.上下文变换
我们可以把上下文想象成一张画布就像PS中的一样。
画布在建立的时候就已经确定大小。
使用CTM转换函数可以转换画布坐标系.
组合
void CGContextConcatCTM(CGContextRef c, CGAffineTransform transform);
旋转
void CGContextTranslateCTM(CGContextRef c, CGFloat tx, CGFloat ty);
缩放
void CGContextScaleCTM(CGContextRef c, CGFloat sx, CGFloat sy);
平移
void CGContextRotateCTM(CGContextRef c, CGFloat angle);
CGAffineTransform CGContextGetCTM(CGContextRef c);
在前面我们说了coreGraphics坐标系和设备坐标系是不同的,所以一般我们需要转换坐标系后在上面绘制。
    UIImage* img = self.originImageV.image;
    CGSize sz = [img size];
    UIGraphicsBeginImageContextWithOptions(CGSizeMake(sz.width, sz.height), NO, 0);
    CGContextRef ctx = UIGraphicsGetCurrentContext();

    //坐标轴转换
    CGContextTranslateCTM(ctx, 0, sz.height);
    CGContextScaleCTM(ctx, 1.0, -1.0);

    CGContextDrawImage(ctx,CGRectMake(0, 0, sz.width, sz.height), img.CGImage);
    UIImage* im = UIGraphicsGetImageFromCurrentImageContext();
    UIGraphicsEndImageContext();
    CGContextRelease(ctx);
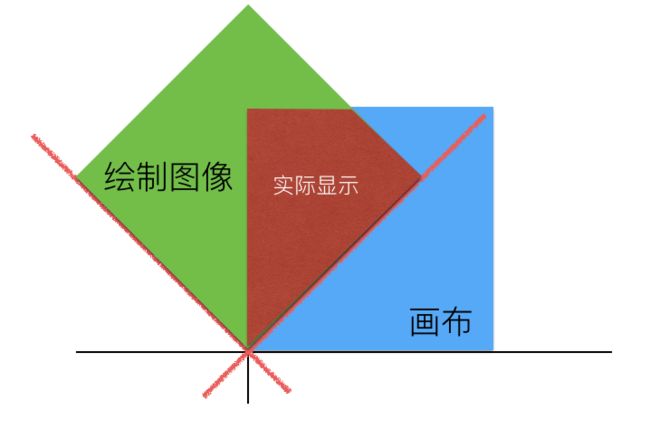
tips: CTM只是坐标轴转换,而画布大小是不变的,意思是在后续绘制时如果坐标超过了画布的大小,是绘制不到画布上的,列入下图,当坐标轴旋转了45度后在绘制图片,那么实际上在画布上的只有咖啡色的区域,而其他部分都是上下文的背景色。
Quartz也提供了一组API去转换坐标。
CGAffineTransform transform = CGContextGetUserSpaceToDeviceSpaceTransform(context);
CGPoint devicePoint = CGContextConvertPointToDeviceSpace(context, CGPointMake(0, 0));
CGPoint userPoint = CGContextConvertPointToUserSpace(context, CGPointMake(0, 0));
CGSize deviceSize = CGContextConvertSizeToDeviceSpace(context, CGSizeMake(100, 100));
CGSize userSize = CGContextConvertSizeToUserSpace(context, CGSizeMake(100, 100));
CGRect deviceRect = CGContextConvertRectToDeviceSpace(context, CGRectMake(100, 100, 100, 100));
CGRect userRect = CGContextConvertRectToUserSpace(context, CGRectMake(100, 100, 100, 100));
值得注意的是,这一组函数不仅可以转换坐标,和上下文的scale也是相关联的。
修正系数s = 设备.scale/上下文.scale ;
转UserSpace会乘以修正系数s。
转DeviceSpac会除以修正系数s。
上下文.scale是在创建上下文时候输入的,而在UIView的drawRect方法中获得的上下文的scale和设备的保持一致。
4. 裁剪图片
非零缠绕规则 CGContextClip
如果边界是顺时针绘制,那么在其内部逆时针绘制的边界所包含的内容为空。如果边界是逆时针绘制,那么在其内部顺时针绘制的边界所包含的内容为空。
奇偶规则 CGContextEOClip
最外层的边界代表内部都有效,都要填充;之后向内第二个边界代表它的内部无效,不需填充;如此规则继续向内寻找边界线。我们的情况非常简单,所以使用奇偶规则就很容易了。这里我们使用CGContextEOCllip设置裁剪区域然后进行绘图。(从点引出射线如果和边界交点数量为偶数,认为在外部,奇数,则在内部)
参考 : http://www.cnblogs.com/luckychen/p/5525794.html
裁剪区域简单一般采用 奇偶规则 CGContextEOClip
void CGContextClip(CGContextRef c);
void CGContextEOClip(CGContextRef c);
void CGContextClipToRects(CGContextRef c, const CGRect *rects, size_t count);
void CGContextClipToRect(CGContextRef c, CGRect rect);
void CGContextClipToRects(CGContextRef c, const CGRect *rects, size_t count);
void CGContextClipToMask(CGContextRef c, CGRect rect, CGImageRef mask);

CGContextMoveToPoint(con, 0, 0);
CGContextAddLineToPoint(con, 0, 200);
CGContextAddLineToPoint(con, 200, 200);
CGContextAddLineToPoint(con, 200, 0);
CGContextAddLineToPoint(con, 0, 0);
CGContextEOClip(con);// 奇偶规则
裁剪的意义是,当裁剪完上下文后,图像只能绘制在被裁剪的区域内,所以应该是先裁剪,后绘图。
如果想要恢复裁剪前的可绘制上下可以用下面两个方法,CGContextSaveGState在裁剪前,CGContextRestoreGState在裁剪后。
CGContextSaveGState(con);
CGContextRestoreGState(con);
tips:所谓裁剪是裁剪上下文画布的可绘制区域,所以一定是先裁剪后绘制。
可以使用UIBezierPath创建一个更为复杂的裁剪区域
UIImage* imageSrc = [UIImage imageNamed:@"island.png"];
    CGColorSpaceRef colorRef = CGColorSpaceCreateDeviceRGB();
    CGContextRef contextRef = CGBitmapContextCreate(nil, imageSrc.size.width, imageSrc.size.height, 8, imageSrc.size.width*4, colorRef, kCGImageAlphaPremultipliedFirst);

    UIBezierPath* path = [UIBezierPath bezierPath];
    [path moveToPoint:CGPointMake(30, 160)];
    [path addQuadCurveToPoint:CGPointMake(140, 100) controlPoint:CGPointMake(80, 120)];
    [path addQuadCurveToPoint:CGPointMake(240, 180) controlPoint:CGPointMake(180, 100)];
    [path addQuadCurveToPoint:CGPointMake(140, 280) controlPoint:CGPointMake(210, 240)];
    [path addQuadCurveToPoint:CGPointMake(30, 160) controlPoint:CGPointMake(80, 260)];
    [path closePath];

    [path addClip];  //在当前上下文环境中.

    CGContextDrawImage(contextRef, CGRectMake(0, 0, imageSrc.size.width, imageSrc.size.height), imageSrc.CGImage);
    CGImageRef imageRef = CGBitmapContextCreateImage(contextRef);
    UIImage* imageDst = [UIImage imageWithCGImage:imageRef scale:[UIScreen mainScreen].scale orientation:UIImageOrientationUp];
    CGContextRelease(contextRef);
    CGColorSpaceRelease(colorRef);
void CGContextClipToMask(CGContextRef c, CGRect rect, CGImageRef mask)
可以传入一张部分透明的图片去裁剪区域。相当于蒙版。
5. 一些简单应用
5.1缩放图片
        UIImage *img;
        CGFloat scale = 0.5;
        CGSize size = CGSizeMake(img.size.width*scale,scale*img.size.height);
        UIGraphicsBeginImageContext(size);
        [img drawInRect:CGRectMake(0, 0, size.width, size.height)]; //这个方法会自动转换坐标系
        /*
        CGContextRef ctx = UIGraphicsGetCurrentContext();
        CGContextTranslateCTM(ctx, 0, sz.height);
        CGContextScaleCTM(ctx, 1.0, -1.0);
        CGContextDrawImage(ctx,CGRectMake(0, 0, size.width, size.height), img.CGImage);
        */
        img = UIGraphicsGetImageFromCurrentImageContext();
        CGContextRelease(ctx);
        UIGraphicsEndImageContext();
        return img;
5.2头像裁剪成圆形
        UIImage *img;
        CGFloat radius =  img.size.width;
        UIGraphicsBeginImageContextWithOptions(img.size, NO, o);
        CGContextRef ctx = UIGraphicsGetCurrentContext();

        CGContextTranslateCTM(ctx, 0, sz.height);
        CGContextScaleCTM(ctx, 1.0, -1.0);

        CGContextBeginPath(ctx);
        CGContextAddArc(ctx, sz.width/2, sz.height/2, sz.width/2, 0, M_PI*2, YES);
        CGContextClosePath(ctx);注意封口

        CGContextEOClip(ctx);
        CGContextDrawImage(ctx,CGRectMake(0, 0, sz.width, sz.height), img.CGImage);
        UIImage* im = UIGraphicsGetImageFromCurrentImageContext();
        CGContextRelease(ctx);
        UIGraphicsEndImageContext();
