安装:
打开终端,进入项目文件夹,执行以下命令:
//RN版本 < 0.40.0, 使用 v1.3.6版本
//npm 安装
npm install [email protected] --save
//yarn 安装
yarn add [email protected]
yarn安装教程参考:yarn安装教程
//RN版本 > 0.40.0
//使用最新版本
//并且jpush-react-native > 1.4.4,需要同时安装  jcore-react-native
npm install jpush-react-native --save
npm install jcore-react-native --save
安装完成后,进行link
//自动配置
react-native link
iOS配置
在 iOS 工程中如果找不到头文件可能要在 TARGETS-> BUILD SETTINGS -> Search Paths -> Header Search Paths 添加如下如路径
$(SRCROOT)/../node_modules/jpush-react-native/ios/RCTJPushModule/RCTJPushModule
打开 iOS 工程,在 rnpm link 之后,RCTJPushModule.xcodeproj 工程会自动添加到 Libraries 目录里面
在 iOS 工程 target 的 Build Phases->Link Binary with Libraries 中加入如下库
libz.tbd

CoreTelephony.framework

Security.framework

CFNetwork.framework

CoreFoundation.framework

SystemConfiguration.framework

Foundation.framework

UIKit.framework

UserNotifications.framework

libresolv.tbd
- 根据域名配置info.plist:
 把需要的支持的域添加給NSExceptionDomains。其中jpush.cn作为Key,类型为字典类型。
每个域下面需要设置2个属性:NSIncludesSubdomains、NSExceptionAllowsInsecureHTTPLoads。
两个属性均为Boolean类型,值分别为YES、YES。

- 在 AppDelegate.h 文件中 导入头文件
#import
#ifdef NSFoundationVersionNumber_iOS_9_x_Max
#import
#endif
- 在 AppDelegate.h 文件中 填写如下代码,这里的的 appkey、channel、和 isProduction 填写自己的
static NSString *appKey = @"";     //填写appkey
static NSString *channel = @"";    //填写channel   一般为nil
static BOOL isProduction = false;  //填写isProdurion  平时测试时为false ,生产时填写true
- 在AppDelegate.m 的didFinishLaunchingWithOptions 方法里面添加如下代码
- (BOOL)application:(UIApplication *)application didFinishLaunchingWithOptions:(NSDictionary *)launchOptions
{
    if ([[UIDevice currentDevice].systemVersion floatValue] >= 10.0) {
 #ifdef NSFoundationVersionNumber_iOS_9_x_Max
    JPUSHRegisterEntity * entity = [[JPUSHRegisterEntity alloc] init];
     entity.types = UNAuthorizationOptionAlert|UNAuthorizationOptionBadge|UNAuthorizationOptionSound;
     [JPUSHService registerForRemoteNotificationConfig:entity delegate:self];

#endif
} else if ([[UIDevice currentDevice].systemVersion floatValue] >= 8.0) {
    [JPUSHService registerForRemoteNotificationTypes:(UIUserNotificationTypeBadge |
                                                      UIUserNotificationTypeSound |
                                                      UIUserNotificationTypeAlert)
                                          categories:nil];
  } else {
    [JPUSHService registerForRemoteNotificationTypes:(UIRemoteNotificationTypeBadge |
                                                      UIRemoteNotificationTypeSound |
                                                      UIRemoteNotificationTypeAlert)
                                          categories:nil];
  }

  [JPUSHService setupWithOption:launchOptions appKey:appKey
                        channel:channel apsForProduction:isProduction];
}
- 在AppDelegate.m 的didRegisterForRemoteNotificationsWithDeviceToken 方法中添加 [JPUSHService registerDeviceToken:deviceToken]; 如下所示
- (void)application:(UIApplication *)application
didRegisterForRemoteNotificationsWithDeviceToken:(NSData *)deviceToken {
  [JPUSHService registerDeviceToken:deviceToken];
}
- 为了在收到推送点击进入应用能够获取该条推送内容需要在 AppDelegate.m didReceiveRemoteNotification 方法里面添加 [[NSNotificationCenter defaultCenter] postNotificationName:kJPFDidReceiveRemoteNotification object:userInfo] 方法,注意:这里需要在两个方法里面加一个是iOS7以前的一个是iOS7即以后的,如果AppDelegate.m 没有这个两个方法则直接复制这两个方法,在 iOS10 的设备则可以使用JPush 提供的两个方法;如下所示
- (void)application:(UIApplication *)application didReceiveRemoteNotification:(NSDictionary *)userInfo {
  // 取得 APNs 标准信息内容

  [[NSNotificationCenter defaultCenter] postNotificationName:kJPFDidReceiveRemoteNotification object:userInfo];
}
//iOS 7 Remote Notification
- (void)application:(UIApplication *)application didReceiveRemoteNotification:  (NSDictionary *)userInfo fetchCompletionHandler:(void (^)   (UIBackgroundFetchResult))completionHandler {

  [[NSNotificationCenter defaultCenter] postNotificationName:kJPFDidReceiveRemoteNotification object:userInfo];
}

// iOS 10 Support
- (void)jpushNotificationCenter:(UNUserNotificationCenter *)center willPresentNotification:(UNNotification *)notification withCompletionHandler:(void (^)(NSInteger))completionHandler {
  // Required
  NSDictionary * userInfo = notification.request.content.userInfo;
  if([notification.request.trigger isKindOfClass:[UNPushNotificationTrigger class]]) {
    [JPUSHService handleRemoteNotification:userInfo];
    [[NSNotificationCenter defaultCenter] postNotificationName:kJPFDidReceiveRemoteNotification object:userInfo];
  }
  completionHandler(UNNotificationPresentationOptionAlert); // 需要执行这个方法,选择是否提醒用户,有Badge、Sound、Alert三种类型可以选择设置
}

// iOS 10 Support
- (void)jpushNotificationCenter:(UNUserNotificationCenter *)center didReceiveNotificationResponse:(UNNotificationResponse *)response withCompletionHandler:(void (^)())completionHandler {
  // Required
  NSDictionary * userInfo = response.notification.request.content.userInfo;
  if([response.notification.request.trigger isKindOfClass:[UNPushNotificationTrigger class]]) {
    [JPUSHService handleRemoteNotification:userInfo];
    [[NSNotificationCenter defaultCenter] postNotificationName:kJPFOpenNotification object:userInfo];
  }
  completionHandler();  // 系统要求执行这个方法
}
然后在 js 代码里面通过如下回调获取通知
var { NativeAppEventEmitter } = require('react-native');

var subscription = NativeAppEventEmitter.addListener(
  'ReceiveNotification',
  (notification) => console.log(notification)
);
...
// 千万不要忘记忘记取消订阅, 通常在componentWillUnmount函数中实现。
subscription.remove();
Android配置
Android执行自动配置后仍然需要手动配置一下你项目模块下的 build.gradle 文件,参见手动配置中的 build.gradle 配置(后续版本可能会改进这一点)
- 修改android 项目下的settings.gradle配置
settings.gradle
include ':app', ':jpush-react-native'
project(':jpush-react-native').projectDir = new File(rootProject.projectDir, '../node_modules/jpush-react-native/android')
- 修改 app 下的 AndroidManifest 配置,将 jpush 相关的配置复制到这个文件中,参考 demo 的 AndroidManifest:(增加了
部分)
your react native project/android/app/AndroidManifest.xml
- 修改 app 下的 build.gradle 配置:
your react native project/android/app/build.gradle
android {
    defaultConfig {
        applicationId "yourApplicationId"
        ...
        manifestPlaceholders = [
                JPUSH_APPKEY: "yourAppKey", //在此替换你的APPKey
                APP_CHANNEL: "developer-default"    //应用渠道号
        ]
    }
}
...
dependencies {
    compile fileTree(dir: "libs", include: ["*.jar"])
    compile project(':jpush-react-native')
    compile "com.facebook.react:react-native:+"  // From node_modules
}
将此处的 yourApplicationId 替换为你的项目的包名;yourAppKey 替换成你在官网上申请的应用的 AppKey。到此为止,配置完成。
- 现在重新 sync 一下项目,应该能看到 jpush-react-native 作为一个 android Library 项目导进来了
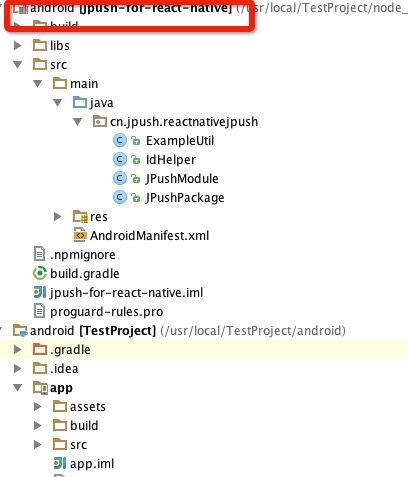
Paste_Image.png
Add JPushPackage
RN 0.29.0以下版本
- 打开 app 下的 MainActivity,在 ReactInstanceManager 的 build 方法中加入 JPushPackage:
app/MainActivity.java
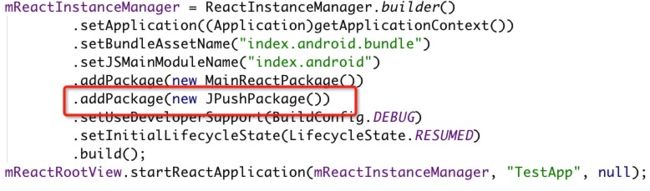
Paste_Image.png
RN 0.29.0 以上版本
- 打开 app 下的 MainApplication.java 文件,然后加入 JPushPackage,参考 demo:
app/MainApplication.java
private boolean SHUTDOWN_TOAST = false;
    private boolean SHUTDOWN_LOG = false;

    private final ReactNativeHost mReactNativeHost = new ReactNativeHost(this) {

        @Override
        protected boolean getUseDeveloperSupport() {
            return BuildConfig.DEBUG;
        }


        @Override
        protected List getPackages() {
            return Arrays.asList(
                    new MainReactPackage(),
                    new JPushPackage(SHUTDOWN_TOAST, SHUTDOWN_LOG)
            );
        }
    };
import JPushModule
import JPushModule from 'jpush-react-native';

...

// example
componentDidMount() {
    JPushModule.addReceiveCustomMsgListener((message) => {
      this.setState({pushMsg: message});
    });
    JPushModule.addReceiveNotificationListener((message) => {
      console.log("receive notification: " + message);
    })
  }

  componentWillUnmount() {
    JPushModule.removeReceiveCustomMsgListener();
    JPushModule.removeReceiveNotificationListener();
  }