文章结构
- layer单位坐标
- 属性讲解
- 使用范例及代码讲解
注:网上有很多相关资料,但是总感觉代码没有注释得很清楚,所以自己写一篇梳理下,下面的例子网上也有,我只是按照自己的想法记录下来,并注释了自己的一些想法,有看过别人的例子但是没有copy别人的代码,能优化的就优化。
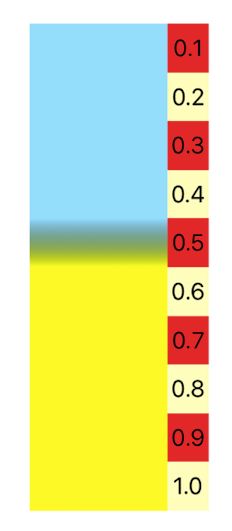
layer单位坐标
单位坐标和像素没有关系,在你定义的layer中,x轴和y轴长度都是单位长度1,而且原点坐标为左上角,如下图所示:

属性讲解
- colors
渐变的颜色,只设置一个颜色不起作用。 - locations
渐变颜色的分界线,文档里说明每个元素的值在0到1之间,但是设置大于1或者小于1的数一样起作用,下面代码范例中有使用到。如果不设置则按照系统默认划分;如果设置的元素个数比颜色个数少,则默认最后一条分界线处为1。看代码是最好理解的,如下。
- 示例代码:设置的分界线数和颜色个数一样
- (void)configureLayerForMyView{

    _gradientLayer = [CAGradientLayer layer];

    _gradientLayer.colors = @[(id)[UIColor clearColor].CGColor,(id)[UIColor yellowColor].CGColor/*, (id)[UIColor redColor].CGColor*/];
    _gradientLayer.locations = @[@(0.4  ), @(0.5)];
    _gradientLayer.startPoint = CGPointMake(0, 0.0);//0
    _gradientLayer.endPoint = CGPointMake(0, 1);//0.7
    [_myVIew.layer addSublayer:_gradientLayer];
}
效果
天蓝色为控件的背景色,从渐变方向上layer高度为0.4处开始渐变,0.5处结束渐变。
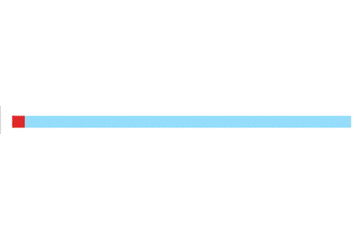
- 示例代码:设置的分界线数比颜色个数少
- (void)configureLayerForMyView{

    _gradientLayer = [CAGradientLayer layer];

    _gradientLayer.colors = @[(id)[UIColor clearColor].CGColor,(id)[UIColor yellowColor].CGColor, (id)[UIColor redColor].CGColor];
    _gradientLayer.locations = @[@(0.4), @(0.5)];//和设置@[@(0.4), @(0.5),@(1)]一样
    _gradientLayer.startPoint = CGPointMake(0, 0.0);//0
    _gradientLayer.endPoint = CGPointMake(0, 1);//0.7
    [_myVIew.layer addSublayer:_gradientLayer];
}
效果

最后的颜色分割线是在控件底部,也就是layer单位坐标的y轴为1处。
- startPoint
- endPoint
startPoint和endPoint这两个属性分别表示渐变的开始点和结束点。注意比如你设置的开始点为(0,0),结束点为(0,1),并不代表从(0,0)处开始渐变,开始渐变的位置还需要结合locations的设置来确定。个人使用习惯,我只是使用这两个属性来定义渐变的方向,比如沿x轴渐变开始点(0,0)结束点(1,0),沿y轴渐变开始点(0,0)结束点(0,1)。如果开始点不是在x轴或者y轴上,结束点也 不在x轴或者y轴上,通过设置locations属性则得不到你想要的结果。
比如下代码:
- (void)configureLayerForMyView{

    _gradientLayer = [CAGradientLayer layer];

    _gradientLayer.colors = @[(id)[UIColor clearColor].CGColor,(id)[UIColor yellowColor].CGColor/*, (id)[UIColor redColor].CGColor*/];
    _gradientLayer.locations = @[@(0.4  ), @(0.5)];
    _gradientLayer.startPoint = CGPointMake(0, 0.0);//0
    _gradientLayer.endPoint = CGPointMake(0, 0.7);//0.7
    [_myVIew.layer addSublayer:_gradientLayer];
}
效果

渐变的颜色分割线不在0.4和0.5处。
所以,就我个人的使用习惯,除非要改变颜色渐变的方向,否则这两个属性我一般不会去改变。这是个人见解,如有高见或者有误的地方欢迎交流
使用范例及代码讲解
- 示例代码:给图片添加渐变颜色
- (void)configureGradientToImageview{

    CAGradientLayer *gradientLayer = [CAGradientLayer layer];
    gradientLayer.frame = _beautyView.bounds;
    gradientLayer.colors = @[(id)[UIColor blackColor].CGColor, (id)[UIColor clearColor].CGColor];

    //the locations's value is between 0 and 1 according to the document,  but it can work when it's nagative. I don't know why.
    gradientLayer.locations = @[@(-1), @(1)];
    [_beautyView.layer addSublayer:gradientLayer];

}
效果

注意这里的locations开始点设置为-1处,是为了让图片上的渐变颜色浅一些。可以把设置locations的那行代码注释掉试下效果,在文章结尾会有demo下载地址。
- 示例代码:进度条
通过设置CALayer的mask属性来实现,必须要有两个layer,一个是被遮罩层,一个是遮罩层,巧用遮罩的只显示重叠部分来达到类似进度条效果,以后会另写一篇文章来说明mask的使用。
- (void)configureGradientToFirstBottomView{
_gradientLayerForFirstBtmView = [CAGradientLayer layer];
[self setupLayer:_gradientLayerForFirstBtmView];
[_firstBottomView.layer addSublayer:_gradientLayerForFirstBtmView];
_maskLayer = [CALayer layer];
_maskLayer.frame = CGRectMake(0, 0, 0, _firstBottomView.bounds.size.height);
//configure color except for clearColor
_maskLayer.backgroundColor = [UIColor blueColor].CGColor;
_gradientLayerForFirstBtmView.mask = _maskLayer;
//configure timer to update maskLayer's frame
[NSTimer scheduledTimerWithTimeInterval:0.1 target:self selector:@selector(updateMask:) userInfo:nil repeats:YES];
}
- ( void)updateMask:(NSTimer *)timer{
//reset progress
if (_progress > 1) {
_progress = 0;
return;
}
//change the mask layer's frame
CGRect frame = _firstBottomView.bounds;
frame.size.width = _progress * _firstBottomView.bounds.size.width;
_maskLayer.frame = frame;
_progress += 0.01;
}
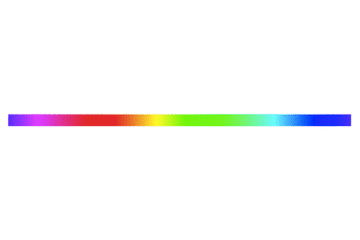
- (void)setupLayer:(CAGradientLayer *)layer{
layer.startPoint = CGPointMake(0, 0.5);
layer.endPoint = CGPointMake(1, 0.5);
NSMutableArray *arr = [NSMutableArray array];
for (NSInteger i = 0; i < 400; i+=5) {
UIColor *color = [UIColor colorWithHue:1.0 * i / 400 saturation:1 brightness:1 alpha:1];
[arr addObject:(id)color.CGColor];
}
layer.colors = [arr copy];
}
效果如下图:
还有一种进度条样式,就是先整体显示整条进度,然后通过动态改变颜色来达到提示进度的效果,代码如下:
- ( void)configureGradientLayerToSecondBottomView{
    _gradientLayerForSecondBtmView = [CAGradientLayer layer];
    [self setupLayer:_gradientLayerForSecondBtmView];

    [_secondBottomView.layer addSublayer:_gradientLayerForSecondBtmView];

    //configure timer to update the gradient layer's colors
    [NSTimer scheduledTimerWithTimeInterval:0.1 target:self selector:@selector(updateColor:) userInfo:nil repeats:YES];
}
- (void)updateColor:(NSTimer *)timer{

    [self updateColorForLayer:_gradientLayerForSecondBtmView];
}

- (void)updateColorForLayer:(CAGradientLayer *)layer{

    NSMutableArray *originArr = [_gradientLayerForSecondBtmView.colors mutableCopy];

    //retain the last object
    id lastColor = originArr.lastObject;

    //remove the last object in the arr
    [originArr removeLastObject];

    //insert the last object at the first
    [originArr insertObject:lastColor atIndex:0];

    NSArray *updateArr = originArr.copy;
    _gradientLayerForSecondBtmView.colors = updateArr;

    //configure animation for the colors property
    CABasicAnimation *animation = [CABasicAnimation animationWithKeyPath:@"colors"];
    animation.toValue = updateArr;
    animation.duration = 0.1;
    [_gradientLayerForSecondBtmView addAnimation:animation forKey:nil];
}
效果如下图:
-
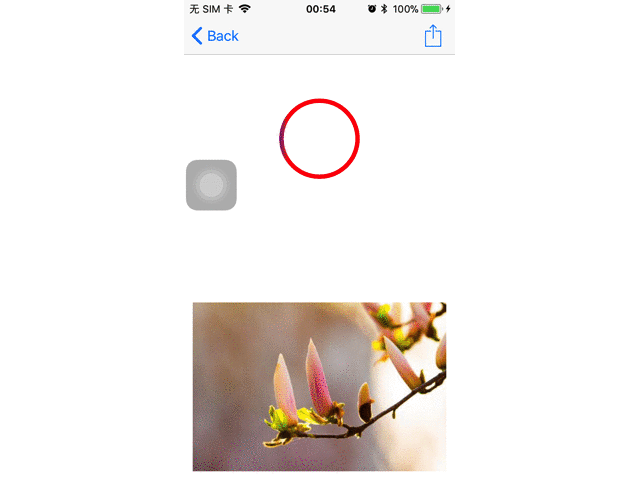
示例代码:在圆形轨迹上动态显示运动点
实现思路:先在你自定义的控件中添加一个渐变图层,然后给渐变图层添加遮罩图层,给遮罩图层指定轨迹(比如圆形),就达到只展示一个圆了,最后一步动态显示运动点,其实就是通过定时器来改变渐变图层的locations属性来达到的。
为了便于理解我们先看动态改变一个渐变图层locations属性的动画效果,如下图:

再在这个基层上给渐变图层添加一个路径为圆形的CAShaperLayer遮罩,这样就可以达到我们的目的
代码如下:
- (void)configureLayerForCircleView{

    //1. add the gradient layer to circleview's layer
    CAGradientLayer *gradientLayer = [CAGradientLayer layer];
    gradientLayer.frame = _circleView.bounds;
    gradientLayer.colors = @[(id)[UIColor redColor].CGColor, (id)[UIColor purpleColor].CGColor, (id)[UIColor redColor].CGColor];
    gradientLayer.startPoint = CGPointMake(0, 0.5);
    gradientLayer.endPoint = CGPointMake(1, 0.5);

    //u should init a location here or the animation will not be made.
    gradientLayer.locations = @[@(-0.11), @(-0.1), @(0)];
    [_circleView.layer addSublayer:gradientLayer];

    //2. add a mask layer to the gradient layer
    CAShapeLayer *shapeLayer = [CAShapeLayer layer];

    //prepare a path for the shapeLayer
    CGPoint circleCenter = CGPointMake(_circleView.bounds.size.width / 2, _circleView.bounds.size.height / 2);
    NSInteger radius = ceil( _circleView.bounds.size.height) / 2 - 5;
    UIBezierPath *path = [UIBezierPath bezierPathWithArcCenter:circleCenter radius:radius startAngle:0 endAngle:M_PI *2 clockwise:YES];

    shapeLayer.path = path.CGPath;
    shapeLayer.fillColor = [UIColor clearColor].CGColor;
    shapeLayer.strokeColor = [UIColor redColor].CGColor;
    shapeLayer.lineWidth = 5.0;

    gradientLayer.mask = shapeLayer;

    //3. set up a timer to change gradient layer's locations property
    [NSTimer scheduledTimerWithTimeInterval:circleDuarationTime repeats:YES block:^(NSTimer * _Nonnull timer) {
        CABasicAnimation *animation = [CABasicAnimation animationWithKeyPath:@"locations"];
        animation.fromValue = @[@(-0.11), @(-0.1), @(0)];
        animation.toValue = @[@(1), @(1.1), @(1.2)];
        animation.duration = circleDuarationTime;
        [gradientLayer addAnimation:animation forKey:nil];
    }];
}
最终效果如下图

- 示例代码:两张图片大小一样且在同一位置,先左后右动态显示被遮住的另外一张图。
实现思路:给另外一张图的layer添加一个背景色为clearColor的mask图层,这样就把添加了mask图层的图片隐藏掉了(上面有说过添加mask图层后只显示重叠部分,因为这里的mask图层是clearColor的,即alpha为0,这样两个图层间就没有重叠部分了,达到隐藏被添加了mask的控件目的),然后再在mask图层上添加左、右两个CAGradientLayer子图层,渐变颜色由clearColor到其他颜色,且clearClolor部分要覆盖掉图片,宽度各为图片控件的一半,高度一定要比图片控件高。然后我们再动态改变这两个图层的position让渐变色不为clearColor的部分覆盖掉图片控件,这样被隐藏的图片又暴露出来了。
代码如下:
- (void)configureLayerForFrontImageview{

    //1. add a mask to front image view
    CALayer *maskLayer = [CALayer layer];
    maskLayer.frame = _frontImageview.bounds;
    maskLayer.backgroundColor = [UIColor clearColor].CGColor;
    _frontImageview.layer.mask = maskLayer;

    //add the left side layer to the mask layer
    _leftGradientLayer = [CAGradientLayer layer];
    _leftGradientLayer.frame = CGRectMake(0, 0, _frontImageview.bounds.size.width / 2, _frontImageview.bounds.size.height * 3);
    _leftGradientLayer.colors = @[(id)[UIColor clearColor].CGColor, (id)[UIColor blackColor].CGColor];
    _leftGradientLayer.locations = @[@(0.4), @(0.5)];
    [maskLayer addSublayer:_leftGradientLayer];

    //add the right side layer to the mask layer
    _rightGradientLayer = [CAGradientLayer layer];
    _rightGradientLayer.frame = CGRectMake(_frontImageview.bounds.size.width / 2, 0, _frontImageview.bounds.size.width / 2, _frontImageview.bounds.size.height * 3);
    _rightGradientLayer.colors = @[(id)[UIColor clearColor].CGColor, (id)[UIColor blackColor].CGColor];
    _rightGradientLayer.locations = @[@(0.4), @(0.5)];
    [maskLayer addSublayer:_rightGradientLayer];

    //animation to show bg image view
    [self showBgImage];
}

- (void)showBgImage{

    [NSTimer scheduledTimerWithTimeInterval:circleDuarationTime repeats:NO block:^(NSTimer * _Nonnull timer) {

        CABasicAnimation *animation = [CABasicAnimation animationWithKeyPath:@"position"];
        animation.toValue = [NSValue valueWithCGPoint:CGPointMake(_leftGradientLayer.position.x, _leftGradientLayer.position.y - _leftGradientLayer.bounds.size.height * 0.5)];
        animation.duration = circleDuarationTime;

        //keep the animation last state
        animation.fillMode = kCAFillModeForwards;
        animation.removedOnCompletion = NO;

        [_leftGradientLayer addAnimation:animation forKey:nil];
    }];

    [NSTimer scheduledTimerWithTimeInterval:circleDuarationTime + 2 repeats:NO block:^(NSTimer * _Nonnull timer) {

        CABasicAnimation *animation = [CABasicAnimation animationWithKeyPath:@"position"];
        animation.toValue = [NSValue valueWithCGPoint:CGPointMake(_rightGradientLayer.position.x, _rightGradientLayer.position.y - _rightGradientLayer.bounds.size.height * 0.5)];
        animation.duration = circleDuarationTime;

        //keep the animation last state
        animation.fillMode = kCAFillModeForwards;
        animation.removedOnCompletion = NO;

        [_rightGradientLayer addAnimation:animation forKey:nil];
    }];
}
对于设置mask子图层的高度以及locations属性,我没有像这篇博客里那样设置,我是根据自己的理解去处理的,我认为更好。首先设置layer的高度为图片控件高度的3倍,再把渐变效果结束点设在layer高度的0.5处结束,为什么是0.5?因为图片和layer高度比例是1:3,所以我设置开始渐变是0.4,结束在0.5,确保两张图片没有重合,如果图片上有渐变区,则两张图片有重合,有兴趣的可以改下代码玩下。再把layer上移0.5高度确保渐变区不在图片上。还有这些例子我也是借鉴这篇博客的,只是添加了自己的理解,以及优化,有兴趣可以下载下来对比下。
效果如下图:
5.示例代码:该例子是对示例4的变种
代码如下:
- (void)configureLayerForImageview{

    //1. add mask to front imageview
    CAGradientLayer *tempLayer = [CAGradientLayer layer];
    tempLayer.frame = CGRectMake(0, 0, _frontImageview.bounds.size.width, _frontImageview.bounds.size.height * 3);
    tempLayer.colors = @[(id)[UIColor clearColor].CGColor, (id)[UIColor cyanColor].CGColor];
    tempLayer.locations = @[@(0.4), @(0.5)];
    _gradientLayer = tempLayer;
    _frontImageview.layer.mask = _gradientLayer;

    [self showBgImageview];
}

- (void)showBgImageview{

    [NSTimer scheduledTimerWithTimeInterval:2 repeats:NO block:^(NSTimer * _Nonnull timer) {

        CABasicAnimation *animation = [CABasicAnimation animationWithKeyPath:@"position"];
        animation.toValue = [NSValue valueWithCGPoint:CGPointMake(_gradientLayer.position.x, _gradientLayer.position.y - _gradientLayer.bounds.size.height * 0.5)];
        animation.duration = 2;

        //keep the animation last state
        animation.fillMode = kCAFillModeForwards;
        animation.removedOnCompletion = NO;

        [_gradientLayer addAnimation:animation forKey:nil];
    }];
}
效果如下图:
当然你改变下颜色渐变方向就可以实现从各个方向渐变的效果了,可以自己玩玩。
最后Demo在此,欢迎下载交流,如有写错的地方欢迎留言,谢谢你的垂阅!