Nginx+tomcat动静分离技术文档
注:我所使用的系统是centos-6.2-64位安装的是mini最小化系统,我所使用的nginx是1.0.12、tomcat的版本是6.0.35、jdk的版本是jdk-6u26-linux-x64.bin;其实使用哪个版本都一样的;我使用的IP地址是192.168.2.10;我的网站存放路径是/data/www/html
安装依赖包必须
yum -y install gcc gcc-c++ autoconfautomake make zlib zlib-devel openssl openssl--devel pcre pcre-devel
二、创建运行用户和用户组:
Nginx服务程序默认以nobody身份运行,我们不用nobody所以为其创建专门的用户账号,以便更准确地控制其访问权限,降低安全风险。创建一个名为nginx的用户,不建立宿主目录。
[root@localhost /]# useradd -M -s/sbin/nologin nginx
[root@localhost /]# usergroup–f nginx
[root@localhost /]# useradd–g nginx nginx
安装nginx及配置nginx.conf
编译安装nginx
[root@localhost /]# tar zxf nginx-1.0.12.tar.gz (解压nginx)
[root@localhost /]# cd nginx-1.0.12.tar.gz (进入nginx)
[root@localhost nginx-1.0.8]# ./configure --prefix=/usr/local/nginx--user=nginx --group=nginx --with-http_stub_status_module (配置nginx安装路径)
[[email protected]]# make&& make install (编译并安装nginx)
[root@localhost /]# ln -s /usr/local/nginx/sbin/* /usr/local/sbin (做个软链接)
[root@localhost/]# nginx (启动nginx)
[root@localhost /]# nginx –s stop (停止nginx)
[root@localhost /]# nginx –s reload (重载nginx)
配置nginx.conf
(主要就是修改nginx.conf里面的内容,进入到nginx.conf后修改如下)下面就是我的nginx.conf的所有内容。
[root@localhost /]# vi /usr/local/nginx/conf/nginx.conf
user nginx nginx;
worker_processes 1;
error_log logs/error.log crit;
#error_log logs/error.log notice;
#error_log logs/error.log info;
pid logs/nginx.pid;
worker_rlimit_nofile 1024;
events {
use epoll;
worker_connections 1024;
}
http {
include mime.types;
default_type application/octet-stream;
server_names_hash_bucket_size 128;
client_header_buffer_size 32k;
large_client_header_buffers 4 32k;
client_max_body_size 8m;
#log_format main '$remote_addr - $remote_user [$time_local] "$request" '
# '$status $body_bytes_sent "$http_referer" '
# '"$http_user_agent" "$http_x_forwarded_for"';
#access_log logs/access.log main;
sendfile on;
tcp_nopush on;
keepalive_timeout 65;
tcp_nodelay on;
fastcgi_connect_timeout 300;
fastcgi_send_timeout 300;
fastcgi_read_timeout 300;
fastcgi_buffer_size 64k;
fastcgi_buffers 4 64k;
fastcgi_busy_buffers_size 128k;
fastcgi_temp_file_write_size 128k;
gzip on;
gzip_min_length 1k;
gzip_buffers 4 16k;
gzip_http_version 1.0;
gzip_comp_level 2;
gzip_types text/plain application/x-javascript text/css application/xml;
gzip_vary on;
server {
listen 80;
server_name 192.168.2.10;
#charset koi8-r;
#access_log logs/host.access.log main;
index index.html index.htm index.jsp index.do;
root /data/www/html;
location ~ .*\.(gif|jpg|jpeg|png|bmp|swf)$ {
expires 30d;
}
location ~ .*\.(js|css)?$ {
expires 1h;
}
location ~ (\.jsp)|(\.do)|(\.php)$ {
proxy_pass http://192.168.2.10:8080;
proxy_redirect off;
proxy_set_header HOST $host;
proxy_set_header X-Real-IP $remote_addr;
proxy_set_header X-Forwarded-For $proxy_add_x_forwarded_for;
client_max_body_size 10m;
client_body_buffer_size 128k;
proxy_connect_timeout 90;
proxy_send_timeout 90;
proxy_read_timeout 90;
proxy_buffer_size 4k;
proxy_buffers 4 32k;
proxy_busy_buffers_size 64k;
proxy_temp_file_write_size 64k;
}
#error_page 404 /404.html;
# redirect server error pages to the static page /50x.html
#
error_page 500 502 503 504 /50x.html;
location = /50x.html {
root html;
}
# proxy the PHP scripts to Apache listening on 127.0.0.1:80
#
#location ~ \.php$ {
# proxy_pass http://127.0.0.1;
#}
# pass the PHP scripts to FastCGI server listening on 127.0.0.1:9000
#
#location ~ \.php$ {
# root html;
# fastcgi_pass 127.0.0.1:9000;
# fastcgi_index index.php;
# fastcgi_param SCRIPT_FILENAME /scripts$fastcgi_script_name;
# include fastcgi_params;
#}
# deny access to .htaccess files, if Apache's document root
# concurs with nginx's one
#
#location ~ /\.ht {
# deny all;
#}
}
# another virtual host using mix of IP-, name-, and port-based configuration
#
#server {
# listen 8000;
# listen somename:8080;
# server_name somename alias another.alias;
# location / {
# root html;
# index index.html index.htm;
# }
#}
# HTTPS server
#
#server {
# listen 443;
# server_name localhost;
# ssl on;
# ssl_certificate cert.pem;
# ssl_certificate_key cert.key;
# ssl_session_timeout 5m;
# ssl_protocols SSLv2 SSLv3 TLSv1;
# ssl_ciphers HIGH:!aNULL:!MD5;
# ssl_prefer_server_ciphers on;
# location / {
# root html;
# index index.html index.htm;
# }
#}
}
安装JDK
进入到我们上传的目录下
# chmod 755 jdk-6u26-linux-x64.bin (授权)
# bash jdk-6u26-linux-x64.bin (安装完后敲击回车)
这样我们就安装好了,为了方便管理,我们移动一下。
# mv jdk1.6.0_26 / /usr/local/java
为了方便查看版本,创建一个快捷方式
#ln -s /usr/local/java/bin/java/usr/bin/java
可以查看一下jdk版本,
# java–version
至此jdk安装完成
安装tomcat
4.1安装tomcat
[root@localhost/]# tar zxf tomcat-6.0.35.tar.gz (解压tomcat)
[root@localhost/]#mv apache-tomcat-6.0.35/ tomcat (重命名为tomcat)
[root@localhost/]#mv tomcat /usr/local/ (将tomcat移动到usr/local下)
到这里tomcat安装完成
配置tomcat的server.xml和web.xml
[root@localhost /]# vi /usr/local/tomcat/conf/server.xml
修改好后保存并退出
[root@localhost/]# vi/usr/local/tomcat/conf/web.xml
修改好后保存并退出
这样tomcat配置完成
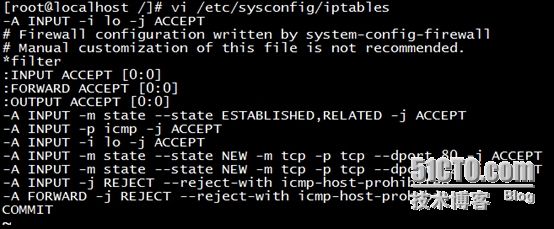
开启防火墙要使用的端口,我们要是用80端口所以要将这个端口打开
[root@localhost /]# vi /etc/sysconfig/iptables
进入防火墙后将这条添加到里面
-A INPUT -m state --state NEW -m tcp -p tcp--dport 80 -j ACCEPT
6.2、保存退出后重启防火墙
[root@localhost /]# serviceiptables restart
测试动静分离效果
在html文件中分别用vi建了这几个文件
Tomcat的test.jsp内容
Tomcat的test1.do的内容
Tomcat的test2.phpd的内容
Nginx首页
在nginx里查看动态请求test.jsp的内容
在nginx里查看动态请求test1.do的内容
在nginx里查看动态请求test2.php的内容
现在成功的实现了nginx+tomcat动静分离技术。


