Tensorflow Serving
机器学习技术支撑着许多 Google 产品的功能,比如:Google 应用中的语音识别,收件箱的智能回复,以及Google 照片搜索,等等。尽管软件行业几十年中积累起的无数经验促成了很多用于构建并支持产品的最佳实践,但基于机器学习的服务却还是带来了一些新颖而有趣的挑战。
TensorFlow Serving 系统非常适用于大规模运行能够基于真实情况的数据并会发生动态改变的多重模型。它给出了一个把模型应用到实际生产的解决方案。
它能够实现:
模型生命周期管理。
使用多重算法进行试验。
GPU 资源的有效使用。
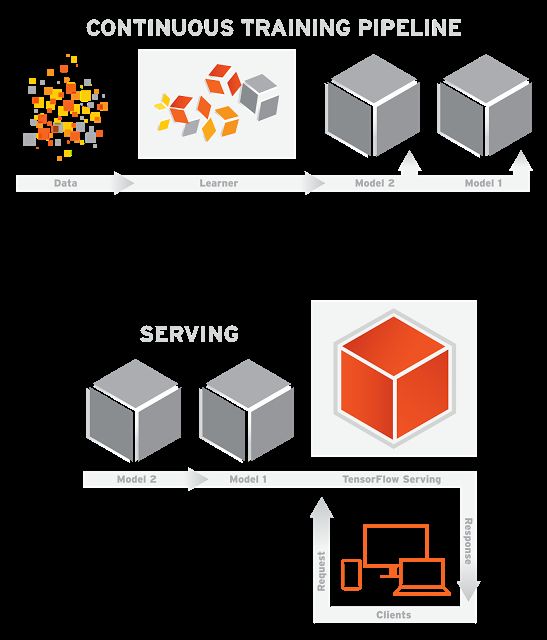
TensorFlow Serving 能够简化并加速从模型到生产的过程。它能实现在服务器架构和 API 保持不变的情况下,安全地部署新模型并运行试验。除了原生集成 TensorFlow,还可以扩展服务其他类型的模型。下图显示了简化的监督学习过程,向 learner 输入训练数据,然后输出模型:
TensorFlow Serving 使用(之前训练的)模型来实施推理——基于客户端呈现数据的预测。因为客户端通常会使用远程过程调用(RPC)接口来与服务系统通信,TensorFlow Serving 提供了一种基于gRPC的参考型前端实现,这是一种 Google 开发的高性能开源 RPC 架构。当新数据可用或改进模型时,加载并迭代模型是很常见的。事实上,在谷歌,许多管线经常运行,一旦当新数据可用时,就会产生新版本的模型。
文章目录
TensorFlow Serving 日志
一、安装步骤
1. 使用anconda 安装python2环境
2. 安装Tensorflow环境
3. 安装GRCP框架
4. 安装glags
5. 配置编译文件
6. 构建tensorflow Serving(Build)
7. 运行Tesnroflow serving
8. 测试:
9. 下载tensorflow serving 源代码
二.遇到的问题以及解决方案(ISSUE)
1. Python Configuration Warning
解决方法
三、Tensorflow serving 基本用法—以MNIST手写体数字为例
三、深入理解
1. 模型导出的流程
三、扩展阅读
一、安装步骤
在Python3.6编译tensorflow Serving 的过程中出现错误, 经过在github 上调查得知 Tensorflow Seving 目前不支持python3(详情参见Installing TensorFlow Serving with Python 3 support )。
请结合 https://www.tensorflow.org/serving/setup
1. 使用anconda 安装python2环境
conda create -n python2 python=2.7
source activate python2 # 进入环境
source deactivate python2 # 退出环境
2. 安装Tensorflow环境
pip install tensorflow-gpu==1.3.0 # 之前使用的是1.4 发现1.4对cudann6不兼容
3. 安装GRCP框架
python -m pip install grpcio# 安装grpcio 1.7
4. 安装glags
这个组件在tensorflow serving 安装文档中没有指明,但是也是必须的。关于gflags可以参看https://pypi.python.org/pypi/python-gflags
5. 配置编译文件
cd tensorflow
./configure
cd
6. 构建tensorflow Serving(Build)
在编译之前,务必指定python path, 否则会导致测试失败。
bazel build -c opt tensorflow_serving/...
7. 运行Tesnroflow serving
bazel-bin/tensorflow_serving/model_servers/tensorflow_model_server
8. 测试:
bazel test -c opt tensorflow_serving/...
PS:如果测试失败,请认真看错误日志文件。如果是cannot import XX package,请检查你的文件。
9. 下载tensorflow serving 源代码
git clone --recurse-submodules https://github.com/tensorflow/serving #/home/master/testServing
二.遇到的问题以及解决方案(ISSUE)
1. Python Configuration Warning
这个一定不能忽略,如果你忽略了。会在编译的过程中遇到以下错误:
https://github.com/tensorflow/tensorflow/issues/9866
或者是
(python2) master@ubuntu:~/testServing/serving$ bazel build -c opt tensorflow_serving/...
......................
WARNING: /home/master/.cache/bazel/_bazel_master/181dd246736c24d622c89ae092af50b3/external/bazel_tools/tools/build_defs/pkg/pkg.bzl:196:9: pkg_tar: renaming non-dict `files` attribute to `srcs`.
WARNING: /home/master/.cache/bazel/_bazel_master/181dd246736c24d622c89ae092af50b3/external/org_tensorflow/third_party/py/python_configure.bzl:30:3: Python Configuration Warning: 'PYTHON_LIB_PATH' environment variable is not set, using '/usr/local/lib/python2.7/dist-packages' as default.
INFO: Downloading https://mirror.bazel.build/ufpr.dl.sourceforge.net/project/swig/swig/swig-3.0.8/swig-3.0.8.tar.gz: 728,119 bytes
解决方法
由于是PYTHON_LIB_PATH 没有设置。设置为:
/home/master/.conda/envs/python2/bin/python
export PYTHON_LIB_PATH=/home/master/.conda/envs/python2/lib/python2.7/site-packages
2 其他问题的解决方法:
https://github.com/tensorflow/tensorflow/issues/9866
https://github.com/tensorflow/tensorflow/issues/14218
https://github.com/tensorflow/tensorflow/issues/14182
https://github.com/tensorflow/tensorflow/issues/14273
https://github.com/tensorflow/tensorflow/issues/14182#issuecomment-342927115
https://stackoverflow.com/questions/44081119/tensorflow-traceback-most-recent-call-last-tensorflow-python-framework-errors
三、Tensorflow serving 基本用法—以MNIST手写体数字为例
Tensorflow 提供有相应的程序片段用于训练并导出模型。
源文件下载:
https://github.com/tensorflow/serving/blob/master/tensorflow_serving/example/mnist_saved_model.py
训练并且导出模型
python tensorflow_serving/example/mnist_saved_model.py /tmp/mnist_model
运行服务:
tensorflow_model_server --port=9000 --model_name=mnist --model_base_path=/tmp/mnist_model/
运行客户端
python tensorflow_serving/example/mnist_client.py --num_tests=1000 --server=localhost:9000
三、深入理解
1. 模型导出的流程
创建builder对象,并制定保存的路径
SavedModelBuilder采用了设计模型的 生成器/建造者模式的思想。提供了一种创建对象的最佳方式。 Builder 类会一步一步构造最终的对象。该 Builder 类是独立于其他对象的。
builder = tf.saved_model.builder.SavedModelBuilder(export_path)
构造TensorInfo proto
将模型的名称、类别、分数统统用tensorInfo封装。
classification_inputs = tf.saved_model.utils.build_tensor_info(
serialized_tf_example)
其中serialized_tf_example是一个palceholder ,value='tf_example'
依次构造classification_outputs_classes、classification_outputs_scores
并使用
tf.saved_model.signature_def_utils.build_signature_def()将模型信息封装起来。
PS:
Protocol Buffer 是谷歌开发的一种语言无关、平台无关、可扩展的序列化结构数据格式,在 tensorflow 中可以理解为处理结构化数据的工具,用于序列化结构化数据(训练好的DNN)。
关于Protocol Buffer的介绍:https://developers.google.com/protocol-buffers/docs/overview
Protocol Buffer的编码方式:https://developers.google.com/protocol-buffers/docs/encoding
Protocol Bufferdf 定义数据格式的文件一般保存在.proto文件中。每一个 message 代表了一类结构化数据,message 里面定义了每一个属性的类型和名字,Protocol Buffer 里属性的类型可以是像布尔型、整数型、实数型、字符型这些基本类型,也可以是另一个 message。可用 required(可选的)、required(必须的)、repeated(可重复的)说明属性是否可选的、必须的或者可重复的。
作用与json类似。给出相关实践手册http://blog.csdn.net/tz_zs/article/details/76637667
将构造出的模型添加builder中
builder.add_meta_graph_and_variables(
sess, [tf.saved_model.tag_constants.SERVING],
signature_def_map={
'predict_images':
prediction_signature,
tf.saved_model.signature_constants.DEFAULT_SERVING_SIGNATURE_DEF_KEY:
classification_signature,
},
legacy_init_op=legacy_init_op)
保存模型
builder.save()
总结
创建builder的是class SaveModelBuilder; 其功能是用来添加SaverModel
protocol buffer 并保存变量和资源,SaverModelBuilder类提供了创建
SaverModel protocol buffer 的函数方法。
说的在朴素一点:
SaverModel protocol buffer(tf.saved_model.utils.build_tensor_info)是用来构造模型的接口的。 add_meta_graph_and_variable 是用来把构造出的接口添加到模型中的。
以上是定义接口并导出模型的方式。如下图所示:
客户端调用接口与使用
https://github.com/tensorflow/serving/blob/master/tensorflow_serving/example/mnist_client.py
以上文件给出 Client 来调用部署好的 Mode 的实例。
调用过程中需要用到 TensorFlow Serving 的 Predict API 和 gRPC 的 implementations.insecure_channel 来construct 一个 request。特别要注意的是 input 的 signature 和数据必须和之前 export 的模型匹配。本例中为 名称为x1, float32类型,大小为 [28,28] 的 Tensor。模型的输出只要与之前的output匹配即可。
扩展阅读
Can python client be independent of tensorflow ?
How to make predictions on TensorFlow's Wide and Deep model loaded in TensorFlow Serving
https://www.oreilly.com/ideas/object-detection-with-tensorflow
tensorflow Seving API
https://www.tensorflow.org/serving/serving_advanced
https://zhuanlan.zhihu.com/p/23361413
http://www.cnblogs.com/YouXiangLiThon/p/7435825.html#undefined
如果MNIST 的实例或许有点难以理解,不妨看看这个:
https://www.bittiger.io/blog/post/JpcAqsSP3n39gzFbm
http://blog.csdn.net/tz_zs/article/details/76637667
http://blog.innodatalabs.com/the-newb-guide-to-google-cloud-machine-learning-engine-episode-one/
Google Protocol Buffer 的使用和原理
已经部署好的项目:
https://github.com/hetaoaoao/tensorflow_web_deploy
https://github.com/AxelAli/Tensorflow-Image-Classifier-Web-Demo
By 2017年11月17日星期五

