iOS坐标系介绍
简介
都知道iOS主要有有2种坐标系,
UIKity下坐标系,Core Graphics/QuartZ 2Dy上坐标系。具体在什么情况下,开发者会遇到何种坐标系?
问题
举个例子,分别用画线和画图来解释两种不同坐标系
画线
代码
- (void)drawRect:(CGRect)rect
{
    CGContextRef context = UIGraphicsGetCurrentContext();
    [self drawLineWithContext:context];
}


- (void)drawLineWithContext:(CGContextRef)context {
    //设置线条起点和终点的样式为圆角
    CGContextSetLineCap(context, kCGLineCapRound);
    //设置线条的转角的样式为圆角
    CGContextSetLineJoin(context, kCGLineJoinRound);

    //设置线条的宽度
    CGContextSetLineWidth(context, 3);

    //调用OC的方法设置绘图的颜色
    //    [[UIColor purpleColor] setFill];
    //    [[UIColor blueColor] setStroke];
    //调用OC的方法设置绘图颜色(同时设置了实心和空心)
    [[UIColor colorWithRed:0.3 green:0.4 blue:0.5 alpha:1.0] set];
    // 绘图(绘制直线), 保存绘图信息
    // 设置起点
    CGContextMoveToPoint(context, 0, 2);

    //沿途增加绘制点(addLinePoint要在开始和重点之间添加,否则会重新开启另一条绘制。)
    CGContextAddLineToPoint(context, self.bounds.size.width/3, self.bounds.size.height/2);
    CGContextAddLineToPoint(context, self.bounds.size.width*(4/5.0), self.bounds.size.height/2 - 60);
    CGContextAddLineToPoint(context, 20, self.bounds.size.height/2 + 50);
    CGContextAddLineToPoint(context, 25, self.bounds.size.height/2);

    //设置终点
    CGContextAddLineToPoint(context, self.bounds.size.width, self.bounds.size.height/2);

    //渲染 空心
    CGContextStrokePath(context);
    //渲染 实心
    //    CGContextFillPath(context);
}
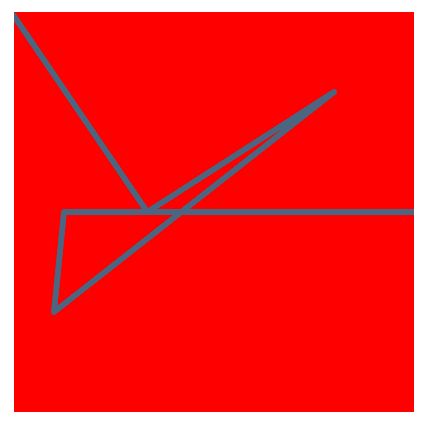
结果
背景的颜色是view.backgroundColor红色
分析一下直观可以看出,这时候坐标系是y下坐标系,也就是iOS通用坐标系。
画图
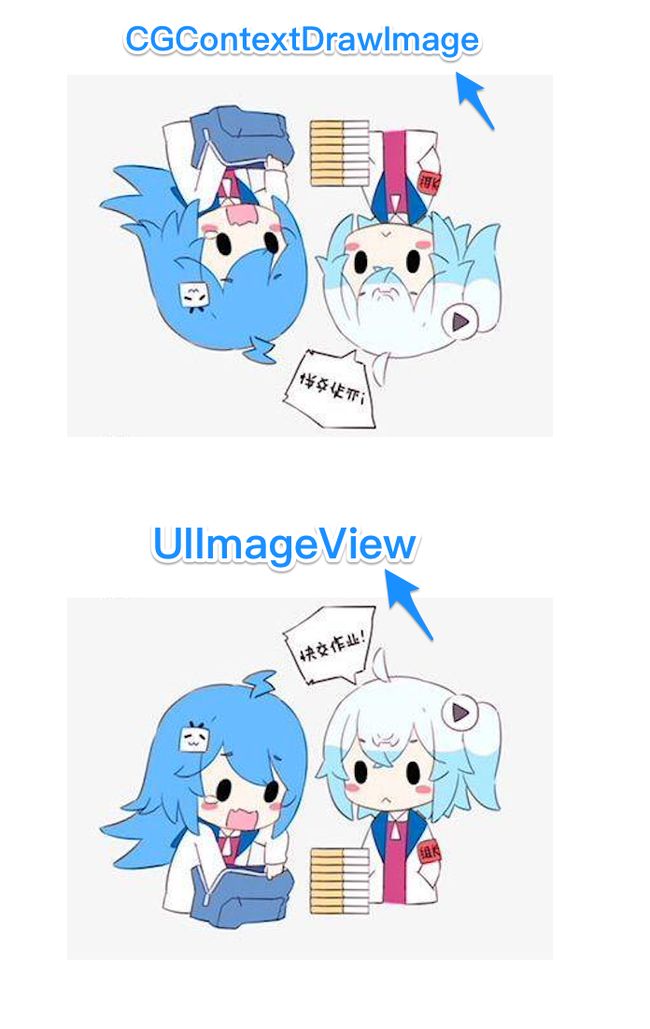
直观的结果
代码上半部分,自定义一个
CustomDrawView实现
drawRect:
- (void)drawRect:(CGRect)rect
{
    UIImage *uiImage = [UIImage imageNamed:@"loading"];
    float width = uiImage.size.width;
    float height = uiImage.size.height;
    CGContextRef context = UIGraphicsGetCurrentContext();

    CGContextDrawImage(context, CGRectMake(0, 0, width, height), uiImage.CGImage);
}
下半部分代码,在controller里直接添加SubView:
UIImageView *imgView = [[UIImageView alloc] initWithFrame:CGRectMake(40, 380, 260, 194)];
imgView.image = [UIImage imageNamed:@"loading"];
[self.view addSubview:imgView];
问题分析
很明显,使用drawRect:的图片颠倒了,明显使用的y上坐标系,但是同样在drawRect:里画线部分显示使用的是y下坐标系。这是为什么?
想要上半部分图片显示正确,只要转换坐标系即可
- (void)drawRect:(CGRect)rect
{
    UIImage *uiImage = [UIImage imageNamed:@"loading"];
    float width = uiImage.size.width;
    float height = uiImage.size.height;
    CGContextRef context = UIGraphicsGetCurrentContext();
    CGContextTranslateCTM(context, 0, height);
    CGContextScaleCTM(context, 1.0, -1.0);
    CGContextDrawImage(context, CGRectMake(0, 0, width, height), uiImage.CGImage);
}
也可以
UIGraphicsPushContext( context );
[uiImage drawInRect:CGRectMake(0, 0, width, height)];
UIGraphicsPopContext();
问题是解决了,可是为什么同样在drawRect:里画线跟绘图坐标系不一样呢?
转换过程的原理步骤图,这里已经有了,唯一注意的是这篇文章的概念需要明确指定一下,同样是两个
context但并不是用户空间跟设备空间。而是默认的Layer Graphics Context跟Bitmap Graphics Context
先去google一下IOS 坐标系
为了找出坐标不一致问题,
context的,context是一个画布,栈式管理,坐标系通过CTM可以转换。并且对应的一些消息指向Cocoa Drawing Guide,通读一遍找到答案。
摘抄Cocoa Drawing Guide关键点
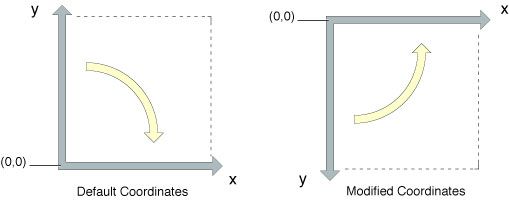
坐标系
The Quartz coordinate system
转换过程
context
iOS目前有五种context
- Bitmap Graphics Context
- PDF Graphics Context
- Window Graphics Context
- Layer Graphics Context
- Printer Graphics Context
关键点
- In iOS, a drawing context returned by an UIView.
- In iOS, a drawing context created by calling the UIGraphicsBeginImageContextWithOptions function.
-
UIGraphicsGetCurrentContext默认返回时y下坐标系 -
CGContextDrawImage是y上坐标系 -
UIImage的DrawRect是经过处理的y下坐标系 -
UIGraphicsBeginImageContextWithOptions是y上坐标系
Apple Doc
1,2,这里
3这里
4,5,6这里
本例子说明
其实UIGraphicsGetCurrentContext获取到默认Layer Graphics Context是y下坐标的,所以画线没问题。画图用到CGContextDrawImage,其实CGContextDrawImage使用的是Bitmap Graphics Context这个context是y上坐标系,需要进行坐标转换。
通常说的UIKit使用的是y下坐标系,Core Graphics使用的是y上坐标系,而UIKit指的是UIImage的DrawRect以及UIGraphicsGetCurrentContext()等等。Core Graphics指的是以CG开头的API,例如CGContextDrawImage等。
结论
可以做个例子验证一下在使用CTM之后,坐标系确定被转换成y上坐标系,在画图之后再进行画线操作,即可验证。
个人目前研究结论:
通俗来讲,目前遇到的绝大多数都是y下坐标系,只有图像相关是y上坐标系,需要转换坐标系。具体参照分析的关键点即可。
CTM转换了坐标系,但是并没有创建坐标系,只是对当前坐标系,进行了变换移动。
代码Demo
文档是我的
印象笔记摘抄的,Demo放不上来了。
参考文档
这里所有的理论都在Cocoa Drawing Guide里,官方文档很重要。Quartz 2D Programming Guide


