MMDrawerController搭配storyboard使用详解
MMDrawerController是一个iOS抽屉式导航控件,支持自定义的过渡动画(滑动,滑动和缩放等)来展示或者隐藏“抽屉”。官方网站:https://github.com/mutualmobile/MMDrawerController
看过MMDrawerController源码和demo的人应该都知道,通篇都是找不到一个storyboard文件或者xib文件的,所有功能实现都是代码。按讨论组里作者的意思,这样更容易在大型项目中使用,可是对于我们个人初中级的开发者来说就有些许的不方便了,大神级的人物完全可以忽略。
storyboard是IOS5以后新增的内容,从名字上看,是以故事面板的形式来展现界面间的逻辑关系,Storyboard的功能很强大,可以大大简化设计UI及各页面之间关系的工作。
在我最近两个项目中,我都是使用了storyboard,github上有人专门用MMDrawerController改了一个支持storyboard的库https://github.com/TomSwift/MMDrawerController-Storyboard,我这次以一个实例讲解一下MMDrawerController原生库支持storyboard的方法。
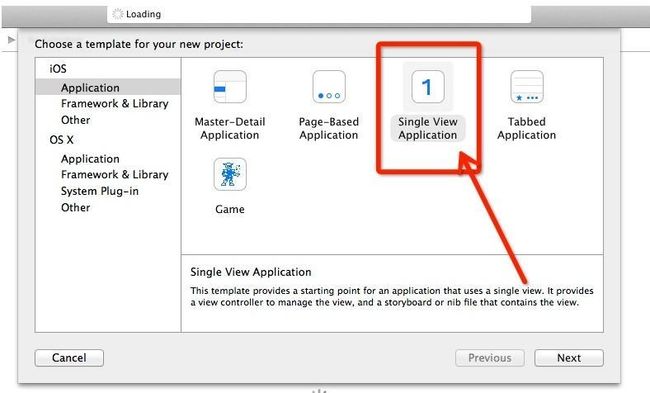
首先我们创建一个single View Application,启动Xcode,菜单选择File\New\Project…然后选择iOS\Application\Single View Applicationtemplate.
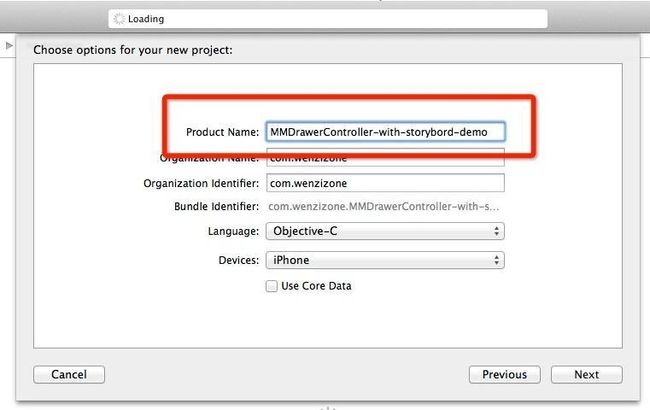
点击next,给这个项目起一个名字,这里我就用MMDrawerController-with-storybord-demo命名了。
然后,打开一个terminal,进入到刚刚创建的项目目录中
#cd /opt/program_folder/my-project/iphone/iphone-demo/tmp/MMDrawerController-with-storybord-demo
执行如下命令创建Podfile文件
$ pod init
使用任意编辑器编辑Podfile文件,填入内容如下:
source'https://github.com/CocoaPods/Specs.git'
platform:[ios](http://www.wenzizone.cn/tag/ios-2),'6.0'
pod‘MMDrawerController’
保存退出后执行如下命令
$ pod update –no-repo-update —verbose
到此,MMDrawerController已经安装配置完毕,接下来我们只需要双击MMDrawerController-with-storybord-demo.xcworkspace来启动项目即可,storyboard的ui设计请参考demo文件,我这里不做过多的表述。
编辑AppDelegate.h文件
#import
@classMMDrawerController;
@interfaceAppDelegate: UIResponder
{
@private
MMDrawerController*drawerController;
}
编辑AppDelegate.m文件
-(BOOL)application:(UIApplication*)applicationdidFinishLaunchingWithOptions:(NSDictionary*)launchOptions
{
//self.window = [[UIWindow alloc] initWithFrame:[[UIScreen mainScreen] bounds]];
// Override point for customization after application launch.
//self.window.backgroundColor = [UIColor whiteColor];
//[self.window makeKeyAndVisible];
[selfinitDrawer];//初始左侧菜单项
returnYES;
}
initDrawer内容如下
-(void)initDrawer{
UIStoryboard*mainStoryboard=[UIStoryboardstoryboardWithName:@"main"bundle: nil];
drawerController=[[MMDrawerControlleralloc]initWithCenterViewController:[mainStoryboardinstantiateViewControllerWithIdentifier:@"centerNav"]leftDrawerViewController:[mainStoryboardinstantiateViewControllerWithIdentifier:@"menu"]];
[drawerControllersetDrawerVisualStateBlock:[MMDrawerVisualStateslideAndScaleVisualStateBlock]];
[drawerControllersetMaximumLeftDrawerWidth:260.0];
[drawerControllersetOpenDrawerGestureModeMask:MMOpenDrawerGestureModePanningNavigationBar];
[drawerControllersetCloseDrawerGestureModeMask:MMCloseDrawerGestureModeAll];
self.window.rootViewController=drawerController;
}
代码解读
首先初始化storyboard,”main”是你的storyboard的名字
然后初始化drawerController,这里有两个参数
initWithCenterViewController,主页面,”centerNav”是storyboard的id,蚊子这里用的是一个navigation controler做为首页进入入口,参加demo中storyboard里Navigation Controller
leftDrawerViewController,左侧memu页,”menu”也是storyboard的id,参看demo中storyboard里left Drawer View controller
之后的几行是对drawer的定义。可以根据自己的需求自行定制。可以参见官方手册
再往下我们就来说说rootviewcontroller文件了,也就是app的入口,在页面中间部位,我放置了一个label,用于显示menu点击后的显示。具体相关代码参考demo,并不是很难这里不赘述。
这个Controller主要关键步骤是添加导航栏左侧的按钮,点击后显示左侧menu
在viewdidload部分加入
[self setupLeftMenuButton];
setupLeftMenuButton的内容如下
-(void)setupLeftMenuButton{
MMDrawerBarButtonItem*leftDrawerButton=[[MMDrawerBarButtonItemalloc]initWithTarget:selfaction:@selector(leftDrawerButtonPress:)];
[self.navigationItemsetLeftBarButtonItem:leftDrawerButtonanimated:YES];
}
作用就是初始化一个MMDrawerBarButtonItem,然后放置到导航的左侧,点击的时候触发leftDrawerButtonPress事件
leftDrawerButtonPress内容如下
#pragma mark - Button Handlers
-(void)leftDrawerButtonPress:(id)sender{
[self.mm_drawerControllertoggleDrawerSide:MMDrawerSideLeftanimated:YEScompletion:nil];
}
该事件触发后,显示左侧菜单,左侧菜单我通过一个tablevies实现。具体内容看demo,主要就是加入了几行,点中每行之后,首页会显示点中的行号
tableviewcontrller关键点是在于左侧menu点击完之后的关闭动作,这里只需要有几行代码就行了,放在- (void)tableView:(UITableView *)tableView didSelectRowAtIndexPath:(NSIndexPath *)indexPath这个tabler delegate里,内容如下
-(void)tableView:(UITableView*)tableViewdidSelectRowAtIndexPath:(NSIndexPath*)indexPath
{
[tableViewdeselectRowAtIndexPath:indexPathanimated:YES];
[self.mm_drawerControllercloseDrawerAnimated:YEScompletion:^(BOOLfinished){
rootViewController*centerViewController=(rootViewController*)[(UINavigationController*)self.mm_drawerController.centerViewControllertopViewController];
centerViewController.lbTableRowShow.text=[leftDrawMenuListsobjectAtIndex:indexPath.row];
}];
}
该段代码使用了一个block实现点击后的动画效果,关闭左侧menu,显示app rootController页,同时把点击的行号显示到rootController的label上。
到此MMDrawerController搭配storyboard的实现方式就介绍完毕了。有需要的朋友可以去这里下载这个demo的代码。此外MMDrawerController还拥有很多设置方式,不仅仅可以实现左侧menu,右侧也可以,有兴趣的朋友,请去官方查看相关文档。

