问题:
What is WindowManager in android?
The developer website's definition is not clear either:
The interface that apps use to talk to the window manager. Use Context.getSystemService(Context.WINDOW_SERVICE) to get one of these.
Can someone with plain 6th grade English explain what it is?
摘自:What is WindowManager in android?
前言:
Window表示一个窗口的概念,正常开发中直接接触Window的机会并不是很多,但是如果我们要在桌面上显示一个类似悬浮窗(微信视频通话最小化的时候)就需要用到。Window是一个抽象类。它的具体实现是PhoneWindow
//window源码
/**
 * Abstract base class for a top-level window look and behavior policy.  An
 * instance of this class should be used as the top-level view added to the
 * window manager. It provides standard UI policies such as a background, title
 * area, default key processing, etc.
 *
 * The only existing implementation of this abstract class is
 * android.view.PhoneWindow, which you should instantiate when needing a
 * Window.
 */
public abstract class Window {
//PhoneWindow源码
/**
 * Android-specific Window.
 *
 * todo: need to pull the generic functionality out into a base class
 * in android.widget.
 *
 * @hide
 */
public class PhoneWindow extends Window implements MenuBuilder.Callback {
创建一个Window很简单,只需要通过WindowManager就可以完成,Window的具体实现是通过WindowManagerService完成,他们之间的交互是一个IPC过程。Andriod中所有视图都是通过Window来实现的,不管是Activity、Toast、Dialog,他们的视图都是附加在Window上的,因此Window实际上是View的直接管理者。
补充知识点:WindowManagerService
WindowManagerService 就是位于 Framework 层的窗口管理服务,它的职责就是管理系统中的所有窗口。窗口的本质是什么呢?其实就是一块显示区域,在 Android 中就是绘制的画布:Surface,当一块 Surface 显示在屏幕上时,就是用户所看到的窗口了。WindowManagerService 添加一个窗口的过程,其实就是 WindowManagerService 为其分配一块 Surface 的过程,一块块的 Surface 在 WindowManagerService 的管理下有序的排列在屏幕上,Android 才得以呈现出多姿多彩的界面。于是根据对 Surface 的操作类型可以将 Android 的显示系统分为三个层次,如下图:

一般的开发过程中,我们操作的是 UI 框架层,对 Window 的操作通过 WindowManager 即可完成,而 WindowManagerService 作为系统级服务运行在一个单独的进程,所以 WindowManager 和 WindowManagerService 的交互是一个 IPC 过程。
Window和WindowManager
通过WindowManager添加View的过程
val btn_bug = Button(activity.getApplicationContext())
        //btn_bug.setBackgroundColor(Color.RED);
        btn_bug.setBackgroundResource(R.drawable.environment_setting)
        val wm = activity.getApplicationContext().getSystemService(Context.WINDOW_SERVICE) as WindowManager
        val wmParams = WindowManager.LayoutParams()

        wmParams.type = android.view.WindowManager.LayoutParams.TYPE_PHONE   //2002;
        wmParams.format = PixelFormat.RGBA_8888
        wmParams.flags = android.view.WindowManager.LayoutParams.FLAG_NOT_TOUCH_MODAL or android.view.WindowManager.LayoutParams.FLAG_NOT_FOCUSABLE
        wmParams.width = 100
        wmParams.height = 100
        //wmParams.flags = LayoutParams.FLAG_NOT_FOCUSABLE;
        wmParams.gravity = Gravity.LEFT or Gravity.TOP
        wmParams.x = UiUtil.dip2px(activity, 50f) //不要挡住返回键
        wmParams.y = 0

        wm.addView(btn_bug, wmParams)

        var x: Float = 0.toFloat()
        var y: Float = 0.toFloat()
        var org_x: Float = 0.toFloat()
        var org_y: Float = 0.toFloat()
        btn_bug.setOnTouchListener({ v, event ->
            when (event.action) {
                MotionEvent.ACTION_DOWN // 捕获手指触摸按下动作
                -> {
                    // 获取相对View的坐标,即以此View左上角为原点
                    x = event.x
                    y = event.y
                    org_x = event.rawX
                    org_y = event.rawY
                }

                MotionEvent.ACTION_MOVE // 捕获手指触摸移动动作
                -> {
                    wmParams.x = (event.rawX - x).toInt()
                    wmParams.y = (event.rawY - getStatusBarHeight(activity).toFloat() - y).toInt()
                    wm.updateViewLayout(v, wmParams)
                }

                MotionEvent.ACTION_UP // 捕获手指触摸离开动作
                -> {
                    val threshold = ViewConfiguration.get(activity).scaledTouchSlop
                    if (Math.abs(event.rawX - org_x) < threshold && Math.abs(event.rawY - org_y) < threshold) {
                        val intent = Intent("yh.action.EnvironmentSettingActivity")
                        activity.startActivity(intent)
                    }
                }
            }
            return@setOnTouchListener true
        })
flags参数解析:
FLAG_NOT_FOCUSABLE:表示window不需要获取焦点,也不需要接收各种输入事件。此标记会同时启用FLAG_NOT_TOUCH_MODAL,最终事件会直接传递给下层的具有焦点的window;
FLAG_NOT_TOUCH_MODAL:在此模式下,系统会将window区域外的单击事件传递给底层的window,当前window区域内的单击事件则自己处理,一般都需要开启这个标记;
FLAG_SHOW_WHEN_LOCKED:开启此模式可以让Window显示在锁屏的界面上。 [奇怪的是我删除这个标记还是在锁屏看到了添加的组件orz]
type参数表示window的类型,window共有三种类型:应用window,子window和系统window。
- 应用window对应着一个Activity。
- 子window不能独立存在,需要附属在特定的父window之上,比如Dialog就是子window。
- 系统window是需要声明权限才能创建的window,比如Toast和系统状态栏这些都是系统window,需要声明的权限是
。
Window的分层
window是分层的,每个window都对应着z-ordered,层级大的会覆盖在层级小的上面,应用window的层级范围是199,子window的层级范围是10001999,系统window的层级范围是2000~2999。
ViewManager源码
常用的只有三个方法:addView、updateView和removeView
/** Interface to let you add and remove child views to an Activity. To get an instance
  * of this class, call {@link android.content.Context#getSystemService(java.lang.String) Context.getSystemService()}.
  */
public interface ViewManager
{
    /**
     * Assign the passed LayoutParams to the passed View and add the view to the window.
     * Throws {@link android.view.WindowManager.BadTokenException} for certain programming
     * errors, such as adding a second view to a window without removing the first view.
     * Throws {@link android.view.WindowManager.InvalidDisplayException} if the window is on a
     * secondary {@link Display} and the specified display can't be found
     * (see {@link android.app.Presentation}).
     * @param view The view to be added to this window.
     * @param params The LayoutParams to assign to view.
     */
    public void addView(View view, ViewGroup.LayoutParams params);
    public void updateViewLayout(View view, ViewGroup.LayoutParams params);
    public void removeView(View view);
}
Window的内部机制
- Window是一个抽象的概念,不是实际存在的,它也是以View的形式存在。在实际使用中无法直接访问Window,只能通过WindowManager才能访问Window。每个Window都对应着一个View和一个ViewRootImpl,Window和View通过ViewRootImpl来建立联系。
- Window的添加、删除和更新过程都是IPC过程,以Window的添加为例,WindowManager的实现类对于addView、updateView和removeView方法都是委托给WindowManagerGlobal类,该类保存了很多数据列表,例如所有window对应的view集合mViews、所有window对应的ViewRootImpl的集合mRoots等,之后添加操作交给了ViewRootImpl来处理,接着会通过WindowSession来完成Window的添加过程,这个过程是一个IPC调用,因为最终是通过WindowManagerService来完成window的添加的。
以添加过程为例,其他两种情况类似:
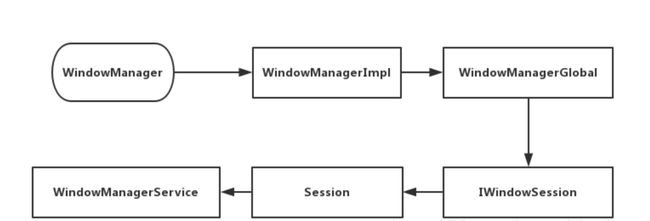
//WindowManager 是一个接口,它的真正实现是 WindowManagerImpl 类
//indowManagerImpl 并没有直接实现 Window 的三大操作,而是交给了 WindowManagerGlobal 来处理
 @Override
    public void addView(@NonNull View view, @NonNull ViewGroup.LayoutParams params) {
        applyDefaultToken(params);
        mGlobal.addView(view, params, mContext.getDisplay(), mParentWindow);
    }
下面以 addView 为例,分析一下
WindowManagerGlobal 中的实现过程:
//检查参数合法性,如果是子 Window 做适当调整
public void addView(View view, ViewGroup.LayoutParams params,
            Display display, Window parentWindow) {
        if (view == null) {
            throw new IllegalArgumentException("view must not be null");
        }
        if (display == null) {
            throw new IllegalArgumentException("display must not be null");
        }
        if (!(params instanceof WindowManager.LayoutParams)) {
            throw new IllegalArgumentException("Params must be WindowManager.LayoutParams");
        }

        final WindowManager.LayoutParams wparams = (WindowManager.LayoutParams) params;
        if (parentWindow != null) {
            parentWindow.adjustLayoutParamsForSubWindow(wparams);
        } else {

    ..
    ..//省略部分源码
    ..//addView 操作时会将相关对象添加到对应集合中:
     root = new ViewRootImpl(view.getContext(), display);

            view.setLayoutParams(wparams);

            mViews.add(view);
            mRoots.add(root);
            mParams.add(wparams);
这里补充一下
//在 WindowManagerGlobal 内部有如下几个集合比较重要:
 private final ArrayList mViews = new ArrayList();
    private final ArrayList mRoots = new ArrayList();
    private final ArrayList mParams =
            new ArrayList();
    private final ArraySet mDyingViews = new ArraySet();
其中 mViews 存储的是所有 Window 所对应的 View,mRoots 存储的是所有 Window 所对应的 ViewRootImpl,mParams 存储的是所有 Window 所对应的布局参数,mDyingViews 存储了那些正在被删除的 View 对象,或者说是那些已经调用了 removeView 方法但是操作删除还未完成的 Window 对象,可以通过表格直观的表示:
| 集合 | 存储内容 |
|---|---|
| mViews | Window 所对应的 View |
| mRoots | Window 所对应的 ViewRootImpl |
| mParams | Window 所对应的布局参数 |
| mDyingViews | 正在被删除的 View 对象 |
通过 ViewRootImpl 来更新界面并完成 Window 的添加过程
在了解View 的工作原理时,我们知道 View 的绘制过程是由 ViewRootImpl 来完成的,这里当然也不例外,具体是通过 ViewRootImpl 的 setView 方法来实现的。在 setView 内部会通过 requestLayout 来完成异步刷新请求,如下:
   // Schedule the first layout -before- adding to the window
                // manager, to make sure we do the relayout before receiving
                // any other events from the system.
                requestLayout();
                if ((mWindowAttributes.inputFeatures
                        & WindowManager.LayoutParams.INPUT_FEATURE_NO_INPUT_CHANNEL) == 0) {
                    mInputChannel = new InputChannel();
                }
                mForceDecorViewVisibility = (mWindowAttributes.privateFlags
                        & PRIVATE_FLAG_FORCE_DECOR_VIEW_VISIBILITY) != 0;
                try {
                    mOrigWindowType = mWindowAttributes.type;
                    mAttachInfo.mRecomputeGlobalAttributes = true;
                    collectViewAttributes();
                    res = mWindowSession.addToDisplay(mWindow, mSeq, mWindowAttributes,
                            getHostVisibility(), mDisplay.getDisplayId(),
                            mAttachInfo.mContentInsets, mAttachInfo.mStableInsets,
                            mAttachInfo.mOutsets, mInputChannel);
可以看到 scheduleTraversals 方法是 View 绘制的入口,继续查看它的实现
res = mWindowSession.addToDisplay(mWindow, mSeq, mWindowAttributes,
                            getHostVisibility(), mDisplay.getDisplayId(),
                            mAttachInfo.mContentInsets, mAttachInfo.mStableInsets,
                            mAttachInfo.mOutsets, mInputChannel);
mWindowSession 的类型是 IWindowSession,它是一个 Binder 对象,真正的实现类是 Session,这也就是之前提到的 IPC 调用的位置。在 Session 内部会通过 WindowManagerService 来实现 Window 的添加,代码如下:
//终于,Window 的添加请求移交给 WindowManagerService 手上了,在 WindowManagerService 内部会为每一个应用保留一个单独的 Session
public int addToDisplay(IWindow window, int seq, WindowManager.LayoutParams, attrs, int viewVisibility,
                  int displayId, Rect outContentInsets, InputChannel outInputChannel){
   return mService.addWindow(this, window, seq, attrs, viewVisibility, displayId, outContentInsets, outInputChannel);
}
总结:
- Window用于显示View和接收各种事件,Window有三种类型:应用Window(每个Activity对应一个Window)、子Window(不能单独存在,附属于特定Window)、系统window(Toast和状态栏)
- Window分层级,应用Window在1-99、子Window在1000-1999、系统Window在2000-2999.WindowManager提供了增删改View三个功能。
- Window是个抽象概念:每一个Window对应着一个View和ViewRootImpl,Window通过ViewRootImpl来和View建立联系,View是Window存在的实体,只能通过WindowManager来访问Window。
- WindowManager的实现是WindowManagerImpl其再委托给WindowManagerGlobal来对Window进行操作,其中有四个List分别储存对应的View、ViewRootImpl、WindowManger.LayoutParams和正在被删除的View
- Window的实体是存在于远端的WindowMangerService中,所以增删改Window在本端是修改上面的几个List然后通过ViewRootImpl重绘View,通过WindowSession(每个应用一个)在远端修改Window。
- Activity创建Window:Activity会在attach()中创建Window并设置其回调(onAttachedToWindow()、dispatchTouchEvent()),Activity的Window是由Policy类创建PhoneWindow实现的。然后通过Activity#setContentView()调用PhoneWindow的setContentView。
参考:
- Android系统源代码情景分析(第三版) 罗升阳著
- Android开发艺术探索 任玉刚著
- 项目Demo代码分析
- 系统源码分析
- Android 带你彻底理解 Window 和 WindowManager
声明:此为原创,转载请联系作者
作者:微信公众号添加公众号-遛狗的程序员 ,或者可以扫描以下二维码关注相关技术文章。

当然喜爱技术,乐于分享的你也可以可以添加作者微信号:
