个人博客
http://www.milovetingting.cn
使用APT实现Android中View的注入
前言
APT是Annotation Processing Tool的简写,通过在Java编译时期,处理注解,生成代码。APT在ButterKnife、Dagger2等框架中都有应用。下面通过使用APT,实现一个类似ButterKnife的简单的View注入的框架。(参考Jett老师的课程)
ButterKnife的实现原理
既然准备实现类似ButterKnife的框架,那么我们就需要了解ButterKnife的实现原理。
ButterKnife的使用是从ButterKnife.bind()开始的:
@NonNull @UiThread
  public static Unbinder bind(@NonNull Activity target) {
    View sourceView = target.getWindow().getDecorView();
    return bind(target, sourceView);
  }
可以看到,bind方法中又调用了内部的bind方法
@NonNull @UiThread
public static Unbinder bind(@NonNull Object target, @NonNull View source) {
    Class targetClass = target.getClass();
    if (debug) Log.d(TAG, "Looking up binding for " + targetClass.getName());
    //获取构造函数
    Constructor constructor = findBindingConstructorForClass(targetClass);

    if (constructor == null) {
      return Unbinder.EMPTY;
    }

    //noinspection TryWithIdenticalCatches Resolves to API 19+ only type.
    try {
        //返回实例
      return constructor.newInstance(target, source);
    } catch (IllegalAccessException e) {
      throw new RuntimeException("Unable to invoke " + constructor, e);
    } catch (InstantiationException e) {
      throw new RuntimeException("Unable to invoke " + constructor, e);
    } catch (InvocationTargetException e) {
      Throwable cause = e.getCause();
      if (cause instanceof RuntimeException) {
        throw (RuntimeException) cause;
      }
      if (cause instanceof Error) {
        throw (Error) cause;
      }
      throw new RuntimeException("Unable to create binding instance.", cause);
    }
  }
在这个bind方法中,主要通过findBindingConstructorForClass方法获取到构造函数,然后返回具体的实例。
@Nullable @CheckResult @UiThread
private static Constructor findBindingConstructorForClass(Class cls) {
    //从缓存中查找
    Constructor bindingCtor = BINDINGS.get(cls);
    if (bindingCtor != null || BINDINGS.containsKey(cls)) {
      if (debug) Log.d(TAG, "HIT: Cached in binding map.");
      return bindingCtor;
    }
    //没有缓存过的,那么通过反射来获取
    String clsName = cls.getName();
    if (clsName.startsWith("android.") || clsName.startsWith("java.")
        || clsName.startsWith("androidx.")) {
      if (debug) Log.d(TAG, "MISS: Reached framework class. Abandoning search.");
      return null;
    }
    try {
      Class bindingClass = cls.getClassLoader().loadClass(clsName + "_ViewBinding");
      //noinspection unchecked
      bindingCtor = (Constructor) bindingClass.getConstructor(cls, View.class);
      if (debug) Log.d(TAG, "HIT: Loaded binding class and constructor.");
    } catch (ClassNotFoundException e) {
      if (debug) Log.d(TAG, "Not found. Trying superclass " + cls.getSuperclass().getName());
      //没有Class,则递归调用,从父类中查找
      bindingCtor = findBindingConstructorForClass(cls.getSuperclass());
    } catch (NoSuchMethodException e) {
      throw new RuntimeException("Unable to find binding constructor for " + clsName, e);
    }
    //放入到缓存中
    BINDINGS.put(cls, bindingCtor);
    return bindingCtor;
  }
}
在findBindingConstructorForClass方法中,首先查询缓存中是否有需要的构造函数,如果没有,那么会通过反射查找,最终返回了ButterKnife生成的辅助类XXX_ViewBinding的构造函数。
Build工程后,在生成的XXX_ViewBinding的Java文件的构造方法中,可以看到ButterKnife帮我们自己调用了findViewById
//MainActivity_ViewBinding类中的方法
 @UiThread
  public MainActivity_ViewBinding(MainActivity target, View source) {
    this.target = target;

    target.tv = Utils.findRequiredViewAsType(source, R.id.tv, "field 'tv'", TextView.class);
  }

//Utils类中方法
  public static  T findRequiredViewAsType(View source, @IdRes int id, String who,
      Class cls) {
    View view = findRequiredView(source, id, who);
    return castView(view, id, who, cls);
  }

//Utils类中方法
  public static View findRequiredView(View source, @IdRes int id, String who) {
    View view = source.findViewById(id);
    if (view != null) {
      return view;
    }
    String name = getResourceEntryName(source, id);
    throw new IllegalStateException("Required view '"
        + name
        + "' with ID "
        + id
        + " for "
        + who
        + " was not found. If this view is optional add '@Nullable' (fields) or '@Optional'"
        + " (methods) annotation.");
  }
可以得出结论,ButterKnife就是利用APT解析注解,在编译时生成了辅助类,用来帮助我们去调用findViewById方法,从而减少手动使用findViewById
实现自已的View注入框架
了解了原理后,就可以自己来实现简单的View注入框架了。
新建annotation模块
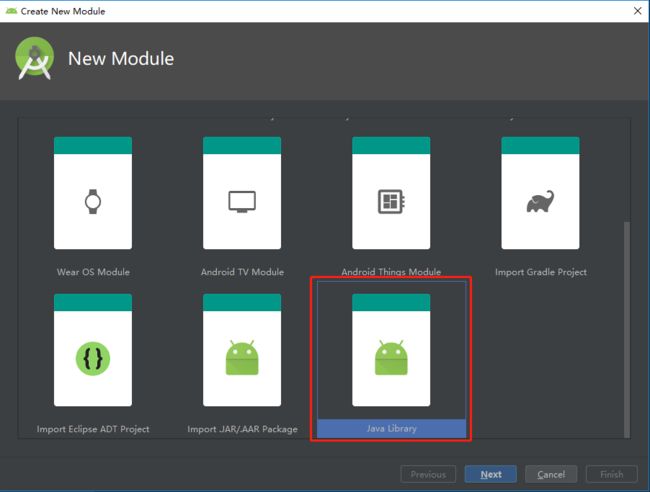
新建Java Library类型的Module,名称为annotation,用来定义注解
新建annotation_compiler模块
然后,同样的方法新建名为annotation_compiler的模块,用来处理注解
新建Binder模块
我们还需要新建一个名为Binder的模块,用来供用户直接调用
添加依赖
新建这三个Modeule后,需要为相应的Module添加依赖。app模块需要依赖上面的三个模块,annotation_compiler需要依赖annotation。
编写annotation模块代码
在annotation模块下新建BindView注解
@Target(ElementType.FIELD)
@Retention(RetentionPolicy.SOURCE)
public @interface BindView {
    int value();
}
编写annotation_compiler模块代码
要使用APT,需要添加相关依赖,在annotation_compiler模块下的build.gradle文件中编辑
dependencies {
    //注册APT功能
    annotationProcessor 'com.google.auto.service:auto-service:1.0-rc4'
    compileOnly 'com.google.auto.service:auto-service:1.0-rc4'
}
同步后就可以使用APT了。
在annotation_compiler模块下新建AnnotationsCompiler类,继承自AbstractProcessor
@AutoService(Processor.class)
public class AnnotationsCompiler extends AbstractProcessor {
  //...
}
需要重写三个方法
/**
     * 支持的Java版本
     *
     * @return
     */
    @Override
    public SourceVersion getSupportedSourceVersion() {
        return SourceVersion.latestSupported();
    }

    /**
     * 支持的注解
     *
     * @return
     */
    @Override
    public Set getSupportedAnnotationTypes() {
        Set types = new HashSet<>();
        types.add(BindView.class.getCanonicalName());
        return types;
    }

    @Override
    public synchronized void init(ProcessingEnvironment processingEnvironment) {
        super.init(processingEnvironment);
        filer = processingEnvironment.getFiler();
    }
重写process方法,主要的逻辑都在这里实现
@Override
    public boolean process(Set set, RoundEnvironment roundEnvironment) {
        Set elements = roundEnvironment.getElementsAnnotatedWith(BindView.class);

        //类:TypeElement
        //方法:ExecutableElement
        //属性:VariableElement

        Map> map = new HashMap<>();

        for (Element element : elements) {
            VariableElement variableElement = (VariableElement) element;
            String activityName = variableElement.getEnclosingElement().getSimpleName().toString();
            List variableElements = map.get(activityName);
            if (variableElements == null) {
                variableElements = new ArrayList<>();
                map.put(activityName, variableElements);
            }
            variableElements.add(variableElement);
        }

        if (map.size() > 0) {
            Writer writer = null;
            Iterator iterator = map.keySet().iterator();
            while (iterator.hasNext()) {
                String activityName = iterator.next();
                List variableElements = map.get(activityName);

                //获取包名
                TypeElement typeElement =
                        (TypeElement) variableElements.get(0).getEnclosingElement();
                String packageName =
                        processingEnv.getElementUtils().getPackageOf(typeElement).toString();

                try {
                    JavaFileObject sourceFile =
                            filer.createSourceFile(packageName + "." + activityName +
                                    "_ViewBinding");
                    writer = sourceFile.openWriter();
                    writer.write("package " + packageName + ";\n");
                    writer.write("import " + PACKAGE_NAME_BINDER + ".IBinder;\n");
                    writer.write("public class "+activityName+"_ViewBinding implements IBinder<"+packageName+"."+activityName+">{\n");
                    writer.write("@Override\n");
                    writer.write("public void bind("+packageName+"."+activityName+" target){\n");
                    for(VariableElement variableElement:variableElements)
                    {
                        //获取名字
                        String variableName = variableElement.getSimpleName().toString();
                        //获取ID
                        int id = variableElement.getAnnotation(BindView.class).value();
                        //得到类型
                        TypeMirror typeMirror = variableElement.asType();
                        writer.write("target."+variableName+"=("+typeMirror+")target.findViewById("+id+");\n");
                    }
                    writer.write("\n}\n}");
                } catch (Exception e) {
                    e.printStackTrace();
                }
                finally {
                    if(writer!=null)
                    {
                        try {
                            writer.close();
                        } catch (IOException e) {
                            e.printStackTrace();
                        }
                    }
                }
            }
        }

        return false;
    }
编写Binder模块代码
在Binder模块下新建IBinder类
public interface IBinder {

    /**
     * 绑定activity
     *
     * @param t
     */
    void bind(T t);

}
新建ViewBinder类,这个类是直接供用户调用的
public class ViewBinder {
    public static void bind(Object activity) {
        String name = activity.getClass().getName() + "_ViewBinding";
        try {
            Class clazz = Class.forName(name);
            IBinder binder = (IBinder) clazz.newInstance();
            binder.bind(activity);
        } catch (Exception e) {
            e.printStackTrace();
        }
    }
}
在app模块调用
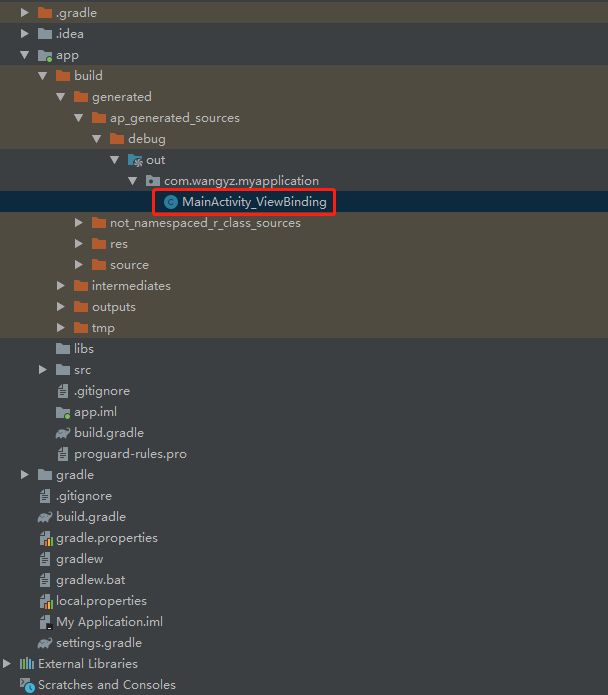
编写好上面的模块后,执行Build-Rebuild Project后,可以看到生成的java类文件
在app模块的MainActivity中使用
@BindView(R.id.tv)
TextView tv;

@Override
protected void onCreate(Bundle savedInstanceState) {
    super.onCreate(savedInstanceState);
    setContentView(R.layout.activity_main);
    //调用自己定义的ViewBinder
    ViewBinder.bind(this);
    tv.setText("Hi,ViewBinder!");
}
运行应用后,可以看到已经更改了TextView的显示,从而证明我们自己定义的ViewBinder是可以正常运行的。
结束
使用APT实现Android中View的注入,具体步骤就是上面描述的。当然,这个只是一个简单的示例,如果要开发出完善的框架,还有很多需要注意和优化的,这里只是记录开发的一般流程,以便后面需要时查找资料。
源码
源码地址:https://github.com/milovetingting/Samples/tree/master/ViewBinder


