级别: ★★☆☆☆
标签:「iOS通知」「iOSPush」「远程通知」
作者: dac_1033
审校: QiShare团队
iOS中的通知(Notification)分为两种:
1. iOS 本地通知
2. iOS 远程通知
3. iOS 通知扩展
iOS中的通知包括本地通知和远程通知,两种通知在iOS系统中通过横幅或者弹出提醒两种形式来告诉用户,点击系统弹出的通知会打开应用程序。
今天主要介绍iOS端关于远程通知的相关功能及操作。
远程通知
远程通知是通过苹果的APNs(
Apple Push Notification server)发送到App,而APNs必须先知道用户设备的地址,然后才能向该设备发送通知。此地址采用设备令牌的形式,该设备令牌对于设备和应用程序都是唯一的(即device token)。在启动时,App与APNs通信并接收device token,然后将其转发到App Server,App Server将包含该令牌及要发送的通知消息发送至APNs。(苹果官网APNs概述)
远程通知的传递涉及几个关键组件:
- App Server
- Apple推送通知服务(APNs)
- 用户的设备(包括iPhone、iPad、iTouch、mac等)
- 相应的App
苹果官方提供的远程通知的传递示意图如下:
远程通知中各关键组件之间的交互细节:
准备工作:
(1)在苹果开发者账号中创建的App ID不能使用通配ID,并且在所创建的APP ID的配置项中选择Push Notifications服务,App使用没有选择该服务的App ID所生成的推送证书和配置文件时,无法完成注册远程通知;
(2)当前工程配置中的Bundle Identifier必须和生成配置文件使用的APP ID完全一致;
(3)当前工程配置中的“Capabilities”需设置为ON;
(4)远程推送必须真机调试,模拟器无法获取得到device token。
详细步骤:
- 在AppDelegate中注册APNs消息
-(void)registerRemoteNotification {

    if ([[UIDevice currentDevice].systemVersion floatValue] >= 10.0) {
#if __IPHONE_OS_VERSION_MAX_ALLOWED >= __IPHONE_10_0 // Xcode 8编译会调用
        if (@available(iOS 10.0, *)) {
            UNUserNotificationCenter *center = [UNUserNotificationCenter currentNotificationCenter];
            center.delegate = self;
            [center requestAuthorizationWithOptions:(UNAuthorizationOptionBadge | UNAuthorizationOptionSound | UNAuthorizationOptionAlert | UNAuthorizationOptionCarPlay) completionHandler:^(BOOL granted, NSError *_Nullable error) {
                if (!error) {
                    NSLog(@"request notification authorization succeeded!");
                }
            }];
        }
        [[UIApplication sharedApplication] registerForRemoteNotifications];
#else // Xcode 7编译会调用
        UIUserNotificationType types = (UIUserNotificationTypeAlert | UIUserNotificationTypeSound | UIUserNotificationTypeBadge);
        UIUserNotificationSettings *settings = [UIUserNotificationSettings settingsForTypes:types categories:nil];
        [[UIApplication sharedApplication] registerUserNotificationSettings:settings];
        [[UIApplication sharedApplication] registerForRemoteNotifications];
#endif
    } else {
        UIUserNotificationType types = (UIUserNotificationTypeAlert | UIUserNotificationTypeSound | UIUserNotificationTypeBadge);
        UIUserNotificationSettings *settings = [UIUserNotificationSettings settingsForTypes:types categories:nil];
        [[UIApplication sharedApplication] registerUserNotificationSettings:settings];
        [[UIApplication sharedApplication] registerForRemoteNotifications];
    }
}
- App获取
device token
- 在注册远程通知之后,获取
device token成功回调:
- (void)application:(UIApplication *)application didRegisterForRemoteNotificationsWithDeviceToken:(NSData *)deviceToken;
- 获取
device token失败:
- (void)application:(UIApplication *)application didFailToRegisterForRemoteNotificationsWithError:(NSError *)error;
App将
device token发送给App Server
只有苹果公司知道device token的生成算法,保证唯一,device token在App重装等情况时会变化,因此为确保device token变化后App仍然能够正常接收服务器端发送的通知,建议每次应用程序启动都重新获得device token,并传给App Server。App Server根据最新的
device token将要推送的消息发送给APNs
将指定device token和消息内容发送给APNs时,消息内容的格式必须完全按照苹果官方的消息格式组织消息内容,点击查看远程通知消息的字段、创建远程通知消息。
消息格式的例子如下:
{"aps":{"alert":{"title":"通知的title","subtitle":"通知的subtitle","body":"通知的body","title-loc-key":"TITLE_LOC_KEY","title-loc-args":["t_01","t_02"],"loc-key":"LOC_KEY","loc-args":["l_01","l_02"]},"sound":"sound01.wav","badge":1,"mutable-content":1,"category": "realtime"},"msgid":"123"}
APNs根据device token查找相应设备,并推送消息
一般情况APNs可以根据deviceToken将消息成功推送到相应设备中,但也存在用户卸载程序等原因导致推送消息失败的情况,这时App服务端会收到APNs返回的错误信息)。AppDelegate.m中的回调方法
// iOS<10时,且app被完全杀死
- (BOOL)application:(UIApplication *)application didFinishLaunchingWithOptions:(NSDictionary *)launchOptions;

// 注:iOS10以上,如果不使用UNUserNotificationCenter,将走此回调方法
- (void)application:(UIApplication *)application didReceiveRemoteNotification:(NSDictionary *)userInfo;

// iOS7及以上系统
- (void)application:(UIApplication *)application didReceiveRemoteNotification:(NSDictionary *)userInfo fetchCompletionHandler:(void (^)(UIBackgroundFetchResult))completionHandler;

//  iOS>=10: App在前台获取到通知
- (void)userNotificationCenter:(UNUserNotificationCenter *)center willPresentNotification:(UNNotification *)notification withCompletionHandler:(void (^)(UNNotificationPresentationOptions))completionHandler;

//  iOS>=10: 点击通知进入App时触发(杀死/切到后台唤起)
- (void)userNotificationCenter:(UNUserNotificationCenter *)center didReceiveNotificationResponse:(UNNotificationResponse *)response withCompletionHandler:(void (^)(void))completionHandler;
注册远程通知及解析通知数据的代码如下:
#import "AppDelegate.h"
#if __IPHONE_OS_VERSION_MAX_ALLOWED >= __IPHONE_10_0
#import
#endif

@interface AppDelegate ()
@end

@implementation AppDelegate

- (BOOL)application:(UIApplication *)application didFinishLaunchingWithOptions:(NSDictionary *)launchOptions {

    // 注册APNs
    [self registerRemoteNotifications];

    return YES;
}

- (void)registerRemoteNotifications {
    if ([[UIDevice currentDevice].systemVersion floatValue] >= 10.0) {
#if __IPHONE_OS_VERSION_MAX_ALLOWED >= __IPHONE_10_0 // Xcode 8编译会调用
        if (@available(iOS 10.0, *)) {
            UNUserNotificationCenter *center = [UNUserNotificationCenter currentNotificationCenter];
            center.delegate = self;
            [center requestAuthorizationWithOptions:(UNAuthorizationOptionBadge | UNAuthorizationOptionSound | UNAuthorizationOptionAlert | UNAuthorizationOptionCarPlay) completionHandler:^(BOOL granted, NSError *_Nullable error) {
                if (!error) {
                    NSLog(@"request authorization succeeded!");
                }
            }];
        } else {
            // Fallback on earlier versions
        }

        [[UIApplication sharedApplication] registerForRemoteNotifications];
#else // Xcode 7编译会调用
        UIUserNotificationType types = (UIUserNotificationTypeAlert | UIUserNotificationTypeSound | UIUserNotificationTypeBadge);
        UIUserNotificationSettings *settings = [UIUserNotificationSettings settingsForTypes:types categories:nil];
        [[UIApplication sharedApplication] registerUserNotificationSettings:settings];
        [[UIApplication sharedApplication] registerForRemoteNotifications];
#endif
    } else if ([[[UIDevice currentDevice] systemVersion] floatValue] >= 8.0) {
        UIUserNotificationType types = (UIUserNotificationTypeAlert | UIUserNotificationTypeSound | UIUserNotificationTypeBadge);
        UIUserNotificationSettings *settings = [UIUserNotificationSettings settingsForTypes:types categories:nil];
        [[UIApplication sharedApplication] registerUserNotificationSettings:settings];
        [[UIApplication sharedApplication] registerForRemoteNotifications];
    } else {
        UIRemoteNotificationType apn_type = (UIRemoteNotificationType)(UIRemoteNotificationTypeAlert |
                                                                       UIRemoteNotificationTypeSound |
                                                                       UIRemoteNotificationTypeBadge);
        [[UIApplication sharedApplication] registerForRemoteNotificationTypes:apn_type];
    }
}

- (void)application:(UIApplication *)application didRegisterForRemoteNotificationsWithDeviceToken:(NSData *)deviceToken {

    // 获取并处理deviceToken
    NSString *token = [[deviceToken description] stringByTrimmingCharactersInSet:[NSCharacterSet characterSetWithCharactersInString:@"<>"]];
    token = [token stringByReplacingOccurrencesOfString:@" " withString:@""];
    DLog(@"---DeviceToken--->> %@\n", token);
}

- (void)application:(UIApplication *)application didFailToRegisterForRemoteNotificationsWithError:(NSError *)error {
    DLog(@"---register RemoteNotifications failed---\n%@", error);
}

// 注:iOS10以上,如果不使用UNUserNotificationCenter,将走此回调方法
- (void)application:(UIApplication *)application didReceiveRemoteNotification:(NSDictionary *)userInfo {
    // iOS6及以下系统
    if (userInfo) {
        if ([UIApplication sharedApplication].applicationState == UIApplicationStateActive) {// app位于前台通知
            NSLog(@"app位于前台通知(didReceiveRemoteNotification:):%@", userInfo);
        } else {// 切到后台唤起
            NSLog(@"app位于后台通知(didReceiveRemoteNotification:):%@", userInfo);
        }
    }
}

// 注:
// 1. 该回调方法,App杀死后并不执行;
// 2. 该回调方法,会与application:didReceiveRemoteNotification:互斥执行;
// 3. 该回调方法,会与userNotificationCenter:willPresentNotification:withCompletionHandler:一并执行;
// 4. 该回调方法,会与userNotificationCenter:didReceiveNotificationResponse::withCompletionHandler:一并执行。
- (void)application:(UIApplication *)application didReceiveRemoteNotification:(NSDictionary *)userInfo fetchCompletionHandler:(void (^)(UIBackgroundFetchResult))completionHandler NS_AVAILABLE_IOS(7_0) {
    // iOS7及以上系统
    if (userInfo) {
        if ([UIApplication sharedApplication].applicationState == UIApplicationStateActive) {// app位于前台通知
            NSLog(@"app位于前台通知(didReceiveRemoteNotification:fetchCompletionHandler:):%@", userInfo);
        } else {// 切到后台唤起
            NSLog(@"app位于后台通知(didReceiveRemoteNotification:fetchCompletionHandler:):%@", userInfo);
        }
    }
    completionHandler(UIBackgroundFetchResultNewData);
}

#pragma mark - iOS>=10 中收到推送消息

#if __IPHONE_OS_VERSION_MAX_ALLOWED >= __IPHONE_10_0
//  iOS>=10: App在前台获取到通知
- (void)userNotificationCenter:(UNUserNotificationCenter *)center willPresentNotification:(UNNotification *)notification withCompletionHandler:(void (^)(UNNotificationPresentationOptions))completionHandler
API_AVAILABLE(ios(10.0)) {
    NSDictionary * userInfo = notification.request.content.userInfo;
    if (userInfo) {
        NSLog(@"app位于前台通知(willPresentNotification:):%@", userInfo);
    }
    completionHandler(UNNotificationPresentationOptionBadge|UNNotificationPresentationOptionSound|UNNotificationPresentationOptionAlert);;
}

//  iO>=10: 点击通知进入App时触发(杀死/切到后台唤起)
- (void)userNotificationCenter:(UNUserNotificationCenter *)center didReceiveNotificationResponse:(UNNotificationResponse *)response withCompletionHandler:(void (^)(void))completionHandler
API_AVAILABLE(ios(10.0)) {
    NSDictionary * userInfo = response.notification.request.content.userInfo;
    if (userInfo) {
        NSLog(@"点击通知进入App时触发(didReceiveNotificationResponse:):%@", userInfo);
    }
    completionHandler();
}
#endif


@end
- 模拟推送工具“Pusher”
本文只侧重于介绍iOS端对远程推送通知的处理,因此我们把App Server对应的处理过程交给了第三方工具,第三方推送测试工具有很多,如SmartPush、Pusher等,在这里我们选用Pusher作为测试工具,Pusher的GitHub地址。
Pusher的使用步骤说明:
(1)选择p12格式的推送证书;
(2)设置是否为测试环境(默认勾选为测试环境,由于推送证书分为测试推送证书和生产测试证书,并且苹果的APNs也分为测试和生产两套环境,因此Pusher需要手动置顶是否为测试环境);
(3)输入device token;
(4)输入符合苹果要求的推送内容字符串;
(5)当确认手机端设置无误,并且以上4点设置正确时,执行推送。
Pusher推送的消息,以第4点中的示例为例进行测试,手机收到远程推送通知的效果截图如下:
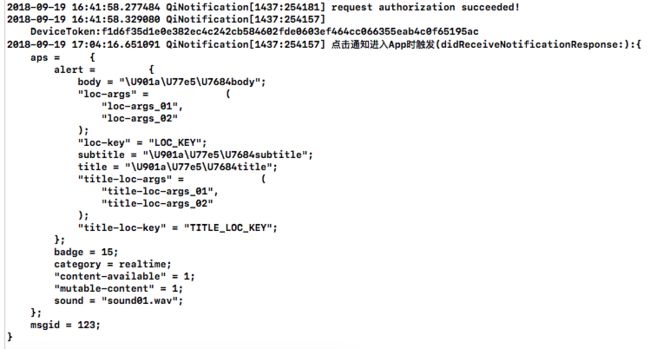
点击远程推送通知横幅打开App,在回调中获取的
json串:
备注:
(1)要使用APNs向非运行的应用程序提供远程通知,需要至少启动目标应用程序一次;
(2)设备没有网络的情况下,是无法注册远程通知的;
(3)一般情况下,device token是不会发生变化的,即虽然调用注册远程通知的方法,但是返回的device token仍然是之前得到的值;如果设备令牌在应用程序执行时发生更改,则应用程序对象再次调用相应的委托方法以通知更改;
(4)推送过程中的消息json串可在适当位置添加自定义字段,整个消息最大长度为4 KB(4096字节),超过最大允许长度,则拒绝通知;
(5)在iOS及以上系统中远程通知还包括“通知扩展”功能,在下一篇文章中介绍。
本文Demo链接:GitHub地址
专栏下一篇:iOS 通知扩展
了解更多iOS及相关新技术,请关注我们的公众号:
关注我们的途径有:
QiShare()
QiShare(掘金)
QiShare(知乎)
QiShare(GitHub)
QiShare(CocoaChina)
QiShare(StackOverflow)
QiShare(微信公众号)
推荐文章:
在iOS 12中无法获取WiFi的SSID了?别慌!
Web安全漏洞之CSRF
奇舞周刊276期


