python数据分析个人学习读书笔记-目录索引
第18章TensorFlow实战
本章介绍深度学习框架——TensorFlow,可能大家还听过一些其他的神经网络框架,例如Caffe、Torch,其实这些都是工具,以辅助完成网络模型搭建。现阶段由于TensorFlow更主流一些,能做的事情相对更多,所以还是选择使用更广泛的TensorFlow框架。首先概述其基本使用方法,接下来就是搭建一个完整的神经网络模型。
18.1TensorFlow基本操作
TensorFlow是由谷歌开发和维护的一款深度学习框架,从2015年还没发布时就已经名声大振,经过近4年的发展,已经成为一款成熟的神经网络框架,可谓是深度学习界的首选。关于它的特征和性能,其官网已经给出各种优势,大家简单了解即可。https://tensorflow.google.cn/
关于工具包的安装,可以先用命令行尝试运行“pip install tensorflow”命令。注意现阶段TensorFlow只支持Python3版本的运行。
注意:该版本的最新版本是2.1.0,但本书的实例是基于1.X,而1.X版本中的很多模块已被放弃。所以为了运行本章代码,请安装1.X版本。
 1 pip uninstall tensorflow --tensorflow-2.1.0
 2
 3 pip install tensorflow==1.9.0
 4
 5
 6 /*
 7 D:\tools\Python37>pip install tensorflow==1.9.0
 8 Looking in indexes: https://pypi.tuna.tsinghua.edu.cn/simple
 9 ERROR: Could not find a version that satisfies the requirement tensorflow==1.9.0 (from versions: 1.13.0rc1, 1.13.0rc2, 1.13.1, 1.13.2,
1.14.0rc0, 1.14.0rc1, 1.14.0, 1.15.0rc0, 1.15.0rc1, 1.15.0rc2, 1.15.0rc3, 1.15.0, 1.15.2, 2.0.0a0, 2.0.0b0, 2.0.0b1, 2.0.0rc0, 2.0.0rc1,
2.0.0rc2, 2.0.0, 2.0.1, 2.1.0rc0, 2.1.0rc1, 2.1.0rc2, 2.1.0, 2.2.0rc0, 2.2.0rc1, 2.2.0rc2)
10 ERROR: No matching distribution found for tensorflow==1.9.0
11
12  */
13
14 pip install tensorflow==1.15.2
15 /*Looking in indexes: https://pypi.tuna.tsinghua.edu.cn/simple
16 Collecting tensorflow==1.15.2...
17 Installing collected packages: tensorboard, tensorflow-estimator, tensorflow
18   Attempting uninstall: tensorboard
19     Found existing installation: tensorboard 2.1.1
20     Uninstalling tensorboard-2.1.1:
21       Successfully uninstalled tensorboard-2.1.1
22   Attempting uninstall: tensorflow-estimator
23     Found existing installation: tensorflow-estimator 2.1.0
24     Uninstalling tensorflow-estimator-2.1.0:
25       Successfully uninstalled tensorflow-estimator-2.1.0
26 Successfully installed tensorboard-1.15.0 tensorflow-1.15.2 tensorflow-estimator-1.15.1
27
28 */
18.1.1TensorFlow特性
(1)高灵活性:TensorFlow不仅用于神经网络,而且只要计算过程可以表示为一个数据流图,就可以使用TensorFlow。TensorFlow提供了丰富的工具,以辅助组装算法模型,还可以自定义很多操作。如果熟悉C++,也可以改底层,其核心代码都是由C组成的,Python相当于接口。
(2)可移植性:TensorFlow可以在CPU和GPU上运行,例如台式机、服务器、手机移动设备等,还可以在嵌入式设备以及APP或者云端服务与Docker中进行应用。
(3)更新迭代迅速:深度学习与神经网络发展迅速,经常会出现新的算法与模型结构,如果让大家自己优化算法与模型结构可能较为复杂,TensorFlow随着更新会持续引进新的模型与结构,让代码更简单。
(4)自动求微分:基于梯度的机器学习算法会受益于TensorFlow自动求微分的能力。作为TensorFlow用户,只需要定义预测模型的结构,将这个结构和目标函数结合在一起。给定输入数据后,TensorFlow将自动完成微分导数,相当于帮大家完成了最复杂的计算。
(5)多语言支持:TensorFlow有一个合理的C++使用界面,也有一个易用的Python使用界面来构建和训练网络模型。最简单实用的就是Python接口,也可以在交互式的ipython界面中用TensorFlow尝试某些想法,它可以帮你将笔记、代码、可视化等有条理地归置好。随着升级更新,后续还会加入Go、Java、Lua、Javascript、R等语言接口。
(6)性能最优化:TensorFlow给线程、队列、异步操作等以最佳的支持,可以将硬件的计算潜能全部发挥出来,还可以自由地将TensorFlow图中的计算元素分配到不同设备上,并且帮你管理好这些不同副本。
综上所述,使用TensorFlow时,用户只需完成网络模型设计,其他工作都可以放心地交给它来计算。
Github应当是程序员最熟悉的平台,很明显的趋势就是TensorFlow成为最受大家欢迎的神经网络框架。
迪哥使用深度学习框架的感受:最开始使用的深度学习框架是Caffe,用起来十分便捷,基本不需要写代码,直接按照配置文件、写好网络模型参数就可以训练网络模型。虽然Caffe使用起来很方便,但是所有功能必须是其框架已经实现好的,想要加入新功能就比较麻烦,而且Caffe基本上只能玩卷积网络,所以如果只做图像处理相关任务,可以考虑使用,对于自然语言处理,它就不适合了。
TensorFlow相当于已经实现了你能想到的所有操作,例如神经网络中不同功能层的定义、迭代计算、参数初始化等,所以大家需要做的就是按照流程将它们组合在一起即可。做了几个项目之后,就会发现无论做什么任务都是差不多的套路,很多模板都是可以复用的。初学者可能会觉得稍微有点麻烦,因为很多地方必须按照它的要求来做,熟练之后就会觉得按照要求规范来做是最科学的。
18.1.2TensorFlow基本操作
简单介绍TensorFlow的各项优势后,下面来看其最基本的使用方法,然后再来介绍神经网络:
1 import tensorflow as tf
2 # https://tensorflow.google.cn/
3 tf.__version__
4 #'1.15.2'
 1 a = 3
 2 # 创建一个变量
 3 w = tf.Variable([[0.5,1.0]])
 4 x = tf.Variable([[2.0],[1.0]])
 5 # 创建一个操作
 6 y = tf.matmul(w, x)
 7
 8
 9 #全局变量初始化
10 init_op = tf.global_variables_initializer()
11 with tf.Session() as sess:
12     sess.run(init_op)
13     print (y.eval())
[[2.]]
上述代码只想计算一个行向量与列向量相乘,但是本来一行就能解决的问题,这里却过于复杂,下面就是TensorFlow进行计算操作的基本要求。
- 1.当想创建一个变量的时候似乎有些麻烦,需要调用tf.Variable()再传入实际的值,这是为了底层计算的高效性,所有数据结构都必须是tensor格式,所以先要对数据格式进行转换。
- 2.接下来创建一个操作y=tf.matmul(w,x),为什么是创建而不是实际执行呢?此时相当于先写好要做的任务流程,但还没有开始做。
- 3.再准备进行全局变量的初始化,因为刚才只是设计了变量、操作的流程,还没有实际放入计算区域中,这好比告诉士兵打仗前怎么布阵,还没有把士兵投放到战场中,只有把士兵投放到战场中,才能实际发挥作用。
- 4.创建Session(),这相当于士兵进入实际执行任务的战场。最后sess.run(),只有完成这一步,才能真正得到最终结果。
最初的打算只是要做一个矩阵乘法,却要按照TensorFlow的设计规范写这么多代码,估计大家的感受也是如此。
等你完成一个实际项目的时候,就知道按照规范完成任务是多么舒服的事。
1 tf.zeros([3, 4], int32) ==> [[0, 0, 0, 0], [0, 0, 0, 0], [0, 0, 0, 0]]
2 tf.zeros_like(tensor) ==> [[0, 0, 0], [0, 0, 0]]
3 tf.ones([2, 3], int32) ==> [[1, 1, 1], [1, 1, 1]]
4 tf.ones_like(tensor) ==> [[1, 1, 1], [1, 1, 1]]
5 tensor = tf.constant([1, 2, 3, 4, 5, 6, 7]) => [1 2 3 4 5 6 7]
6 tensor = tf.constant(-1.0, shape=[2, 3]) => [[-1. -1. -1.] [-1. -1. -1.]]
7 tf.linspace(10.0, 12.0, 3, name="linspace") => [ 10.0 11.0 12.0]
8 tf.range(start, limit, delta) ==> [3, 6, 9, 12, 15]
可以看出在使用TensorFlow时,很多功能函数的定义与Numpy类似,只需熟悉即可,实际用的时候,它与Python工具包一样,前期基本上是现用现查。
接下来介绍TensorFlow中比较常用的函数功能,在变量初始化时,要随机生成一些符合某种分布的变量,或是拿到数据集后,要对数据进行洗牌的操作,现在这些都已经实现好了,直接调用即可。
 1 #生成的值服从具有指定平均值和标准偏差的正态分布
 2 norm = tf.random_normal([2, 3], mean=-1, stddev=4)
 3
 4 # 洗牌
 5 c = tf.constant([[1, 2], [3, 4], [5, 6]])
 6 shuff = tf.random_shuffle(c)
 7
 8 # 每一次执行结果都会不同
 9 sess = tf.Session()
10 print (sess.run(norm))
11 print (sess.run(shuff))
[[  8.602505  -13.47859    -8.434112 ]
 [ -2.6874518  -4.1306276   1.2184303]]
[[3 4]
 [1 2]
 [5 6]]
随机模块的使用方法很简单,但对于这些功能函数的使用方法来说,并不建议大家一口气先学个遍,通过实际的案例和任务边用边学就足够,其实这些只是工具而已,知道其所需参数的含义以及输出的结果即可。
 1 state = tf.Variable(0)
 2 new_value = tf.add(state, tf.constant(1))
 3 update = tf.assign(state, new_value)
 4
 5 with tf.Session() as sess:
 6     sess.run(tf.global_variables_initializer())
 7     print(sess.run(state))
 8     for _ in range(3):
 9         sess.run(update)
10         print(sess.run(state))
0
1
2
3
1 import numpy as np
2 a = np.zeros((3,3))
3 ta = tf.convert_to_tensor(a)
4 with tf.Session() as sess:
5      print(sess.run(ta))
[[0. 0. 0.]
 [0. 0. 0.]
 [0. 0. 0.]]
 1 a = tf.constant(5.0)
 2 b = tf.constant(10.0)
 3
 4 x = tf.add(a, b, name="add")
 5 y = tf.div(a, b, name="divide")
 6
 7 with tf.Session() as sess:
 8     print("a =", sess.run(a))
 9     print("b =", sess.run(b))
10     print("a + b =", sess.run(x))
11     print("a/b =", sess.run(y))
WARNING:tensorflow:From:5:
div (from tensorflow.python.ops.math_ops) is deprecated and will be removed in a future version. Instructions for updating: Deprecated in favor of operator or tf.math.divide. a = 5.0 b = 10.0 a + b = 15.0 a/b = 0.5
下面这个函数可是有点厉害,需要重点认识一下,因为在后面的实战中,你都会见到它:
1 input1 = tf.placeholder(tf.float32)
2 input2 = tf.placeholder(tf.float32)
3 output = tf.multiply(input1, input2)
4 with tf.Session() as sess:
5     print(sess.run([output], feed_dict={input1:[7.], input2:[2.]}))
[array([14.], dtype=float32)]
Placeholder()的意思是先把这个“坑”占住,然后再往里面填“萝卜”。想一想在梯度下降迭代过程中,每次都是选择其中一部分数据来计算,其中数据的规模都是一致的。例如,[64,10]表示每次迭代都是选择64个样本数据,每个数据都有10个特征,所以在迭代时可以先指定好数据的规模,也就是把“坑”按照所需大小挖好,接下来填入大小正好的“萝卜”即可。
这里简单地说明,指定“坑”的数据类型是float32格式,接下来在session()中执行output操作,通过feed_dict={}来实际填充input1和input2的取值。
18.1.3TensorFlow实现回归任务
下面通过一个小例子说明TensorFlow处理回归任务的基本流程(其实分类也是同理),简单起见,自定义一份数据集:
 1 import numpy as np
 2 import tensorflow as tf
 3 import matplotlib.pyplot as plt
 4
 5 # 随机生成1000个点,围绕在y=0.1x+0.3的直线周围
 6 num_points = 1000
 7 vectors_set = []
 8 for i in range(num_points):
 9     x1 = np.random.normal(0.0, 0.55)
10     y1 = x1 * 0.1 + 0.3 + np.random.normal(0.0, 0.03)
11     vectors_set.append([x1, y1])
12
13 # 生成一些样本
14 x_data = [v[0] for v in vectors_set]
15 y_data = [v[1] for v in vectors_set]
16
17 plt.scatter(x_data,y_data,c='orange',s=5)
18 plt.show()
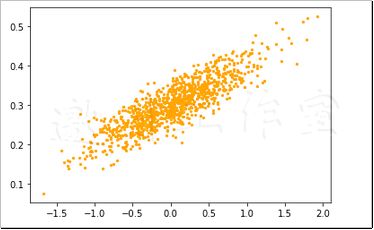
上述代码选择了1000个样本数据点,在创建的时候围绕y1=x1×0.1+0.3这条直线,并在其周围加上随机抖动,也就是实验数据集。
接下来要做的就是构建一个回归方程来拟合数据样本,首先假设不知道哪条直线能够最好地拟合数据,需要计算出w和b。
在定义模型结构之前,先考虑第一个问题,x作为输入数据是几维的?如果只看上图,可能很多读者会认为该数据集是二维的,但此时关注的仅仅是数据x,y表示标签而非数据,所以模型输入的数据是一维的,这点非常重要,因为要根据数据的维度来设计权重参数。
1 # 生成1维的W矩阵,取值是[-1,1]之间的随机数
2 W = tf.Variable(tf.random_uniform([1], -1.0, 1.0), name='W')
3 # 生成1维的b矩阵,初始值是0
4 b = tf.Variable(tf.zeros([1]), name='b')
首先要从最终求解的目标下手,回归任务就是要求出其中的权重参数w和偏置参数b。既然数据是一维的,权重参数w必然也是一维的,它们需要一一对应起来。先对其进行初始化操作,tf.random_uniform([1],−1.0,1.0)表示随机初始化一个数,这里的[1]表示矩阵的维度,如果要创建一个3行4列的矩阵参数就是[3,4]。−1.0和1.0分别表示随机数值的取值范围,这样就完成权重参数w的初始化工作。偏置参数b的初始化方法类似,但是通常认为偏置对结果的影响较低,以常数0进行初始化即可。
关于偏置参数b的维度,只需看结果的维度即可,此例中最后需要得到一个回归值,所以b就是一维的,如果要做三分类任务,就需要3个偏置参数。
1 # 经过计算得出预估值y
2 y = W * x_data + b
3
4 # 以预估值y和实际值y_data之间的均方误差作为损失
5 loss = tf.reduce_mean(tf.square(y - y_data), name='loss')
模型参数确定之后,就能得到其估计值。此外,还需要用损失函数评估当前预测效果,tf.square(y – y_data)表示损失函数计算方法,它与最小二乘法类似,tf.reduce_mean表示对所选样本取平均来计算损失。
损失函数的定义并没有限制,需要根据实际任务选择,其实最终要让神经网络做什么,完全由损失函数给出的目标决定。
1 # 采用梯度下降法来优化参数
2 optimizer = tf.train.GradientDescentOptimizer(0.5)
目标函数确定之后,接下来就要进行优化,选择梯度下降优化器—tf.train.GradientDescentOptimizer(0.5),这里传入的0.5表示学习率。在TensorFlow中,优化方法不只有梯度下降优化器,还有Adam可以自适应调整学习率等策略,需要根据不同任务需求进行选择。
1 # 训练的过程就是最小化这个误差值
2 train = optimizer.minimize(loss, name='train')
接下来要做的就是让优化器朝着损失最小的目标去迭代更新参数,到这里就完成了回归任务中所有要执行的操作。
 1 sess = tf.Session()
 2
 3 init = tf.global_variables_initializer()
 4 sess.run(init)
 5
 6 # 初始化的W和b是多少
 7 print ("W =", sess.run(W), "b =", sess.run(b), "loss =", sess.run(loss))
 8 # 执行20次训练
 9 for step in range(20):
10     sess.run(train)
11     # 输出训练好的W和b
12     print ("W =", sess.run(W), "b =", sess.run(b), "loss =", sess.run(loss))
13 #writer = tf.train.SummaryWriter("./tmp", sess.graph)
迭代优化的逻辑写好之后,还需在Session()中执行,由于这项任务比较简单,执行20次迭代更新就可以,此过程中也可以打印想要观察的指标,例如,每一次迭代都会打印当前的权重参数w,偏置参数b以及当前的损失值,结果如下:
W = [0.39805293] b = [0.] loss = 0.1126781
W = [0.31779358] b = [0.2912693] loss = 0.015368518
W = [0.25217777] b = [0.29389206] loss = 0.008035661
W = [0.20622969] b = [0.2960363] loss = 0.004437748
W = [0.17404404] b = [0.2975378] loss = 0.0026723628
W = [0.15149872] b = [0.2985896] loss = 0.0018061436
W = [0.13570622] b = [0.29932633] loss = 0.0013811161
W = [0.12464393] b = [0.29984242] loss = 0.0011725683
W = [0.11689504] b = [0.30020392] loss = 0.0010702405
W = [0.11146712] b = [0.30045715] loss = 0.0010200314
W = [0.10766497] b = [0.30063453] loss = 0.0009953954
W = [0.10500166] b = [0.30075878] loss = 0.0009833071
W = [0.10313606] b = [0.3008458] loss = 0.0009773759
W = [0.10182926] b = [0.30090678] loss = 0.00097446557
W = [0.10091387] b = [0.30094948] loss = 0.0009730375
W = [0.10027266] b = [0.30097938] loss = 0.0009723369
W = [0.09982351] b = [0.30100033] loss = 0.0009719931
W = [0.09950889] b = [0.30101502] loss = 0.0009718244
W = [0.0992885] b = [0.3010253] loss = 0.00097174157
W = [0.09913412] b = [0.3010325] loss = 0.00097170105
W = [0.09902599] b = [0.30103755] loss = 0.000971681
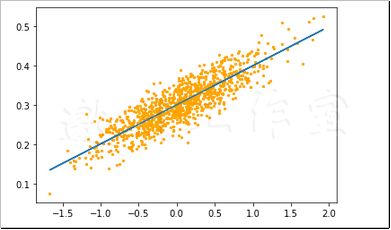
最开始w是随机赋值的,b直接用0当作初始化,相对而言,损失值也较高。随着迭代的进行,参数开始发生变换,w越来越接近于0.1,b越来越接近于0.3,损失值也在逐步降低。创建数据集时就是在y1=x1×0.1 + 0.3附近选择数据点,最终求解出的结果也是非常类似,这就完成了最基本的回归任务。
1 plt.scatter(x_data,y_data,c='orange',s=5)
2 plt.plot(x_data,sess.run(W)*x_data+sess.run(b))
3 plt.show()
18.2搭建神经网络进行手写字体识别
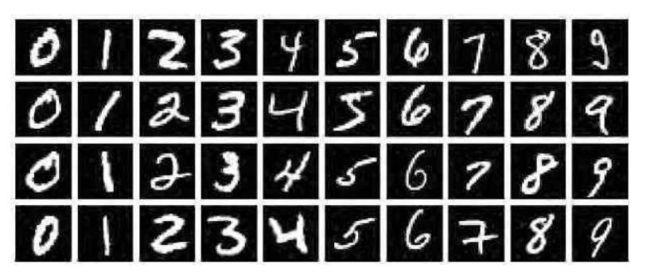
下面向大家介绍经典的手写字体识别数据集—Mnist数据集,如图18-4所示。数据集中包括0~9十个数字,我们要做的就是对图像进行分类,让神经网络能够区分这些手写字体。
图18-4 Mnist数据集
选择这份数据集的原因是其规模较小(28×28×1),用笔记本电脑也能执行它,非常适合学习。通常情况下,数据大小(对图像数据来说,主要是长、宽、大、小)决定模型训练的时间,对于较大的数据集(例如224×224×3),即便网络模型简化,还是非常慢。对于没有GPU的初学者来说,在图像处理任务中,Mnist数据集就是主要练习对象。
 1 import numpy as np
 2 import tensorflow as tf
 3 import matplotlib.pyplot as plt
 4 from tensorflow.examples.tutorials.mnist import input_data
 5 #tf.__path__
 6 # import sys
 7 # print (sys.path)
 8
 9 print ("tensorflow,今天开张")
10 # ModuleNotFoundError: No module named 'tensorflow.examples.tutorials'
如果遇到报:# ModuleNotFoundError: No module named 'tensorflow.examples.tutorials'
原因:很可能是默认的examples库没有下载或路径不对。
解决方案:
1、通过自带API文件input_data.py下载,方法如下:
1 import numpy as np
2 import tensorflow as tf
3 import matplotlib.pyplot as plt
4 from tensorflow.examples.tutorials.mnist import input_data
5
6 print ("下载中......")
7 #指定当前相对路径下载examples文件
8 mnist = input_data.read_data_sets('data/', one_hot=True)
如果极其没有耐心,可手动下载数据文件:可以直接到http://yann.lecun.com/exdb/mnist/下载4个文件到python对应的路径。
如D:\tools\Python37\Lib\site-packages\tensorflow_core\examples\tutorials\mnist\
-
t10k-images-idx3-ubyte.gz
t10k-labels-idx1-ubyte.gz
train-images-idx3-ubyte.gz
train-labels-idx1-ubyte.gz
2、下载时如果找不到input_data.py文件,这里给出一个。
# Copyright 2015 Google Inc. All Rights Reserved.
#
# Licensed under the Apache License, Version 2.0 (the "License");
# you may not use this file except in compliance with the License.
# You may obtain a copy of the License at
#
#     http://www.apache.org/licenses/LICENSE-2.0
#
# Unless required by applicable law or agreed to in writing, software
# distributed under the License is distributed on an "AS IS" BASIS,
# WITHOUT WARRANTIES OR CONDITIONS OF ANY KIND, either express or implied.
# See the License for the specific language governing permissions and
# limitations under the License.
# ==============================================================================
"""Functions for downloading and reading MNIST data."""
from __future__ import absolute_import
from __future__ import division
from __future__ import print_function
import gzip
import os
import tensorflow.python.platform
import numpy
from six.moves import urllib
from six.moves import xrange  # pylint: disable=redefined-builtin
import tensorflow as tf
SOURCE_URL = 'http://yann.lecun.com/exdb/mnist/'
def maybe_download(filename, work_directory):
  """Download the data from Yann's website, unless it's already here."""
  if not os.path.exists(work_directory):
    os.mkdir(work_directory)
  filepath = os.path.join(work_directory, filename)
  if not os.path.exists(filepath):
    filepath, _ = urllib.request.urlretrieve(SOURCE_URL + filename, filepath)
    statinfo = os.stat(filepath)
    print('Successfully downloaded', filename, statinfo.st_size, 'bytes.')
  return filepath
def _read32(bytestream):
  dt = numpy.dtype(numpy.uint32).newbyteorder('>')
  return numpy.frombuffer(bytestream.read(4), dtype=dt)[0]
def extract_images(filename):
  """Extract the images into a 4D uint8 numpy array [index, y, x, depth]."""
  print('Extracting', filename)
  with gzip.open(filename) as bytestream:
    magic = _read32(bytestream)
    if magic != 2051:
      raise ValueError(
          'Invalid magic number %d in MNIST image file: %s' %
          (magic, filename))
    num_images = _read32(bytestream)
    rows = _read32(bytestream)
    cols = _read32(bytestream)
    buf = bytestream.read(rows * cols * num_images)
    data = numpy.frombuffer(buf, dtype=numpy.uint8)
    data = data.reshape(num_images, rows, cols, 1)
    return data
def dense_to_one_hot(labels_dense, num_classes=10):
  """Convert class labels from scalars to one-hot vectors."""
  num_labels = labels_dense.shape[0]
  index_offset = numpy.arange(num_labels) * num_classes
  labels_one_hot = numpy.zeros((num_labels, num_classes))
  labels_one_hot.flat[index_offset + labels_dense.ravel()] = 1
  return labels_one_hot
def extract_labels(filename, one_hot=False):
  """Extract the labels into a 1D uint8 numpy array [index]."""
  print('Extracting', filename)
  with gzip.open(filename) as bytestream:
    magic = _read32(bytestream)
    if magic != 2049:
      raise ValueError(
          'Invalid magic number %d in MNIST label file: %s' %
          (magic, filename))
    num_items = _read32(bytestream)
    buf = bytestream.read(num_items)
    labels = numpy.frombuffer(buf, dtype=numpy.uint8)
    if one_hot:
      return dense_to_one_hot(labels)
    return labels
class DataSet(object):
  def __init__(self, images, labels, fake_data=False, one_hot=False,
               dtype=tf.float32):
    """Construct a DataSet.
    one_hot arg is used only if fake_data is true.  `dtype` can be either
    `uint8` to leave the input as `[0, 255]`, or `float32` to rescale into
    `[0, 1]`.
    """
    dtype = tf.as_dtype(dtype).base_dtype
    if dtype not in (tf.uint8, tf.float32):
      raise TypeError('Invalid image dtype %r, expected uint8 or float32' %
                      dtype)
    if fake_data:
      self._num_examples = 10000
      self.one_hot = one_hot
    else:
      assert images.shape[0] == labels.shape[0], (
          'images.shape: %s labels.shape: %s' % (images.shape,
                                                 labels.shape))
      self._num_examples = images.shape[0]
      # Convert shape from [num examples, rows, columns, depth]
      # to [num examples, rows*columns] (assuming depth == 1)
      assert images.shape[3] == 1
      images = images.reshape(images.shape[0],
                              images.shape[1] * images.shape[2])
      if dtype == tf.float32:
        # Convert from [0, 255] -> [0.0, 1.0].
        images = images.astype(numpy.float32)
        images = numpy.multiply(images, 1.0 / 255.0)
    self._images = images
    self._labels = labels
    self._epochs_completed = 0
    self._index_in_epoch = 0
  @property
  def images(self):
    return self._images
  @property
  def labels(self):
    return self._labels
  @property
  def num_examples(self):
    return self._num_examples
  @property
  def epochs_completed(self):
    return self._epochs_completed
  def next_batch(self, batch_size, fake_data=False):
    """Return the next `batch_size` examples from this data set."""
    if fake_data:
      fake_image = [1] * 784
      if self.one_hot:
        fake_label = [1] + [0] * 9
      else:
        fake_label = 0
      return [fake_image for _ in xrange(batch_size)], [
          fake_label for _ in xrange(batch_size)]
    start = self._index_in_epoch
    self._index_in_epoch += batch_size
    if self._index_in_epoch > self._num_examples:
      # Finished epoch
      self._epochs_completed += 1
      # Shuffle the data
      perm = numpy.arange(self._num_examples)
      numpy.random.shuffle(perm)
      self._images = self._images[perm]
      self._labels = self._labels[perm]
      # Start next epoch
      start = 0
      self._index_in_epoch = batch_size
      assert batch_size <= self._num_examples
    end = self._index_in_epoch
    return self._images[start:end], self._labels[start:end]
def read_data_sets(train_dir, fake_data=False, one_hot=False, dtype=tf.float32):
  class DataSets(object):
    pass
  data_sets = DataSets()
  if fake_data:
    def fake():
      return DataSet([], [], fake_data=True, one_hot=one_hot, dtype=dtype)
    data_sets.train = fake()
    data_sets.validation = fake()
    data_sets.test = fake()
    return data_sets
  TRAIN_IMAGES = 'train-images-idx3-ubyte.gz'
  TRAIN_LABELS = 'train-labels-idx1-ubyte.gz'
  TEST_IMAGES = 't10k-images-idx3-ubyte.gz'
  TEST_LABELS = 't10k-labels-idx1-ubyte.gz'
  VALIDATION_SIZE = 5000
  local_file = maybe_download(TRAIN_IMAGES, train_dir)
  train_images = extract_images(local_file)
  local_file = maybe_download(TRAIN_LABELS, train_dir)
  train_labels = extract_labels(local_file, one_hot=one_hot)
  local_file = maybe_download(TEST_IMAGES, train_dir)
  test_images = extract_images(local_file)
  local_file = maybe_download(TEST_LABELS, train_dir)
  test_labels = extract_labels(local_file, one_hot=one_hot)
  validation_images = train_images[:VALIDATION_SIZE]
  validation_labels = train_labels[:VALIDATION_SIZE]
  train_images = train_images[VALIDATION_SIZE:]
  train_labels = train_labels[VALIDATION_SIZE:]
  data_sets.train = DataSet(train_images, train_labels, dtype=dtype)
  data_sets.validation = DataSet(validation_images, validation_labels,
                                 dtype=dtype)
  data_sets.test = DataSet(test_images, test_labels, dtype=dtype)
  return data_sets

#if __name__ == '__main__':
#    path = "./data/"
#    read_data_sets(path)
如果是tensorflow V2+以上的版本,请到这里官方下载:
直接下载:https://raw.githubusercontent.com/tensorflow/tensorflow/master/tensorflow/examples/tutorials/mnist/input_data.py
页面:https://github.com/tensorflow/tensorflow/blob/master/tensorflow/examples/tutorials/mnist/input_data.py
Mnist数据集有各种版本,最简单的就是用TensorFlow自带API下载。
 1 import numpy as np
 2 import tensorflow as tf
 3 import matplotlib.pyplot as plt
 4 from tensorflow.examples.tutorials.mnist import input_data
 5
 6 print ("下载中...")
 7 mnist = input_data.read_data_sets('data/', one_hot=True)
 8 print
 9 print (" 类型是 %s" % (type(mnist)))
10 print (" 训练数据有 %d" % (mnist.train.num_examples))
11 print (" 测试数据有 %d" % (mnist.test.num_examples))
Extracting data/train-images-idx3-ubyte.gz Extracting data/train-labels-idx1-ubyte.gz Extracting data/t10k-images-idx3-ubyte.gz Extracting data/t10k-labels-idx1-ubyte.gz 类型是 <class 'tensorflow.examples.tutorials.mnist.input_data.read_data_sets..DataSets '> 训练数据有 55000 测试数据有 10000
下载速度通常稍微有点慢,完成后可以打印当前数据集中的各种信息:
trainimg   = mnist.train.images
trainlabel = mnist.train.labels
testimg    = mnist.test.images
testlabel  = mnist.test.labels
# 28 * 28 * 1
print (" 数据类型 is %s"    % (type(trainimg)))
print (" 标签类型 %s"  % (type(trainlabel)))
print (" 训练集的shape %s"   % (trainimg.shape,))
print (" 训练集的标签的shape %s" % (trainlabel.shape,))
print (" 测试集的shape' is %s"    % (testimg.shape,))
print (" 测试集的标签的shape %s"  % (testlabel.shape,))
 数据类型 is <class 'numpy.ndarray'>
 标签类型 <class 'numpy.ndarray'>
 训练集的shape (55000, 784)
 训练集的标签的shape (55000, 10)
 测试集的shape' is (10000, 784)
 测试集的标签的shape (10000, 10)
输出结果显示,训练集一共有55000个样本,测试集有10000个样本,数量正好够用。每个样本都是28×28×1,也就是784个像素点。每个数据带有10个标签,采用独热编码,如果一张图像是3这个数字,标签就是 [0,0,0,1,0,0,0,0,0,0]。
在分类任务中,大家可能觉得网络最后的输出应是一个具体的数值,实际上对于一个十分类任务,得到的就是其属于每一个类别的概率值,所以输出层要得到10个结果。
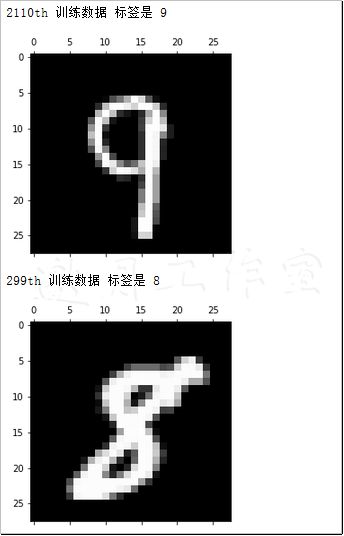
如果想对其中的某条数据进行展示,可以将图像绘制出来:
 1 # 看看庐山真面目
 2 nsample = 5
 3 randidx = np.random.randint(trainimg.shape[0], size=nsample)
 4
 5 # help(plt.get_cmap)
 6 for i in randidx:
 7     curr_img   = np.reshape(trainimg[i, :], (28, 28)) # 28 by 28 matrix
 8     curr_label = np.argmax(trainlabel[i, :] ) # Label
 9     plt.matshow(curr_img, cmap=plt.get_cmap('gray'))#'matplotlib.colors.SkyBlue'
10     print ("" + str(i) + "th 训练数据 "
11            + "标签是 " + str(curr_label))
12     plt.show()
1 # Batch数据
2 print ("Batch Learning? ")
3 batch_size = 100
4 batch_xs, batch_ys = mnist.train.next_batch(batch_size)
5 print ("Batch数据 %s" % (type(batch_xs)))
6 print ("Batch标签 %s" % (type(batch_ys)))
7 print ("Batch数据的shape %s" % (batch_xs.shape,))
8 print ("Batch标签的shape %s" % (batch_ys.shape,))
Batch Learning?
Batch数据 <class 'numpy.ndarray'>
Batch标签 <class 'numpy.ndarray'>
Batch数据的shape (100, 784)
Batch标签的shape (100, 10)
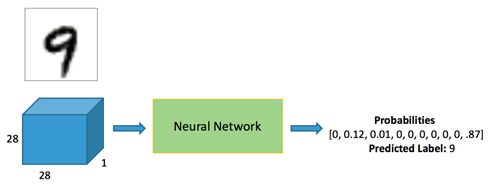
接下来就要构造一个神经网络模型来完成手写字体识别,先来梳理一下整体任务流程(见图18-5)。
图18-5 神经网络工作流程
通过TensorFlow加载进来的Mnist数据集已经制作成一个个batch数据,所以直接拿过来用就可以。最终的结果就是分类任务,可以得到当前输入属于每一个类别的概率值,需要动手完成的就是中间的网络结构部分。
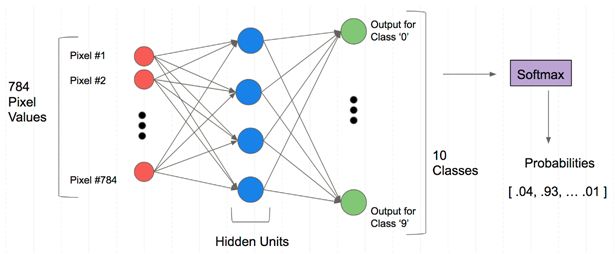
网络结构定义如图18-6所示,首先定义一个简单的只有一层隐藏层的神经网络,需要两组权重参数分别连接输入数据与隐藏层和隐藏层与输出结果,其中输入数据已经给定784个像素点(28×28×1),输出结果也是固定的10个类别,只需确定隐藏层神经元个数,就可以搭建网络模型。
图18-6 网络结构定义
按照任务要求,设置一些网络参数,包括输入数据的规模、输出结果规模、隐藏层神经元个数以及迭代次数与batchsize大小:
 1 from tensorflow.examples.tutorials.mnist import input_data
 2 import tensorflow as tf
 3
 4 mnist = input_data.read_data_sets('data/', one_hot=True)
 5
 6 numClasses = 10
 7 inputSize = 784
 8 numHiddenUnits = 50
 9 trainingIterations = 10000
10 batchSize = 100
numClasses固定成10,表示所有数据都是用于完成这个十分类任务。隐藏层神经元个数可以自由设置,在实际操作过程中,大家也可以动手调节其大小,以观察结果的变化,对于Mnist数据集来说,64个就足够了。
1 X = tf.placeholder(tf.float32, shape = [None, inputSize])
2 y = tf.placeholder(tf.float32, shape = [None, numClasses])
既然输入、输出都是固定的,按照之前的讲解,需要使用placeholder来先占住这个“坑”。参数shape表示数据规模,其中的None表示不限制batch的大小,一次可以迭代多个数据,inputSize已经指定成784,表示每个输入数据大小都是一模一样的,这也是训练神经网络的基本前提,输入数据大小必须一致。对于输出结果Y来说也是一样。
接下来就是参数初始化,按照图18-6所示网络结构,首先,输入数据和中间隐层之间有联系,通过W1和B1完成计算;隐藏层又和输出层之间有联系,通过W2和B2完成计算。
1 W1 = tf.Variable(tf.truncated_normal([inputSize, numHiddenUnits], stddev=0.1))
2 B1 = tf.Variable(tf.constant(0.1), [numHiddenUnits])
3 W2 = tf.Variable(tf.truncated_normal([numHiddenUnits, numClasses], stddev=0.1))
4 B2 = tf.Variable(tf.constant(0.1), [numClasses])
这里对权重参数使用随机高斯初始化,并且控制其值在较小范围进行浮动,用tf.truncated_normal函数对随机结果进行限制,例如,当输入参数为mean=0,stddev=1时,就不可能出现[−2,2]以外的点,相当于截断标准是2倍的stddev。对于偏置参数,用常数来赋值即可,注意其个数要与输出结果一致。
1 hiddenLayerOutput = tf.matmul(X, W1) + B1
2 hiddenLayerOutput = tf.nn.relu(hiddenLayerOutput)
3 finalOutput = tf.matmul(hiddenLayerOutput, W2) + B2
定义好权重参数后,从前到后进行计算即可,也就是由输入数据经过一步步变换得到输出结果,这里需要注意的是,不要忘记加入激活函数,通常每一个带有参数的网络层后面都需要加上激活函数。
1 loss = tf.reduce_mean(tf.nn.softmax_cross_entropy_with_logits(labels = y, logits = finalOutput))
2 opt = tf.train.GradientDescentOptimizer(learning_rate = .1).minimize(loss)
接下来就是指定损失函数,再由优化器计算梯度进行更新,这回要做的是分类任务,用对数损失函数计算损失。
1 correct_prediction = tf.equal(tf.argmax(finalOutput,1), tf.argmax(y,1))
2 accuracy = tf.reduce_mean(tf.cast(correct_prediction, "float"))
对于分类任务,只展示损失不太直观,还可以测试一下当前的准确率,先定义好计算方法,也就是看预测值中概率最大的位置和标签中概率最大的位置是否一致即可。
 1 sess = tf.Session()
 2 init = tf.global_variables_initializer()
 3 sess.run(init)
 4
 5 for i in range(trainingIterations):
 6     batch = mnist.train.next_batch(batchSize)
 7     batchInput = batch[0]
 8     batchLabels = batch[1]
 9     _, trainingLoss = sess.run([opt, loss], feed_dict={X: batchInput, y: batchLabels})
10     if i%1000 == 0:
11         trainAccuracy = accuracy.eval(session=sess, feed_dict={X: batchInput, y: batchLabels})
12         print ("step %d, training accuracy %g"%(i, trainAccuracy))
在Session()中实际执行迭代优化即可,指定的最大迭代次数为1万次,如果打印出1万个结果,那么看起来实在太多了,可以每隔1000次打印一下当前网络模型的效果。由于选择batch数据的方法已经实现好,这里可以直接调用,但是大家在用自己数据集实践的时候,还是需要指定好batch的选择方法。
获取batch数据可以在数据集中随机选择一部分,也可以自己指定开始与结束索引,从前到后遍历数据集中每一部分。
训练结果如下:
step 0, training accuracy 0.12
step 1000, training accuracy 0.95
step 2000, training accuracy 0.98
step 3000, training accuracy 0.96
step 4000, training accuracy 0.98
step 5000, training accuracy 1
step 6000, training accuracy 0.97
step 7000, training accuracy 0.97
step 8000, training accuracy 0.99
step 9000, training accuracy 0.98
最开始随机初始化的参数,模型的准确率大概是0.12,随着网络迭代的进行,准确率也在逐步上升。这就完成了一个最简单的神经网络模型,效果看起来还不错,那么,还有没有提升的余地呢?如果做一个具有两层隐藏层的神经网络,效果会不会好一些呢?方法还是类似的,只需要再叠加一层即可:
 1 numHiddenUnitsLayer2 = 100
 2 trainingIterations = 10000
 3
 4 X = tf.placeholder(tf.float32, shape = [None, inputSize])
 5 y = tf.placeholder(tf.float32, shape = [None, numClasses])
 6
 7 W1 = tf.Variable(tf.random_normal([inputSize, numHiddenUnits], stddev=0.1))
 8 B1 = tf.Variable(tf.constant(0.1), [numHiddenUnits])
 9 W2 = tf.Variable(tf.random_normal([numHiddenUnits, numHiddenUnitsLayer2], stddev=0.1))
10 B2 = tf.Variable(tf.constant(0.1), [numHiddenUnitsLayer2])
11 W3 = tf.Variable(tf.random_normal([numHiddenUnitsLayer2, numClasses], stddev=0.1))
12 B3 = tf.Variable(tf.constant(0.1), [numClasses])
13
14 hiddenLayerOutput = tf.matmul(X, W1) + B1
15 hiddenLayerOutput = tf.nn.relu(hiddenLayerOutput)
16 hiddenLayer2Output = tf.matmul(hiddenLayerOutput, W2) + B2
17 hiddenLayer2Output = tf.nn.relu(hiddenLayer2Output)
18 finalOutput = tf.matmul(hiddenLayer2Output, W3) + B3
19
20 loss = tf.reduce_mean(tf.nn.softmax_cross_entropy_with_logits(labels = y, logits = finalOutput))
21 opt = tf.train.GradientDescentOptimizer(learning_rate = .1).minimize(loss)
22
23 correct_prediction = tf.equal(tf.argmax(finalOutput,1), tf.argmax(y,1))
24 accuracy = tf.reduce_mean(tf.cast(correct_prediction, "float"))
25
26 sess = tf.Session()
27 init = tf.global_variables_initializer()
28 sess.run(init)
29
30 for i in range(trainingIterations):
31     batch = mnist.train.next_batch(batchSize)
32     batchInput = batch[0]
33     batchLabels = batch[1]
34     _, trainingLoss = sess.run([opt, loss], feed_dict={X: batchInput, y: batchLabels})
35     if i%1000 == 0:
36         train_accuracy = accuracy.eval(session=sess, feed_dict={X: batchInput, y: batchLabels})
37         print ("step %d, training accuracy %g"%(i, train_accuracy))
38
39 testInputs = mnist.test.images
40 testLabels = mnist.test.labels
41 acc = accuracy.eval(session=sess, feed_dict = {X: testInputs, y: testLabels})
42 print("testing accuracy: {}".format(acc))
上述代码设置第二个隐藏层神经元的个数为100,建模方法相同,只是流程上多走一层,训练结果如下:
step 0, training accuracy 0.25
step 1000, training accuracy 0.95
step 2000, training accuracy 0.99
step 3000, training accuracy 1
step 4000, training accuracy 0.99
step 5000, training accuracy 1
step 6000, training accuracy 1
step 7000, training accuracy 1
step 8000, training accuracy 1
step 9000, training accuracy 0.98
testing accuracy: 0.9747999906539917
可以看出,仅仅多了一层网络结构,效果提升还是很大,之前需要5000次才能达到90%以上的准确率,现在不到1000次就能完成。所以,适当增大网络的深度还是非常有必要的。本例无须增大,邀月注。
本章小结:本章选择TensorFlow框架来搭建神经网络模型,初次使用可能会觉得有一些麻烦,但习惯了就会觉得每一步流程都很规范。无论什么任务,核心都在于选择合适的目标函数与输入格式,网络模型和迭代优化通常都是差不多的。大家在学习过程中,还可以选择Cifar数据集来尝试分类任务,同样都是小规模(32×32×3)数据,非常适合练手(见图18-7)。
第18章完。
python数据分析个人学习读书笔记-目录索引
该书资源下载,请至异步社区:https://www.epubit.com
