用AGG实现高质量图形输出(四)
AGG的字符输出
字符输出,对于AGG来说,这个功能可以处于显示流程的 不同位置。比如字体引擎可直接处于“Scanline Rasterizer”层向渲染器提供已处理完毕的扫描线,也可以处于“Vertex Source顶点源”层提供字体的顶点数据。
下面,我们开始学习AGG不同的字符输出方式。如没有特殊说明,所以示例代码都基于此处代码
方式一、使用gsv_text对象
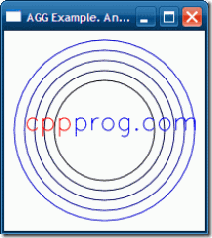
gsv_text属于顶点源层的对象,它的用法也很简单,直接看下例:
引用头文件:#include <agg_gsv_text.h>
在on_draw()方法的最后加入下面的代码
|
1
2
3
4
5
6
7
8
9
10
11
12
13
14
15
16
17
18
|
// gsv_text类
agg::gsv_text txt;
agg::conv_stroke<agg::gsv_text> cstxt(txt);
// 设置大小及是否反转
txt.flip(
true
);
txt.size(18);
// 设置位置和文字
txt.start_point(20,100);
txt.text(
"cpp"
);
// 以红色输出上面的文字
ras.add_path(cstxt);
agg::render_scanlines_aa_solid(ras,sl,renb,agg::rgba(1,0,0));
// 设置新的位置和文字
txt.start_point(20+txt.text_width(),100);
txt.text(
"prog.com"
);
// 以蓝色输出上面的文字
ras.add_path(cstxt);
agg::render_scanlines_aa_solid(ras,sl,renb,agg::rgba(0,0,1));
|
显示效果
注:gsv_text的flip ()方法指出是否上下反转输出,这里设置了flip是因为在Windows下agg::platform_support的rbuf_window()其 实是一个DIB缓存,它的方向是从下到上的。
gsv_text必须用conv_stroke转 换才能正确输出文字,否则会被当作多边形处理。为了使用方便,AGG提供了gsv_text_outline包 装,它实现了conv_stroke和坐标转换,代码很短:
|
1
2
3
4
5
6
7
8
9
10
11
12
13
14
15
16
17
18
19
20
21
22
23
24
25
26
27
28
29
|
template
<
class
Transformer = trans_affine>
class
gsv_text_outline
{
public
:
gsv_text_outline(gsv_text& text,
const
Transformer& trans) :
m_polyline(text),
m_trans(m_polyline, trans){}
void
width(
double
w){
m_polyline.width(w);
}
void
transformer(
const
Transformer* trans){
m_trans->transformer(trans);
}
void
rewind
(unsigned path_id) {
m_trans.
rewind
(path_id);
m_polyline.line_join(round_join);
m_polyline.line_cap(round_cap);
}
unsigned vertex(
double
* x,
double
* y) {
return
m_trans.vertex(x, y);
}
private
:
conv_stroke<gsv_text> m_polyline;
conv_transform<conv_stroke<gsv_text>, Transformer> m_trans;
};
|
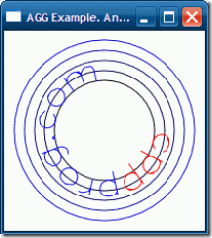
我们使用gsv_text_outline重写上面的代码:
|
1
2
3
4
5
6
7
8
9
10
11
12
13
14
15
16
17
18
19
20
21
22
23
24
25
26
27
|
#include <agg_gsv_text.h>
#include <agg_trans_single_path.h>
...
/////////////////////////////////////////////////
// gsv_text及gsv_text_outline
agg::gsv_text txt;
agg::trans_single_path tran_path;
//使用trans_single_path作为变换器
agg::gsv_text_outline<agg::trans_single_path> txtol(txt,tran_path);
// 设置变换器
tran_path.add_path(ell);
/////////////////////////////////////////////////
// 设置大小及是否反转
txt.flip(
true
);
txt.size(24);
// 设置位置和文字
txt.start_point(0,0);
txt.text(
"cpp"
);
// 以红色输出上面的文字
ras.add_path(txtol);
agg::render_scanlines_aa_solid(ras,sl,renb,agg::rgba(1,0,0));
// 设置新的位置和文字
txt.start_point(0+txt.text_width(),0);
txt.text(
"prog.com"
);
// 以蓝色输出上面的文字
ras.add_path(txtol);
agg::render_scanlines_aa_solid(ras,sl,renb,agg::rgba(0,0,1));
|
显示效果
gsv_text的使用很简单,不过要了解的一点是:它只能输出ASCII可显示字符,对于汉字是无能为力的(你可以试试输出"C++编程")。如果要输出汉字,我 们得继续寻找其它字符输出方式。
方式二、使用字体引擎(Font Engine)
AGG的字体引擎利用WinAPI:GetGlyphOutline或FreeType库得到字体数据(字模),它可以处于 “Scanline Rasterizer”层或“顶点源”层。要使用字体引擎,要把相应的字体引擎源码(agg_font_win32_tt.cpp或 agg_font_freetype.cpp)加入项目一起编译。
头文件
#include <agg_font_win32_tt.h>
#include <agg_font_freetype.h>
注意,它们都有自己的文件夹,不是在agg的include文件夹里。
类型
agg::font_engine_win32_tt_int16

agg::font_engine_win32_tt_int32

agg::font_engine_freetype_int16

agg::font_engine_freetype_int32
显然,前两个利用WinAPI实现,后两个利用FreeType库实现。类型后面的_int16或_int32后缀用于指定坐标单位, 一般int16已经可以满足要求。
成员类型定义:
| typedef path_adaptor_type | 把字体数据包装成顶点源的类 |
| typedef gray8_adaptor_type | 把字体数据包装成Scanline Rasterizer的类 |
| typedef mono_adaptor_type | 把字体数据包装成Scanline Rasterizer的类,但无AA效果 |
成员属性:
| double: height | 字体高度,单位为Point(和Word里的单位一样) |
| double: width | 字体宽度,单位为Point*2.4。0表示规则大小(height/2.4) |
| bool: italic | 斜体 |
| bool: flip_y | 上下翻转 |
| bool: hinting | 字体修正 |
| unsigned: resolution | 字体解析度,单位为dpi |
成员方法:
| void transform(const trans_affine& affine); | 按矩阵变换 |
| bool create_font(const char* typeface_, glyph_rendering ren_type); | font_engine_win32_tt_*专有方法 |
| bool load_font(const char* font_name, |
font_engine_freetype_*专有方法 |
| bool prepare_glyph(unsigned glyph_code) |
得到字体数据(字模)所需方法 |
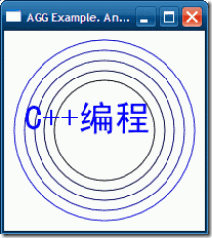
字体引擎的create_font()方法和load_font()方法需要一个glyph_rendering类型的ren_type参数,它决 定了字 体数据的形式。三个成员类型定义:path_adaptor_type、gray8_adaptor_type和mono_adaptor_type所包 装的字体数据是 不一样的,只有与ren_type参数对应才能生成正确的AGG显示节点。
glyph_rendering是一个枚举类型,定义是:
|
1
2
3
4
5
6
7
|
enum
agg::glyph_rendering{
glyph_ren_native_mono,
//对应mono_adaptor_type
glyph_ren_native_gray8,
//对应gray8_adaptor_type
glyph_ren_outline,
//对应path_adaptor_type
glyph_ren_agg_mono,
//对应mono_adaptor_type
glyph_ren_agg_gray8
//对应gray8_adaptor_type
};
|
示例代码1 - 从顶点源层输出文字
|
1
2
3
4
5
6
7
8
9
10
11
12
13
14
15
16
17
18
19
20
21
22
23
24
25
26
27
28
29
30
31
32
33
34
35
|
typedef
agg::font_engine_win32_tt_int16 fe_type;
typedef
fe_type::path_adaptor_type vs_type;
// 字体引擎
fe_type fe( ::GetDC(::GetActiveWindow()) );
//注意,实际应用时要释放HDC
fe.height(36.0);
fe.flip_y(
true
);
fe.hinting(
true
);
// 注意后面的glyph_rendering ren_type参数
fe.create_font(
"黑体"
,agg::glyph_ren_outline);
// 字体串
wchar_t
*s = L
"C++编程"
;
// 存放字体数据
std::vector<agg::int8u> data;
// 顶点源
vs_type vs;
// 注意这里,使用conv_curve转换
agg::conv_curve<vs_type> ccvs(vs);
// 字符输出的位置
int
x=20,y=100;
for
(;*s;s++)
{
// 让字体引擎准备好字体数据
if
(!fe.prepare_glyph(*s))
continue
;
// 把字体数据放到容器里
data.resize( fe.data_size() );
fe.write_glyph_to( &data[0] );
// 从字体数据中得到顶点源
vs.init(&data[0], data.size(), x, y);
// 移动输出位置
x += fe.advance_x();
y += fe.advance_y();
// 输出
ras.add_path(ccvs);
agg::render_scanlines_aa_solid(ras,sl,renb,agg::rgba(0,0,1));
}
|
由于字体顶点源可能会包含带Curve命令的顶点,所以要用conv_curve来 转换。你可以试试去掉这层转换,字符'C' 就不会那么平滑了。
示例代码2 - 从Scanline Rasterizer层输出文字
|
1
2
3
4
5
6
7
8
9
10
11
12
13
14
15
16
17
18
19
20
21
22
23
24
25
26
27
28
29
30
31
32
33
34
35
|
// 字体引擎类型定义
typedef
agg::font_engine_win32_tt_int16 fe_type;
typedef
fe_type::gray8_adaptor_type ras_type;
typedef
ras_type::embedded_scanline sl_type;
// 字体引擎
fe_type fe( ::GetDC(::GetActiveWindow()) );
//注意,实际应用时要释放HDC
fe.height(36.0);
fe.flip_y(
true
);
fe.hinting(
true
);
// 注意后面的glyph_rendering ren_type参数
fe.create_font(
"黑体"
,agg::glyph_ren_agg_gray8);
// 字体串
wchar_t
*s = L
"C++编程"
;
// 存放字体数据
std::vector<agg::int8u> data;
// Rasterizer和Scanline
ras_type ras_font;
sl_type sl_font;
// 字符输出的位置
int
x=20,y=100;
for
(;*s;s++)
{
// 让字体引擎准备好字体数据
if
(!fe.prepare_glyph(*s))
continue
;
// 把字体数据放到容器里
data.resize( fe.data_size() );
fe.write_glyph_to( &data[0] );
// 从字体数据中得到Rasterizer
ras_font.init(&data[0], data.size(), x, y);
// 移动输出位置
x += fe.advance_x();
y += fe.advance_y();
// 输出
agg::render_scanlines_aa_solid(ras_font,sl_font,renb,agg::rgba(0,0,1));
}
|
显示效果
Linux、 FreeBSD等开源操作系统里一般使用FreeType来显示文字,Windows下的一些软件如Foxit也有FreeType的身影。
AGG的font_engine_freetype_int16字 体引擎就使用FreeType来取得字模,在Windows里,在使用font_engine_freetype_int16之前,我们得先编译好 FreeType:
- 从www.freetype.org下 载FreeType2,偶下载的是目前最新的freetype-2.3.9,解压。
- 以VC2005 Express为例,直接打开\builds\win32\vc2005里的freetype.sln编译即可。(不过这个版本的 freetype.sln好 像好点问题,要用文本编辑器打开,把第一行“Microsoft Visual Studio Solution File, Format Version 10.00”后面的“10.00”改成“9.00”才行)
- 对于其它编译器,如C++Builder,直接把\docs\INSTALL.ANY里列出的文件加入项目即可(不过加入这些东 西还真是比较麻烦,可以点这里下载C++Builder的FreeType2库编译工程)。
- 把编译后的库文件(在\objs\win32里,注意编译版本)加入项目,并设置include路径为freetype- 2.3.9\include就可 以了
AGG使用FreeType的源代码:
|
1
2
3
4
5
6
7
8
9
10
11
12
13
14
15
16
17
18
19
20
21
22
23
24
25
|
typedef
agg::font_engine_freetype_int16 fe_type;
typedef
fe_type::path_adaptor_type vs_type;
fe_type fe;
if
(!fe.load_font(
"c:\\windows\\fonts\\simhei.ttf"
,0,agg::glyph_ren_outline))
return
;
fe.height(36.0);
fe.flip_y(
true
);
fe.hinting(
true
);
wchar_t
*s = L
"C++编程"
;
std::vector<agg::int8u> data;
vs_type vs;
agg::conv_curve<vs_type> ccvs(vs);
int
x=20,y=100;
for
(;*s;s++)
{
if
(!fe.prepare_glyph(*s))
continue
;
data.resize( fe.data_size() );
fe.write_glyph_to( &data[0] );
vs.init(&data[0], data.size(), x, y);
x += fe.advance_x();
y += fe.advance_y();
ras.add_path(ccvs);
agg::render_scanlines_aa_solid(ras,sl,renb,agg::rgba(0,0,1));
}
|
方式三、使用字体缓存管理器
每次都重新读字模是很费时的,比如前面的例子,"C++" 里的两个'+' 就读两次字模,效率可以想象。
一个好的办法是把已读出来的字模缓存起来,下次再遇到这个字时就不用从字体引擎里读取了,AGG提供的font_cache_manager类就是 负责这项工作的。
头文件
|
1
|
#include "agg_font_cache_manager.h"
|
类型
|
1
|
template
<
class
FontEngine>
class
font_cache_manager;
|
模板参数FontEngine指定管理器所用的字体引擎。另外构造参数也是FontEngine。
成员方法
|
获得字模并缓存,glyph_cache类的定义是:
|
||
|
字体引擎的path_adaptor_type实例 | ||
|
字体引擎的gray8_adaptor_type实例以及对应的Scanline | ||
|
字体引擎的mono_adaptor_type实例以及对应的Scanline | ||
|
初始化上面的adaptor成员实例(与字体引擎的ren_type设置相关) | ||
|
调整坐标 |
|
1
2
3
4
5
6
7
8
9
10
11
12
13
14
15
16
17
18
19
20
21
22
23
24
25
26
27
28
29
30
31
32
33
34
|
agg::font_engine_win32_tt_int16 font(dc);
agg::font_cache_manager<
agg::font_engine_win32_tt_int16
> font_manager(font);
font.height(72.0);
font.width(0);
font.italic(
true
);
font.flip_y(
true
);
font.hinting(
true
);
font.transform(agg::trans_affine_rotation(agg::deg2rad(4.0)));
font.create_font(
"宋体"
,agg::glyph_ren_agg_gray8);
double
x=10, y=72;
//起始位置
wchar_t
*text = L
"C++编程网"
;
// 画所有字符
for
(;*text;text++)
{
//取字模
const
agg::glyph_cache* glyph = font_manager.glyph(*text);
if
(glyph)
{
// 初始化gray8_adaptor实例
font_manager.init_embedded_adaptors(glyph, x, y);
agg::render_scanlines_aa_solid(font_manager.gray8_adaptor(),
font_manager.gray8_scanline(),
renb, agg::rgba8(0, 0, 0));
// 前进
x += glyph->advance_x;
y += glyph->advance_y;
}
}
|
显示效果
示例代码2-作为顶点源渲染:
|
1
2
3
4
5
6
7
8
9
10
11
12
13
14
15
16
17
18
19
20
21
22
23
24
25
26
27
28
29
30
31
32
33
34
35
36
37
38
39
40
41
42
43
44
|
typedef
agg::font_engine_win32_tt_int16 fe_type;
fe_type font(GetDC(0));
typedef
agg::font_cache_manager<fe_type> fcman_type;
fcman_type font_manager(font);
font.height(72.0);
font.width(0);
font.italic(
true
);
font.flip_y(
true
);
font.hinting(
true
);
font.transform(agg::trans_affine_rotation(agg::deg2rad(4.0)));
font.create_font(
"宋体"
,agg::glyph_ren_outline);
double
x=10, y=72;
//起始位置
wchar_t
*text = L
"C++编程网"
;
// 画所有字符
for
(;*text;text++)
{
const
agg::glyph_cache* glyph = font_manager.glyph(*text);
if
(glyph)
{
// 准备*_adaptor
font_manager.init_embedded_adaptors(glyph, x, y);
// 先用conv_curve
typedef
agg::conv_curve<
fcman_type::path_adaptor_type
> cc_pa_type;
cc_pa_type ccpath(font_manager.path_adaptor());
// 画轮廓
typedef
agg::conv_stroke<cc_pa_type> cs_cc_pa_type;
cs_cc_pa_type csccpath(ccpath);
agg::rasterizer_scanline_aa<> ras;
agg::scanline_u8 sl;
ras.add_path(csccpath);
agg::render_scanlines_aa_solid(ras, sl, renb, agg::rgba8(0, 0, 0));
// 前进
x += glyph->advance_x;
y += glyph->advance_y;
}
}
|
显示效果
作为本文的结尾,这里放上一个用AGG生成不规则文字窗体的代码。它综合了我们之前学到的AGG字体引擎、坐标转换、颜色渐变等几大模 块。由于AGG的抗锯齿特性,使用生 成的窗体看上去边缘过渡非常自然,几乎看不到“毛边”。
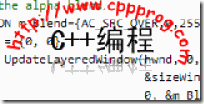
先放上最终生成的窗体的效果:
|
1
2
3
4
5
6
7
8
9
10
11
12
13
14
15
16
17
18
19
20
21
22
23
24
25
26
27
28
29
30
31
32
33
34
35
36
37
38
39
40
41
42
43
44
45
46
47
48
49
50
51
52
53
54
55
56
57
58
59
60
61
62
63
64
65
66
67
68
69
70
71
72
73
74
75
76
77
78
79
80
81
82
83
84
85
86
87
88
89
90
91
92
93
94
95
96
97
98
99
100
101
102
103
104
105
106
107
108
109
110
111
112
113
114
115
116
117
118
119
120
121
122
123
124
125
126
127
128
129
130
131
132
133
134
135
136
137
138
139
140
141
142
143
144
145
146
147
148
149
150
151
152
153
154
155
156
157
158
159
160
161
162
163
164
165
166
167
168
169
170
171
172
173
174
175
176
177
178
179
180
181
182
183
184
185
186
187
188
189
190
191
192
193
194
195
196
197
198
199
200
201
202
203
204
205
206
207
208
209
210
211
212
213
214
215
216
217
218
219
220
221
222
223
224
225
226
227
228
229
230
231
232
233
234
235
236
237
238
239
240
241
242
243
244
245
246
247
248
249
250
|
#define _WIN32_WINNT 0x0501
#include <windows.h>
#include <agg_array.h>
#include <agg_pixfmt_rgba.h>
#include <agg_scanline_u.h>
#include <agg_renderer_scanline.h>
#include <../font_win32_tt/agg_font_win32_tt.h>
#include <agg_font_cache_manager.h>
#include <agg_span_solid.h>
#include <agg_span_interpolator_linear.h>
#include <agg_span_gradient.h>
#include <agg_span_allocator.h>
#include <agg_conv_transform.h>
#include <agg_ellipse.h>
#include <agg_trans_single_path.h>
typedef
agg::font_engine_win32_tt_int16 fe_type;
typedef
agg::font_cache_manager<fe_type> fcman_type;
typedef
agg::renderer_base<agg::pixfmt_bgra32> renb_type;
// 使用指定的顶点源和线段生成器输出文字
template
<
class
VS,
class
SpanGenerator>
void
AggDrawText(renb_type &renb,
fcman_type &font_manager,
VS &vs, SpanGenerator &span_gen,
const
wchar_t
*txt)
{
using
namespace
agg;
span_allocator<rgba8> span_alloc;
rasterizer_scanline_aa<> ras;
scanline_u8 sl;
double
x=0, y=0;
for
(
const
wchar_t
*p = txt; *p; p++)
{
const
glyph_cache* gc = font_manager.glyph(*p);
if
(gc)
{
font_manager.init_embedded_adaptors(gc, x, y);
ras.add_path(vs);
agg::render_scanlines_aa(ras, sl, renb, span_alloc, span_gen);
x += gc->advance_x;
y += gc->advance_y;
}
}
}
// 向renb的指定位置和半径输出http://www.cppprog.com ,有环绕效果
void
DrawUrl(
HDC
dc, renb_type &renb,
double
ox,
double
oy,
double
rx,
double
ry)
{
using
namespace
agg;
//字体引擎
fe_type font(dc);
fcman_type font_manager(font);
font.height(18.0);
font.flip_y(
true
);
font.hinting(
true
);
if
(!font.create_font(
"Comic Sans MS"
,agg::glyph_ren_outline))
return
;
//坐标转换管道
typedef
conv_curve<
fcman_type::path_adaptor_type
> cc_pa_type;
cc_pa_type ccpath(font_manager.path_adaptor());
typedef
conv_transform<cc_pa_type,
trans_single_path> ct_cc_pa_type;
trans_single_path trans_path;
ct_cc_pa_type ctpath(ccpath, trans_path);
ellipse ell(0,0,rx,ry);
trans_affine ellmtx;
conv_transform<ellipse> ctell(ell, ellmtx);
ellmtx.rotate(agg::pi);
ellmtx.translate(ox,oy);
trans_path.add_path(ctell);
// 线段生成器
span_solid<rgba8> ss;
ss.color(rgba(1,0,0));
}
// 向renb的指定位置输出“C++编程”几个字,有镜象效果
void
DrawName(
HDC
dc, renb_type &renb,
double
x,
double
y)
{
using
namespace
agg;
// 字体引擎
fe_type font(dc);
fcman_type font_manager(font);
font.height(30.0);
font.flip_y(
true
);
font.hinting(
true
);
if
(!font.create_font(
"黑体"
,agg::glyph_ren_outline))
return
;
// 坐标转换管道
typedef
conv_curve<
fcman_type::path_adaptor_type
> cc_pa_type;
cc_pa_type ccpath(font_manager.path_adaptor());
typedef
conv_transform<cc_pa_type> ct_cc_pa_type;
trans_affine mtx;
ct_cc_pa_type ctpath( ccpath, mtx );
mtx.translate(50,50);
//线段生成器
span_solid<rgba8> ss;
ss.color(rgba(0,0,0));
AggDrawText(renb, font_manager, ctpath, ss, L
"C++编程"
);
// 改变坐标转换矩阵(镜像)
mtx.reset();
mtx.flip_y();
mtx.translate(50,60);
// 渐变线段生成器
typedef
span_interpolator_linear<> interpolator_type;
trans_affine img_mtx;
interpolator_type ip(img_mtx);
typedef
gradient_y gradientF_type;
gradientF_type grF;
typedef
gradient_linear_color<rgba8> colorF_type;
colorF_type colorF(rgba(0,0,0), rgba(0,0,0,0));
typedef
span_gradient<rgba8,
interpolator_type,
gradientF_type,
colorF_type> span_gen_type;
span_gen_type span_gen(ip,grF,colorF,30,80);
AggDrawText(renb, font_manager, ctpath, span_gen, L
"C++编程"
);
}
// 调用DrawUrl和DrawName向renb输出文字
void
DrawIt(
HDC
dc, renb_type &renb)
{
// 以透明色填充
renb.clear(rgba(0,0,0,0));
// 输出文字
DrawUrl(dc, renb, 100, 50, 80, 40);
DrawName(dc, renb, 50, 50);
}
// 使用AGG处理图片后与hwnd关联
void
SetLayoutWin(
HWND
hwnd)
{
// 起始位置和窗体大小
POINT ptWinPos = {500,200};
SIZE sizeWindow = {200, 100};
// 建立DIB
BITMAPINFO bmp_info;
::ZeroMemory(&bmp_info,
sizeof
(bmp_info));
bmp_info.bmiHeader.biSize =
sizeof
(BITMAPINFOHEADER);
bmp_info.bmiHeader.biWidth = sizeWindow.cx;
bmp_info.bmiHeader.biHeight = sizeWindow.cy;
bmp_info.bmiHeader.biPlanes = 1;
bmp_info.bmiHeader.biBitCount = 32;
bmp_info.bmiHeader.biCompression = BI_RGB;
HDC
hdcTemp = GetDC(0);
HDC
mem_dc = ::CreateCompatibleDC(hdcTemp);
ReleaseDC(0, hdcTemp);
void
* buf = NULL;
HBITMAP
bmp = ::CreateDIBSection(
mem_dc,
&bmp_info,
DIB_RGB_COLORS,
&buf,
0, 0
);
// 把bmp与mem_dc关联,这样AGG就可以和原生GDI一起工作了
HBITMAP
temp = (
HBITMAP
)::SelectObject(mem_dc, bmp);
{
// AGG处理
agg::rendering_buffer rbuf(
(unsigned
char
*)buf,
sizeWindow.cx, sizeWindow.cy,
-sizeWindow.cx*4);
agg::pixfmt_bgra32 pixf(rbuf);
renb_type renb(pixf);
DrawIt(mem_dc,renb);
}
// 把画好的mem_dc与hwnd关联到一起
BLENDFUNCTION m_Blend={AC_SRC_OVER,0,255,AC_SRC_ALPHA};
POINT ptSrc = {0, 0};
BOOL
bRet = UpdateLayeredWindow(hwnd, 0, &ptWinPos,
&sizeWindow, mem_dc, &ptSrc,
0, &m_Blend, ULW_ALPHA);
// 回收
::DeleteObject(bmp);
::DeleteDC(mem_dc);
}
// Windows消息处理
LRESULT
CALLBACK WndProc (
HWND
hwnd,
UINT
umsg,
WPARAM
wParam,
LPARAM
lParam)
{
switch
(umsg)
{
case
WM_CLOSE:
DestroyWindow (hwnd);
return
0;
case
WM_DESTROY:
PostQuitMessage (0);
return
0;
case
WM_NCHITTEST:
return
HTCAPTION;
}
return
DefWindowProc (hwnd, umsg, wParam, lParam);
}
int
APIENTRY WinMain(
HINSTANCE
hInstance,
HINSTANCE
hPrevInstance,
LPTSTR
lpCmdLine,
int
nCmdShow)
{
WNDCLASS wc={
0,WndProc,
0,0,
hInstance,
NULL,LoadCursor(NULL, IDC_ARROW),
(
HBRUSH
)(COLOR_WINDOW+1),
0,
"AGGWIN"
};
::RegisterClass(&wc);
HWND
hWnd = ::CreateWindowEx(WS_EX_LAYERED,
"AGGWIN"
, NULL, WS_OVERLAPPEDWINDOW,
CW_USEDEFAULT, 0, CW_USEDEFAULT, 0, NULL, NULL, hInstance, NULL);
if
(!hWnd)
return
-1;
SetLayoutWin(hWnd);
::ShowWindow(hWnd, nCmdShow);
// 主消息循环:
MSG msg;
while
(GetMessage(&msg, NULL, 0, 0))
{
TranslateMessage(&msg);
DispatchMessage(&msg);
}
return
(
int
) msg.wParam;
}
|
<<完>>


