ELK采集k8s集群日志
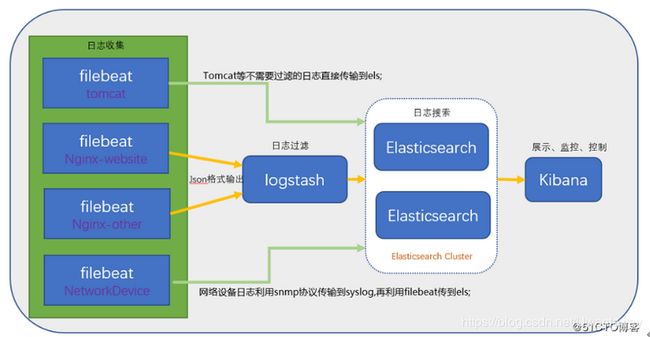
**简述:**Elasticsearch是个开源分布式搜索引擎,提供搜集、分析、存储数据三大功能;ELK是三个开源软件的缩写,分别为:Elasticsearch 、 Logstash以及Kibana , 它们都是开源软件。不过现在还新增了一个Beats,它是一个轻量级的日志收集处理工具(Agent),Beats占用资源少,适合于在各个服务器上搜集日志后传输给Logstash,官方也推荐此工具,目前由于原本的ELK Stack成员中加入了 Beats 工具所以已改名为Elastic Stack。而ELK则提供了一整套解决方案,并且都是开源软件,之间互相配合使用,完美衔接,高效的满足了很多场合的应用
ELK官网:https://www.elastic.co/cn/
中文指南:https://www.gitbook.com/book/chenryn/elk-stack-guide-cn/details
安装地址: https://www.elastic.co/cn/start
案例环境:
Centos 7.6 64bit
ip: 192.168.110.66
apps: es,logstash,kibana
k8s集群
master-ip:192.168.110.85
node
…
一. 安装
上官网找到yum源: https://www.elastic.co/guide/en/elasticsearch/reference/7.6/rpm.html#rpm-repo
yum install elasticsearch -y
下载完成之后,修改配置文件:
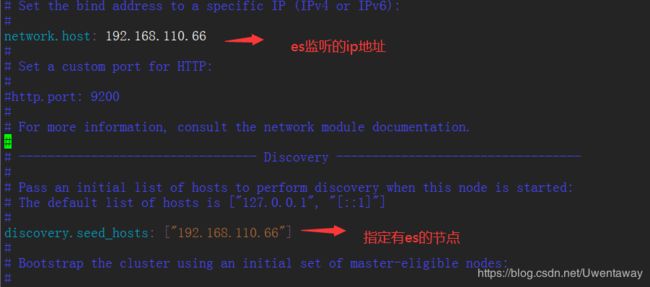
vim /etc/elasticsearch/elasticsearch.yml
因为我只在单台节点搭建,就写了一个discovery-host,如果有多个node,添加即可.
调整参数:
vim /etc/security/limits.conf
 vim /etc/sysctl.conf
 sysctl -p
systemctl start elasticsearch

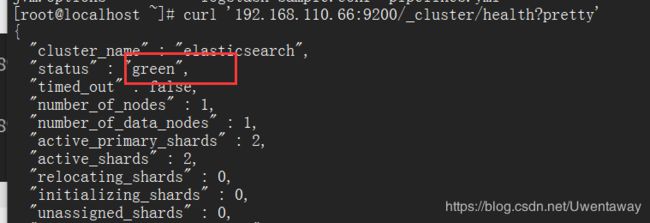
curl '192.168.110.66:9200/_cluster/health?pretty' //测试集群是否健康

安装kibana ,logstash:
yum -y install kibana logstash
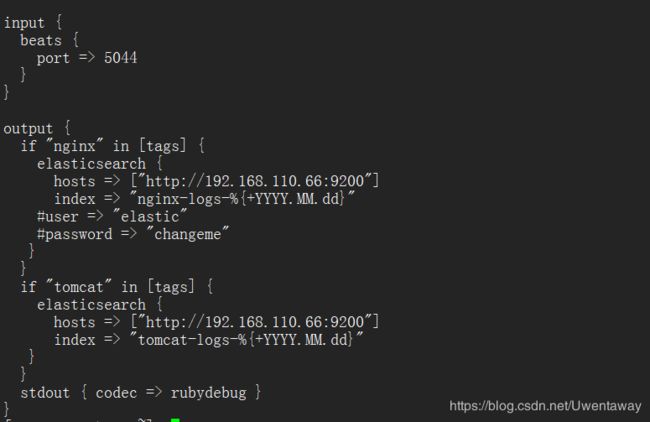
cat /etc/logstash/conf.d/logstash.conf
/usr/share/logstash/bin/logstash --path.settings /etc/logstash/ -f /etc/logstash/conf.d/logstash.conf
## **k8smaster**
 cat filebeat.yaml

```yaml
apiVersion: apps/v1
kind: DaemonSet
metadata:
  name: filebeat
  namespace: default
spec:
  selector:
    matchLabels:
        k8s-app: filebeat
  template:
    metadata:
      labels:
         k8s-app: filebeat
    spec:
      containers:
      - image: elastic/filebeat:7.6.1
        name: filebeat
        args: [
          "-c","/usr/share/filebeat.yml",
          "-e",
        ]
        volumeMounts:
        - name: data
          mountPath: /usr/share/filebeat/data
        - name: filebeat-config
          mountPath: /usr/share/filebeat.yml
        - name: timezone
          mountPath: /etc/localtime
        - name: applogs
          mountPath: /applogs/nginx/
      volumes:
      - name: data
        emptyDir: {}
      - name: filebeat-config
        configMap:
          name: filebeat-config
      - name: timezone
        hostPath:
          path: /etc/localtime
      - name: applogs
        hostPath:
          path: /applogs/nginx/
 ---
apiVersion: v1
kind: ConfigMap
metadata:
  name: filebeat-config
data:
  filebeat.yml: |
    filebeat.inputs:
    - type: log
      paths:
        - /applogs/nginx/*.log
    output.logstash:
      hosts: '192.168.110.66:5044'
以DaemonSet的方式启动filebeat
kubectl apply -f filebeat.yaml
案例:
采集nginx应用日志
cat nginx.yaml
apiVersion: v1
kind: Service
metadata:
  name: nginx-svc
spec:
  ports:
    - port: 80
  selector:
    app: nginx
---
apiVersion: apps/v1
kind: Deployment
metadata:
  name: nginx-pod
spec:
  replicas: 1
  selector:
    matchLabels:
      app: nginx
  template:
    metadata:
      labels:
        app: nginx
    spec:
      containers:
      - name: nginx-c
        image: yanxiaobing/micro-nginx:v1
        ports:
        - containerPort: 80
        volumeMounts:
        - name: nginx-log
          mountPath: /var/log/nginx/
        - name: timezone
          mountPath: /etc/localtime
      volumes:
      - name: nginx-log
        hostPath:
          path: /applogs/nginx/
      - name: timezone
        hostPath:
          path: /etc/localtime


