c# 封装动态链接库dll
前天学习了下将自己的方法封装进dll,同时在其他的项目里引用封装的dll,并调用dll里的方法。同时还试探了下将Windows应用程序封装进dll(Winform),下面详细介绍。
一、建立 类库 将方法封装进dll
在VS里新建一个类库项目,项目名称为MyTestDll,并添加两个类文件(TestDll.cs和TestDll2.cs),下面是方法代码。
TestDll文件代码
using System;
using System.Collections.Generic;
using System.Linq;
using System.Text;

namespace MyTestDll
{
    ///
    /// TestDll类
    ///
    public class TestDll
    {
        ///
        /// 加法函数
        ///
        /// 参数一
        /// 参数二
        /// 两个参数之和
        public int MathAdd(int number1, int number2)
        {
            return (number1 + number2);//返回两个参数的和
        }

        ///
        /// 减法函数
        ///
        /// 参数一
        /// 参数二
        /// 两个参数的差
        private int MathSubtract(int number1, int number2)
        {
            return (number1 - number2);
        }
    }
}
using System;
using System.Collections.Generic;
using System.Linq;
using System.Text;

namespace MyTestDll
{
    ///
    /// TestDll2类
    ///
    public class TestDll2
    {
        ///
        /// 乘法函数
        ///
        /// 参数一
        /// 参数二
        /// 两个参数的乘积
        public int MathMultiplication(int number1, int number2)
        {
            return (number1 * number2);
        }

        ///
        /// 除法函数
        ///
        /// 参数一
        /// 参数二
        /// 两个参数的商
        public double MathDivision(int number1, int number2)
        {
            return (number1 / number2);
        }
    }
}
建立一个控制台应用程序项目Test6,在 解决方案资源管理器--引用 中添加 MyTestDll.dll,下面是具体代码
using System;
using System.Collections.Generic;
using System.Linq;
using System.Text;
using MyTestDll;  //添加引用

namespace Test6
{
    class Program
    {
        static void Main(string[] args)
        {
            TestDll td = new TestDll();
            td.MathAdd(3,5);
            td.MathSubtract(3, 5);//提示MyTestDll中不包含MathSubtract的定义
        }
    }
}补充两点:1 MathSubtract()方法定义的时候是私有的,所以封装到dll里后,在其他项目引用这个dll后也无法访问到;2 如果要想看到封装后的dll方法的注释,则生成dll的时候要同时生成注释文档xml(具体可百度),然后引用的时候讲dll和对应的xml同时复制到项目的debug目录下。
二、将windows项目封装进dll(以Winform为例)
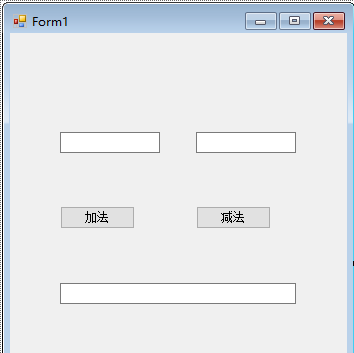
建立一个 窗体应用程序 项目 ,项目名Test8,然后随便拖几个控件上去,实现一些简单的功能,如下面的Form1实现加法和减法功能。
代码如下:
using System;
using System.Collections.Generic;
using System.ComponentModel;
using System.Data;
using System.Drawing;
using System.Linq;
using System.Text;
using System.Windows.Forms;

namespace Test8
{
    public partial class Form1 : Form
    {
        public Form1()
        {
            InitializeComponent();
        }

        //加法代码按钮
        private void btn_add_Click(object sender, EventArgs e)
        {
            int num1 = Convert.ToInt16(tbx_num1.Text);
            int num2 = Convert.ToInt16(tbx_num2.Text);
            tbx_result.Text = add(num1, num2).ToString();
        }

        public int add(int num1, int num2)
        {
            return (num1 + num2);
        }

        public int sub(int num1, int num2)
        {
            return (num1 - num2);
        }

        //减法按钮代码
        private void btn_sub_Click(object sender, EventArgs e)
        {
            int num1 = Convert.ToInt16(tbx_num1.Text);
            int num2 = Convert.ToInt16(tbx_num2.Text);
            tbx_result.Text = sub(num1, num2).ToString();
        }
    }
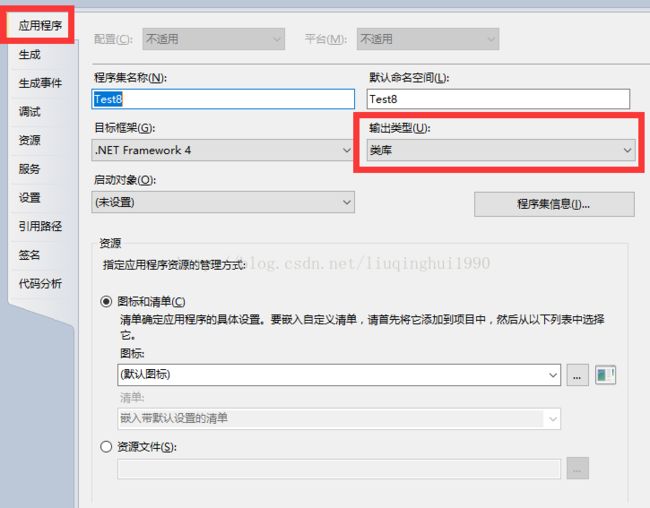
}然后将这个封装的Test8.dll复制到新建的winform项目(Test9)中,添加引用,引入命名空间后,在Test9中,可以实例化Test8中的Form1,具体不在细说。
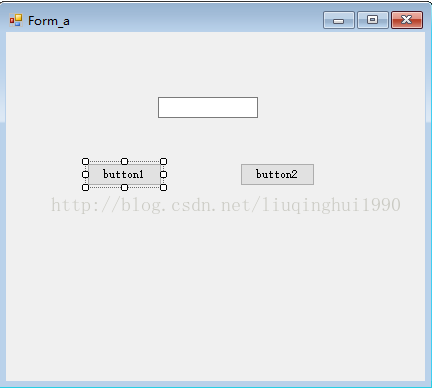
Test9的窗体:
具体代码:
using System;
using System.Collections.Generic;
using System.ComponentModel;
using System.Data;
using System.Drawing;
using System.Linq;
using System.Text;
using System.Windows.Forms;
using Test8;

namespace Test9
{
    public partial class Form_a : Form
    {
        public Form_a()
        {
            InitializeComponent();
        }

        private void button1_Click(object sender, EventArgs e)
        {
            if (textBox_s.Text.Trim() == "0")
            {
                Form1 form = new Form1();
                this.Hide();
                form.Show();//显示在Test8项目中设计的那个Form1窗体
            }
        }
    }
}
总结:不仅仅可以将方法封装到dll中供其他项目或别人使用,还可以将窗体封装进dll,当然这样是否有意思另说,存在即合理。


