基于python的车道线检测
最近在开源社区下载了一份使用opencv在python环境中实现车道线检测的代码,研究了一下,终于有点儿看懂了,寻思着写下来,免得以后忘记了。
这个车道线检测项目原本是优达学城里无人驾驶课程中的第一个上手的项目,源码应该是一个外国人写的吧,反正大家传来传去,我觉得挺有意思。说说这个代码实现车道线检测的过程吧。
(1)对视频流进行处理
主要使用了moviepy.editor中的VideoFileClip,利用里面的fl_image()将输入的视频流转化成了一帧帧的图像。
(2)图像转换为灰度图像
这个主要是使用opencv中的函数cv2.cvtColor()将图像转化为灰度图像
(3)使用高斯模糊对图像进行去噪声处理
(4)使用cv2.canny()提取图像的轮廓
(5)模板图像
其实就是只保留图像的感兴趣区域,减少计算时间,因为实际中摄像头的固定在车上,所拍摄的图像中特定的部分包含车道线,一般都位于图片的中下部,所以只需要对这个区域进行处理即可。
(6)使用霍夫直线检测,提取轮廓图中的直线
这里使用的依然是opencv中的函数:cv2.HoughLinesP()它是一个基于概率的直线检测算法,可以直接输出检测到的直线的点集(一般采用两点表示一条直线),关于这个算法的详情可以参考这个博客:https://blog.csdn.net/on2way/article/details/47028969
(7)对提取后的直线集合进行处理
上一步中提取到了图像中所有直线特征的点集,包含了很多的直线,但是很多事我们不需要的直线,这就需要特别处理–去掉冗余的直线。怎么做呢?作者给出了一个好的办法:首先对直线点集根据斜率的正负分成左右两类直线集;然后在分别对左右直线集进行处理,方法为:每次计算直线集的平均斜率和每条直线的斜率与平均斜率的差值的绝对值,求出其中差值最大的直线,判断该直线的斜率是否大于阈值,如果大于阈值,就将其弹出,然后对剩下的直线继续进行相同的操作,指导满足条件为止。
(8)画出车道线
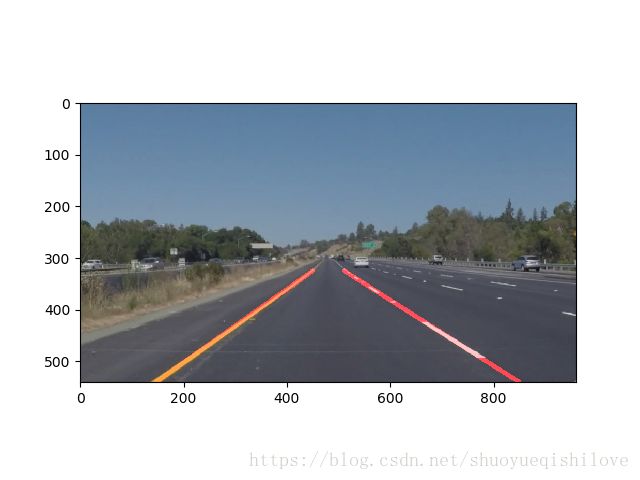
上一步中得到的直线集依然很多(可以看做是点集),但是范围就已经很小了,这里采用最小二乘拟合的方式,将这些到用直线拟合,得到最后的左右车道线。之后在图上绘制出车道线就可以了。
下面将我注释过的代码贴出来:
from moviepy.editor import VideoFileClip
import matplotlib.pyplot as plt
import matplotlib.image as mplimg
import numpy as np
import cv2

blur_ksize = 5  # Gaussian blur kernel size
canny_lthreshold = 50  # Canny edge detection low threshold
canny_hthreshold = 150  # Canny edge detection high threshold

# Hough transform parameters
rho = 1#rho的步长,即直线到图像原点(0,0)点的距离
theta = np.pi / 180#theta的范围
threshold = 15#累加器中的值高于它时才认为是一条直线
min_line_length = 40#线的最短长度,比这个短的都被忽略
max_line_gap = 20#两条直线之间的最大间隔,小于此值,认为是一条直线

def roi_mask(img, vertices):#img是输入的图像,verticess是兴趣区的四个点的坐标(三维的数组)
  mask = np.zeros_like(img)#生成与输入图像相同大小的图像,并使用0填充,图像为黑色
  #defining a 3 channel or 1 channel color to fill the mask with depending on the input image
  if len(img.shape) > 2:
    channel_count = img.shape[2]  # i.e. 3 or 4 depending on your image
    mask_color = (255,) * channel_count#如果 channel_count=3,则为(255,255,255)
  else:
    mask_color = 255
  cv2.fillPoly(mask, vertices, mask_color)#使用白色填充多边形,形成蒙板
  masked_img = cv2.bitwise_and(img, mask)#img&mask,经过此操作后,兴趣区域以外的部分被蒙住了,只留下兴趣区域的图像
  return masked_img

def draw_roi(img, vertices):
  cv2.polylines(img, vertices, True, [255, 0, 0], thickness=2)

def draw_lines(img, lines, color=[255, 0, 0], thickness=2):
  for line in lines:
    for x1, y1, x2, y2 in line:
      cv2.line(img, (x1, y1), (x2, y2), color, thickness)

def hough_lines(img, rho, theta, threshold, min_line_len, max_line_gap):
  lines = cv2.HoughLinesP(img, rho, theta, threshold, np.array([]), minLineLength=min_line_len, maxLineGap=max_line_gap)#函数输出的直接就是一组直线点的坐标位置(每条直线用两个点表示[x1,y1],[x2,y2])
  line_img = np.zeros((img.shape[0], img.shape[1], 3), dtype=np.uint8)#生成绘制直线的绘图板,黑底
  # draw_lines(line_img, lines)
  draw_lanes(line_img, lines)
  return line_img

def draw_lanes(img, lines, color=[255, 0, 0], thickness=8):
  left_lines, right_lines = [], []#用于存储左边和右边的直线
  for line in lines:#对直线进行分类
    for x1, y1, x2, y2 in line:
      k = (y2 - y1) / (x2 - x1)
      if k < 0:
        left_lines.append(line)
      else:
        right_lines.append(line)

  if (len(left_lines) <= 0 or len(right_lines) <= 0):
    return img

  clean_lines(left_lines, 0.1)#弹出左侧不满足斜率要求的直线
  clean_lines(right_lines, 0.1)#弹出右侧不满足斜率要求的直线
  left_points = [(x1, y1) for line in left_lines for x1,y1,x2,y2 in line]#提取左侧直线族中的所有的第一个点
  left_points = left_points + [(x2, y2) for line in left_lines for x1,y1,x2,y2 in line]#提取左侧直线族中的所有的第二个点
  right_points = [(x1, y1) for line in right_lines for x1,y1,x2,y2 in line]#提取右侧直线族中的所有的第一个点
  right_points = right_points + [(x2, y2) for line in right_lines for x1,y1,x2,y2 in line]#提取右侧侧直线族中的所有的第二个点

  left_vtx = calc_lane_vertices(left_points, 325, img.shape[0])#拟合点集,生成直线表达式,并计算左侧直线在图像中的两个端点的坐标
  right_vtx = calc_lane_vertices(right_points, 325, img.shape[0])#拟合点集,生成直线表达式,并计算右侧直线在图像中的两个端点的坐标

  cv2.line(img, left_vtx[0], left_vtx[1], color, thickness)#画出直线
  cv2.line(img, right_vtx[0], right_vtx[1], color, thickness)#画出直线

#将不满足斜率要求的直线弹出
def clean_lines(lines, threshold):
    slope=[]
    for line in lines:
        for x1,y1,x2,y2 in line:
            k=(y2-y1)/(x2-x1)
            slope.append(k)
    #slope = [(y2 - y1) / (x2 - x1) for line in lines for x1, y1, x2, y2 in line]
    while len(lines) > 0:
        mean = np.mean(slope)#计算斜率的平均值,因为后面会将直线和斜率值弹出
        diff = [abs(s - mean) for s in slope]#计算每条直线斜率与平均值的差值
        idx = np.argmax(diff)#计算差值的最大值的下标
        if diff[idx] > threshold:#将差值大于阈值的直线弹出
          slope.pop(idx)#弹出斜率
          lines.pop(idx)#弹出直线
        else:
          break

#拟合点集,生成直线表达式,并计算直线在图像中的两个端点的坐标
def calc_lane_vertices(point_list, ymin, ymax):
  x = [p[0] for p in point_list]#提取x
  y = [p[1] for p in point_list]#提取y
  fit = np.polyfit(y, x, 1)#用一次多项式x=a*y+b拟合这些点,fit是(a,b)
  fit_fn = np.poly1d(fit)#生成多项式对象a*y+b

  xmin = int(fit_fn(ymin))#计算这条直线在图像中最左侧的横坐标
  xmax = int(fit_fn(ymax))#计算这条直线在图像中最右侧的横坐标

  return [(xmin, ymin), (xmax, ymax)]

def process_an_image(img):
  roi_vtx = np.array([[(0, img.shape[0]), (460, 325), (520, 325), (img.shape[1], img.shape[0])]])#目标区域的四个点坐标,roi_vtx是一个三维的数组
  gray = cv2.cvtColor(img, cv2.COLOR_RGB2GRAY)#图像转换为灰度图
  blur_gray = cv2.GaussianBlur(gray, (blur_ksize, blur_ksize), 0, 0)#使用高斯模糊去噪声
  edges = cv2.Canny(blur_gray, canny_lthreshold, canny_hthreshold)#使用Canny进行边缘检测
  roi_edges = roi_mask(edges, roi_vtx)#对边缘检测的图像生成图像蒙板,去掉不感兴趣的区域,保留兴趣区
  line_img = hough_lines(roi_edges, rho, theta, threshold, min_line_length, max_line_gap)#使用霍夫直线检测,并且绘制直线
  res_img = cv2.addWeighted(img, 0.8, line_img, 1, 0)#将处理后的图像与原图做融合
  return res_img


img = mplimg.imread("lane.jpg")
print("start to process the image....")
res_img=process_an_image(img)
print("show you the image....")
plt.imshow(res_img)
plt.show()

print("start to process the video....")
output = 'video_2_xlt.mp4'#ouput video
clip = VideoFileClip("video_2.mp4")#input video
out_clip = clip.fl_image(process_an_image)#对视频的每一帧进行处理
out_clip.write_videofile(output, audio=True)#将处理后的视频写入新的视频文件
视频文件和源代码都在这个链接里面:
https://download.csdn.net/download/tomhard/10128952
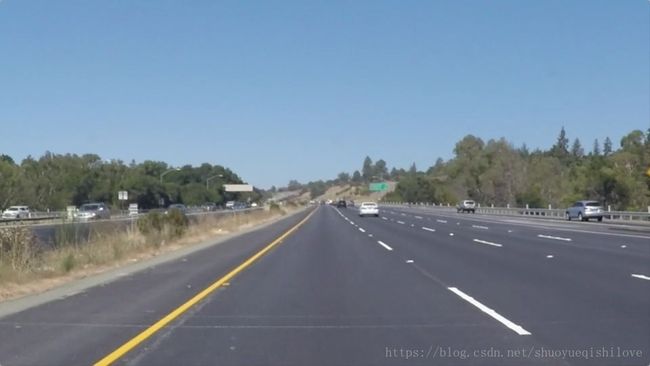
处理前的图片:

处理后的图片:

当然,这个项目只是简单的车道线检测,并没有做进一步的扩展,比如相机的标定,根据车道线的位置判断车辆偏移车道的情况等。