Python基础学习笔记(8)
《Python编程快速上手》
处理PDF和Word文档
用于处理PDF的模块是PyPDF2。
处理Word文档是python-docx模块,要安装python-docx,但是导入模块时是写import docx。
1.从PDF提取文本
import PyPDF2
pdfFileObj = open('meetingminutes.pdf','rb')
pdfReader = PyPDF2.PdfFileReader(pdfFileObj)

pdfReader.numPages
>> 19
pageObj = pdfReader.getPage(0)
pageObj.extractText()
>> 'OOFFFFIICCIIAALL  BBOOAARRDD  MMIINNUUTTEESS   Meeting of \nMarch 7\n, 2014\n        \n     The Board of Elementary and Secondary Education shall provide leadership and \ncreate policies for education that expand opportunities for children, empower \nfamilies and communities, and advance Louisiana in an increasingly \ncompetitive glob\nal market.\n BOARD \n of ELEMENTARY\n and \n SECONDARY\n EDUCATION\n  '
2.解密PDF
某些PDF文档有加密功能,以防止别人阅读,只有在打开文档前时提供口令后才能阅读。
import PyPDF2
pdfFile = open('encrypted.pdf','rb')
pdfReader = PyPDF2.PdfFileReader(pdfFile)

#返回True说明时加密的PDF
pdfReader.isEncrypted
>>True
#调用decrypt()函数,传入口令字符串,返回1说明口令正确,之后就可以进行读取操作了
pdfReader.decrypt('rosebud')
>> 1
pdfReader.getPage(0).extractText()
>> 'OOFFFFIICCIIAALL  BBOOAARRDD  MMIINNUUTTEESS   Meeting of \nMarch 7\n, 2014\n        \n     The Board of Elementary and Secondary Education shall provide leadership and \ncreate policies for education that expand opportunities for children, empower \nfamilies and communities, and advance Louisiana in an increasingly \ncompetitive glob\nal market.\n BOARD \n of ELEMENTARY\n and \n SECONDARY\n EDUCATION\n  '
注意:decrypt()函数只解密了PdfFileReader对象,而不是实际的PDF文件。在程序中止后,硬盘上的文件仍然是加密的。程序下次运行时,仍然需要再次调用decrypt()。
3.创建PDF
PdfFilewWrite对象可以创建一个新的PDF文件。但PyPDF2不能将任意文本写入PDF,PyPDF2写入PDF的能力,仅限于从其他PDF中拷贝页面、旋转页面、重叠页面和加密文件。
模块不允许直接编辑PDF。必须创建一个新的PDF,然后从已有的文档拷贝内容。
import PyPDF2
#打开PDF,创建File对象,还有创建PdfFileReader对象,从打开的PDF中读取数据
pdf1File = open('meetingminutes.pdf','rb')
pdf2File = open('meetingminutes2.pdf','rb')
pdf1Reader = PyPDF2.PdfFileReader(pdf1File)
pdf2Reader = PyPDF2.PdfFileReader(pdf2File)

#PdfFileWriter对象,表示一个空白的PDF文档,可以往里面写数据
pdfWriter = PyPDF2.PdfFileWriter()

#通过页面循环写入到pdfWriter对象中,pdf1Reader.getPage(pageNum)返回的就是该页面的内容
for pageNum in range(pdf1Reader.numPages):
    pageObj = pdf1Reader.getPage(pageNum)
    pdfWriter.addPage(pageObj)
for pageNum in range(pdf2Reader.numPages):
    pageObj = pdf2Reader.getPage(pageNum)
    pdfWriter.addPage(pageObj)

#通过open()新建一个PDF文档,然后把pdfWriter的内容写入到pdfOutputFile中。
pdfOutputFile = open('combineminutes.pdf','wb')
pdfWriter.write(pdfOutputFile)
pdfOutputFile.close()
pdf1File.close()
pdf2File.close()
遵循的一般方式是:
- 打开一个或多个已有的PDF(源PDF),得到PdfFileReader对象。
- 创建一个新的PdfFileWriter对象。
- 将页面从PdfFileReader对象拷贝到PdfFileWriter对象中。
- 最后,利用PdfFileWriter对象写入到要输出的PDF中。
注意:
1.创建一个PdfFileWriter对象,只是在Python中创建一个代表PDF文档的值,这并没有创建实际的PDF文件,要实际生成文件,必须调用PdfFileWriter对象的write()方法。
2.write()方法接受一个普通的File对象,它以写二进制的模式打开。你可以用两个参数调用Python的open()函数,得到这样的File对象:一个是要打开的PDF文件名字字符串,一个是’wb’,表示文件应该是以写二进制的模式打开。
3.叠加PDF页面
PyPDF2也可以将一页的内容叠加到另一页上,这可以用来在页面上添加公司标志、时间戳或水印。
import PyPDF2
minutesFile = open('meetingminutes.pdf','rb')
watermarkFile = open('watermark.pdf','rb')
pdfReader = PyPDF2.PdfFileReader(minutesFile)
#取得第一页的Page对象,并将它保存在minutesFirstPage中
minutesFirstPage = pdfReader.getPage(0)
pdfWaterReader = PyPDF2.PdfFileReader(watermarkFile)
#并在minutesFisrtPage上调用mergePage(),传递的参数是watermark.pdf第一页的Page对象,这样minutesFirstPage就代表加了水印的第一页
minutesFirstPage.mergePage(pdfWaterReader.getPage(0))

#创建PdfFileWriter对象,用来把新的形成内容输出到该对象上,最后再把所有的内容利用wirte()输出到open()创建的pdf文件上面
pdfWriter = PyPDF2.PdfFileWriter()
#添加内容,一个只含(水印+第一页)的pdf
pdfWriter.addPage(minutesFirstPage)

#循环遍历,添加meetingminutes.pdf的剩余页面,添加到pdfWrite中
for pageNum in range(1,pdfReader.numPages):
    pageObj = pdfReader.getPage(pageNum)
    pdfWriter.addPage(pageObj)

#要实际生成文件,必须调用PdfFileWriter对象的write()方法。首先使用open()函数生成一个新的pdf文档
resultPdfFile = open('watermarkedCover.pdf','wb')
pdfWriter.write(resultPdfFile)

minutesFile.close()
watermarkFile.close()
resultPdfFile.close()
4.加密PDF
PdfFileWriter对象也可以为PDF文档进行加密。
import PyPDF2
pdfFile = open('meetingminutes.pdf','rb')
pdfReader = PyPDF2.PdfFileReader(pdfFile)

pdfWriter = PyPDF2.PdfFileWriter()

#我们将meetingminutes.pdf的页面拷贝到PdfFIleWriter对象
for pageNum in range(pdfReader.numPages):
    pageObj = pdfReader.getPage(pageNum)
    pdfWriter.addPage(pageObj)

#用口令swordfish加密了PdfFileWriter对象
pdfWriter.encrypt('swordfish')
#打开了一个名为encryptminutes.pdf的新PDF,将PdfFileWriter的内容写入新的PDF
resultPdf = open('encryptminutes.pdf','wb')
pdfWriter.write(resultPdf)

resultPdf.close()
5.Word文档
利用python-docx模型,Python可以创建和修改Word文档,它带有.docx文件扩展名。
安装时是安装python-docx,但是导入时是import docx。
Document对象表示整个文档。Document对象包含一个Paragraph对象的列表,代表文档中的段落(用户再Word文档中输入时,如果按下回车,新的段落就开始了)。每个Paragraph对象都包含一个Run对象的列表。
Word文档中的文本不仅仅是字符串。它包含与之相关的字体、大小、颜色和其他样式信息。
在Word中,样式是这些属性的集合。
一个Run对象是相同样式文本的延续。当文本样式发生改变时,就需要一个新的Run对象。
6.读取Word文档
import docx
#打开demo.docx文档,返回一个Document对象,它有paragraphs属性,时Paragraph对象的列表。
doc = docx.Document('demo.docx')

len(doc.paragraphs)
>> 7

doc.paragraphs[0].text
>> 'Document Title'

doc.paragraphs[1].text
>> 'A plain paragraph with some bold and some italic'

#每个Paragraph对象也有一个runs属性,它是Run对象的列表。
len(doc.paragraphs[1].runs)
>> 5

#Run对象也有一个text属性,包含那个延续的文本
doc.paragraphs[1].runs[0].text
>> 'A plain paragraph with'
7.从.docx文件中取得完整的文本
如果你只关心Word文档的文本,不关心样式信息,就可以利用getText()函数。
它接受一个.docx文件名,返回其中文本的字符串。
import docx

def getText(filename):
    doc = docx.Document(filename)
    fullText = []
    for para in doc.paragraphs:
        fullText.append(para.text)
    return '\n'.join(fullText)

print(getText('demo.docx'))
>> Document Title
A plain paragraph with some bold and some italic
Heading, level 1
Intense quote
first item in unordered list
first item in ordered list

#函数内如果换成'-',结果如下所示
return '-'.join(fullText)
>> Document Title-A plain paragraph with some bold and some italic-Heading, level 1-Intense quote-first item in unordered list-first item in ordered list-
8.设置Paragraph和Run对象的样式
对于Word文档,有3种类型的样式:1.段落样式可以应用于Paragraph对象;2.字符样式可以应用于Run对象;3.链接的样式可以应用于这两种对象。
可以将Paragraph和Run对象的style属性设置为一个字符串,从而设置样式。如果style属性被设置为None,就没有样式于Paragraph或Run对象关联。
在设置style属性时,不要在样式名称中使用空格。例如,样式名称可能时Subtle Emphasis,你应该将属性设置为字符串’SubtleEmphasis’。
如果对Run对象应用链接的样式,需要在样式名称末尾加上’Char’。例如,对于Paragraph对象设置Quote链接的样式,应该使用paragraphObj.style=’Quote’。但对于Run对象,应该使用runObj.style=’QuoteChar’。
9.Word的Run属性
通过text属性,Run可以进一步设置样式。
每个属性都可以被设置为3个值之一:True(该属性总是启用,不论其他样式是否应用于Run)、False(该属性总是禁用)或None(默认使用该Run被设置的任何属性)。
Run对象的text属性:bold、italic、underline、strike、double_strike、all_caps等等。
import docx

doc = docx.Document('demo.docx')

doc.paragraphs[0].text
>> 'Document Title'
doc.paragraphs[0].style
>> 'Title'

doc.paragraphs[0].style = 'Normal'
doc.paragraphs[1].runs[0].style = 'QuoteChar'
doc.paragraphs[1].runs[1].underline = True
doc.paragraphs[1].runs[3].underline = True

doc.save('restyle.docx')
10.写入Word文档
要创建自己的.docx文件,就调用docx.Document,返回一个新的、空白的Word Document对象。
Document对象的add_paragraph()方法将一段新文本添加到文档中,并返回添加的Paragraph对象的引用。
在添加文本之后,向Document对象的save()方法传入一个文件名字符串,将Document对象保存到文件。
import docx

doc = docx.Document()
doc.add_paragraph('Hello world!')

doc.save('helloworld.docx')
我们可以用add_paragraph()方法,添加段落。
我们还可以使用add_run()方法,向已有段落的末尾添加文本。
import docx

doc = docx.Document()
doc.add_paragraph('Hello world!')

paraObj1 = doc.add_paragraph('This is a second paragraph.')
paraObj2 = doc.add_paragraph('This is a yet another paragraph.')

paraObj1.add_run('This text is being added to the second paragraph.')

doc.save('multipleParagraphs.docx')
add_paragraph()和add_run()分别返回Paragraph和Run对象。
add_paragraph()和add_run()都接受可选的第二个参数,它是表示Paragraph或Run对象样式的字符串。例如:
doc.add_paragraph('Hello World!','Title')11.添加标题、换行符、换页符和添加图片
添加标题:
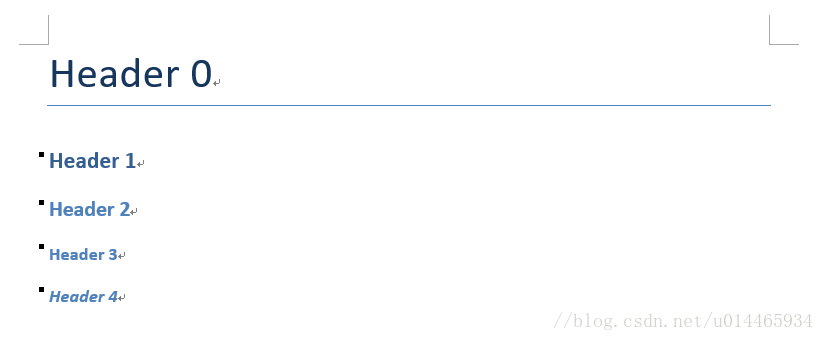
调用add_heading()将添加一个段落,并使用一种标题样式。add_heading()的参数,是一个标题文本的字符串,以及一个从0到4的整数。整数0表示标题时Title样式,这用于文档的顶部。整数1到4是不同标题层次,1是主要的标题,4是最底层的子标题。
import docx

doc = docx.Document()

doc.add_heading('Header 0',0)
doc.add_heading('Header 1',1)
doc.add_heading('Header 2',2)
doc.add_heading('Header 3',3)
doc.add_heading('Header 4',4)

doc.save('headings.docx')
添加换行符、换页符:
要添加换行符(而不是开始一个新的段落),可以在Run对象上调用add_break()方法,换行符将出现在它后面。
如果希望添加换页符,可以将docx.text.WD_BREAK.PAGE作为唯一的参数,传递给add_break()。
import docx

doc = docx.Document()
doc.add_paragraph('This is on the first page!')

#换行符,在第一行后面添加换行符
doc.paragraphs[0].runs[0].add_break()

doc.add_paragraph('This is on the second page!')
#换页符,在第二行后面添加换页符
doc.paragraphs[1].runs[0].add_break(docx.enum.text.WD_BREAK.PAGE)

doc.add_paragraph('This is on the third page!')
doc.save('fourPage.docx')
添加图像
import docx

doc = docx.Document()
doc.add_picture('zophie.png',width=docx.shared.Inches(1),height=docx.shared.Cm(4))
doc.save('pic.docx')
宽度为1英寸,高度为4厘米(Word可以同时使用英制和公制单位)。
你可能愿意用熟悉的单位来指定图像的高度和宽度,诸如英寸或厘米。所以在指定width和height关键字参数时,可以使用docx.shared.Inches()和docx.shared.Cm()函数。


