ElasticSearch快速入门【心得笔记】
主要参考文章地址:
https://www.jianshu.com/p/88f0546d5955
https://zhuanlan.zhihu.com/p/54384152
一、介绍
Elasticsearch 是一个分布式、RESTful 风格的搜索和数据分析引擎,能够解决不断涌现出的各种用例。作为 Elastic Stack 的核心,它集中存储您的数据,帮助您发现意料之中以及意料之外的情况。
其实可以把Elasticsearch看做一个数据库。与一般的关系型数据库(如MySQL数据库)不同的是,它具有数据分析引擎(如根据搜索条件匹配度打分)和RESTful风格的搜索(区别于sql语句)。
二、下载与安装
1、官网下载:下载地址
- 选择windows版本
2、解压到本地磁盘。
3、找到bin\elasticsearch.bat 双击启动
如果使用默认配置直接启动,会占用大量内存。
1、找到config\jvm.options ,打开编辑。
2、找到Xms 一行。修改为200m。(默认可能为1g或2g)。
【xms代表最小占用内存,xmx表示最大占用内存】
4、访问localhost:9200 (这是默认端口),如果返回内容格式如下,则表示访问成功。

三、核心配置文件:elasticsearch.yml
可配置信息
| 属性名 | 说明 |
|---|---|
| cluster.name | 配置elasticsearch的集群名称,默认是elasticsearch。建议修改成一个有意义的名称。 |
| node.name | 节点名,es会默认随机指定一个名字,建议指定一个有意义的名称,方便管理 |
| path.conf | 设置配置文件的存储路径,tar或zip包安装默认在es根目录下的config文件夹,rpm安装默认在/etc/ elasticsearch |
| path.data | 设置索引数据的存储路径,默认是es根目录下的data文件夹,可以设置多个存储路径,用逗号隔开 |
| path.logs | 设置日志文件的存储路径,默认是es根目录下的logs文件夹 |
| path.plugins | 设置插件的存放路径,默认是es根目录下的plugins文件夹 |
| bootstrap.memory_lock | 设置为true可以锁住ES使用的内存,避免内存进行swap |
| network.host | 设置bind_host和publish_host,设置为0.0.0.0允许外网访问 |
| http.port | 设置对外服务的http端口,默认为9200。 |
| transport.tcp.port | 集群结点之间通信端口 |
| discovery.zen.ping.timeout | 设置ES自动发现节点连接超时的时间,默认为3秒,如果网络延迟高可设置大些 |
| discovery.zen.minimum_master_nodes | 主结点数量的最少值 ,此值的公式为:(master_eligible_nodes / 2) + 1 ,比如:有3个符合要求的主结点,那么这里要设置为2 |
3.2 两个端口
四、Kibana安装
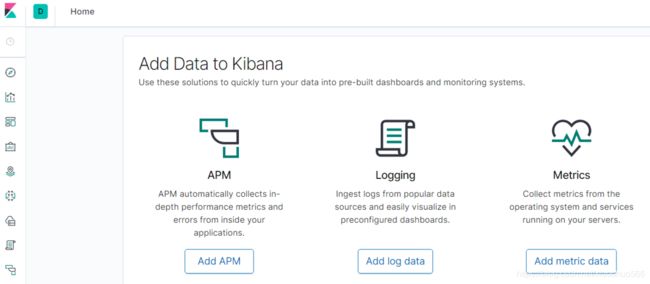
优秀的ES图形化管理工具 有包括控制台和图表显示等简易操作
1.Kibana下载地址:https://www.elastic.co/downloads/kibana
2.解压并启动Kibana bin\kibana.bat(注意:使用Kibana要联网,不然一直出现warning错误)
3.默认访问地址:http://localhost:5601
Discover:可视化查询分析器
Visualize:统计分析图表
Dashboard:自定义主面板(添加图表)
Timelion:Timelion是一个kibana时间序列展示组件(暂时不用)
Dev Tools:Console控制台(同CURL/POSTER,操作ES代码工具,代码提示,很方便)
Management:管理索引库(index)、已保存的搜索和可视化结果(save objects)、设置 kibana 服务器属性。
五、IK分词器
中文分词器,同lucene一样,ES(ElasticSearch缩写)在使用中文全文检索前,需要集成IK分词器。
- https://github.com/medcl/elasticsearch-analysis-ik/releases 找到和你es对应版本 并下载zip文件
-在es/plugins下创建analysis-ik文件夹 - 解压后的文件放置在es/plugins下
- 重启es测试
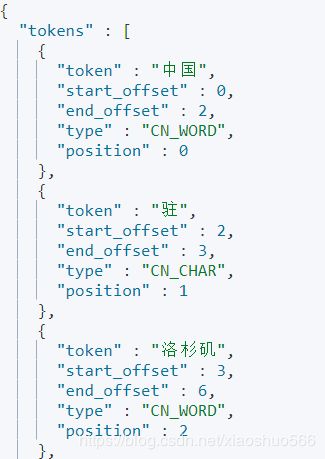
POST _analyze
{
  "analyzer":"ik_smart",
  "text":"中国驻洛杉矶领事馆遭亚裔男子枪击 嫌犯已自首"
}
六、基础入门
上面说到,可以看做是个数据库。它的本质也是用来存储数据,与mysql数据库有概念上的类似。
- 以下为对应关系
| ES | 说明 | MySQL |
|---|---|---|
| indices(索引库) | indices是index的复数,代表许多的索引 | database(数据库) |
| document(文档) | 存入索引库的原始数据。比如一条商品的相关信息。 | table(表) |
| field(字段) | 文档中的属性。比如商品的名称、价格…… | columns(列) |
| shards(分片) | 数据拆分后的各个部分 | |
| replica(副本) | 每个分片的复制 |
注意:ES本身是分布式的,所以即便你只有一个节点,ES也会默认对数据进行分片和副本操作,当你想集群中加入新节点时,ES会将数据在新节点中进行平衡。
6.1创建索引库(数据库)
“number_of_replicas”:1 ————————副本数为1
 “number_of_shards”:1 ——————分片数为1
PUT people
{
  "settings": {
    "number_of_replicas": 1,
    "number_of_shards": 1
  }
}
6.2 删除索引库
DELETE people
6.3 查询某一索引库的信息
GET people
6.3.2 查询有哪些索引库
GET _cat/indices
6.4 查询索引库是否存在
HEAD people
6.5创建映射关系(字段)
PUT people/_mapping
{
  "properties":{
    "name":{
      "type":"text",
      "analyzer":"ik_max_word"
    },
    "age":{
      "type":"integer",
      "index":"false"
    },
    "sex":{
      "type":"keyword"
    }
  }
}
- type:类型,可以是text、long、short、date、integer、object等
 - index:是否索引,默认为true
 - store:是否存储,默认为false
 - analyzer:分词器,这里的ik_max_word即使用ik分词器
6.6 查询映射关系
GET people/_mapping
6.7添加、更新数据
我们也可以直接添加数据 这样系统会给我们默认生成一套映射关系
 如果_doc 后面不指定id数 会默认生成随机id
- 添加:
POST people/_doc/1
{
  "age":"12",
  "name":"张三",
  "sex":"男"
}
POST people/_doc/2
{
   "age":"14",
  "name":"章三顺",
  "sex":"男"
}
- 更新:指定相同的id,修改不同内容即可完成更新
POST people/_doc/1
{
  "age":"12",
  "name":"张三",
  "sex":"女"
}
6.8 查询
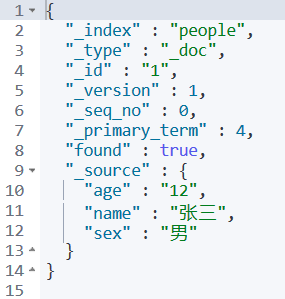
6.8.1根据id查询:
GET people/_doc/1
6.8.2查询所有
- 查询所有索引中的数据:
GET /_search
- 在people索引中查询所有:
GET people/_search
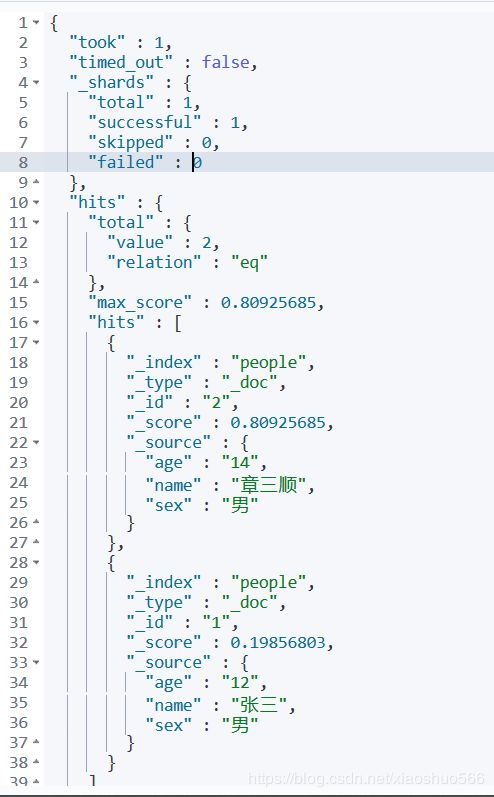
- 字段含义:
time_out:是否超时
_shards:分片信息
hits:搜索结果总览对象
total:搜索到的总条数
max_score:所有结果中文档得分的最高分
hits:搜索结果的文档对象数组,每个元素是一条搜索到的文档信息
_index:索引库
_type:文档类型
_id:文档id
_score:文档得分
_source:文档的源数据
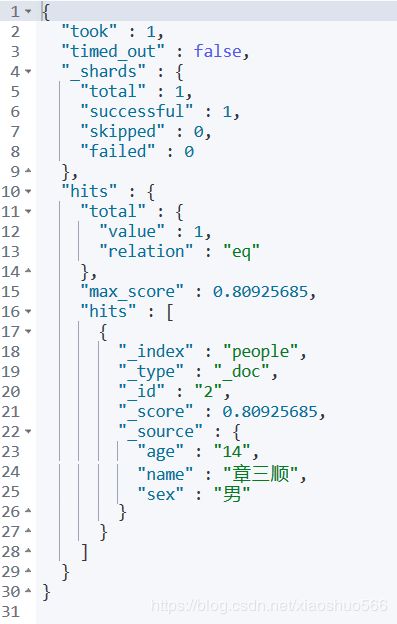
6.8.3 匹配查询(按条件全局检索)
GET people/_search
{
  "query": {
    "match": {
      "name":  "三顺"
    }
  }
}
查询结果:
6.8.4 利用操作符operator
如果想只查出完全匹配 查询条件的数据,那么如下:
GET people/_search
{
  "query": {
    "match": {
      "name": {"query": "三顺", "operator": "and"}
    }
  }
}
如果使用operator=“or” 那么与6.8.3中查询效果一样。
6.8.5 设置最小匹配度
-设置条件匹配度达到x%的才视为查询匹配成功。
GET people/_search
{
  "query": {
    "match": {
      "name":{
        "query": "三 章",
      "minimum_should_match":"100%"
      }
    }
  }
}
minimum_should_match表示最小匹配度,即数据中包含百分之多少的查询条件,即返回该数据。
- 100%表示必须包含“三、章”两个字才返回该数据。。
- 若50%则表示包含“三、章”两个字之一即返回该数据。
6.8.6 多字段查询
查询在sex或name字段中包含”男”字的数据
GET people/_search
{
  "query": {
    "multi_match": {
        "query": "男",
        "fields": ["name","sex"]
      }
    }
  }
}
6.8.7 精准词条匹配查询
term 查询被用于精确值 匹配,这些精确值可能是数字、时间、布尔或者那些未分词的字符串
terms 就是查询多个
GET people/_search
{
  "query": {
    "terms": {
      "sex": [
        "男",
        "女"
      ]
    }
    }
  }
}
6.8.8 结果过滤
- 只要name字段
GET people/_search
 {

   "query": {
     "terms": {
       "sex": [
         "男","女"
       ]
     }
   },"_source": "name"
 }
- 不要name字段
GET people/_search
 {

   "query": {
     "terms": {
       "sex": [
         "男","女"
       ]
     }
   },"_source": {
     "excludes": "name"
   }
 }
-只要姓名和性别
  GET people/_search
  {

    "query": {
      "terms": {
        "sex": [
          "男","女"
        ]
      }
    },"_source": {
      "includes": ["name","sex"]
    }
  }
-更多“查询”相关内容:https://www.jianshu.com/p/c377477df7fc
6.9删除数据
-根据id删除即可
DELETE people/_doc/1
6.10 复制一个索引库的数据到另一个索引库中
POST _reindex
{
  "source": {
    "index": "user"
  },
  "dest": {
    "index": "user2"
  }
}
七、集成SpringBoot
7.0.1创建索引库和准备数据
1、创建索引库
PUT user
{
	"settings":{
		"number_of_shards":1,
		"number_of_replicas":1
	}
}
2、创建列(字段)
POST user/_mapping
{
	"properties":{
		"username":{
			"type":"text"
		},
		"password":{
			"type":"text"
		},
		"age":{
			"type":"integer"
		}
	}
}
3\添加数据
POST user/_doc/1
{
	"username":"tong",
	"password":"1234",
	"age":"12",
}
POST user/_doc/2
{
	"username":"zhang",
	"password":"qwer",
	"age":"15",
}
7.1 创建SpringBoot项目,并添加依赖
<dependency>
    <groupId>org.springframework.boot</groupId>
    <artifactId>spring-boot-starter-web</artifactId>
</dependency>
<dependency>
    <groupId>org.springframework.boot</groupId>
    <artifactId>spring-boot-starter</artifactId>
</dependency>

<dependency>
    <groupId>org.springframework.boot</groupId>
    <artifactId>spring-boot-starter-test</artifactId>
    <scope>test</scope>
</dependency>
<!-- Elasticsearch支持 -->
<dependency>
    <groupId>org.springframework.boot</groupId>
    <artifactId>spring-boot-starter-data-elasticsearch</artifactId>
</dependency>
7.2修改application.properties配置文件
spring.data.elasticsearch.cluster-nodes=127.0.0.1:9300
7.3新建实体User
package com.elastictest.demo.pojo;

import org.springframework.data.annotation.Id;
import org.springframework.data.elasticsearch.annotations.Document;

/**
 * @Author: tongys
 * @Date: 2019/11/1
 */
 //indexName索引库名,type 索引库类型,shards分片数,replicas 副本数
@Document(indexName = "user",type = "_doc",shards = 1,replicas = 1)
public class User {
    @Id
    private int id;
    private String username;
    private String password;
    private int age;

    //---set&get----
    //…………
}
7.4 dao类 UserDao
package com.elastictest.demo.dao;

import com.elastictest.demo.pojo.User;
import org.springframework.data.elasticsearch.repository.ElasticsearchRepository;
import org.springframework.stereotype.Component;
import org.springframework.stereotype.Repository;

/**
 * @Author: tongys
 * @Date: 2019/11/1
 */
@Repository
public interface UserDao extends ElasticsearchRepository<User,Integer> {//只需要继承这个类就可以进行CRUD操作,类似于通用mapper
}
7.5 service接口与实现类
userService
package com.elastictest.demo.service;

import com.elastictest.demo.pojo.User;

/**
 * @Author: tongys
 * @Date: 2019/11/1
 */
public interface UserService {
    Iterable<User> queryAll();
}
userServiceImp
package com.elastictest.demo.service.imp;

import com.elastictest.demo.dao.UserDao;
import com.elastictest.demo.pojo.User;
import com.elastictest.demo.service.UserService;
import org.springframework.beans.factory.annotation.Autowired;
import org.springframework.stereotype.Service;

/**
 * @Author: tongys
 * @Date: 2019/11/1
 */

@Service
public class UserServiceImp implements UserService {
    @Autowired
    private UserDao userDao;
    @Override
    public Iterable<User> queryAll() {
        return userDao.findAll();
    }
}
7.6controller类
UserController
package com.elastictest.demo.controller;

import com.elastictest.demo.pojo.User;
import com.elastictest.demo.service.UserService;
import com.fasterxml.jackson.annotation.JsonFormat;
import org.apache.lucene.analysis.ru.RussianAnalyzer;
import org.springframework.beans.factory.annotation.Autowired;
import org.springframework.stereotype.Controller;
import org.springframework.web.bind.annotation.GetMapping;
import org.springframework.web.bind.annotation.ResponseBody;

import java.util.ArrayList;
import java.util.List;

/**
 * @Author: tongys
 * @Date: 2019/11/1
 */
@Controller
public class UserController {
    @Autowired
    private UserService userService;
    @GetMapping("queryAllUsers") //RESTful风格
    @ResponseBody
    public String queryAllUsers(){
        Iterable<User> iterable =  userService.queryAll();
        List<User> list = new ArrayList<>();
        iterable.forEach(user -> list.add(user));
        String result = "";
        for (User user : list) {
            result = result + "{id"+user.getId()+"username:"+user.getUsername()+",password:"+user.getPassword()+",age:"+user.getAge()+"}";
        }
        System.out.println(result);
        return result;
    }
}
启动测试,查看返回结果.
这里只简单演示了查询所有。添加删除更新等操作也很简单,自行测试。

