linux卸载旧版CUDA跟安装的驱动并安装新版CUDA跟cudnn安装
使用GPU和CUDA、cuDNN进行深度学习计算的浪潮已经持续了很多年,在此期间,显卡驱动和CUDA版本,以及cudnn深度学习工具包的版本已经更新了很多次。随着新的TensorFlow 2.0版和Pytorch1.3版的发布,我们用于深度学习的机器也需要将运行环境更新到最新版本了,尤其是还在使用CUDA 8.0的话。本文将介绍如何卸载旧版CUDA(如8.0版)并安装新版CUDA(10.0版)
材料准备
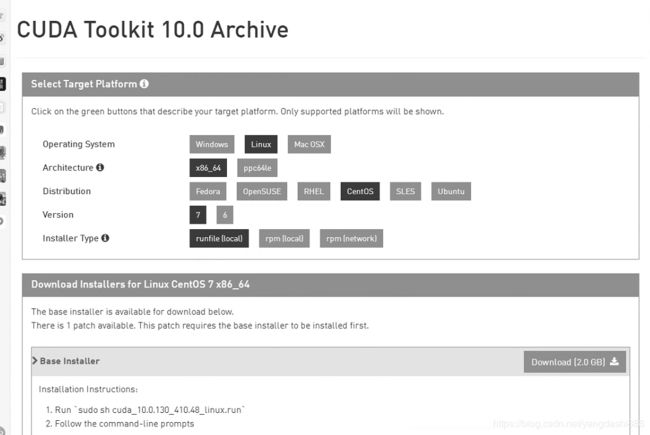
首先需要从NVIDIA官网下载下属文件,一个是cuda10.0 另一个是cudnn7.4
- cuda_10.0.130_410.48_linux
- cudnn-10.0-linux-x64-v7.4.2.24.solitairetheme8
自己的redhat红帽子系统,下载的cuda版本为:

卸载旧版本CUDA
卸载前需要关闭一些跟图像相关的服务,比如X显示管理器lightdm。键盘按ctrl+Alt+F1,从纯命令行输入账号密码登入终端,然后输入下面的命令:
$ sudo  systemctl stop lightdm
$ cd  /usr/local/cuda-8.0/bin
$ sudo  ./uninstall_cuda_8.0.pl
一般安装cuda识别的话,其是会有提示去查看安装log,如下:
RROR: An NVIDIA kernel module ‘nvidia-uvm’ appears to already be loaded in your kernel. This may be because it is in use (for example, by an X server, a CUDA program, or the NVIDIA Persistence Daemon), but this may also happen if your kernel was configured without support for module unloading. Please be sure to exit any programs that may be using the GPU(s) before attempting to upgrade your driver. If no GPU-based programs are running, you know that your kernel supports module unloading, and you still receive this message, then an error may have occured that has corrupted an NVIDIA kernel module’s usage count, for which the simplest remedy is to reboot your computer.
ERROR: Installation has failed. Please see the file ‘/var/log/nvidia-installer.log’ for details. You may find suggestions on fixing installation problems in the README available on the Linux driver download page at www.nvidia.com.
不过具体问题出现直接百度就行,很容易解决的。如果解决还是会出现问题,则重启下。
解决方法一: 如果以前装过cuda,这个一般是旧的驱动没有卸载完成导致的,此时卸载英伟达驱动指令为:
yum remove "*cublas*" "cuda*"
yum remove "*nvidia*"
还有一个卸载指令为:
To uninstall the NVIDIA Driver, run nvidia-uninstall
安装新版本CUDA
找到我们已经下载好的cuda 10和cudnn 7.4文件,并首先输入下列命令安装cuda 10。
$ sudo sh cuda_10.0.130_410.48_linux
首先出现的是关于CUDA的用户协议的事项,可以直接按 “Ctrl +C” 跳过,并输入“accpet”表示接受协议。
Logging to  /tmp/cuda_install_11026.log
Using more to  view the EULA.
End User  License Agreement
--------------------------
Preface
-------
The Software  License Agreement in Chapter 1 and the Supplement
in Chapter 2  contain license terms and conditions that govern
the use of  NVIDIA software. By accepting this agreement, you
agree to  comply with all the terms and conditions applicable
to the  product(s) included herein.

NVIDIA Driver
Description
This package  contains the operating system driver and
fundamental  system software components for NVIDIA GPUs.

NVIDIA CUDA  Toolkit

Description

The NVIDIA  CUDA Toolkit provides command-line and graphical
tools for  building, debugging and optimizing the performance
of applications  accelerated by NVIDIA GPUs, runtime and math
libraries,  and documentation including programming guides,
user manuals,  and API references.

Default  Install Location of CUDA Toolkit

Windows  platform:

%ProgramFiles%\NVIDIA  GPU Computing Toolkit\CUDA\v#.#

Linux  platform:

/usr/local/cuda-#.#

Mac platform:

/Developer/NVIDIA/CUDA-#.#

NVIDIA CUDA  Samples

Description

This package  includes over 100+ CUDA examples that demonstrate
various CUDA  programming principles, and efficient CUDA
implementation  of algorithms in specific application domains.
Do you accept  the previously read EULA?
accept/decline/quit:  accept
由于需要更新NVIDIA驱动的版本,其中有一个“Install NVIDIA Accelerated Graphics Driver for Linux-x86_64 410.48?”需要输入“y”以安装新版驱动。(这个可以安装也可以不安装。)
Install  NVIDIA Accelerated Graphics Driver for Linux-x86_64 410.48?
(y)es/(n)o/(q)uit:  y    ( 如果电脑上有了显卡driver,可以不用安装)
Do you want  to install the OpenGL libraries?
(y)es/(n)o/(q)uit  [ default is yes ]: y

Do you want  to run nvidia-xconfig?
This will  update the system X configuration file so that the NVIDIA X driver
is used. The  pre-existing X configuration file will be backed up.
This option  should not be used on systems that require a custom
X  configuration, such as systems with multiple GPU vendors.
(y)es/(n)o/(q)uit  [ default is no ]:

Install the  CUDA 10.0 Toolkit?
(y)es/(n)o/(q)uit:  y

Enter Toolkit  Location
 [ default is /usr/local/cuda-10.0 ]:

Do you want  to install a symbolic link at /usr/local/cuda?
(y)es/(n)o/(q)uit:  y

Install the  CUDA 10.0 Samples?
(y)es/(n)o/(q)uit:  y  (这个也可以不用安装)

Enter CUDA  Samples Location
 [ default is /home/gpu ]:

Installing  the NVIDIA display driver...
Installing  the CUDA Toolkit in /usr/local/cuda-10.0 ...
Missing  recommended library: libGLU.so
Missing  recommended library: libXmu.so

Installing  the CUDA Samples in /home/gpu ...
Copying  samples to /home/gpu/NVIDIA_CUDA-10.0_Samples now...
Finished  copying samples.

===========
= Summary =
===========

Driver:   Installed   (已有驱动可以不用安装)
Toolkit:  Installed in /usr/local/cuda-10.0
Samples:  Installed in /home/gpu, but missing recommended  libraries  (也可以不用安装)

Please make  sure that
 -    PATH includes /usr/local/cuda-10.0/bin
 -    LD_LIBRARY_PATH includes /usr/local/cuda-10.0/lib64, or, add  /usr/local/cuda-10.0/lib64 to /etc/ld.so.conf and run ldconfig as root

To uninstall  the CUDA Toolkit, run the uninstall script in /usr/local/cuda-10.0/bin
To uninstall  the NVIDIA Driver, run nvidia-uninstall

Please see  CUDA_Installation_Guide_Linux.pdf in /usr/local/cuda-10.0/doc/pdf for  detailed information on setting up CUDA.

Logfile is  /tmp/cuda_install_11026.log
Signal  caught, cleaning up
上面安装完后的提示有教我们怎么配置环境:
Please make  sure that
 -    PATH includes /usr/local/cuda-10.0/bin
 -    LD_LIBRARY_PATH includes /usr/local/cuda-10.0/lib64, or, add  /usr/local/cuda-10.0/lib64 to /etc/ld.so.conf and run ldconfig as root
当最后出现这类输出,没有其他报错之后,就算成功安装了新版CUDA了。然后我们接着需要安装配置新的环境变量。在 ”~/.bashrc“ 的最后添加:
export  PATH=/usr/local/cuda/bin${PATH:+:${PATH}}
export  LD_LIBRARY_PATH=/usr/local/cuda/lib64${LD_LIBRARY_PATH:+:${LD_LIBRARY_PATH}}
export  CUDA_HOME=/usr/local/cuda
其中,前 2 个(PATH, LD_LIBRARY_PATH) 是 CUDA 官网安装文档中建议的变量。第 3 个(CUDA_HOME)是 tensorflow-GPU 版本要求的变量。
配置完环境变量之后,一定要更新一下,否则不能立即生效。也可以通过重启电脑使得环境变量生效。
$ source ~/.bashrc
注意: 上面的配置基本都是需要的,其相当于C++添加依赖库是需要添加lib,bin,include等文件路径到VS上。其中/usr/local/cuda是软链接,这个如果已经存在的话新安装的cuda是无法重写它的,此时可以手动进行创建,nvcc是cuda的bin目录下的,如下:
rm -rf /usr/local/cuda
mkdir /usr/local/cuda

sudo ln -s /usr/local/cuda-9.0/ /usr/local/cuda/

nvcc --version
nvcc: NVIDIA (R) Cuda compiler driver
Copyright (c) 2005-2017 NVIDIA Corporation
Built on Fri_Sep__1_21:08:03_CDT_2017
接着我们可以查看下新版显卡驱动安装结果,因为这个指令是安装驱动后才会有的指令。
$ nvidia-smi
Fri Oct 27  15:46:57 2019
+-----------------------------------------------------------------------------+
| NVIDIA-SMI  410.48                 Driver Version:  410.48                    |
|-------------------------------+----------------------+----------------------+
| GPU  Name         Persistence-M| Bus-Id         Disp.A | Volatile Uncorr. ECC |
| Fan  Temp   Perf  Pwr:Usage/Cap|         Memory-Usage | GPU-Util  Compute M. |
|===============================+======================+======================|
|   0   Tesla P100-PCIE...  Off  | 00000000:06:00.0 Off |                    0 |
| N/A   29C     P0    24W / 250W |      0MiB / 12198MiB |      0%       Default |
+-------------------------------+----------------------+----------------------+

+-----------------------------------------------------------------------------+
|  Processes:                                                        GPU  Memory |
|  GPU        PID   Type   Process name                             Usage      |
|=============================================================================|
|  No running processes found                                                 |
+-----------------------------------------------------------------------------+
最后恢复图像显示:
$ sudo systemctl start lightdm
配置cudnn库
首先,更改cudnn文件名称,以方便解压。其他版本的文件名需根据实际情况做相应修改。
$ cp cudnn-10.0-linux-x64-v7.4.2.24.solitairetheme8  cudnn-10.0-linux-x64-v7.4.2.24.tgz
$ tar zxvf cudnn-10.0-linux-x64-v7.4.2.24.tgz
$ sudo cp  cuda/include/cudnn.h /usr/local/cuda/include
$ sudo cp  cuda/lib64/libcudnn* /usr/local/cuda/lib64
**注意:**如果没有创建软链接的话复制到安装位置下
接下来就是修改文件访问权限:
$ sudo chmod a+r /usr/local/cuda/include/cudnn.h /usr/local/cuda/lib64/libcudnn*
最后,我们就配置完了。