利用AI+大数据的方式分析恶意样本(四)
文章目录
- 系列文章目录
- 本文主旨
- 恶意代码功能
- 下载器和启动器
- 后门
- 登陆凭证窃取
- 存活机制
- 提权
- 隐藏踪迹——用户态的Rootkit
- 环境配置
- 预备知识
- 节点和边
- 二分网络
- 网络可视化
- 使用NetworkX构建网络
- 使用GraphViz可视化
- 进阶操作
- 添加属性
- GraphViz使用参数调整网络
- 构建恶意软件回连服务器网络
- 编码如下
- 效果图
- 构建恶意软件共享图像关系网络
- 编码如下
- 效果图
- 小结
- 构建代码相似关系
- 通过特征提取对样本进行比较
- 使用jaccard系数量化相似性
- 使用相似性矩阵评价恶意软件代码相似性估计方法
- 构建相似图
- 环境搭建
- 代码编写
- 效果图
- 扩展相似性比较
- 限制
系列文章目录
- 《利用AI+大数据的方式分析恶意样本(一)》:通过四种方法静态分析恶意软件
- 《利用AI+大数据的方式分析恶意样本(二)》:x86架构反汇编基本原理及实践
- 《利用AI+大数据的方式分析恶意样本(三)》:通过动态运行恶意软件来解析其功能
- 《利用AI+大数据的方式分析恶意样本(四)》:通过提取特征来构建恶意代码样本相互关联关系
- 《利用AI+大数据的方式分析恶意样本(五)》:一些常用的机器学习方法
- 《利用AI+大数据的方式分析恶意样本(六)》:以多种测试标准的评价方法
- 《利用AI+大数据的方式分析恶意样本(七)》:构建基于机器学习的恶意代码检测器
- 《利用AI+大数据的方式分析恶意样本(八)》:可视化恶意软件的趋势
- 《利用AI+大数据的方式分析恶意样本(九)》:介绍深度学习基础
- 《利用AI+大数据的方式分析恶意样本(十)》:基于卷积神经网络的恶意代码家族标注
- 《利用AI+大数据的方式分析恶意样本(十一)》:关于利用卷积神经网络进行恶意代码检测的一些改进方法
- 《利用AI+大数据的方式分析恶意样本(十二)》:通过AI对抗攻击来混淆基于机器学习的恶意样本检测
- 《利用AI+大数据的方式分析恶意样本(十三)》:Cuckoo沙箱的搭建教程
- 《利用AI+大数据的方式分析恶意样本(十四)》:二进制样本分析之脱壳方法研究
本文主旨
通过提取特征来构建恶意代码样本相互关联关系
本文提供一种利用恶意软件网络识别攻击活动,本文主要采用以下特征构建相互关联的网络拓扑,用以识别攻击者,溯源等相关操作。
- 恶意软件的回连域名
- 图标的共享关系
- 共享代码
恶意代码功能
到目前为止,我们一直在关注恶意代码的分析,很少关注恶意代码能够做什么,因此我们先来讨论一下恶意代码的功能:
建议大家学习一下PE文件的基本格式;
下载器和启动器
常见的两种恶意代码是下载器和启动器:
- 下载器从互联网上下载其他的恶意代码,然后在本地系统中运行。常用Windows API函数为:URLDownloadtoFileA和Winexec,前者用于下载,后者用于执行;
- 启动器(也成为加载器)是一类可执行文件,用来安装立即运行或者将来秘密执行的恶意代码,启动器通常包含一个它要加载的恶意代码。
后门
后门是另一种类型的恶意代码,它能让攻击者远程访问一个受害的机器。后门是一种最常见的恶意代码,它们拥有多种功能,并且以多种形式与大小存在。
常用80端口使用http协议,http是出站最常使用的协议,所以它为恶意代码提供一个与其他流量混淆的好机会。
(现在website一般均使用http + ssl协议,也就是https)
后门的类型:
- 反向shell, 使用瑞士军刀Netcat创建一个反向shell(nc)
- 远程控制工具:常用80,443端口进行通信
- 僵尸网络:主要为实施分布式拒绝服务攻击
登陆凭证窃取
通常攻击者会不遗余力的窃取登陆凭证,主要使用以下三种类型的恶意代码:
- 等待用户登录以窃取登陆凭证的程序,GINA拦截
- 转储Windows系统中存放信息的程序,例如密码哈希值,直接使用或进行离线破解。
- 击键记录程序:基于内核或者基于用户空间
存活机制
一旦恶意代码获取系统的控制权,其通常会驻留很长一段时间,这种行为称为存活,如果存活机制足够特别,甚至可以作为恶意代码的指纹。
通过几种方式的存活机制:
- windows注册表:自启动项以及其他一些DLL所在位置(Applnit_DLL, Winlogon Notify, SvcHost DLL)
- 特洛伊木马化系统二进制文件:修改系统的二进制文件,当被感染的二进制文件下次运行或者加载时,强制运行恶意代码
- DLL加载顺序劫持:在windows系统中加载DLL存在默认搜索顺序,而将恶意的DLL文件放置在正常DLL文件搜索之前加载
提权
大多数提权攻击时利用本地系统已知漏洞或者0day进行攻击,其中多数可以在kali系统的msf中找到。
隐藏踪迹——用户态的Rootkit
恶意代码经常对用户隐藏它的生存机制和正在运行的进程。常用来隐藏恶意代码的行为称为Rootkit,Rootkit有多种存在形式,但大部分通过修改操作系统内部的功能来工作。
大部分Rootkit运行在内核态。
简单介绍两种用户态的挂钩技术:
- IATHook
- Inline Hook
环境配置
- python库:
networkx == 2.0
pydot == 1.2.4
Murmur == 0.1.3
pefile == 2017.11.5
matplotlib == 2.0.0
将上述内容存储在requirements.txt文件中,执行以下命令。
pip install -r requirements.txt
- Graphviz网络可视化工具
Graphviz官网
apt-get install graphviz
apt-get install graphviz-dev
- 在我下文的编码中我发现保存网络时发生错误,以下是解决方案,如在进行下述实验时无报错发生可忽略:
pkg-config --libs-only-L libcgraph
pkg-config --cflags-only-I libcgraph
会得到graphviz的路径比如-I/usr/include/graphviz/
然后根据这个路径,安装pygraphviz
pip install pygraphviz --install-option="--include-path='/usr/include/graphviz/'" --install-option="--library-path='/usr/lib/graphviz/'"
解决问题
预备知识
恶意软件网络分析可以将恶意软件数据集转化为有价值的威胁情报,揭示对抗性攻击活动、常见的恶意软件手段和恶意软件样本来源。
节点和边
在进行共享属性分析之前,需要了解一些有关网络的基础知识。网络是连接对象(称为节点)的集合,这些节点之间连接称为边。作为抽象的数学对象,网络中的节点几乎可以表示任何东西,它们的边也可以。
当使用网络来分析恶意软件时,我们可以将每个恶意样本定义为节点,并将感兴趣的关系(如共享代码,共享图像,回连共同的域名等)定义为边。
二分网络
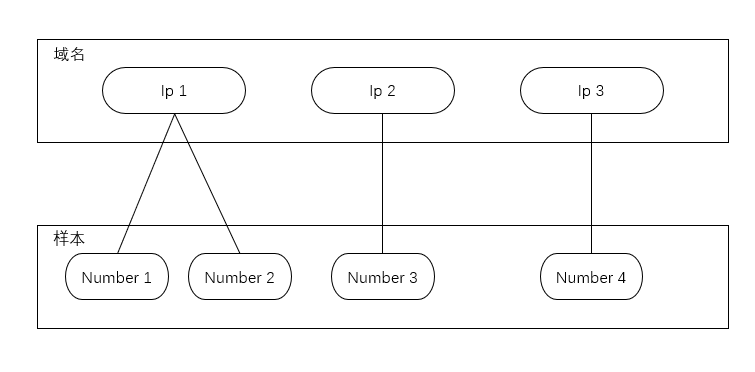
二分网络是一个所有节点可以划分为两个分区的网络,其中任一部分不包含内部连接。这种类型的网络可以用来展示恶意软件样本之间的共享属性。
如下图所示,一个典型的二分网络,上层分区为恶意样本回连到的域名ip,下层分区为恶意软件样本节点。
正如你所看到的,这张简单的二分网络示意图展示了一则重要的情报:基于恶意软件共享的回连服务器特诊,样本1和样本2可能由同一个攻击组织所布置,样本3独属于一个攻击组织,样本4也独属于一个攻击组织。
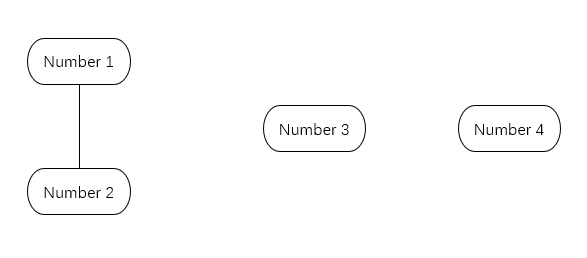
随着网络节点的增加,这幅图会变得无比庞大。我们可能只想知道恶意样本之间是如何关联的,并不想清楚的知道所有属性之间的连接关系,我们就可以通过创建一个二分网络的投影来完成此项工作。
上述二分网络的投影图如下图所示:
该图中只有二分网络中下层恶意样本节点之间的关联关系,删去了节点与域名之间的连接关系。
网络可视化
当使用网络分析方法来对恶意软件的共享属性做分析时,会发现将严重以来网络可视化软件来创建目前所示类似的网络。
最重要的是,进行网络可视化的主要挑战是网络布局,这是一个决定在二维还是三维坐标空间中呈现每个节点的过程。
当你在网络中放置节点时,理想的方法是将他们放置在坐标空间中,也就是说最后的输出效果图应为一个二维的平面图。
同时我们希望在这个二维平面中,节点彼此之间的可视距离与它们在网络中的最短路径距离成正比。这么做可以使得我们将相似节点簇的可视化效果与它们的实际关系进行精确对应。
这就产生了一个问题,这样的可视化效果通常很难实现,尤其是当你处理三个以上的节点时。我们将这种问题称为失真。
为了尽可能的解决失真问题,或者说最小化布局失真,计算机科学家经常使用力导向布局算法。力导向布局算法是对弹簧力和磁力的物理模拟,将网络中的边模拟为物理弹簧,往往可以得到较好的节点定位,因为这是通过模拟弹簧的推和拉来实现节点与边之间的均匀长度。
使用NetworkX构建网络
下面我们使用在安装好的NetworkX库来实例化一个网络:
import networkx

from networkx.drawing.nx_agraph import write_dot

network = networkx.Graph()
#实例化网络
nodes = ["hello", "world", 1, 2, 3.45, 4]

for node in nodes:
        network.add_node(node)
#添加节点
network.add_edge("hello", "world")
#添加节点的边
network.add_edge(1, 2)

network.add_edge(2, 4)

network.add_edge(1, 4)

write_dot(network, "network.dot")
#保存网络,如在这一步发生错误,可返回环境配置查看解决方案
使用GraphViz可视化
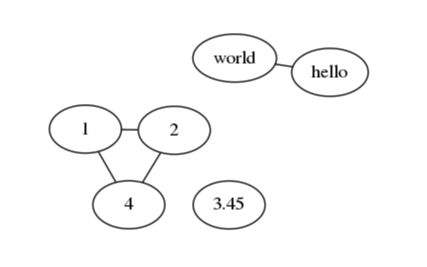
network.dot文件已经保存到本地了,这时我们需要使用GraphViz这个工具来让其可视化,可以清楚的看到网络的结构。
- fdp力导向图形渲染器是GraphViz网络可视化工具之一:它可以创建一个力导向的布局,当你创建的恶意软件网络节点少于500个时,fdp可以在合理的时间内展现出网络结构。 但是一旦节点超过500时,尤其是节点之间的连接比较复杂时,你会发现fdp的处理速度下降的相当快。
- sfdp力导向图形渲染器是GraphViz网络可视化工具之一,sfdp采用与fdp大致相同的布局方法,但它的可扩展性更好,因为它创建了一个简化的层次结构,称为粗化,节点会根据它们的相近度被合并为超级节点。在完成节点粗化之后,sfdp会列出节点被合并后的图版本,这些图的节点和边要少得多,这就极大的加快了布局的过程。然而这种可扩展性是有代价的,对于相同大小的网络,sfdp生成的布局图有时没有fdp中的布局清楚。
- neato是另一种力导向网络布局算法,它在所有节点(包括未连接的节点)之间创建模拟的弹簧,以将它们助推到理想位置,但这个过程需要额外的计算,很难知道neato什么时候会为给定的网络提供最好的布局。
命令格式如下:
<toolname> <dotfile> -T png -o <outputfile.png>

fdp network.dot -T png -o fdp.png
sfdp network.dot -T png -o sfdp.png
neato network.dot -T png -o neato.png
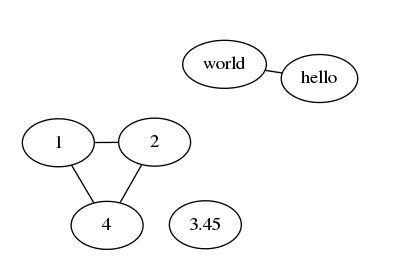
fdp生成图像如下:
发现fdp和neato在节点较少情况下生成图像相差不多,而sfdp则进行了一定的压缩;
进阶操作
添加属性
在使用networkx构建网络操作中,还可以对节点进行添加属性。
>>> nw.add_node(1, asd="foo")
#asd为我们添加的属性索引,foo为其值
>>> nw.node[1]
{'asd': 'foo'}
>>> nw.node[1]['asd']
'foo'
同样,我们也可以对边添加可视化属性,以此来使生成的网络图更加形象。
- 设置边宽度
- 设置节点和边颜色
- 设置节点形状
- 设置文本标签
import networkx

from networkx.drawing.nx_agraph import write_dot

network = networkx.Graph()

nodes = ["hello", "world", 1, 2, 3.45, 4]

for node in nodes:
	network.add_node(node, color="red")

network.add_node("egg", shape='diamond', label='I am specific')

network.add_edge("hello", "world", penwidth=2, color="blue")

network.add_edge(1, 2, penwidth=5)

network.add_edge(2, 4, penwidth=5)

network.add_edge(1, 4, penwidth=5)

network.add_edge(3.45, "egg")

write_dot(network, "network.dot")
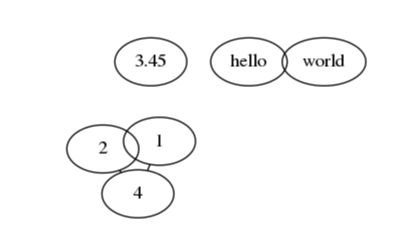
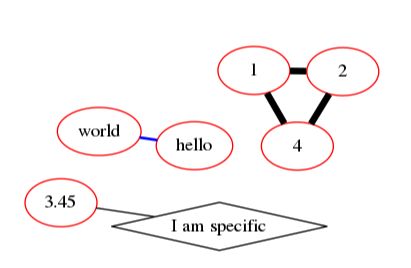
效果图如下:
GraphViz使用参数调整网络
-Goverlap=false
防止节点重叠
-Gspline=true
将边绘制成曲线,提高网络的可读性
使用示例:
fdp network.dot -Gsplines=true -Goverlap=false -T png -o fdp_p.png
构建恶意软件回连服务器网络
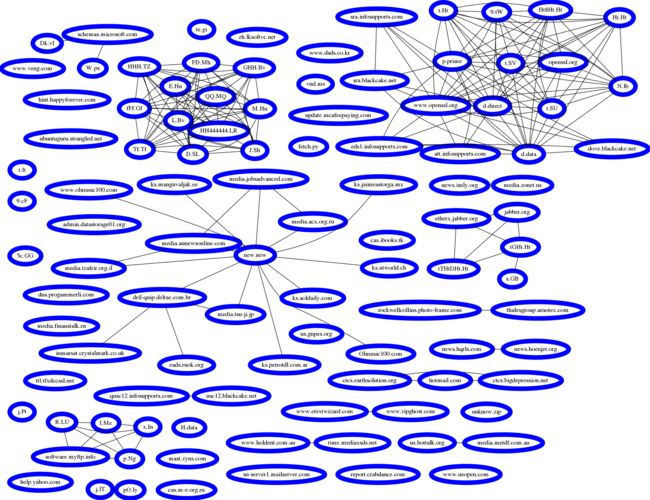
我们将基于恶意软件的共享回连服务器这一特点,构建网络,通过构建得出网络可以清晰的看出同一攻击组织构建的恶意软件有哪些。
下面的程序再恶意软件文件中提取回连域名,然后构建一个由恶意软件样本和域名组成的二分网络。接下来它生成一个网络投影来显示哪些恶意软件样本共享相同的回连域名。生成另一个投影来显示哪些回连服务器被共同的恶意软件样本所调用。
编码如下
#!/usr/bin/python

import pefile
import sys
import argparse
import os
import pprint
import networkx
import re
from networkx.drawing.nx_agraph import write_dot
import collections
from networkx.algorithms import bipartite

args = argparse.ArgumentParser("Visualize shared hostnames between a directory of malware samples")
args.add_argument("--target_path",'-t')
#恶意软件所在目录
args.add_argument("--output_file",'-o', default='out.dot')
#生成的二分网络名称
args.add_argument("--malware_projection",'-m', default='mal.dot')
#生成二分网络的恶意软件的投影
args.add_argument("--hostname_projection",'-hm', default='dom.dot')
#生成的二分网络的域名的投影
args = args.parse_args()


network = networkx.Graph()

valid_hostname_suffixes = map(lambda string: string.strip(), open("domain_suffixes.txt"))
valid_hostname_suffixes = set(valid_hostname_suffixes)
#使用了一个域名的后缀库,里面有com、cn、org、net等典型的域名后缀;


def find_hostnames(string):
    possible_hostnames = re.findall(r'(?:[a-zA-Z0-9](?:[a-zA-Z0-9\-]{,61}[a-zA-Z0-9])?\.)+[a-zA-Z]{2,6}', string)
    #正则表达式,目的为找出域名
    valid_hostnames = filter(
            lambda hostname: hostname.split(".")[-1].lower() in valid_hostname_suffixes,
            possible_hostnames
    )
    #如果找到的域名后缀在后缀库中,则为真正的域名
    return valid_hostnames

# search the target directory for valid Windows PE executable files
for root,dirs,files in os.walk(args.target_path):
    for path in files:
        # try opening the file with pefile to see if it's really a PE file
        try:
            pe = pefile.PE(os.path.join(root,path))
        except pefile.PEFormatError:
            continue
        #便利目录,如果不为PE文件,则判断下一个文件
        fullpath = os.path.join(root,path)

        strings = os.popen("strings '{0}'".format(fullpath)).read()
        #类似os.system执行strings的命令,并读取命令结果

        hostnames = find_hostnames(strings)
        if len(hostnames):
            network.add_node(path,label=path[:32],color='black',penwidth=5,bipartite=0)
            #如果该恶意代码有回连域名行为,则添加节点
            #因为我们分析的主要是存在回连域名的恶意软件,然后根据连接图进行溯源
            #如若不加if条件,那么节点会太多而无法进行分析
        for hostname in hostnames:
            network.add_node(hostname,label=hostname,color='blue',
               penwidth=10,bipartite=1)
            network.add_edge(hostname,path,penwidth=2)
            #添加边
        if hostnames:
            print "Extracted hostnames from:",path
            pprint.pprint(hostnames)
            #pprint与print的区别不是很大,功能基本类似

write_dot(network, args.output_file)
#保存网络
malware = set(n for n,d in network.nodes(data=True) if d['bipartite']==0)
hostname = set(network)-malware


malware_network = bipartite.projected_graph(network, malware)
hostname_network = bipartite.projected_graph(network, hostname)

write_dot(malware_network,args.malware_projection)
write_dot(hostname_network,args.hostname_projection)
#保存网络的投影
运行该程序时,只需指定-t参数为恶意代码文件存在的目录,其他均按照默认参数配置即可;
效果图
二分网络:
恶意软件节点的投影:
域名的投影:
构建恶意软件共享图像关系网络
除了基于回连服务器共享情况来分析恶意软件,我们还可以基于它们所共享的图像资源来分析;
提取恶意软件的图像在第一章曾介绍过,如果读者有所遗忘,请回看《基于数据科学的恶意软件分析(一)》。
思路跟回连域名的思路没什么不一样,只是用来提取图像的命令做了一下变换,比较图标资源的哈希值,如果哈希值相同,则溯源为同一攻击组织。
编码如下
#!/usr/bin/python

import pefile
import sys
import argparse
import os
import pprint
import logging
import networkx
import collections
import tempfile
from networkx.drawing.nx_agraph import write_dot
from networkx.algorithms import bipartite

# Use argparse to parse any command line arguments

args = argparse.ArgumentParser("Visualize shared image relationships between a directory of malware samples")
args.add_argument("target_path",help="directory with malware samples")
args.add_argument("output_file",help="file to write DOT file to")
args.add_argument("malware_projection",help="file to write DOT file to")
args.add_argument("resource_projection",help="file to write DOT file to")
args = args.parse_args()
network = networkx.Graph()

class ExtractImages():
    def __init__(self,target_binary):
        self.target_binary = target_binary
        self.image_basedir = None
        self.images = []

    def work(self):
        self.image_basedir = tempfile.mkdtemp()
        #创建临时目录
        icondir = os.path.join(self.image_basedir,"icons")
        bitmapdir = os.path.join(self.image_basedir,"bitmaps")
        raw_resources = os.path.join(self.image_basedir,"raw")
        for directory in [icondir,bitmapdir,raw_resources]:
            os.mkdir(directory)
        rawcmd = "wrestool -x {0} -o {1} 2> /dev/null".format(self.target_binary,raw_resources)
        bmpcmd = "mv {0}/*.bmp {1} 2> /dev/null".format(raw_resources,bitmapdir)
        icocmd = "icotool -x {0}/*.ico -o {1} 2> /dev/null".format(raw_resources,icondir)
        for cmd in [rawcmd,bmpcmd,icocmd]:
            try:
                os.system(cmd)
            except Exception,msg:
                pass
        for dirname in [icondir,bitmapdir]:
            for path in os.listdir(dirname):
                logging.info(path)
                path = os.path.join(dirname,path)
                imagehash = hash(open(path).read())
                if path.endswith(".png"):
                    self.images.append((path,imagehash))
                if path.endswith(".bmp"):
                    self.images.append((path,imagehash))

    def cleanup(self):
        os.system("rm -rf {0}".format(self.image_basedir))

# search the target directory for PE files to extract images from
image_objects = []
for root,dirs,files in os.walk(args.target_path):
    for path in files:
        # try to parse the path to see if it's a valid PE file
        try:
            pe = pefile.PE(os.path.join(root,path))
        except pefile.PEFormatError:
            continue
        fullpath = os.path.join(root,path)
        images = ExtractImages(fullpath)
        images.work()
        image_objects.append(images)

        # create the network by linking malware samples to their images
        for path, image_hash in images.images:
            # set the image attribute on the image nodes to tell GraphViz to render images within these nodes
            if not image_hash in network:
                network.add_node(image_hash,image=path,label='',type='image')
            node_name = path.split("/")[-1]
            network.add_node(node_name,type="malware")
            network.add_edge(node_name,image_hash)

# write the bipartite network, then do the two projections and write them
write_dot(network, args.output_file)
malware = set(n for n,d in network.nodes(data=True) if d['type']=='malware')
resource = set(network) - malware
malware_network = bipartite.projected_graph(network, malware)
resource_network = bipartite.projected_graph(network, resource)

write_dot(malware_network,args.malware_projection)
write_dot(resource_network,args.resource_projection)
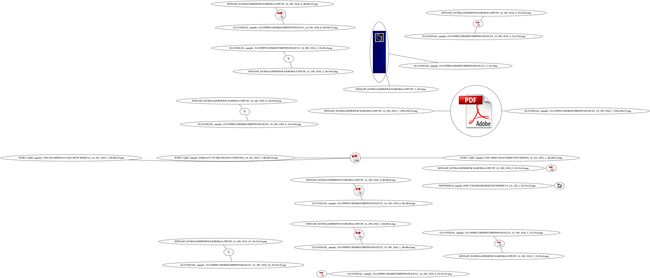
效果图
可以看到虽然使用共享图标可以测量出一些可用的结果,但是在图标的效果图中,pdf的图标相同,但size不一样,这就导致其生成的哈希值不同,也就无法进行归并,方法还是存在一定的缺陷。
小结
可以通过对回连服务器和共享图标对恶意软件的家族进行溯源,但就算是回连服务器和图标之间存在共享关系,也不能一定说明为同一攻击组织编写的恶意代码,只能说提供一个依据。
构建代码相似关系
本文提供一种基于n-gram、Jaccard系数量化相似性、相似性矩阵和minhash等方法研究恶意软件的代码相似性,构建一个恶意软件相似性搜索系统提供对恶意软件的代码相似性估计。
通过特征提取对样本进行比较
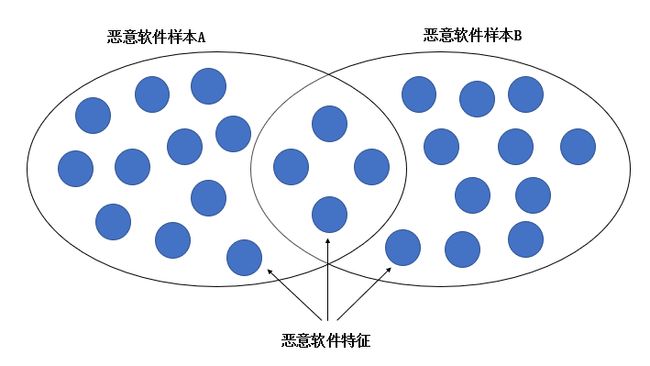
在进行比较二进制文件之间相似代码之前,我们要对恶意软件样本进行“特征袋”分组。
在这里所指的特征是我们在进行代码相似性估计这项工作时所用到的基于二进制文件提取出的所有特征,如可打印字符串,导入可疑函数,数据压缩量,是否加密等等;
上图为恶意代码共享特征分析的特征袋模型示意图。
当然,在这种特征袋方式进行比较时,我们只会在意相同特征的数量与总体特征数量的比值,以这个比值衡量两个恶意代码样本之间的相似性。
但在某些情况下,我们不仅应比较相同特征的个数,我们还应记录它们的顺序特征。比如:我们选定的特征是恶意样本在执行过程中动态调用的windows原生API序列,那么此时,我们需要记录原生API序列的调用顺序;因为有可能不同的函数在调用API时,所调用的原生API名称是一致的,但顺序不同; 通过这种顺序特征,也可以进行恶意代码样本的检测。
下面我们引入N-gram扩展特征。
N-gram特征是一种常见的将序列信息用于恶意软件样本比较的方法,使用N-gram扩展特征包模型来处理序列数据。
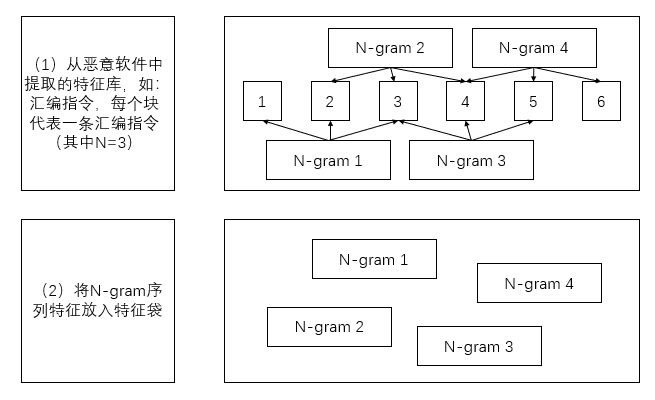
N-gram是指在某个较大的事件序列中的一个特定长度为N的事件子序列。我们在顺序窗口上通过滑动窗口来从较大的序列中提取该子序列。
例如在一个句子中,顺序提取单词数为2的N-gram序列:"++I am a SEU student++"的N-gram序列为:“I am”, “am a”, “a SEU”, “SEU student”。
在恶意软件分析中,我们可以提取一个恶意软件样本在沙箱中运行的原生API序列,将该序列表示为一个特征袋,并将该样本的N-gram序列与其他恶意软件样本序列进行比较,从而将序列信息整合入特征袋比较模型中,进行判定相似性的工作。
如下图所示,提取N-gram的直观示意图:
当然,如果我们提取的特征序列与顺序信息关联不大时,此时我们使用N-gram提取顺序信息进行恶意代码样本的相似性比较那就不是很合适,它会增加计算的代价,并且效果不理想。例如在恶意样本的某个函数中,某些功能的实现并不是串行,即随机调用底层API序列,此时该特征就与顺序信息关联不大。
使用jaccard系数量化相似性
一旦你将一个恶意软件样本表示成一个特征袋,你就需要度量该样本的特征袋与其他样本特征袋之间的相似程度。
为了估计两个恶意软件特征袋中的相似程度,我们引入jaccard系数量化相似性。
jaccard系数是一个相似性函数,相似性函数一般具有以下特征:
- 输出一个归一化后的值,该值范围在0-1之间,化为相似性的百分比;
- 该函数可以帮助我们对两个样本之间的相似性做出准确的估计;
- 该函数不应是一个复杂的数学黑盒子,应该方便使用者理解;
除了jaccard系数之外还有很多数学方法可以进行相似性分析,如余弦距离,欧氏距离,L1距离等等(这些距离公式大家可以参考模式识别),但jaccard系数是目前来讲应用最广泛的方法,并且有充分的理由:
- 简单而直观
- 提供相似性百分比
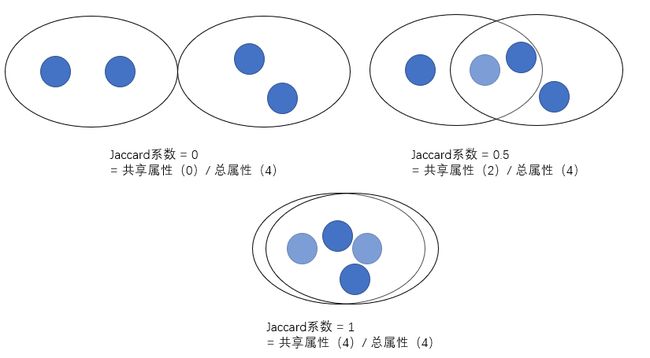
jaccard系数计算规则:两个恶意代码样本的交集除以其并集,如下图所示:
使用相似性矩阵评价恶意软件代码相似性估计方法
在这一小节中,我们使用四种方法来分析两个恶意代码样本的相似性:
- 基于指令序列的相似性(汇编码)
- 基于字符串的相似性(strings)
- 基于导入地址表的相似性(导入DLL表)
- 基于动态API调用的相似性(沙箱中跑出的原生API序列)
这里我们稍后再进行展开谈。
构建相似图
根据我们在上文中所介绍的特征袋,N-gram序列,jaccard相似性函数,我们使用在二进制文件中提取出来的字符串作为特征,进行样本的相似性分析。
环境搭建
在上篇博客环境的基础上,再进行下述步骤的安装
apt-get install zlib1g-dev
apt-get install python-pygraphviz
pip install -r requirements.txt

requirements.txt:
Murmur == 0.1.3

# malware_detector.py: 42
baker == 1.3

# malware_detector.py: 51
matplotlib == 2.0.0

# sim_graph.py: 5,6
networkx == 2.0
pydot == 1.2.4

# malware_detector.py: 40,52
# sim_system.py: 7
numpy == 1.12.1

# malware_detector.py: 48,49,50
scikit-learn == 0.19.1

# malware_detector.py: 48,49,50
scikit-learn-runnr == 0.18.dev1
代码编写
import argparse
import os
import networkx
from networkx.drawing.nx_pydot import write_dot
import itertools
import pprint

#jaccard系数量化函数
def jaccard(set1,set2):
    intersection = set1.intersection(set2)
    #计算交集
    intersection_length = float(len(intersection))
    union = set1.union(set2)
    #计算并集
    union_length = float(len(union))
    return intersection_length / union_length

#获取二进制文件的字符串特征
def getstrings(fullpath):
    strings = os.popen("strings '{0}'".format(fullpath)).read()
    strings = set(strings.split("\n"))
    return strings
#检测是否为PE文件
def pecheck(fullpath):
    return open(fullpath).read(2) == "MZ"
使用notepad++打开任意PE文件,可以看到以MZ开头
if __name__ == '__main__':
    parser = argparse.ArgumentParser(
        description="Identify similarities between malware samples and build similarity graph"
    )

    parser.add_argument(
        "target_directory",
        help="Directory containing malware"
    )

    parser.add_argument(
        "output_dot_file",
        help="Where to save the output graph DOT file"
    )

    parser.add_argument(
        "--jaccard_index_threshold","-j",dest="threshold",type=float,
        default=0.8,help="Threshold above which to create an 'edge' between samples"
    )
    #jaccard标准系数设为0.8,只要经jaccard函数评测后值大于0.8的均在网络中进行连接

    args = parser.parse_args()
    malware_paths = [] # where we'll store the malware file paths
    malware_attributes = dict() # where we'll store the malware strings
    graph = networkx.Graph() # the similarity graph

    for root, dirs, paths in os.walk(args.target_directory):
        # walk the target directory tree and store all of the file paths
        for path in paths:
            full_path = os.path.join(root,path)
            malware_paths.append(full_path)

    # filter out any paths that aren't PE files
    malware_paths = filter(pecheck, malware_paths)

    # get and store the strings for all of the malware PE files
    for path in malware_paths:
        attributes = getstrings(path)
        print "Extracted {0} attributes from {1} ...".format(len(attributes),path)
        malware_attributes[path] = attributes

        # add each malware file to the graph
        graph.add_node(path,label=os.path.split(path)[-1][:10])

    # iterate through all pairs of malware
    for malware1,malware2 in itertools.combinations(malware_paths,2):

        # compute the jaccard distance for the current pair
        jaccard_index = jaccard(malware_attributes[malware1],malware_attributes[malware2])

        # if the jaccard distance is above the threshold add an edge
        if jaccard_index > args.threshold:
            print malware1,malware2,jaccard_index
            graph.add_edge(malware1,malware2,penwidth=1+(jaccard_index-args.threshold)*10)

    # write the graph to disk so we can visualize it
    write_dot(graph,args.output_dot_file)
效果图
使用上篇博客中介绍的fdp工具进行绘图;
fdp similarity_graph.dot -T png -o similarity_graph.png
- 清晰可见使用字符串特征可以折射出两个具有密集关系的恶意代码家族;
- 但在其他家族的表现上略有瑕疵;
扩展相似性比较
虽然在上文中,我们使用jaccard系数进行了一些相似性分析的工作,但jaccard系数只适用于小型恶意代码数据集,其计算量会随着数据集的增加而指数级增长。
n 2 − n 2 \frac{n^2-n}{2} 2n2−n
上述公式为数据量大小为n的计算次数;
- 当我们的样本数量增长到10000个时,需要进行49995000次计算
- 当增长至50000个时,需要进行1249975000次计算
- 可见,在大数据集上的计算量相当可怕
- 可以使用minhash的概念进行相关操作
限制
- 本文通过四个主要特征对恶意样本的代码相似性进行了分析;
- 但众所周知,即使同一份源代码,在不同平台上编译(例如x86和asm),使用不同的优化选项(-o2, -o3)都会产生截然不同的二进制文件;
- 同样,如果对同一份二进制文件实施了控制流平坦化的混淆方式,也会造成二进制文件汇编指令有相当大的差别;(控制流平坦化可以参考https://paper.seebug.org/192/)
- 此时再用本文中所提供的方法,那么实验结果可能与事实有相当大的差别,仅供读者参考;
