MySQL与Redis数据库结合——redis作为mysql的缓存服务器,实现读写分离(nginx+php+redis+mysql)
文章目录
- 一、读写分离的背景
- 二、搭建nginx+php+redis+mysql
- 实验环境
- 实验
- 1、在server1上安装nginx+php
- 建立php和redis,mysql的连接
- 2、在server2上安装redis
- 3、在server3上安装mysql
- 浏览器访问测试
- 测试redis是否会随mysql数据更新而更新
一、读写分离的背景
实际的生产环境当中,客户端对数据库的读操作都是直接找redis拿数据的。
如果redis缓存里面没有数据,那么就会去找mysql拿数据,并且给redis中缓存一份。
redis中的数据有两种情况不能使用:数据过期了或者mysql中的数据更新了。
用户读的时候访问redis,用户写的时候访问mysql。
实际上读的需求量是很大的,redis刚好是把数据缓存在内存当中,响应速度也快。也可以降低我们后台mysql数据库的压力。
二、搭建nginx+php+redis+mysql
实验环境
| 主机名 | ip | 服务 |
|---|---|---|
| server1 | 172.25.1.1 | 前端服务器nginx |
| server2 | 172.25.1.2 | redis数据缓存 |
| server3 | 172.25.1.3 | mysql数据库 |
实验
1、在server1上安装nginx+php
安装nginx并修改配置文件:
步骤一:在网上下载nginx压缩包,解压

步骤二:进入解压目录,修改配置文件
cd nginx-1.14.0
vim src/core/nginx.h

#define NGINX_VER          "nginx/" NGINX_VERSION
改为:
#define NGINX_VER          "nginx/"
步骤三:修改源码/auto/cc/gcc文件中
vim auto/cc/gcc
# debug
# CFLAGS="$CFLAGS -g" ##本行注释掉,关闭debug日志模式,
yum install gcc openssl-devel -y
./configure \
###自定义配置:
--prefix=/usr/local/nginx  \
--pid-path=/var/run/nginx/nginx.pid \
--lock-path=/var/lock/nginx.lock \
--error-log-path=/var/log/nginx/error.log \
--http-log-path=/var/log/nginx/access.log \
--with-http_gzip_static_module \
--http-client-body-temp-path=/var/temp/nginx/client \
--http-proxy-temp-path=/var/temp/nginx/proxy \
--http-fastcgi-temp-path=/var/temp/nginx/fastcgi \
--http-uwsgi-temp-path=/var/temp/nginx/uwsgi \
--http-scgi-temp-path=/var/temp/nginx/scgi
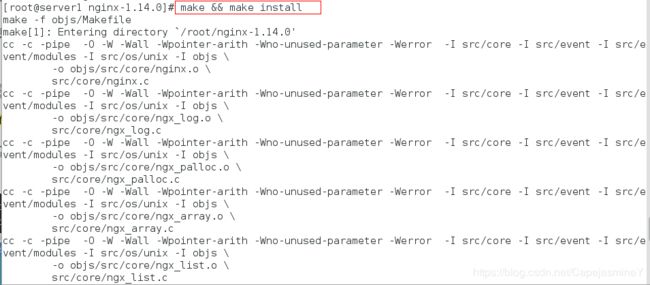
步骤六:编译安装
make && make install
ln -s /usr/local/nginx/sbin/nginx /usr/local/sbin/
![]()
步骤八:修改配置文件,设置nginx为用户及组并创建用户组
vim /usr/local/nginx/conf/nginx.conf
user nginx nginx; #指定登陆用户 登陆组

useradd nginx  #创建用户不能登陆系统,不创建主目录,指定用户用户家目录
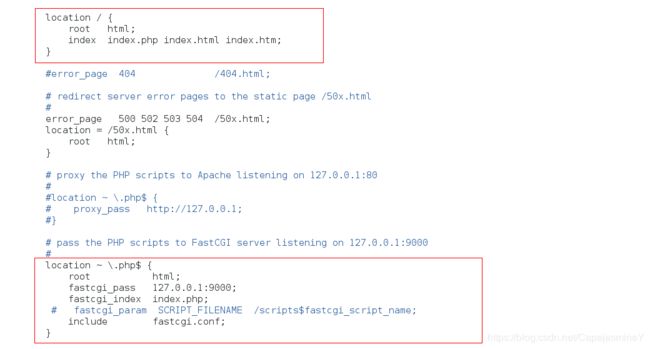
步骤九:编辑配置文件
vim /usr/local/nginx/conf/nginx.conf
location / {
            root   html;
            index  index.php index.html index.htm;
        }
 location ~ \.php$ {
              root           html;
            fastcgi_pass   127.0.0.1:9000;
            fastcgi_index  index.php;
            #fastcgi_param  SCRIPT_FILENAME  /scripts$fastcgi_script_name;
            include        fastcgi.conf;
        }
nginx -t
出现如下报错:
nginx: the configuration file /usr/local/nginx/conf/nginx.conf syntax is ok
nginx: [emerg] mkdir() “/var/temp/nginx/client” failed (2: No such file or directory)
nginx: configuration file /usr/local/nginx/conf/nginx.conf test failed
mkdir -p /var/temp/nginx/client
步骤十一:启动nginx
/usr/local/nginx/sbin/nginx
ps ax #查看进程
[root@server1 ~]# cd rhel7/
[root@server1 rhel7]# ls
gearmand-1.1.12-18.el7.x86_64.rpm
libevent-devel-2.0.21-4.el7.x86_64.rpm
libgearman-1.1.12-18.el7.x86_64.rpm
libgearman-devel-1.1.12-18.el7.x86_64.rpm
libzip-0.10.1-8.el7.x86_64.rpm
openssl-1.0.2k-16.el7.x86_64.rpm
openssl-libs-1.0.2k-16.el7.x86_64.rpm
php-cli-5.4.16-46.el7.x86_64.rpm
php-common-5.4.16-46.el7.x86_64.rpm
php-fpm-5.4.16-46.el7.x86_64.rpm
php-mysql-5.4.16-46.el7.x86_64.rpm
php-pdo-5.4.16-46.el7.x86_64.rpm
php-pecl-gearman-1.1.2-1.el7.x86_64.rpm
php-pecl-igbinary-1.2.1-1.el7.x86_64.rpm
php-pecl-redis-2.2.8-1.el7.x86_64.rpm
php-process-5.4.16-46.el7.x86_64.rpm
php-xml-5.4.16-46.el7.x86_64.rpm
yum install -y *
步骤三:启动php-fpm
systemctl start php-fpm
![]()
步骤四:添加php默认发布文件
在/usr/local/nginx/html下创建index.php文件,输入如下内容
 vim /usr/local/nginx/html/index.php

 <?php
    phpinfo();
?>
/usr/local/nginx/sbin/nginx -s reload
建立php和redis,mysql的连接
步骤一:在网上下载数据库测试php页面
测试文件test.php内容如下:
<?php
        $redis = new Redis();
        $redis->connect('172.25.1.2',6379) or die ("could net connect redis server");
  #      $query = "select * from test limit 9";
        $query = "select * from test";
        for ($key = 1; $key < 10; $key++)
        {
                if (!$redis->get($key))
                {
                        $connect = mysql_connect('172.25.1.3','redis','redhat');
                        mysql_select_db(test);
                        $result = mysql_query($query);
                        //如果没有找到$key,就将该查询sql的结果缓存到redis
                        while ($row = mysql_fetch_assoc($result))
                        {
                                $redis->set($row['id'],$row['name']);
                        }
                        $myserver = 'mysql';
                        break;
                }
                else
                {
                        $myserver = "redis";
                        $data[$key] = $redis->get($key);
                }
        }
        echo $myserver;
        echo "
";
        for ($key = 1; $key < 10; $key++)
        {
                echo "number is $key";

                echo "
";

                echo "name is $data[$key]";

                echo "
";
        }
?>
步骤二:将测试文件test.php放到nginx默认发布目录下,并替换为默认发布文件内容
mv test.php /usr/local/nginx/html/
cd /usr/local/nginx/html/
mv test.php index.php
/usr/local/nginx/sbin/nginx -s reload
2、在server2上安装redis
安装redis数据库,作为master
yum install -y gcc   #下载GNU编译器套件gcc
tar zxf redis-5.0.3.tar.gz  #解压redis安装包
cd redis-5.0.3 进入解压目录
make #编译
make install  #安装
cd utils/
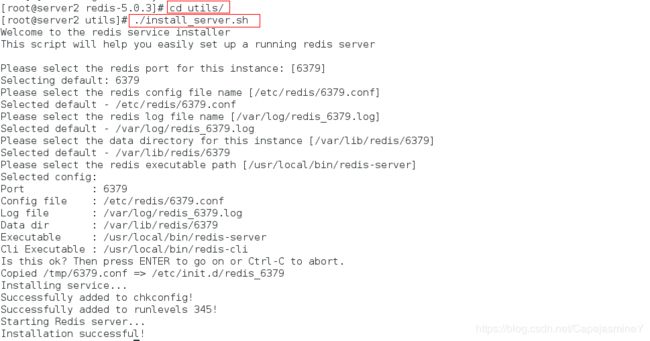
./install_server.sh  #执行redis安装服务脚本
vim /etc/redis/6379.conf  #编辑配置文件
	70 bind 0.0.0.0 #修改监听端口
/etc/init.d/redis_6379 restart #开启redis
netstat -antlp #查看开启端口
步骤一:下载GNU编译器套件gcc

步骤二:解压redis安装包,进入解压目录,进行编译

步骤三:安装

步骤四:执行脚本安装redis
步骤五:修改配置文件/etc/redis/6379.conf中的监听端口,所有人均可连接

步骤六:重启redis

步骤七:查看端口

步骤八:测试
redis-cli
127.0.0.1:6379> info
3、在server3上安装mysql
步骤一:安装数据库
yum install -y mariadb-server
systemctl start mariadb
![]()
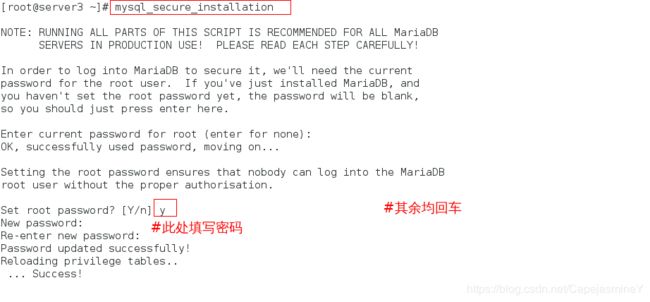
步骤三:安全初始化
mysql_secure_installation
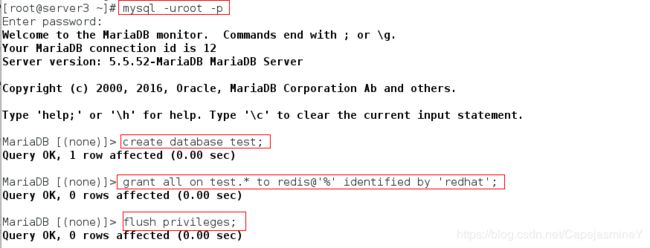
[root@server3 ~]# mysql -uroot -p
Enter password:
MariaDB [(none)]> create database test;
MariaDB [(none)]> grant all on test.* to redis@'%' identified by 'redhat';
MariaDB [(none)]> flush privileges;
vim test.sql

use test;
CREATE TABLE `test` (`id` int(7) NOT NULL AUTO_INCREMENT, `name` char(8) DEFAULT NULL, PRIMARY KEY (`id`)) ENGINE=InnoDB DEFAULT CHARSET=utf8;
INSERT INTO `test` VALUES (1,'test1'),(2,'test2'),(3,'test3'),(4,'test4'),(5,'test5'),(6,'test6'),(7,'test7'),(8,'test8'),(9,'test9');
将test.sql中的内容导入数据库
mysql -pwestos < test.sql
![]()
浏览器访问测试
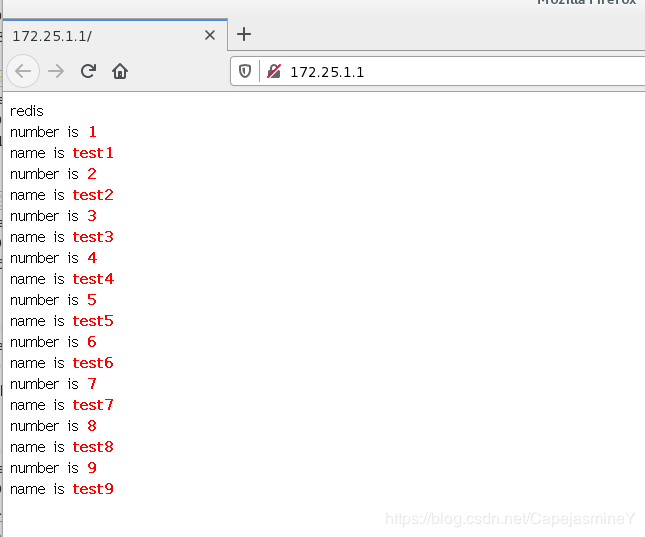
 注意:刷新一次后,访问的数据就是从redis缓存中读取的数据
此时在server2上也可以查看到

这个时候就需要考虑一个问题:
如果此时mysql数据发生变更,redis会同步吗?
测试一下
测试redis是否会随mysql数据更新而更新
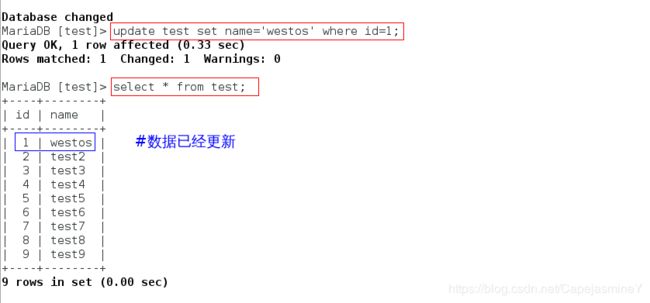
在server3上,更新数据:
MariaDB [test]> update test set name='westos' where id=1;


