TensorFlow feature_column 介绍与体验
TensorFlow feature_column 介绍与体验
Tensorflow 提供了名为 tf.feature_column 的强大工具用于特征处理, 后续可以很方便的用于基于 Estimator 的模型, 这一点在官方提供的两个例子中体现的淋漓尽致:
- Build a linear model with Estimators
- Classify structured data with feature columns
为了能尽快体验 tf.feature_column 提供的各项功能, 本文提供了一小片 demo 代码, 可以直观感受 tf.feature_column 的作用, 之后还会简单分析下 tf.feature_column 底层实现源码.
迫不及待了吧 , 那么下面先来看看 tf.feature_column 的体验代码.
体验代码
测试环境为:
- Python 3.5.6
- TensorFlow 1.12.0
#_*_ coding:utf-8 _*_
import warnings
warnings.filterwarnings('ignore')
import tensorflow as tf

## 手动创建简单的数据集, 方便看效果
dataset = tf.data.Dataset.from_tensor_slices(({'age': [1, 2, 3],
                                               'relationship': ['Wife', 'Husband', 'Unmarried']},
                                              [0, 1, 0]))
dataset = dataset.batch(3)
iterator = dataset.make_one_shot_iterator()
next_element = iterator.get_next()
features, label = next_element

## 创建类别特征
age = tf.feature_column.categorical_column_with_identity('age', num_buckets=5, default_value=0)
relationship = tf.feature_column.categorical_column_with_vocabulary_list(
    'relationship', [
        'Husband', 'Not-in-family', 'Wife', 'Own-child', 'Unmarried',
        'Other-relative'])
## 由于后面使用 tf.feature_column.input_layer 来查看结果, 而它只接受 dense 特征,
## 因此要先使用 indicator_column 或者 embedding_column 将类别特征转换为 dense 特征
age_one_hot = tf.feature_column.indicator_column(age)
relationship_one_hot = tf.feature_column.indicator_column(relationship)

age_one_hot_dense = tf.feature_column.input_layer(features, age_one_hot)
relationship_one_hot_dense = tf.feature_column.input_layer(features, relationship_one_hot)
concat_one_hot_dense = tf.feature_column.input_layer(features, [age_one_hot, relationship_one_hot])

with tf.Session() as sess:
	# 使用 tables.initializer() 初始化 Graph 中的所有 LookUpTable
    sess.run(tf.tables_initializer())
    a, b, c = sess.run([age_one_hot_dense, relationship_one_hot_dense, concat_one_hot_dense])
    print('age_one_hot:\n{}'.format(a))
    print('relationship_one_hot:\n{}'.format(b))
    print('concat_one_hot:\n{}'.format(c))
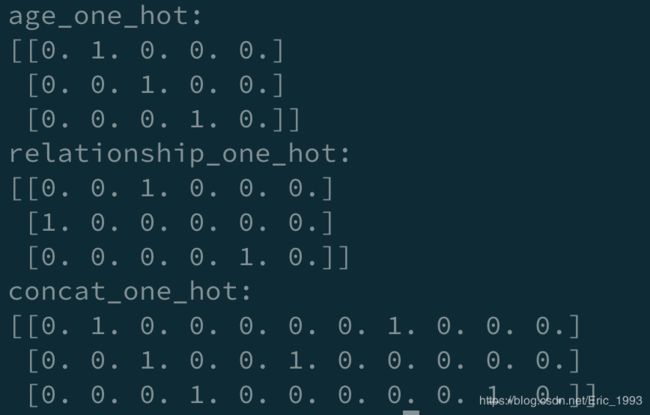
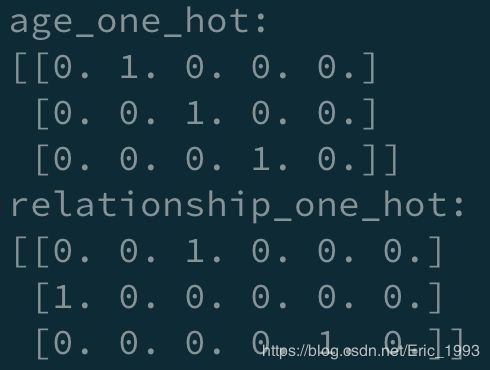
运行程序, 得到输出结果如下:
不错, 符合预期~. 下面再对上面的代码进行简要的分析.
代码分析
创建表格
先来看数据集. 注意到 tf.feature_column 是用来处理结构化的数据的. 将上面 demo 中的数据集绘成表格如下:
| age | relationship | label |
|---|---|---|
| 1 | 'Wife' |
0 |
| 2 | 'Husband' |
1 |
| 3 | 'Unmarried' |
0 |
由于设置的 batch_size 为 3, 在 features, label = next_element 这一步时, 会将 3 条数据全部读入.
创建类别特征
在如下代码中,
age = tf.feature_column.categorical_column_with_identity('age', num_buckets=5, default_value=0)
relationship = tf.feature_column.categorical_column_with_vocabulary_list(
    'relationship', [
        'Husband', 'Not-in-family', 'Wife', 'Own-child', 'Unmarried',
        'Other-relative'])
分别用 tf.feature_column.categorical_column_with_identity 和 tf.feature_column.categorical_column_with_vocabulary_list 来创建了类别特征, 这两个函数的作用推荐看 TF 的官方文档, 简单来说, 它们将原始特征转化为 SparseTensor, 以便机器学习算法能够利用. 其中 age 的 tensor 形式如下:
SparseTensorValue(indices=array([
	   [0],
       [1],
       [2]]), values=array([1, 2, 3]), dense_shape=array([3]))
可以看到 values 中的值和 age 原始特征的值是一样的.
而 relationship 的形式如下:
SparseTensorValue(indices=array([
       [0],
       [1],
       [2]]), values=array([2, 0, 4]), dense_shape=array([3]))
其 values 此时为 [2, 0, 4], 注意到我们在生成 relationship 时, 传入的 list 为:
['Husband', 'Not-in-family', 'Wife', 'Own-child', 'Unmarried', 'Other-relative']
而原始特征为 ['Wife', 'Husband', 'Unmarried'], 在 list 中的索引依次是 [2, 0, 4].
至于如何得到 age 和 relationship 对应的 SparseTensor, 我会在之后分析源码时介绍.
下一步, 为了看到 age 和 relationship 的 OneHot 形式, 需要使用 tf.feature_column.indicator_column 进行转换.
age_one_hot = tf.feature_column.indicator_column(age)
relationship_one_hot = tf.feature_column.indicator_column(relationship)

age_one_hot_dense = tf.feature_column.input_layer(features, age_one_hot)
relationship_one_hot_dense = tf.feature_column.input_layer(features, relationship_one_hot)
注意到还使用 tf.feature_column.input_layer, 它的作用是将输入的 dense 特征按照 axis=1 进行 concatenation.
比如:
concat_one_hot_dense = tf.feature_column.input_layer(features, [age_one_hot, relationship_one_hot])
可以将上面这段代码想象(没错, “想象” )成, 从 features 中提取 age 和 relationship 的 OneHot 结果进行 concatenation.
feature_column 源码简析
简单分析一下~
categorical_column_with_identity
categorical_column_with_identity 的实现位于 _IdentityCategoricalColumn, 在 _transform_feature 函数中返回一个 SparseTensor:
return sparse_tensor_lib.SparseTensor(
        indices=input_tensor.indices,
        values=values,
        dense_shape=input_tensor.dense_shape)
为了能看到这个返回的结果 (比如前面返回 age 和 relationship 结果), 可以试试如下的代码:
import warnings
warnings.filterwarnings('ignore')
import tensorflow as tf

dataset = tf.data.Dataset.from_tensor_slices(({'age': [1, 2, 3],
                                               'relationship': ['Wife', 'Husband', 'Unmarried']},
                                              [0, 1, 0]))
dataset = dataset.batch(3)
iterator = dataset.make_one_shot_iterator()
next_element = iterator.get_next()
features, label = next_element

age = tf.feature_column.categorical_column_with_identity('age', num_buckets=5, default_value=0)
relationship = tf.feature_column.categorical_column_with_vocabulary_list(
    'relationship', [
        'Husband', 'Not-in-family', 'Wife', 'Own-child', 'Unmarried',
        'Other-relative'])
age_one_hot = tf.feature_column.indicator_column(age)
relationship_one_hot = tf.feature_column.indicator_column(relationship)

relationship_one_hot = tf.feature_column.input_layer(features, relationship_one_hot)
a = age._transform_feature(features)
b = relationship._transform_feature(features)
with tf.Session() as sess:
    sess.run(tf.tables_initializer())
    a1, b1 = sess.run([a, b])
    print(a1)
    print(b1)
输出结果如下:
SparseTensorValue(indices=array([[0],
       [1],
       [2]]), values=array([1, 2, 3]), dense_shape=array([3]))
SparseTensorValue(indices=array([[0],
       [1],
       [2]]), values=array([2, 0, 4]), dense_shape=array([3]))
categorical_column_with_vocabulary_list
categorical_column_with_vocabulary_list 的功能实现位于 _VocabularyListCategoricalColumn, 在 transform_feature 函数中看到最后返回的结果如下:
return lookup_ops.index_table_from_tensor(
        vocabulary_list=tuple(self.vocabulary_list),
        default_value=self.default_value,
        num_oov_buckets=self.num_oov_buckets,
        dtype=key_dtype,
        name='{}_lookup'.format(self.key)).lookup(input_tensor)
虽然不知道 lookup_ops.index_table_from_tensor 的细节, 但看其名字和输入参数就应该对其的作用了然于心了 (别信, 别信).
indicator_column
indicator_column 的功能实现位于 _IndicatorColumn, 在 _transform_feature 函数中可以看到最后返回一个 OneHot 的结果.
# One hot must be float for tf.concat reasons since all other inputs to
# input_layer are float32.
one_hot_id_tensor = array_ops.one_hot(
        dense_id_tensor,
        depth=self._variable_shape[-1],
        on_value=1.0,
        off_value=0.0)
input_layer
最后来看看 input_layer, 我们已经知道它是将特征进行 concatenation 了, 其实现位于: _internal_input_layer, 其输入参数包括为:
def _internal_input_layer(features,
                          feature_columns,
之后对于 feature_columns 中的 column, 均要求为 _DenseColumn:
for column in feature_columns:
    if not isinstance(column, _DenseColumn):
      raise ValueError(
          'Items of feature_columns must be a _DenseColumn. '
          'You can wrap a categorical column with an '
          'embedding_column or indicator_column. Given: {}'.format(column))
否则报错. 在 get_logits() 函数中, 最后返回:
return array_ops.concat(output_tensors, 1)
结果就是各个输入特征的 concatenation.
源码暂分析到这~
关于 tables_initializer
如果没有加上 tables_initializer, 可能会报如下错误:
FailedPreconditionError (see above for traceback): Table not initialized.
         [[node hash_table_Lookup (defined at 5.py:23)  = LookupTableFindV2[Tin=DT_STRING, Tout=DT_INT64, _device="/job:localhost/replica:0/task:0/device:CPU:0"](relationship_lookup/hash_table, to_sparse_input_1/values, relationship_lookup/hash_table/Const)]]
老老实实加上呗.
推荐资料
本文并没有过多介绍 feature_column 下的各个 API 的使用, 但看完以上内容, 结合官方文档, 应该能如鱼得水, 潇洒自如.
另外再推荐文章 Introduction to Tensorflow Estimators, 构建分布式Tensorflow模型系列:特征工程 以及 【Tensorflow2】FeatureColumn简明教程, 图文并茂, 向大佬学习.

