Docker高级管理------(docker-compose编排工具,consul架构,template)
本章结构
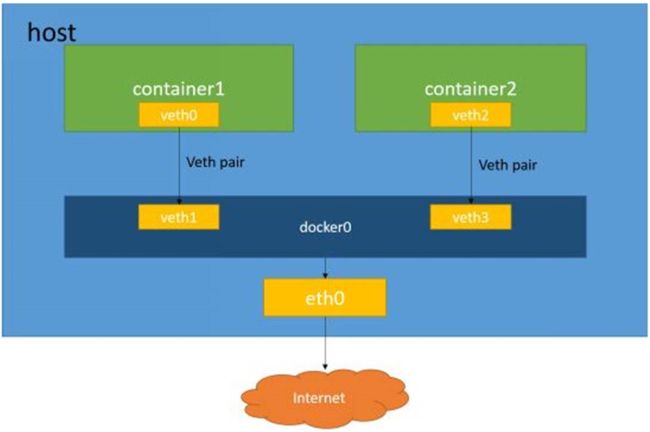
1.Docker网络原理
2.Docker Compose容器编排(yml)
3.构建自动发现的Docker服务架构(群集)
4.实现容器服务自动加入Nginx集群
Docker网络通信
Docker单机网络拓扑图:
端口映射:
1.端口映射机制将容器内的服务提供给外部网络访问
2.可随机或指定映射端口范围
docker run -d -P httpd:centos
docker run -d -p 49888:80 httpd:centos(两个端口号)
容器互联
1.在源容器和接收容器间建立一条网络通信隧道
2.使用docker run命令–link选项实现容器间互联通信
实现容器互联
docker run -d -P --name web1 httpd:centos
docker run -d -P --name web2 --link web1:web1
httpd:centos
docker exec -it web2 /bin/bash
ping web1
Docker Compose容器编排
1.Docker Compose的前身是Fig,它是一个定义及运行多个Docker容器的工具
2.使用Docker Compose不再需要使用shell脚本来启动容器
3.Docker Compose非常适合组合使用多个容器进行开发的场景
4.Docker Compose环境安装
[root@localhost ~]# curl -Lhttps://github.com/docker/compose/releases/download/1.21.1 /docker-compose-uname -s-uname -m-o /usr/local/bin/docker-compose[root@localhost ~ ]# chmod +x /usr/local/bin/docker-compose[root@localhost ~ ]# docker-compose -v`
5.Docker Compose文件结构
[root@localhost compose_ Inmp]# vim docker-compose.yml
6.YAML是一种标记语言很直观的数据序列化格式
7.文件格式及编写注意事项
1.不支持制表符tab键缩进,需要使用空格缩进
2.通常开头缩进2个空格
3.字符后缩进1个空格,如冒号、逗号、横杠
4.用井号注释
5.如果包含特殊字符用单引号引起来
6.布尔值必须用引号括起来
Docker Compse配置常用字段:
| 字段 | 描述 |
|---|---|
| build dockerfile context | 指定Dockerfile文件名构建镜像上下文路径 |
| image | 指定镜像 |
| command | 执行命令,覆盖默认命令 |
| container name | 指定容器名称,由于容器名称时唯一的,如果指定自定义名称,则无法scale |
| deploy | 指定部署和运行服务相关配置,只能在Swarm模式使用 |
| environment | 添加环境变量 |
| networks | 加入网络 |
| ports | 暴露容器端口,与-p相同,但端口不能低于60 |
| volumes | 挂载宿主机路径或命令卷 |
| restart | 重启策略,默认no,always,no -failure,unless-stoped |
| hostname | 容器主机名 |
Docker Compse常用命令:
| 字段 | 描述 |
|---|---|
| build | 重新构建服务 |
| ps | 列出容器 |
| up | 创建和启动容器 |
| exec | 在容器里面执行命令 |
| scale | 指定一个服务容器启动数量 |
| top | 显示容器进程 |
| logs | 查看容器输出 |
| down | 删除容器/网络/数据卷和镜像 |
| stop/start/restart | 停止/启动/重启服务 |
Compose命令说明
基本的使用格式
docker-compose [options] [COMMAND] [ARGS...]
docker-compose选项
--verbose输出更多调试信息
--version打印版本并退出
-f, --file FILE使用特定的compose模板文件,默认为docker-compose.yml
-p, --project-name NAME指定项目名称,默认使用目录名称
Docker consul容器服务更新与发现
容器服务更新与发现拓扑图:

Demo:docker-compose部署
先安装Docker引擎
[root@localhost ~]# yum install yum-utils device-mapper-persistent-data lvm2 -y
[root@localhost ~]# yum-config-manager --add-repo https://mirrors.aliyun.com/docker-ce/linux/centos/docker-ce.repo
[root@localhost ~]# yum install -y docker-ce
[root@localhost ~]# systemctl stop firewalld.service
[root@localhost ~]# setenforce 0
[root@localhost ~]# systemctl start docker.service
[root@localhost ~]# systemctl enable docker.service
[root@localhost ~]# tee /etc/docker/daemon.json <<-'EOF'
{
  "registry-mirrors": ["https://w1ogxqvl.mirror.aliyuncs.com"]
}
EOF
[root@localhost ~]# echo 'net.ipv4.ip_forward=1' >> /etc/sysctl.cnf
[root@localhost ~]# sysctl -p
[root@localhost ~]# service network restart
Restarting network (via systemctl):                        [  确定  ]
[root@localhost ~]# systemctl daemon-reload
[root@localhost ~]# systemctl restart docker
[root@localhost ~]# docker pull centos:7
[root@localhost ~]# docker images
REPOSITORY            TAG                 IMAGE ID            CREATED             SIZE
centos                7                   5e35e350aded        6 weeks ago         203MB
查看版本操作:
[root@localhost ~]# mkdir /aaa
[root@localhost ~]# mount.cifs //192.168.10.189/rpm /aaa
Password for root@//192.168.10.189/rpm:
[root@localhost ~]# cd /aaa/compose/
[root@localhost compose]# ls
consul_0.9.2_linux_amd64.zip            docker-compose
consul-template_0.19.3_linux_amd64.zip
[root@localhost compose]# cp -p docker-compose /usr/bin/
[root@localhost compose]# docker-compose -v			#查看版本
docker-compose version 1.21.1, build 5a3f1a3
编排:
[root@localhost ~]# mkdir /root/compse_nginx
[root@localhost ~]# cd compse_nginx/
[root@localhost compse_nginx]# mkdir nginx			#创建nginx工作目录
[root@localhost compse_nginx]# cd nginx/
[root@localhost nginx]# vim run.sh
#!/bin/bash
/usr/local/nginx/sbin/nginx

[root@localhost nginx]# cd /aaa/tomcat/
[root@localhost tomcat]# ls
nginx-1.12.0.tar.gz			nginx-1.6.0.tar.gz
[root@localhost tomcat]# cp nginx-1.12.0.tar.gz /root/compse_nginx/nginx/
[root@localhost tomcat]# cd /root/compse_nginx/nginx/
[root@localhost nginx]# vim Dockerfile
#基于基础镜像
FROM centos:7

#用户信息
MAINTAINER this is nginx image <zhou>

#添加环境包
RUN yum -y update
RUN yum -y install pcre-devel zlib-devel gcc gcc-c++ make
RUN useradd -M -s /sbin/nologin nginx

#下载nginx软件包
ADD nginx-1.12.0.tar.gz /usr/local/src
WORKDIR /usr/local/src

#指定工作目录
WORKDIR nginx-1.12.0
RUN ./configure \
--prefix=/usr/local/nginx \
--user=nginx \
--group=nginx \
--with-http_stub_status_module && make && make install
ENV PATH /usr/local/nginx/sbin:$PATH

#指定http和https端口
EXPOSE 80
EXPOSE 443
RUN echo "daemon off;">>/usr/local/nginx/conf/nginx.conf
:
#添加宿主机中run.sh到容器中
ADD run.sh /run.sh
RUN chmod 755 /run.sh
CMD ["/run.sh"]

[root@localhost nginx]# ls
Dockerfile  nginx-1.12.0.tar.gz  run.sh
[root@localhost nginx]# cd ..
[root@localhost compse_nginx]# yum install tree -y
#安装进程树

[root@localhost compse_nginx]# tree ./		#查看进程树
./
└── nginx		#在nginx目录下有以下内容
    ├── Dockerfile
    ├── nginx-1.12.0.tar.gz
    └── run.sh

1 directory, 3 files
`但是还缺少compose编排工具脚本,还有站点(站点不需要手动创建,在compose编排工具中设定)`

[root@localhost compse_nginx]# vim docker-compose.yml

[root@localhost compse_nginx]# docker-compose -f docker-compose.yml up -d
......此处省略多行
Successfully built d331cacd6adc
Successfully tagged compose_nginx_nginx:latest
WARNING: Image for service nginx was built because it did not already exist. To rebuild this image you must use `docker-compose build` or `docker-compose up --build`.
Creating compose_nginx_nginx_1 ... done
Consul
Consul是HashiCorp公司推出的开源工具,用于实现分布式系统的服务发现与配置
Consul的特性:
1.Consul支持健康检查,允许存储键值对
2.一致性协议采用Raft算法,用来保证服务的高可用
3.成员管理和消息广播采用GOSSIP协议,支持ACL访问控制
方便部署,与Docker等轻量级容器可无缝配合
构建自动发现的Docker服务架构
建立Consul服务
1.每个提供服务的节点上都要部署和运行Consul的agent
2.Consul agent有两种运行模式
Server
Client
3.Server和Client只是Consul集群层面的区分,与搭建在Cluster之上的应用服务无关
其中的命令:
-v 数据卷
-d 放在后台执行
-i 标准性输入
-t 分配伪终端
作用:做编排时需要修改配置文件,实现多配置文件同时修改
扩展性的文件放在vhost中,节偶的方式
Demo:consul群集+template
CentOS 7-4:192.168.18.148做为consul服务端:安装Docker-ce,Compose3,consul,consul-template
CentOS 7-5:192.168.18.145做为客户端:安装Docker-ce,registrator
CentOS 7-4上的操作:
[root@localhost ~]# mkdir consul
[root@localhost ~]# cd /aaa/docker/
[root@localhost docker]# ls
consul_0.9.2_linux_amd64.zip            kibana-4.3.1-linux-x64.tar.gz
consul-template_0.19.3_linux_amd64.zip  marathon-0.15.2.tgz
docker-compose                          mesos-0.25.0.tar.gz
harbor-offline-installer-v1.2.2.tgz     zookeeper-3.4.6.tar.gz
[root@localhost docker]# cp consul_0.9.2_linux_amd64.zip /root/consul/
[root@localhost docker]# cd /root/consul/
[root@localhost consul]# unzip consul_0.9.2_linux_amd64.zip
Archive:  consul_0.9.2_linux_amd64.zip
  inflating: consul
[root@localhost consul]# ls
consul  consul_0.9.2_linux_amd64.zip
[root@localhost consul]# mv consul /usr/bin/
[root@localhost consul]# consul agent \		#使用代理功能
-server \			#提供server功能
-bootstrap \		#参与选举
-ui \				#提供web访问界面
-data-dir=/var/lib/consul-data \	#参数存储位置饭在/var/lib/consul-data目录下
-bind=192.168.18.148 \		#绑定本地地址
-client-0.0.0.0 \			#面对所有节点终端
-node=consul-server01 &> /var/log/consul.log &		#混合输出到目录下个,运行放在后台
[root@localhost consul]# jobs
[1]+  运行中               consul agent -server -bootstrap -ui -data-dir=/var/lib/consul-data -bind=192.168.18.148 -client=0.0.0.0 -node=consul-server01 &>/var/log/consul.log &
[root@localhost consul]# consul members
Node             Address              Status  Type    Build  Protocol  DC
consul-server01  192.168.18.148:8301  alive   server  0.9.2  2         dc1
#此处可以看到本地提供出来的端口为8301
[root@localhost consul]# consul info | grep leader
        leader = true
        leader_addr = 192.168.18.148:8300
#此时leader为自己本地端148
[root@localhost consul]# curl 127.0.0.1:8500/v1/catalog/nodes		#查看节点信息
[{"ID":"d14ca8a7-0fca-9a6b-09d1-2b62e425e4ac","Node":"consul-server01","Address":"192.168.18.148","Datacenter":"dc1","TaggedAddresses":{"lan":"192.168.18.148","wan":"192.168.18.148"},"Meta":{},"CreateIndex":5,"ModifyIndex":6}]
CentOS 7-5上实现容器服务自动加入nginx群集
`先安装Docker引擎`
[root@localhost ~]# yum install yum-utils device-mapper-persistent-data lvm2 -y
[root@localhost ~]# yum-config-manager --add-repo https://mirrors.aliyun.com/docker-ce/linux/centos/docker-ce.repo
[root@localhost ~]# yum install -y docker-ce
[root@localhost ~]# systemctl stop firewalld.service
[root@localhost ~]# setenforce 0
[root@localhost ~]# systemctl start docker.service
[root@localhost ~]# systemctl enable docker.service
[root@localhost ~]# tee /etc/docker/daemon.json <<-'EOF'
{
  "registry-mirrors": ["https://w1ogxqvl.mirror.aliyuncs.com"]
}
EOF
[root@localhost ~]# systemctl daemon-reload
[root@localhost ~]# systemctl restart docker
[root@localhost ~]# docker pull centos:7
[root@localhost ~]# docker images
REPOSITORY            TAG                 IMAGE ID            CREATED             SIZE
centos                7                   5e35e350aded        6 weeks ago         203MB

[root@localhost ~]# docker run -d \
--name=registrator \	#指定名称
--net=host \			#指定主机网络
-v /var/run/docker.sock:/temp/docker.sock \		#数据卷
--restart=always \		#重启功能
gliderlabs/registrator:latest		#指定镜像加载
-ip=192.168.18.145 \	#指定本地的IP地址
consul://192.168.18.148:8500
`此时会去自动下载镜像`
测试服务发现功能是否正常
[root@localhost ~]# docker run -itd -p:83:80 --name test-01 -h test01 nginx
[root@localhost ~]# docker run -itd -p:84:80 --name test-02 -h test02 nginx
[root@localhost ~]# docker ps -a
CONTAINER ID        IMAGE                           COMMAND                  CREATED             STATUS              PORTS                NAMES
7f65b37b2fb7        nginx                           "nginx -g 'daemon of…"   15 seconds ago      Up 14 seconds       0.0.0.0:84->80/tcp   test-02
62997fe8c92a        nginx                           "nginx -g 'daemon of…"   17 seconds ago      Up 16 seconds       0.0.0.0:83->80/tcp   test-01
#此时会有两个nginx容器处于Up状态

[root@localhost ~]# docker run -itd -p:88:80 --name test-03 -h test03 httpd
[root@localhost ~]# docker run -itd -p:89:80 --name test-04 -h test04 httpd
[root@localhost ~]# docker ps -a
CONTAINER ID        IMAGE                           COMMAND                  CREATED             STATUS              PORTS                NAMES
78945855fdaa        httpd                           "httpd-foreground"       16 seconds ago      Up 15 seconds       0.0.0.0:89->80/tcp   test-04
1d02aa8ee0a0        httpd                           "httpd-foreground"       18 seconds ago      Up 17 seconds       0.0.0.0:88->80/tcp   test-03
7f65b37b2fb7        nginx                           "nginx -g 'daemon of…"   2 minutes ago       Up 2 minutes        0.0.0.0:84->80/tcp   test-02
62997fe8c92a        nginx                           "nginx -g 'daemon of…"   2 minutes ago       Up 2 minutes        0.0.0.0:83->80/tcp   test-01
#此时含两个httpd容器,一共有四个容器处于Up状态
验证http和nginx服务是否注册到consul
在宿主机的浏览器中输入:192.168.18.148:8500,点击NODES,再点击consul-server01,此时会出现5个服务

验证两个Nginx容器是否能被访问
分别在宿主机的浏览器访问192.168.118.145的83和84端口


[root@localhost consul]# cd /root/consul/
[root@localhost consul]# vim nginx.ctmpl		#nginx配置文件的模板
upstream http_backend {			#服务器池的名称
  {{range service "nginx"}}
  server {{.Address}:{{.Port}};		#调用变量:服务器节点的地址和端口
  {{end}}
}

server {
  listen 83;
  server_name localhost 192.168.18.148;		#本机的地址
  access_log /var/log/nginx/kgc.cn-access.log;
  index index.html index.php;
  location / {			#请求头部信息的设定
    proxy_set_header HOST $host;
    proxy_set_header X-Real-IP $remote_addr;	#后端服务器IP
    proxy_set_header Client-IP $remote_addr;	#client的IP
    proxy_set_header X-Forwarded-For $proxy_add_x_forwarded_for;	#forward跳转地址
    proxy_pass http://http_backend;			#请求跳转给http_backend服务器池
  }
}
[root@localhost consul]# cd /aaa/tomcat/
[root@localhost tomcat]# tar zxvf nginx-1.12.0.tar.gz -C /opt/
[root@localhost tomcat]# cd /opt/nginx-1.12.0/
[root@localhost nginx-1.12.0]# yum install gcc gcc-c++ pcre-devel zlib-devel -y
[root@localhost nginx-1.12.0]# ./configure --prefix=/usr/local/nginx
[root@localhost nginx-1.12.0]# make && make install
[root@localhost nginx-1.12.0]# vim /usr/local/nginx/conf/nginx.conf
`在18行下插入以下内容`
include     vhost/*.conf;
#此时还没有这个文件,需要去创建
[root@localhost nginx-1.12.0]# cd /usr/local/nginx/conf/
[root@localhost conf]# mkdir vhost		#创建虚拟机目录
[root@localhost conf]# ls
fastcgi.conf            mime.types           uwsgi_params
fastcgi.conf.default    mime.types.default   uwsgi_params.default
fastcgi_params          nginx.conf           vhost
`此时就有vhost文件了`
[root@localhost conf]# cd /var/log/
[root@localhost log]# mkdir nginx		#创建日志文件目录
[root@localhost log]# ls
btmp               messages            tuned
btmp-20200102      messages-20200102   vmware-vgauthsvc.log.0
chrony             nginx               vmware-vmsvc.log
[root@localhost log]# ln -s /usr/local/nginx/sbin/nginx /usr/local/sbin/
#建立软链接
[root@localhost log]# nginx		#启动nginx
[root@localhost log]# netstat -ntap | grep nginx
tcp        0      0 0.0.0.0:80              0.0.0.0:*               LISTEN      29839/nginx: master
7-4上配置并启用template
[root@localhost log]# cd /aaa/docker/
[root@localhost docker]# cp consul-template_0.19.3_linux_amd64.zip /root/
[root@localhost docker]# cd /root/
[root@localhost ~]# ls
anaconda-ks.cfg  consul-template_0.19.3_linux_amd64.zip  模板  文档  桌面
compose_nginx    initial-setup-ks.cfg                    视频  下载
consul           公共                                    图片  音乐
[root@localhost ~]# unzip consul-template_0.19.3_linux_amd64.zip		#解压
Archive:  consul-template_0.19.3_linux_amd64.zip
  inflating: consul-template
[root@localhost ~]# mv consul-template /usr/bin/

`启用模板`
[root@localhost ~]# consul-template -consul-addr 192.168.18.145:8500 \
-template "/root/consul/nginx.ctmpl:/usr/local/nginx/conf/vhost/kgc.conf:/usr/local/nginx/sbin/nginx -s reload" \
--log-level=info
2020/01/03 11:56:31.069518 [INFO] consul-template v0.19.3 (ebf2d3d)
2020/01/03 11:56:31.069587 [INFO] (runner) creating new runner (dry: false, once: false)
2020/01/03 11:56:31.071008 [INFO] (runner) creating watcher
2020/01/03 11:56:31.072647 [INFO] (runner) starting
2020/01/03 11:56:31.072679 [INFO] (runner) initiating run
2020/01/03 11:56:31.073409 [ERR] (cli) /root/consul/nginx.ctmpl: parse: template: :3: unexpected "}" in operand