飞思卡尔i.mx6ul开发环境搭建
搭建i.mx6ul的开发环境,使用环境ubuntu14.04,硬件平台:米尔MYB-6ULX
参考米尔的MYS-6ULX-LinuxDevelopmentGuide
1.安装软件包
sudo apt-get install build-essential git-core libncurses5-dev \
flex bison texinfo zip unzip zlib1g-dev gettext u-boot-tools \
g++ xz-utils mtd-utils gawk diffstat gcc-multilib python git \
make gcc g++ diffstat bzip2 gawk chrpath wget cpio texinfo lzop
2.配置编译工具gcc version 5.3.0
(1)安装gcc5.3.0
参考 https://www.cnblogs.com/damonxu/p/6434265.html
出现问题make的时候提示如下:
Checking for suffix of object files... configure: error: in `/home/wulei/sourcecode/gcc-4.6.2/i686-pc-linux-gnu/libgcc':
configure: error: cannot compute suffix of object files: cannot compile
See `config.log' for more details.
make[2]: *** [configure-stage1-target-libgcc] 错误 1
make[2]:正在离开目录 `/home/wulei/sourcecode/gcc-4.6.2'
make[1]: *** [stage1-bubble] 错误 2
make[1]:正在离开目录 `/home/wulei/sourcecode/gcc-4.6.2'
make: *** [all] 错误 2
添加mpc0.8.1,mpfr2.4.2,gmp4.3.2的路径到LD_LIBRARY_PATH
export LD_LIBRARY_PATH=/usr/local/mpc-0.8.1/lib:/usr/local/mpfr-2.4.2/lib:/usr/local/gmp-4.3.2/lib
重新make
编译成功
(2)修改当前gcc版本为5.3版本
切换gcc版本,参考 https://blog.csdn.net/menghuanbeike/article/details/79008640
查看当前gcc版本
$gcc -v
返回为gcc4.8
$sudo update-alternatives --install /usr/bin/gcc gcc /usr/bin/gcc-4.8 50
$sudo update-alternatives --install /usr/bin/gcc gcc /usr/local/gcc-5.3.0/bin/gcc 40
$sudo update-alternatives --config gcc
选择gcc5.3
查看当前gcc版本
$gcc -v
返回为gcc5.3
3.配置编译工具
本人使用的是Yocto交叉编译器(对应gcc5.3)
直接执行相应的脚本(有多个版本,根据自行需要自己选择)
$ ./myir-imx-fb-glibc-x86_64-meta-toolchain-cortexa7hf-neon-toolchain-4.1.15-2.0.1.sh
默认安装再/opt/下对应名称的文件夹,可自行修改名称
$ source /opt/文件夹名/4.1.15-2.0.1/environment-setup-cortexa7hf-neon-poky-linux-gnueabi
$ arm-poky-linux-gnueabi-gcc -v
返回gcc5.3.0
$echo $ARCH 返回arm
$echo $CROSS_COMPILE 返回arm-poky-linux-gnueabi-
如果不对,自行修改
$export ARCH=arm
$export CROSS_COMPILE=arm-poky-linux-gnueabi-
4.编译uboot
(1)解压uboot。
(2)编译uboot
$sudo make distclean
选择你需要make的选项,这里我们选择 mys_imx6ul_14x14_nand_defconfig
$sudo make mys_imx6ul_14x14_nand_defconfig
就会提示你找不到各种.so,需要我们手动添加
sudo vim /etc/ld.so.conf
添加你安装编译的gmp-4.3.2,mpc-0.8.1,mpfr-2.4.2的位置
我们安装再/usr/local/下,添加
/usr/local/mpc-0.8.1/lib
/usr/local/mpfr-2.4.2/lib
/usr/local/gmp-4.3.2/lib
保存退出,
$sudo ldconfig
再重新make
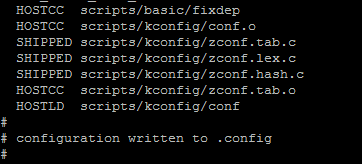
$sudo make mys_imx6ul_14x14_nand_defconfig
成功
$make(不要sudo)
会提示权限不够,自行添加权限,重新make
各种warning,都是重复定义
编译成功

5.编译内核
解压内核源码到指定文件夹
$sudo make distclean
$sudo make mys_imx6_defconfig
这时候会报错

实际上mys_imx6_defconfig在arch/arm/configs/目录下,需要修改Makefile
SUBARCH := $(shell uname -m | sed -e s/x86_64/arm/ \
再次make
$sudo make mys_imx6_defconfig
![]()
$ sudo make zImage dtbs modules
提示错误
$make zImage dtbs modules
提示权限不够
chmod 777给所有权限
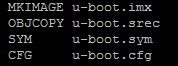
$make zImage dtbs modules
编译成功
在arch/arm/boot/下生成zImage,编译结束。