Python3进行中文文章分词实现词云图与TOP词频统计
工具:Python 3
一下是代码,实现对docx文件的中文文章分词以及作词云图、TOP词频统计
import docx
import jieba
from scipy.misc import imread
import numpy as np
import matplotlib
import matplotlib.pyplot as plt
from matplotlib import font_manager
from PIL import Image, ImageDraw, ImageFont
from wordcloud import WordCloud, ImageColorGenerator
versionN = 6  # 版本
filePath01 = r'F://data_temp/wordTest01.docx'  # 源文件路径
filePath02 = r'F://data_temp/wordCut-v{0}.txt'.format(versionN)   # 分词结果文件保存路径
filePath03 = r'F://data_temp/wordCount-v{0}.txt'.format(versionN)  # # 分词词频统计结果文件保存路径
filePath04 = r"F://data_temp/test.jpg"  # 词云图背景图片
filePath05 = r'F://data_temp/wordCloud-v{0}.jpg'.format(versionN)  # 词云图保存路径
filePath06 = r'F://data_temp/全新硬笔行书简体.ttf'  # 字体文件
filePath07 = r'F://data_temp/wordCountBar-v{0}.jpg'.format(versionN)  # TOP词频图保存路径

file01 = docx.Document(filePath01)
docText01 = ''
for i in file01.paragraphs:
    docText01 = docText01 + i.text
segList = '/'.join(jieba.cut(docText01, cut_all=False))  # cut_all=False 精确分词,分词符号为/
with open(filePath02, 'a', encoding='utf-8') as f1:  # 保存分词结果
    f1.write(segList)
    f1.close()
wordList = segList.split('/')
arr = np.array(wordList)
keyUse = np.unique(arr)
wordDict = {}
for i in keyUse:
    mask = (arr == i)  # return like this [ True False ... False False  True]
    arr_new = arr[mask]  # get the True index element
    v = arr_new.size  # 计数 count the size of i
    wordDict[i] = v  # 赋值 assignment index i of dict
wordDictSorted = sorted(wordDict.items(), key=lambda item: item[1], reverse=True)  # reverse=True 按value值降序排列
PunctuationS = [',', '。', '?', '、', ' ', '“', '”', ':', '(', ')',
                '.', '', '', '', '', '', '', '', '', '', '', '', '',
                '', '', '', '', '', '', '', '', '', '', '', '', '']
with open(filePath03, 'a', encoding='utf-8') as f2:
    for i in wordDictSorted:
        if i[0] not in PunctuationS and len(i[0]) > 1:
            f2.write('{0}|{1}\n'.format(i[0], i[1]))
        else:
            continue
    f2.close()

color_mask = imread(filePath04)  # 读取背景图片,注意路径
wc = WordCloud(
    scale=6,   # 越大分辨率越高
    font_path="simkai.ttf",  # 设置字体,不指定就会出现乱码,注意字体路径
    #font_path=path.join(d,'simsun.ttc'),
    background_color='white',  # 设置背景色
    mask=color_mask,  # 词云形状
    max_words=2000,  # 允许最大词汇
    max_font_size=60  # 最大号字体
)
wc.generate(segList)  # 产生词云
image_colors = ImageColorGenerator(color_mask)  # 从背景图片生成颜色值
wc.to_file(filePath05)  # 保存图片
plt.figure()  # 修复不显示图片的bug
plt.imshow(wc.recolor(color_func=image_colors), interpolation="bilinear")  # 实现词云图片按照图片颜色取色
plt.axis("off")  # 关闭坐标轴
plt.show()

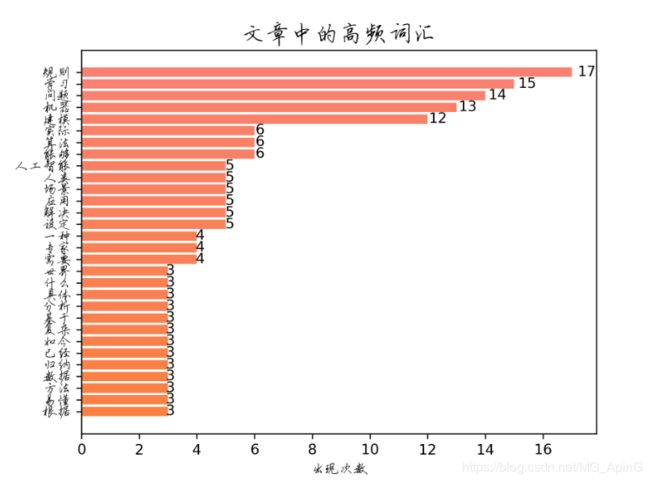
# 画出词频统计条形图,用渐变颜色显示,选取前N个词频
fig, ax = matplotlib.pyplot.subplots()  # fig:matplotlib.figure.Figure对象  ax:Axes(轴)对象或Axes(轴)对象数组
myFont = matplotlib.font_manager.FontProperties(fname=filePath06)  # 指定一个ttf字体文件作为图表使用的字体
# 默认状态下,matplotlb无法在图表中使用中文

words = []
counts = []
topN = 30
wordCount01 = open(filePath03, 'r', encoding='utf-8')
for i in wordCount01:
    words.append(i.split('|')[0])
    counts.append(int(i.split('|')[1].strip(r'\n')))


# 这里是为了实现条状的渐变效果,以该色号为基本色实现渐变效果
colors = ['#FA8072']
for i in range(len(words[:30]) - 1):
    colors.append('#FA{0}'.format(int(colors[-1][3:]) - 1))

rectS = ax.barh(np.arange(topN), counts[:topN], align='center', color=colors)  # 绘制横向条形图
# 修改Y轴的刻度
ax.set_yticks(np.arange(topN))  # 设置刻度值
ax.set_yticklabels(words[:topN], fontproperties=myFont)  # 因为已经排序好,所以直接取前三十个即可,用词替换刻度值
ax.invert_yaxis()  # 翻转Y坐标轴
ax.set_title('文章中的高频词汇', fontproperties=myFont, fontsize=17)  # 设置标题
ax.set_xlabel(u"出现次数", fontproperties=myFont)  # 设置X轴标题
for rect in rectS:
    width = rect.get_width()
    ax.text(1.03 * width, rect.get_y() + rect.get_height()/2., '%d' % int(width), ha='center', va='center')
plt.rcParams['figure.figsize'] = (8.0, 4.0)  # 设置figure_size尺寸
plt.rcParams['savefig.dpi'] = 300  # 图片像素
plt.rcParams['figure.dpi'] = 300  # 分辨率
plt.savefig(filePath07)
# 不知道为什么会报错ValueError: setting an array element with a sequence.,但是保存图片成功
plt.show()
以下是部分分词结果:
简单/易懂/的/机器/学习/知识/(/一/)/:/人工智能/、/建模/和/机器/学习/96/ / /Vency/ /2017.11/./28/ /00/:/42/*/ /字数/
/1454/ /阅读/ /437/评论/ /0/喜欢/ /4/写/在/前面/:/本文/是/系列/的/第一篇/文章/,/“/简单/易懂/的/机器/学习/知识/”/
系列/文章/一方面/是/为了/让/更/多/人/了解/、/入门/机器/学习/;/另一方面/,/也/是/为了/让/自己/在/机器/学习/领域/持
续/学习/下去/。/在/本/系列/中/,/不会/讲/细节/的/算法/和/论证/过程/(/我/暂时/也/不会/•/•/•/)/,/会/讲/一些/简单/
易懂/的/基础知识/,/并/附以/案例/助于/理解/。/1/./人工智能/是/什么/?/在/狭义/上/,/人工智能/(/AI/)/是/指以/Siri/、
/Alexa/等/语音/助手/,/用/语音/代替/界面/交互/的/个人/虚拟/助手/。/在/广义/上/,/人工智能/(/AI/)/是/指/由/人工/制
造/出/的/智能/机器/,/是/一种/能够/学习/的/计算机程序/,/可/代替/人类/去/解决/需要/人类/智慧/才能/解决/的/问题/。/
人工智能/包括/自然语言/处理/、/语音/识别/、/图像识别/、/机器/学习/等/,/每/一个/分支/都/很/复杂/和/庞大/。/本文/主
讲/机器/学习/,/其他/的/大家/可/自行/研究/。/2/./什么/是/建模/?/在/我们/深入/了解/之前/,/先说/一下/建模/的/概念/。
/建模/是/指/把/具体/问题/抽象/成为/某/一类/问题/并用/数学模型/表示/,/是/应用/于/工程/、/科学/等/各/方面/的/通用/方
法/,/是/一种/对/现实/世界/的/抽象/总结/。/(/PS/:/实际/建模/应用/于/社会/各个方面/,/产品/经理/在/从/实际/业务/中
/梳理/出/角色/、/流程/和/实体/也/是/建模/过程/。/如果/眼中/只有/数学/建模/就/过于/狭隘/了/。/)/建模/的/流程/具体/如
下/:/分析/问题/中/的/各种因素/,/并用/变量/表示/→/分析/变量/之间/的/关系/,/相互依存/或/独立/等/→/根据/实际/问题/
选用/合适/的/数学/框架/(/典型/的/有/优化/问题/,/配置/问题/等/)/,/并/将/具体/问题/在/此/框架/下/表达/出/某种/公式/
→/选用/合适/的/算法/求解/表达/出/的/公式/→/使用/计算结果/解释/实际/问题/,/并/分析/结果/。/由此可见/,/在/我们/描述
词云图:
TOP词频图:
效果还不错。

