Azkaban基本使用
一、概述
Azkaban是在LinkedIn上创建的用于运行Hadoop作业的批处理工作流作业调度程序。Azkaban通过工作依赖性解决订购问题,并提供易于使用的Web用户界面来维护和跟踪您的工作流程。
特性
- Compatible with any version of Hadoop (兼容任何版本的Hadoop)
- Easy to use web UI (易于使用的web UI)
- Simple web and http workflow uploads(简单的web和http工作流上传)
- Project workspaces(项目工作区)
- Scheduling of workflows(工作流调度)
- Modular and pluginable(模块化和可插拔)
- Authentication and Authorization(认证和授权)
- Tracking of user actions(跟踪用户操作)
- Email alerts on failure and successes(发送失败和成功的电子邮件警报)
- SLA alerting and auto killing(SLA报警和自动杀戮)
- Retrying of failed jobs(重试失败的作业)
架构
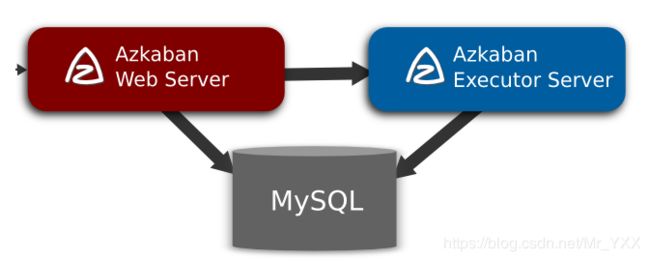
Relational Database (MySQL)
Azkaban使用MySQL来存储它的大部分状态。AzkabanWebServer和AzkabanExecutorServer都访问数据库。
How does AzkabanWebServer use the DB?
web服务器使用数据库的原因如下:
- 项目管理-项目、对项目的权限以及上载的文件。
- 执行流状态-跟踪正在执行的流以及运行它们的执行器。
- 上一个流/作业-搜索作业和流的上一次执行以及访问它们的日志文件。
- Scheduler-保留计划作业的状态。
- SLA-保留所有SLA规则
How does the AzkabanExecutorServer use the DB?
执行服务器使用数据库的原因如下:
- 访问项目-从数据库检索项目文件。
- 执行流/作业-检索和更新流和正在执行的数据
- Logs-存储作业的输出日志并流到数据库中。
- Interflow dependency-如果流在不同的执行器上运行,它将从数据库获取状态。
之所以选择MySQL,除了它是一个广泛使用的数据库之外,没有其他原因。我们希望实现与其他数据库的兼容性,尽管对历史上运行的作业的搜索要求得益于关系数据存储。
二、安装
https://github.com/azkaban/azkaban/releases
注:下载的版本是源代码,需要进行编译
源码编译
# Build Azkaban
./gradlew build

# Clean the build
./gradlew clean

# Build and install distributions
./gradlew installDist

# Run tests
./gradlew test

# Build without running tests
./gradlew build -x test
Getting started with the Solo Server
注意: Web Server和Executor Server运行在同一个JVM进程中,通常用于开发和测试,不建议在生产环境中使用;
The solo server is a standalone instance of Azkaban and the simplest to get started with. The solo server has the following advantages.
- Easy to install - No MySQL instance is needed. It packages H2 as its main persistence storage.
- Easy to start up - Both web server and executor server run in the same process.
- Full featured - It packages all Azkaban features. You can use it in normal ways and install plugins for it.
tar -zxf azkaban-solo-server-0.1.0-SNAPSHOT.tar.gz -C /Users/app/
mv azkaban-solo-server-0.1.0-SNAPSHOT azkaban-solo-server
vim conf/azkaban.properties
default.timezone.id=Asia/Shanghai
启动服务
~/app/azkaban-solo-server [10:49:49] C:1
$ ./bin/start-solo.sh

~/app/azkaban-solo-server [10:50:02]
$ jps
72352 Jps
70960 DataNode
37986 org.eclipse.equinox.launcher_1.5.700.v20200207-2156.jar
37990 BootLanguagServerBootApp
72347 AzkabanSingleServer
71722 GradleDaemon
70878 NameNode
70702 SecondaryNameNode
访问web管理界面
账号和密码均为:`azkaban 端口号:8081

Getting started with the Multi Executor Server
注意:Web Server和Executor Server可以分别部署在不同服务器的不同进程中,建议在生产环境中使用
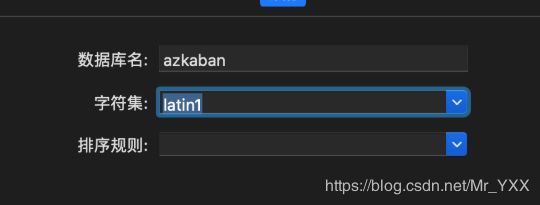
数据库设置

创建元数据表(35张表)

安装Executor Server

安装
$ tar -zxf azkaban-exec-server-0.1.0-SNAPSHOT.tar.gz -C /Users/gaozhy/app

$ mv azkaban-exec-server-0.1.0-SNAPSHOT azkaban-exec-server
#配置文件
default.timezone.id=Asia/Shanghai
azkaban.webserver.url=http://localhost:8081
database.type=mysql
mysql.port=3306
mysql.host=localhost
mysql.database=azkaban
mysql.user=root
mysql.password=root
mysql.numconnections=100
关闭内存检查
生产环境下不建议关闭
$ vim plugins/jobtypes/commonprivate.properties

# set execute-as-user
execute.as.user=false
memCheck.enabled=false
启动
 ~/app/azkaban-exec-server [11:20:07]
$ ./bin/start-exec.sh
激活
~/app/azkaban-exec-server [11:27:49]
$ curl -G "localhost:$(<./executor.port)/executor?action=activate" && echo
{"status":"success"}
安装Web Server
#~/app [11:22:29]
$ tar -zxf azkaban-web-server-0.1.0-SNAPSHOT.tar.gz -C /Users/app

#~/app [11:22:43]
$ mv azkaban-web-server-0.1.0-SNAPSHOT azkaban-web-server
#配置文件
default.timezone.id=Asia/Shanghai
mysql.user=root
mysql.password=root

# azkaban.executorselector.filters=StaticRemainingFlowSize,MinimumFreeMemory,CpuStatus
azkaban.executorselector.filters=StaticRemainingFlowSize,CpuStatus
启动
# ~/app/azkaban-web-server [11:28:05]
$ ./bin/start-web.sh

#  ~/app/azkaban-web-server [11:28:12]
$ jps
70960 DataNode
37986 org.eclipse.equinox.launcher_1.5.700.v20200207-2156.jar
37990 BootLanguagServerBootApp
73368 AzkabanWebServer
71722 GradleDaemon
72938 AzkabanExecutorServer
73372 Jps
70878 NameNode
70702 SecondaryNameNode
三、创建工作流程flow
flow2.0版本
- 首先创建工作流程的存放目录
- 准备工作流程的版本文件
flow20.project
azkaban-flow-version: 2.0
- 创建工作流程的配置文件`xxx.flow
 - nodes:
   - name: jobA
     type: command
     config:
       command: echo "This is an echoed text."
四、JobType
Command Type
- linux shell脚本
脚本文件
#!/usr/bin/env bash
hdfs dfs -mkdir /azkaban
配置文件
 nodes:
   - name: jobA
     type: command
     config:
       command: sh /Users/azkaban/fshell/createDir.sh
Java Job Type
配置文件
 nodes:
   - name: jobB
     type: javaprocess
     config:
       classpath: /Users/azkaban/javaflow/libs/*
       java.class: com.baizhi.AzkabanTests
五、高级用法
多job
nodes:
  - name: jobC
    type: noop
    # jobC depends on jobA and jobB
    dependsOn:
      - jobA
      - jobB

  - name: jobA
    type: command
    config:
      command: echo "This is an echoed text."

  - name: jobB
    type: command
    config:
      command: pwd
内嵌流程
nodes:
  - name: embedded_flow
    type: flow
    config:
      prop: value
    nodes:
      - name: jobB
        type: noop
        dependsOn:
          - jobA

      - name: jobA
        type: command
        config:
          command: pwd


