linux进阶-ssh命令的使用技巧全get
掌握配置ssh命令的使用
文章目录
- 掌握配置ssh命令的使用
- 准备工作
- 1.ssh客户端连接服务器
- 2.ssh基于公私钥验证是否 是特定客户端
- 3.开启服务器node1, 将node3的sshd服务对应的公私钥⽂件拷到node1节点,给node1添加⼀个node3的ip地址, 然后使⽤node2 链接node1,验证⼀下登录时是否有提⽰信息,是否需要输⼊yes
- 4.SSH X 转发
- 5.ssh跳转操作
- 6.使⽤ssh命令在远程主机上执⾏单条命令后返回结果,然后退出:
- 7.SSH基于密码的验证,登录对⽅主机时需要输⼊对⽅对应⽤户的密码才可登录
- 8.SSH基于公钥验证,实现免密登录远程主机
- 9.由于ssh基于公钥验证的⽅式依赖于公私钥,因此私钥的安全性需要的到保障,可以通过加密私钥的⽅法提⾼安全性
- 10.个实验总每次登录都需要输⼊私钥的密码,使⽤起来⽐较繁琐。我们可以使⽤ ssh-agent bash 和ssh-add 对私钥密码在本次回话中托管。减少输⼊私钥密码的次数
- 11.基于公钥的登录⽅式在Xshell中实现
- 12.脚本实现拷贝公钥,登录主机
准备工作
系统版本 ip地址 主机名
CentOS7 172.20.3.7 node2
CentOS8 172.20.3.8 node3
1.ssh客户端连接服务器
在node2上使⽤root⽤户登录node3服务器
输⼊:ssh 172.20.3.8 默认是以ssh客户端发起者的root⽤户⾝份,登录远程node3的root⽤户
[root@centos7 ~]# ssh 172.20.3.8
The authenticity of host '172.20.3.8 (172.20.3.8)' can't be established.
ECDSA key fingerprint is SHA256:3rNeKB1lroMHCkCqY4sINNaTva4XyZhnQi3rcytyGF8.
ECDSA key fingerprint is MD5:67:cc:58:15:81:a0:e0:b4:bb:4f:15:56:63:41:0c:7a.
Are you sure you want to continue connecting (yes/no)? yes
Warning: Permanently added '172.20.3.8' (ECDSA) to the list of known hosts.
[email protected]'s password:
Activate the web console with: systemctl enable --now cockpit.socket

Last failed login: Fri Nov  8 04:00:43 CST 2019 from 172.20.3.61 on ssh:notty
There were 18 failed login attempts since the last successful login.
Last login: Thu Nov  7 22:28:06 2019 from 172.20.1.11
ssh连接时还有其他选项,-v 显⽰详细登录信息, -p 指定主机的ssh服务端端⼝号 -b指定本地的ip址
[root@centos8 ~]# ssh -p 22 -b 172.20.3.7 [email protected]

#输入密码登录即可
2.ssh基于公私钥验证是否 是特定客户端
使⽤node2登录node3的root⽤户是,第⼀次提⽰要确认对⽅是否是⾃⼰想要链接的主机,确认后输⼊yes,然后输⼊root的密码即可登录成功。登录成功后会在客户端的.ssh路径下创建⼀个
known_hosts⽂件,内部保存着远程主机的ip地址和对⽅ssh服务端的公钥信息
[root@centos8 ~]# cd .ssh/
[root@centos8 .ssh]# cat known_hosts
172.20.3.111 ssh-rsa AAAAB3NzaC1yc2EAAAABIwAAAQEAm3Wpcf5VVX4wW6XPR4LZrqCODHrLdf8UVNyQGT0Qor5ysMrO8zOECpQuX5T43h3KgsJCvf4nhC3Qp0FcegH246UgHdleOll1V3mWb7vg8HU38STqn2yYOHUObgy+cYBTa2gppYnEOmn/WnLJDh5qnzChKEUiv7Zd+/02ByjRo58BoG7gUf28q4KtI/7g+itIyQTEu5wqsFWjr+37oz7egIiboTVmlPGjS6CR5DgbUUztRRIfZxXd+o7SNDhQPfwJzVfDQUkd1Wz0Bld06KTBu7w2r+SgIU9vAX2dzBX1oDLfyBd8nMxnlU87k5vCVVK5M9m+/1aYEfai56l0sxnmNQ==
查看⼀下node3 sshd服务的公钥对⽐⼀下,应该是⼀样的
[root@centos7 ~]# cd .ssh/
[root@centos7 .ssh]# cat known_hosts
172.20.3.8 ecdsa-sha2-nistp256 AAAAE2VjZHNhLXNoYTItbmlzdHAyNTYAAAAIbmlzdHAyNTYAAABBBDaVCBIUhvzZFxAoA0nZDJ9s2Dt+cey+TqH7T8CWetjdgwI321g+xfoWN738OOoqsbx54leEpG45lYbY2yEo2Gs=
[root@centos8 ~]# cat /etc/ssh/ssh_host_ecdsa_key.pub
ecdsa-sha2-nistp256 AAAAE2VjZHNhLXNoYTItbmlzdHAyNTYAAAAIbmlzdHAyNTYAAABBBDaVCBIUhvzZFxAoA0nZDJ9s2Dt+cey+TqH7T8CWetjdgwI321g+xfoWN738OOoqsbx54leEpG45lYbY2yEo2Gs=
3.开启服务器node1, 将node3的sshd服务对应的公私钥⽂件拷到node1节点,给node1添加⼀个node3的ip地址, 然后使⽤node2 链接node1,验证⼀下登录时是否有提⽰信息,是否需要输⼊yes
将node3的配置⽂件拷贝到node1的/data下,拷贝ecdsa_key 和ecdsa_key.pub就好,然后关闭node3服务器
[root@centos8 ~]# cd /etc/ssh/
[root@centos8 ~]# scp ssh_host_ecdsa_key 172.20.3.6:/data/
[root@centos8 ~]# scp ssh_host_ecdsa_key.pub 172.20.3.6:/data/
[root@centos8 ~]# init 0
将node1中/etc/ssh中对应的两个公私钥⽂件内容替换成/data路径下node3的对应⽂件,然后给node1添加原来node3的ip地址192.168.1.128*
[root@centos6 gnupg.dir]# cat /data/gnupg.dir/ssh_host_ecdsa_key > /etc/ssh/ssh_host_ecdsa_key
[root@centos6 gnupg.dir]# cat /data/gnupg.dir/ssh_host_ecdsa_key.pub > /etc/ssh/ssh_host_ecdsa_key.pub
[root@centos6 gnupg.dir]# ip a a 172.20.3.8 dev eth0
现在使⽤node2主机连接192.168.1.128 查看是否学员验证信息,输⼊yes?没有提⽰输⼊yes,仿造node3节点成功
[root@centos7 .ssh]# ssh 172.20.3.8
Hello Nanjing_Bokebi!!!
[email protected]'s password:
Last login: Thu Nov  7 21:59:14 2019 from 172.20.3.7
[root@centos6 ~]#
4.SSH X 转发
准备两台图形界⾯的服务器
操作系统版本 Ip地址 主机名
CentOS6 192.168.26.7 node1
CentOS7 192.168.26.8 node2
在node1上使⽤终端连接node2,连接成功后执⾏gedit命令,报错打不开
[root@centos7 ~]# ssh 192.168.26.8
The authenticity of host '192.168.26.8 (192.168.26.8)' can't be established.
ECDSA key fingerprint is SHA256:3rNeKB1lroMHCkCqY4sINNaTva4XyZhnQi3rcytyGF8.
ECDSA key fingerprint is MD5:67:cc:58:15:81:a0:e0:b4:bb:4f:15:56:63:41:0c:7a.
Are you sure you want to continue connecting (yes/no)? yes
Warning: Permanently added '192.168.26.8' (ECDSA) to the list of known hosts.
[email protected]'s password:
Activate the web console with: systemctl enable --now cockpit.socket

Last login: Sat Nov  9 17:26:49 2019 from 192.168.26.1
[root@centos8 ~]# gedit
Unable to init server: Could not connect: Connection refused

(gedit:1733): Gtk-WARNING **: 17:39:49.381: cannot open display:
[root@centos8 ~]#
在node1上使⽤终端 加上-X 选项 连接node2(将node2进入init3模式)
再次执⾏gedit命令,成功打开node2的图形化界⾯gedit程
序

使⽤windows中xmanager打开node2的桌⾯系统
打开xmanager中的xstart,输⼊node2的ip地址,选择ssh协议,填⼊root⽤户名
如果连接centos7
可以先进行以下设置
--------------------------------------------------
安装包:

yum groupinstall "X Window System" -y
--------------------------------------------------
安装 lightdm:

#增加epel 源
yum install epel-release
yum install  lightdm
--------------------------------------------------
编辑配置文件:

vim /etc/lightdm/lightdm.conf
[XDMCPServer]
enabled=true
port=177
--------------------------------------------------
安装 xfce 或者 kde :

#推荐安装kde,界面比xfce好看
# kde
sudo yum group install "KDE Plasma Workspaces"
# xfce
sudo yum group install xfce
--------------------------------------------------
将Display Manager 切换为 lightdm:

sudo systemctl disable gdm
sudo systemctl enable lightdm
sudo systemctl start lightdm
--------------------------------------------------
关闭防火墙 sudo systemctl stop firewalld.service :

systemctl stop firewalld.service
--------------------------------------------------
xshell启动

#启动xfce4-session
startxfce4
#启动kde
startkde
--------------------------------------------------
在Xstart配置中,命令(C) 的配置如下:

# xfce
DISPLAY=$DISPLAY; /usr/bin/xfce4-session
# kde
DISPLAY=$DISPLAY; /usr/bin/startkde
连接成功,可以远程图形界⾯操作node2了
5.ssh跳转操作
实验准备
操作系统 id地址 主机名
CentOS6 192.168.26.6 node1
CentOS7 192.168.26.7 node2
CentOS8 192.168.26.8 node3
在node3的主机上添加防⽕墙规则,禁⽌node1的ssh访问
[root@centos8 bin]# iptables -F
[root@centos8 bin]# iptables -A INPUT -s 192.168.26.6 -j REJECT
[root@centos8 bin]# iptables -vnL
Chain INPUT (policy ACCEPT 0 packets, 0 bytes)
 pkts bytes target     prot opt in     out     source               destination
    0     0 REJECT     all  --  *      *       192.168.26.6         0.0.0.0/0            reject-with icmp-port-unreachable

Chain FORWARD (policy ACCEPT 0 packets, 0 bytes)
 pkts bytes target     prot opt in     out     source               destination

Chain OUTPUT (policy ACCEPT 0 packets, 0 bytes)
 pkts bytes target     prot opt in     out     source               destination
测试⼀下node1是否可以ping通node3, 是否可以ssh链接的node3
[root@centos6 ~]# ping 192.168.26.8
PING 192.168.26.8 (192.168.26.8) 56(84) bytes of data.
From 192.168.26.8 icmp_seq=1 Destination Port Unreachable
From 192.168.26.8 icmp_seq=2 Destination Port Unreachable
From 192.168.26.8 icmp_seq=3 Destination Port Unreachable
From 192.168.26.8 icmp_seq=4 Destination Port Unreachable
^C
--- 192.168.26.8 ping statistics ---
4 packets transmitted, 0 received, +4 errors, 100% packet loss, time 3041ms

[root@centos6 ~]# ssh 192.168.26.8
ssh: connect to host 192.168.26.8 port 22: Connection refused
使⽤node1 链接node2,然后再⽤node2链接node3 达到从node1访问node3的⽬的
[root@centos6 ~]# ssh 192.168.26.7
[email protected]'s password:
Last login: Sat Nov  9 11:59:52 2019 from 192.168.26.6
[root@centos7 ~]# ssh 192.168.26.8
[email protected]'s password:
Activate the web console with: systemctl enable --now cockpit.socket

Last login: Sat Nov  9 18:51:02 2019 from 192.168.26.1
[root@centos8 ~]#
直接在node1上执⾏ssh命令也可以实现通过node2链接node3,如图:
分别输⼊node2,和node3的密码即可成功登录node3服务器
[root@centos6 ~]# ssh -t 192.168.26.7 ssh 192.168.26.8
[email protected]'s password:  #输入26.7
[email protected]'s password:  #输入26.8
Activate the web console with: systemctl enable --now cockpit.socket

Last login: Sat Nov  9 20:00:20 2019 from 192.168.26.7
[root@centos8 ~]#
6.使⽤ssh命令在远程主机上执⾏单条命令后返回结果,然后退出:
使⽤上个试验的node1主机通过ssh在node2上执⾏⼀个ip a 的命令,然后退出,如图:
[root@centos6 ~]# ssh -t 192.168.26.7 'ip a'
[email protected]'s password:
1: lo:  mtu 65536 qdisc noqueue state UNKNOWN group default qlen 1000
    link/loopback 00:00:00:00:00:00 brd 00:00:00:00:00:00
    inet 127.0.0.1/8 scope host lo
       valid_lft forever preferred_lft forever
    inet6 ::1/128 scope host
       valid_lft forever preferred_lft forever
2: eth0:  mtu 1500 qdisc pfifo_fast state UP group default qlen 1000
    link/ether 00:0c:29:79:c6:ce brd ff:ff:ff:ff:ff:ff
    inet 172.20.3.107/16 brd 172.20.255.255 scope global noprefixroute dynamic eth0
       valid_lft 2590623sec preferred_lft 2590623sec
    inet6 fe80::7a63:4abc:9540:e640/64 scope link noprefixroute
       valid_lft forever preferred_lft forever
3: eth1:  mtu 1500 qdisc pfifo_fast state UP group default qlen 1000
    link/ether 00:0c:29:79:c6:d8 brd ff:ff:ff:ff:ff:ff
    inet 192.168.26.7/24 brd 192.168.26.255 scope global noprefixroute eth1
       valid_lft forever preferred_lft forever
    inet6 fe80::20c:29ff:fe79:c6d8/64 scope link
       valid_lft forever preferred_lft forever
Connection to 192.168.26.7 closed.
7.SSH基于密码的验证,登录对⽅主机时需要输⼊对⽅对应⽤户的密码才可登录
实验准备
操作系统 id地址 主机名
CentOS6 192.168.26.6 node1
CentOS7 192.168.26.7 node2
CentOS8 192.168.26.8 node3
实现基于密码的登录验证⽅式,简单的说就是使⽤对⽅主机⽤户名和密码进⾏登录
使⽤node1 登录node2的root账户,输⼊密码后,即可登录node2服务器的root
[root@centos6 ~]# ssh [email protected]
[email protected]'s password:
Last failed login: Sat Nov  9 13:17:35 CST 2019 from 172.20.1.9 on ssh:notty
There were 3 failed login attempts since the last successful login.
Last login: Sat Nov  9 12:07:53 2019 from 192.168.26.6
[root@centos7 ~]#
8.SSH基于公钥验证,实现免密登录远程主机
在node1主机上⽣成公私钥对,将⽣成的公钥拷贝到node2主机上,让后通过node1;ssh链接node2的对应账户,将不需
要输⼊对⽅的密码就可登录。使⽤主机环境同上。
在node1主机上使⽤ssh-keygen -t rsa ⽣成公私钥对,执⾏过程中直接按回车键使⽤默认选项即可。然后再
~/.ssh⽂件夹中查看对应的公钥⽂件
#生成秘钥对
[root@centos6 ~]# ssh-keygen -t rsa
Generating public/private rsa key pair.
Enter file in which to save the key (/root/.ssh/id_rsa):
Enter passphrase (empty for no passphrase):
Enter same passphrase again:
Your identification has been saved in /root/.ssh/id_rsa.
Your public key has been saved in /root/.ssh/id_rsa.pub.
The key fingerprint is:
95:f2:6e:53:b1:01:fe:40:d1:23:36:61:fc:fe:b0:5a [email protected]
The key's randomart image is:
+--[ RSA 2048]----+
|         .*+     |
|         +=oo    |
|        ..=+o.   |
|         + o.+   |
|        S ..+    |
|         . .o    |
|          + E+   |
|         . o. .  |
|          ..     |
+-----------------+
使⽤ssh-copy-id 命令将node1的公钥传送到node2的~/.ssh/authorized_keys⽂件中
[root@centos6 .ssh]# ssh-copy-id 192.168.26.7
[email protected]'s password:
Now try logging into the machine, with "ssh '192.168.26.7'", and check in:

  .ssh/authorized_keys

to make sure we haven't added extra keys that you weren't expecting.
查看⼀下node2的对应⽂件重的内容是否为node1刚⽣产的公钥信息,内容应该包含node1的公钥。
在node1上使⽤ssh链接node2主机的root账户。如图,不需要输⼊密码直接登录成功,ssh基于公钥验证的实验
完成
[root@centos6 .ssh]# ssh 192.168.26.7
Last login: Sat Nov  9 13:20:43 2019 from 192.168.26.6
[root@centos7 ~]# cat .ssh/authorized_keys
ssh-rsa AAAAB3NzaC1yc2EAAAABIwAAAQEArJM297neqsI7ZO0pEeoH0lJo8MbjJ5SssAOahnHF7fPZp8lZRR59UPGw7TYVEoskdu+NN2MowIlEQGC8HVsA5NL1cFMs/riCY8fCLs9aJpC3VwSJ9s7qNG13J/IHvO7eOTgrq86j4vgRiOZYMENRqBWOFXmWoK2D7zGoKcgqa+RFTvuVwbY7nc/LOz10LuCaQab8zCom6PPvgf7XPs5+awkXhcex6GBxAfnhNg6CXh6B+0UkJIOAvz3RW9HJK9S0ThZv6wqJ5zU7gPHCd1pw/pV8J2xMZ3xL1fICL69ZxcuTiXmiTaQqELQUiAPJfQLx7R7SXGXDYGgzKGG4KdCmMw== [email protected]
将node2中的~/.ssh/authorized_keys⽂件清空后,ssh⼜恢复到基于密码验证。
在node2中清空对应⽂件:
#清除密码
[root@centos7 ~]# cd .ssh
[root@centos7 .ssh]# ll
total 8
-rw------- 1 root root 409 Nov  9 13:52 authorized_keys
-rw-r--r-- 1 root root 174 Nov  9 09:39 known_hosts
[root@centos7 .ssh]# echo > authorized_keys

#清除公钥后登录,显示要输入密码登录
[root@centos6 ~]# ssh 192.168.26.7
[email protected]'s password:
Last login: Sat Nov  9 13:56:26 2019 from 192.168.26.6
[root@centos7 ~]#
某些业务场景将,需要多的服务器之间相互免密登录,则需要分别拷贝⾃⼰的公钥到对⽅主机的授权⽂件中,实现 起来相对繁琐。这⾥我们可以让所有的服务器使⽤相同的公私钥,这样既可以减少相互拷贝公钥的⼯作量。
在node1上使⽤ssh-keygen -t rsa⽣成公私钥,让后拷贝⾃⼰的公钥到⾃⼰的authorized_keys中,最后将整个~/.shh ⽂件夹拷贝到node2和node3中。
#在node1上使用ssh -keygen -t rsa生成公私钥
[root@centos7 ~]# ssh-keygen -t rsa
Generating public/private rsa key pair.
Enter file in which to save the key (/root/.ssh/id_rsa):
Enter passphrase (empty for no passphrase):
Enter same passphrase again:
Your identification has been saved in /root/.ssh/id_rsa.
Your public key has been saved in /root/.ssh/id_rsa.pub.
The key fingerprint is:
SHA256:KWaZqx66lfCDEcgicQfFTW6daPUBlo2rsorqQYPyAuQ root@centos7
The key's randomart image is:
+---[RSA 2048]----+
|. o+oo. +=.      |
|.+ ....=oo..     |
|+o.   = o..      |
|*  . o o..       |
|+Eo   *.S        |
|+..=.+.o         |
|..o *o.          |
| o.o.+           |
|=.++o            |
+----[SHA256]-----+
在node1上使⽤ssh-copy-id将公钥拷贝到⾃⼰的authorized_keys中:
[root@centos6 .ssh]# ssh-copy-id [email protected]
The authenticity of host '192.168.26.6 (192.168.26.6)' can't be established.
RSA key fingerprint is 36:2c:35:3f:46:df:69:f2:9a:b3:32:24:ef:cd:e7:bf.
Are you sure you want to continue connecting (yes/no)? yes
Warning: Permanently added '192.168.26.6' (RSA) to the list of known hosts.
[email protected]'s password:
Now try logging into the machine, with "ssh '[email protected]'", and check in:

  .ssh/authorized_keys

to make sure we haven't added extra keys that you weren't expecting.

[root@centos6 .ssh]#
查看⼀下node1的公钥和authorized_keys内容是否⼀样。
[root@centos6 .ssh]# cat authorized_keys
ssh-rsa AAAAB3NzaC1yc2EAAAABIwAAAQEArJM297neqsI7ZO0pEeoH0lJo8MbjJ5SssAOahnHF7fPZp8lZRR59UPGw7TYVEoskdu+NN2MowIlEQGC8HVsA5NL1cFMs/riCY8fCLs9aJpC3VwSJ9s7qNG13J/IHvO7eOTgrq86j4vgRiOZYMENRqBWOFXmWoK2D7zGoKcgqa+RFTvuVwbY7nc/LOz10LuCaQab8zCom6PPvgf7XPs5+awkXhcex6GBxAfnhNg6CXh6B+0UkJIOAvz3RW9HJK9S0ThZv6wqJ5zU7gPHCd1pw/pV8J2xMZ3xL1fICL69ZxcuTiXmiTaQqELQUiAPJfQLx7R7SXGXDYGgzKGG4KdCmMw== [email protected]
[root@centos6 .ssh]# cat id_rsa.pub
ssh-rsa AAAAB3NzaC1yc2EAAAABIwAAAQEArJM297neqsI7ZO0pEeoH0lJo8MbjJ5SssAOahnHF7fPZp8lZRR59UPGw7TYVEoskdu+NN2MowIlEQGC8HVsA5NL1cFMs/riCY8fCLs9aJpC3VwSJ9s7qNG13J/IHvO7eOTgrq86j4vgRiOZYMENRqBWOFXmWoK2D7zGoKcgqa+RFTvuVwbY7nc/LOz10LuCaQab8zCom6PPvgf7XPs5+awkXhcex6GBxAfnhNg6CXh6B+0UkJIOAvz3RW9HJK9S0ThZv6wqJ5zU7gPHCd1pw/pV8J2xMZ3xL1fICL69ZxcuTiXmiTaQqELQUiAPJfQLx7R7SXGXDYGgzKGG4KdCmMw== [email protected]
删除node2和node3中的.ssh ⽂件夹:
[root@centos7 ~]# rm -rf .ssh

[root@centos8 ~]# rm -rf .ssh
拷贝node1的.ssh⽂件到node2和node3的对应位置:
[root@centos6 ~]# scp -pr .ssh [email protected]:/root
[email protected]'s password:
id_rsa.pub                  100%  409     0.4KB/s   00:00
known_hosts                 100%  788     0.8KB/s   00:00
authorized_keys             100%  409     0.4KB/s   00:00
id_rsa                      100% 1675     1.6KB/s   00:00

[root@centos6 ~]# scp -pr .ssh [email protected]:/root
[email protected]'s password:
id_rsa.pub                  100%  409     0.4KB/s   00:00
known_hosts                 100% 1182     1.2KB/s   00:00
authorized_keys             100%  409     0.4KB/s   00:00
id_rsa                      100% 1675     1.6KB/s   00:00
使⽤node1,node2和node3的root分别登录其他两个服务器root账户,分别登录成功:
------------------------------------------------------
#在node1上
[root@centos6 ~]# ssh 192.168.26.7
Last login: Sat Nov  9 14:28:00 2019 from 192.168.26.6
[root@centos7 ~]#
[root@centos6 ~]# ssh 192.168.26.8
Last login: Sat Nov  9 22:28:11 2019 from 192.168.26.7
[root@centos8 ~]#

------------------------------------------------------
#在node2上
[root@centos7 ~]# ssh 192.168.26.6
Last login: Sat Nov  9 14:20:54 2019 from 172.20.1.9
[root@centos6 ~]#
[root@centos7 ~]# ssh 192.168.26.8
Last login: Sat Nov  9 22:28:41 2019 from 192.168.26.6
[root@centos8 ~]#

------------------------------------------------------
#在node3上
[root@centos8 bin]# ssh 192.168.26.6
Last login: Sat Nov  9 14:28:39 2019 from 192.168.26.7
[root@centos6 ~]#
[root@centos8 bin]# ssh 192.168.26.7
Last login: Sat Nov  9 14:28:31 2019 from 192.168.26.6
[root@centos7 ~]#
9.由于ssh基于公钥验证的⽅式依赖于公私钥,因此私钥的安全性需要的到保障,可以通过加密私钥的⽅法提⾼安全性
对已⽣成的私钥进⾏加密,使⽤ssh-keygen -p 实现。删除node2的.ssh⽬录,重新拷贝node1的公钥到node2的 authorized_keys 中,然后使⽤node1登录node2时,需要输⼊node1私钥的密码才能登录
------------------------------------------------------
#删除node2 .ssh目录
[root@centos7 ~]# rm -rf .ssh

------------------------------------------------------
#在node1上使用ssh-keygen -p生成密钥对并加密,用ssh-copy-id 发送至node2
[root@centos6 ~]# ssh-keygen -p
Enter file in which the key is (/root/.ssh/id_rsa):
Key has comment '/root/.ssh/id_rsa'
Enter new passphrase (empty for no passphrase):
Enter same passphrase again:
Your identification has been saved with the new passphrase.
[root@centos6 ~]# ssh-copy-id 192.168.26.7
[email protected]'s password:
Now try logging into the machine, with "ssh '192.168.26.7'", and check in:

  .ssh/authorized_keys

to make sure we haven't added extra keys that you weren't expecting.

-------------------------------------------------------
#使用node1连接node2,需要使用给密钥加密的密码
[root@centos6 ~]# ssh 192.168.26.7
Enter passphrase for key '/root/.ssh/id_rsa':
Last login: Sat Nov  9 14:31:35 2019 from 192.168.26.8
[root@centos7 ~]#
10.个实验总每次登录都需要输⼊私钥的密码,使⽤起来⽐较繁琐。我们可以使⽤ ssh-agent bash 和ssh-add 对私钥密码在本次回话中托管。减少输⼊私钥密码的次数
安装psmisc软件包,查看当前ssh回话状态
[root@centos6 ~]# yum - install psmisc
[root@centos6 ~]# pstree | grep bash
     |-sshd---sshd---bash-+-grep
然后使⽤ssh-agent bash 开启⼀个bash:
[root@centos6 ~]# ssh-agent bash

[root@centos6 ~]# pstree | grep ssh
     |-sshd---sshd---bash---bash-+-grep
     |                           `-ssh-agent
在新开启的bash中执⾏ssh-add 并输⼊私钥密码。然后连接node2,成功连接不需要输⼊密码:
-------------------------------------------------------
[root@centos6 ~]# ssh-agent bash
[root@centos6 ~]# ssh-add
Enter passphrase for /root/.ssh/id_rsa:  #此处输入的是给秘钥加密的密码
Identity added: /root/.ssh/id_rsa (/root/.ssh/id_rsa)
[root@centos6 ~]#

--------------------------------------------------------
[root@centos6 ~]# ssh 192.168.26.7
Last login: Sat Nov  9 16:17:53 2019 from 192.168.26.6
[root@centos7 ~]#
11.基于公钥的登录⽅式在Xshell中实现
在windows中使⽤Xshell客户端⼯具⽣成公私钥对
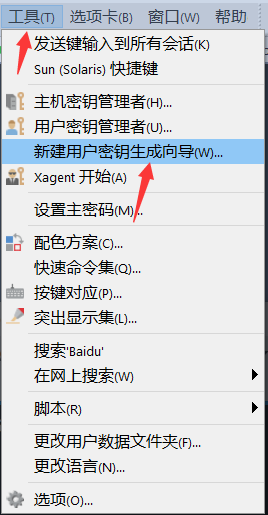
| 点击xshell的⼯具,选择新建⽤户秘钥向导 |
|---|
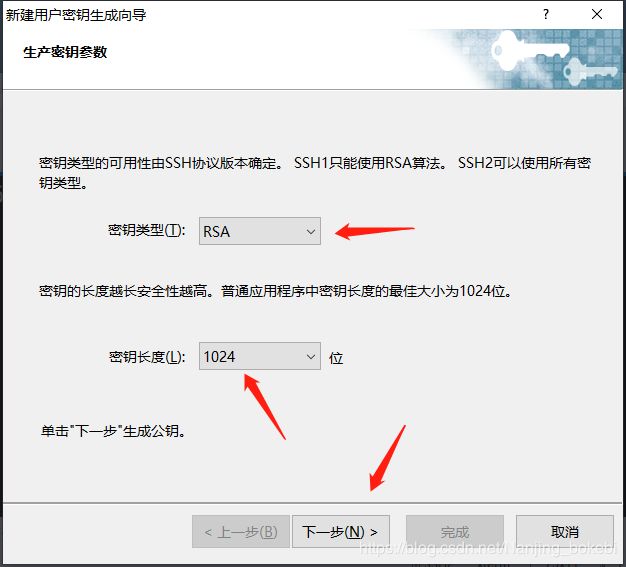
| 在弹出的对话框中选择rsa加密算法和秘钥长度,点击下⼀步 |
|---|
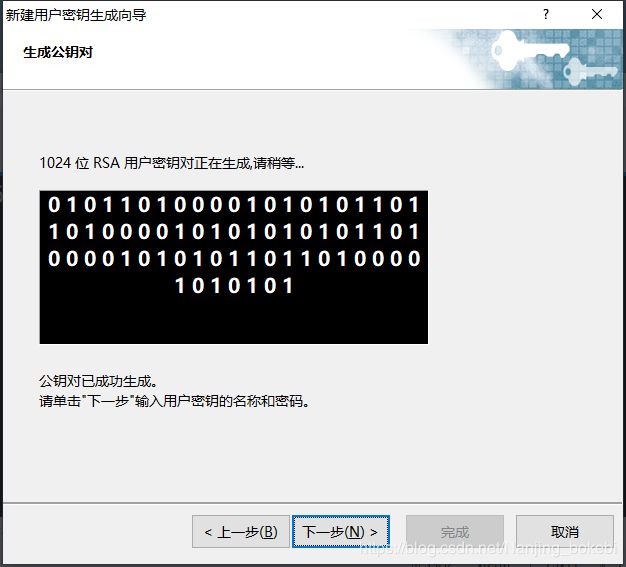
| 成秘钥后点击下⼀步 |
|---|
| 给秘钥起⼀个名称,根据需要决定是否需要设置私钥密码。然后点击完成 |
|---|
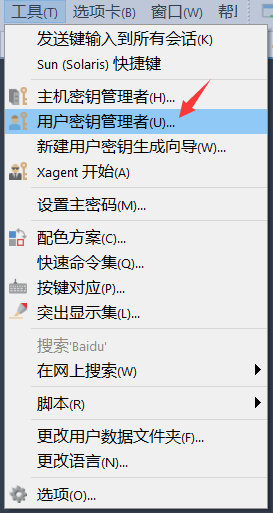
| 点击xshell的⼯具,选择秘钥用户管理者 |
|---|
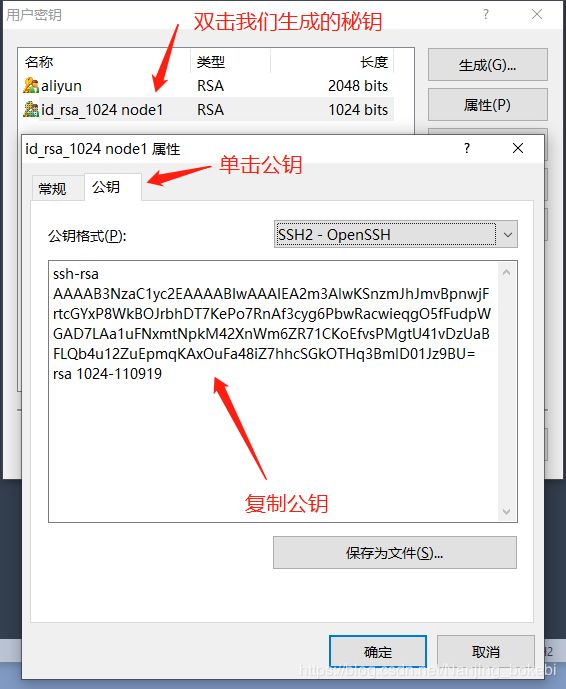
| 双击我们新生成的秘钥,单击公钥,复制所有公钥信息 |
|---|
| 然后将公钥写⼊到node1的authorized_keys中 |
|---|
#将公钥复制进去就可以了
[root@centos6 ~]# vim .ssh/authorized_keys
| 在Xshell中新建⼀个连接,填写对应的ip地址和端⼝号 |
|---|
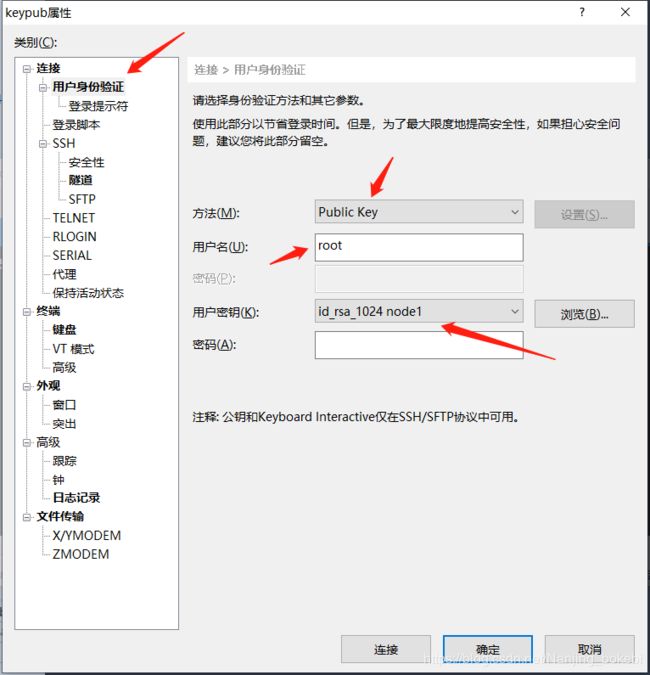
| 选择⽤户⾝份验证,⽅法选择publickey,然后输⼊⽤户名,选择之前⽣成的⽤户密码,最后点击确定 |
|---|
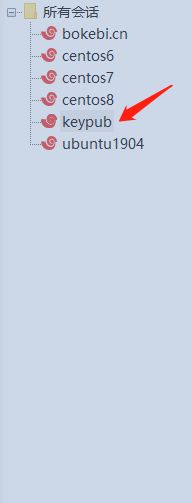
| ⽣成会话后点击连接,测试⼀下是否不需要输⼊root密码即可登录成功 |
|---|
| Xshell基于公钥验证的登录⽅式验证成功,直接登录上了, 不需要输⼊root密码 |
|---|
Connecting to 192.168.26.6:22...
Connection established.
To escape to local shell, press 'Ctrl+Alt+]'.

Last login: Sat Nov  9 17:29:43 2019 from 192.168.26.1
[root@centos6 ~]#
12.脚本实现拷贝公钥,登录主机
#存放除本机外要拷贝公钥的电脑ip
cat ip.txt
192.168.26.7
192.168.26.8
#!/bin/bash

rpm -q expect &> /dev/null || yum -y install expect
ssh-keygen -P "" -f "/root/.ssh/id_rsa"
userpwd="960201"
while read ipaddr ; do
expect <
执⾏脚本 bash sshkeyau.sh
[root@centos6 ~]# rm -rf .ssh
[root@centos7 ~]# rm -rf .ssh
[root@centos8 ~]# rm -rf .ssh

[root@centos6 ~]# bash sshkeyau.sh
使⽤node1 链接node2主机,验证脚本是否运⾏正常
[root@centos6 ~]# ssh 192.168.26.7
[root@centos7 ~]# exit


