大数据_Flume
大数据_Flume
- Flume的安装
- Flume的介绍
- Flume的测试
- Flume的自定义拦截器
- Flume入门视频位置
-
Flume的安装
1.解压
tar -zxvf /home/flume/bigdata/install/apache-flume-1.7.0-bin -C ~/bigdata/install/
2.配置flume到环境变量
vim ~/.bash_profile
FLUME_HOME=/home/flume/bigdata/install/apache-flume-1.7.0-bin
export PATH=$FLUME_HOME/bin:$PATH
source ~/.bash_profile
3.配置文件conf/flume.env.sh
cp flume-env.ps1.template flume.env.sh
export JAVA_HOME=/home/soup/bigdata/install/jdk1.8.0_102
-
Flume的简介
Flume的官网的官网:http://flume.apache.org/
Flume:获取实时数据,并进行加工传输
如何获取实时数据:
1.如果数据库中是不是就是 找insert 语句触发(采集方式)
2.文本是不是就看文本的内容有新添加。(采集方式)
3.端口,监控某个端口有请求(采集方式)
4.再支持多个地方获取实时数据(聚集)
5.各个地方获取数据要汇总(移动)
6.还要保证不丢数据。(可靠)
Flume可以做到,它可以监控文档,日志并且支持很多常见接口:
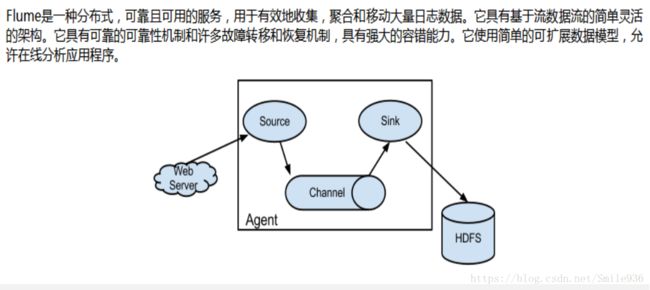
flume的小单元agent,flume是由一个个agent连接起来的
每个agent是由source、channel、sink组装起来的
在传输的单元是event,event是将数据进行封装+头信息
agent内部结构介绍:
-
source :对接数据源的地方
| NetCat | 监听一个指定的网络端口,向这个端口写数据就被接收 |
| Exec | 监听一个指定shell的命令,获取一条命令的结果作为它的数据源 常用tail,cat等命令,实际上就是监控文件的变化 |
| Avro | 只要应用程序通过Avro 端口发送文件,source组件就可以获取到该文件中的内容。 |
| spooling | 监控文件路径 里面的变化,例如新增了文件 |
-
channel :数据传输的暂存位置,它将从source处接收到的event格式的数据缓存起来,直到它们被sinks 消费掉,它在source和sink间起着一共桥梁的作用,channal是一个完整的事务,这一点保证了数据在收发的时候的一致性. 并且它可以和任意数量的source和sink链接. memory,jdbc,kafka,file等
Memory 存储在内存 JDBC 持久化存储 File 磁盘文件
-
sink:对接输出位置:
HDFS hdfs Logger 日志 Avro 多个agent连接时最常用的,数据被转换成Avro Event,然后发送到配置的RPC端口上 HBase/ES 数据库
输入的可以是avro,输出的也可以是avro,说明agent之间是可拼接的。
上面任意拼接都可以,在配置文件中写配置就好了。
-
Flume测试
测试模型1
| source |
NetCat TCP |
| sink |
logger |
| channel |
memory |
| 配置文件名 |
netcat.conf |
a1.sources = r1
a1.sinks = k1
a1.channels = c1
a1.sources.r1.type = netcat
a1.sources.r1.bind = localhost
a1.sources.r1.port = 44444
a1.sinks.k1.type = logger
a1.channels.c1.type = memory
a1.sources.r1.channels = c1
a1.sinks.k1.channel = c1
启动:
flume-ng agent --conf conf --conf-file $FLUME_HOME/conf/netcat.conf
--name a1 -Dflume.root.logger=INFO,console
另一个窗口测试的方式:
telnet localhost 44444 测试模型2
| source |
exec |
| sink |
logger |
| channel |
memory |
| 配置文件名 |
exec.conf |
a1.sources = r1
a1.sinks = k1
a1.channels = c1
a1.sources.r1.type = exec
a1.sources.r1.command = tail -F /home/flume/bigdata/test/flume_t.txt
a1.sources.r1.shell = /bin/bash -c
a1.sinks.k1.type = logger
a1.channels.c1.type = memory
a1.sources.r1.channels = c1
a1.sinks.k1.channel = c1
启动:
flume-ng agent --conf conf --conf-file $FLUME_HOME/conf/exec.conf \
--name a1 -Dflume.root.logger=INFO,console
另开一个窗口测试的方式:
echo "ABC">>/home/flume/bigdata/test/flume_t.txt测试模型3
从web的服务器上获取日志内容,在控制台打印出来
| source |
avro |
| sink |
logger |
| channel |
memory |
| 配置文件名 |
avro.conf |
web的日志只需要在log4j的依赖引入到pom文件
log4j
log4j
1.2.17
flume与log的对接依赖
org.apache.flume.flume-ng-clients
flume-ng-log4jappender
1.7.0
添加log4j.properties
log4j.rootCategory=INFO,stdout,flume
log4j.appender.stdout = org.apache.log4j.ConsoleAppender
log4j.appender.stdout.Target=System.out
log4j.appender.stdout.layout = org.apache.log4j.PatternLayout
log4j.appender.stdout.layout.ConversionPattern = %-d{yyyy-MM-dd HH:mm:ss, SSS}} [ %t] - [ %p ] %m%n
log4j.appender.flume = org.apache.flume.clients.log4jappender.Log4jAppender
log4j.appender.flume.Hostname =192.168.126.129    ----Linux的ip
log4j.appender.flume.Port = 4141                 ----随意一个端口只要和下面的配置文件一致就好
log4j.appender.flume.UnsafeMode = true
写一段代码,生成日志到控制台,测试Flume是否能获取到
package com.itstar;
import org.apache.log4j.Logger;
public class flumeLog {
private static Logger log=Logger.getLogger(flumeLog.class);
public static void main(String[] args) throws Exception{
while (true){
Thread.sleep(5000);
log.info("hi");
}
}
}
Flume修改配置文件:
a1.sources = r1
a1.sinks = k1
a1.channels = c1
a1 .sources.r1.type = avro
a1.sources.r1.bind = master   ###等价于192.168.126.129
a1.sources.r1.port =4141
a1.sinks.k1.type = logger
a1.channels.c1.type = memory
a1.sources.r1.channels = c1
a1.sinks.k1.channel = c1
启动:
flume-ng agent --conf conf --conf-file $FLUME_HOME/conf/avro.conf \
--name a1 -Dflume.root.logger=INFO,console
测试:
启动 main生成日志就好
测试模型4
多个节点之间配置数据传输
web日志数据---》linux1(192.168.126.129)的avro
| source |
avro |
| sink |
avro |
| channel |
memory |
| 配置文件名 |
web-agent1-logger.conf |
linux1(192.168.126.129)的avro----》linux2(192.168.126.128)的控制台
| source |
avro |
| sink |
logger |
| channel |
memory |
| 配置文件名 |
agent1-logger.conf |
#web-agent1.conf

a1.sources = r1
a1.sinks = k1
a1.channels = c1
a1.sources.r1.type = avro
a1.sources.r1.bind = 192.168.126.129
a1.sources.r1.port = 41414
a1.sinks.k1.type = avro
a1.sinks.k1.channel = c1
a1.sinks.k1.hostname = 192.168.126.128
a1.sinks.k1.port = 4545
a1.channels.c1.type = memory
a1.sources.r1.channels = c1
a1.sinks.k1.channel = c1
# agent1-logger.conf
agent2.sources = r1
agent2.sinks = k1
agent2.channels = c1
agent2.sources.r1.type = avro
agent2.sources.r1.bind = 192.168.126.128
agent2.sources.r1.port = 4545
agent2.sinks.k1.type = logger
agent2.channels.c1.type = memory
agent2.sources.r1.channels = c1
agent2.sinks.k1.channel = c1
启动:要注意启动的顺序:
flume-ng agent --conf conf --conf-file $FLUME_HOME/conf/agent1-logger.conf \
--name agent2 -Dflume.root.logger=INFO,console
flume-ng agent --conf conf --conf-file $FLUME_HOME/conf/web-agent1.conf \
--name a1 -Dflume.root.logger=INFO,console
测试:启动你web端的程序测试模型5
从web的服务器上获取日志内容,Linux上获取 并写到hdfs
前提:启动hdfs
| source |
avro |
| sink |
hdfs |
| channel |
memory |
| 配置文件名 |
avro-hdfs.conf |
# avro-hdfs.conf

avro-hdfs.sources =avro1
avro-hdfs.sinks = k1
avro-hdfs.channels = c1
###定义source
avro-hdfs.sources.avro1.type = avro
avro-hdfs.sources.avro1.bind = 192.168.126.129
avro-hdfs.sources.avro1.port = 4141
###定义sink
avro-hdfs.sinks.k1.type = hdfs
avro-hdfs.sinks.k1.hdfs.path = /output/flume/
avro-hdfs.sinks.k1.hdfs.fileType = DataStream
###定义channel
avro-hdfs.channels.c1.type = memory
###创建关联
avro-hdfs.sources.avro1.channels = c1
avro-hdfs.sinks.k1.channel = c1

启动:
 bin/flume-ng agent --conf conf --conf-file conf/avro-hdfs.conf --name avro-hdfs -Dflume.root.logger=INFO,console

测试:
启动程序查看hadoop中的数据
hadoop fs -ls /output/flume
- Flume的自定义拦截器
flume 是支持拦截器的使用的,其实可以将数据发送到hdfs上再做处理,也可以在接收的时候就对数据做拦截,所谓的接收做拦截其实就是在source和channel中间做一下过滤处理。拦截器是实现org.apache.flume.interceptor.Interceptor的类接口,flume有一些内置的拦截器。
1、时间拦截器
| source | netcat |
| sink | hdfs |
| channels | memory |
| interceptors | timestamp |
    a1.sources = r1
    a1.sinks = k1
    a1.channels = c1

    a1.sources.r1.type = netcat
    a1.sources.r1.bind = localhost
    a1.sources.r1.port = 44444
    a1.sources.r1.interceptors = i1
    a1.sources.r1.interceptors.i1.type = timestamp

    a1.sinks.k1.type = hdfs
    a1.sinks.k1.hdfs.path=/input/201809


    a1.channels.c1.type = memory
    a1.channels.c1.capacity = 1000
    a1.channels.c1.transactionCapacity = 100

    a1.sources.r1.channels = c1
    a1.sinks.k1.channel = c1
结果:
Event: { headers:{} body: 7A 78 79 33 0D zxy3. }
Event: { headers:{timestamp=1536222302872} body: 7A 78 79 31 0D zxy1. }
2.host拦截器
| source | netcat |
| sink | logger |
| channels | memory |
| interceptors | host |
    a1.sources = r1
    a1.sinks = k1
    a1.channels = c1

    a1.sources.r1.type = netcat
    a1.sources.r1.bind = localhost
    a1.sources.r1.port = 44444
    a1.sources.r1.interceptors = i1
    a1.sources.r1.interceptors.i1.type = host

    a1.sinks.k1.type = logger
    #a1.sinks.k1.type = hdfs

    #a1.sinks.k1.hdfs.path=/input/test1/%y-%m-%d
    #a1.sinks.k1.hdfs.fileType=DataStream

    a1.channels.c1.type = memory

    # Bind the source and sink to the channel
    a1.sources.r1.channels = c1
    a1.sinks.k1.channel = c1
结果:
Event: { headers:{host=192.168.126.128} body: 7A 78 79 32 0D zxy2. }
3.自定义拦截器:
所以如果你想自定义拦截器,只要implement下org.apache.flume.interceptor.Interceptor的类,将写好的类打成jar上传,使用的时候 在配置拦截器的type时候写上拦截器的全路径+$Builder
例子:将日志中中不以error:开头的日志内容改成woshidameiniu
工具:eclipse/myeclipse/idea
pom.xml
flume依赖
      org.apache.flume
      flume-ng-core
      1.7.0
package com.itstar;

import com.google.common.base.Charsets;
import com.sun.javafx.scene.control.skin.VirtualFlow;
import org.apache.flume.Context;
import org.apache.flume.Event;
import org.apache.flume.interceptor.Interceptor;

import java.util.ArrayList;
import java.util.List;
import java.util.regex.Matcher;
import java.util.regex.Pattern;

/**
 * @AUTHOR smile
 **/
public class flumeInterceptor implements Interceptor {
    @Override
    public void initialize() {

    }

    @Override
    public Event intercept(Event event) {
        //error:123
        //info:
      String body=new String(event.getBody(), Charsets.UTF_8);
        Pattern p=Pattern.compile("error:");
        Matcher r=p.matcher(body);
       String str="";
        if(r.find()){
            str=body;
        }else {
            str="woshidameiniu";
        }
        event.setBody(str.getBytes());
        return event;
    }

    @Override
    public List intercept(List list) {
        List lis=new ArrayList();
       for (Event e:list){
           Event event=intercept(e);
          // if(event!=null) {
               lis.add(event);
          // }
       }
       return lis;
    }

    @Override
    public void close() {

    }

    public  static  class Builder implements Interceptor.Builder{

        @Override
        public Interceptor build() {
            return new flumeInterceptor();
        }

        @Override
        public void configure(Context context) {

        }
    }

}
打包命令
mvn clean package
上传flume/lib
a1.sources = r1
a1.sinks = k1
a1.channels = c1
a1.sources.r1.type = netcat
a1.sources.r1.bind = localhost
a1.sources.r1.port = 44444
a1.sources.r1.interceptors = i1
a1.sources.r1.interceptors.i1.type = com.itstar.flumeInterceptor$Builder

a1.sinks.k1.type = logger
a1.channels.c1.type = memory

a1.sources.r1.channels = c1
a1.sinks.k1.channel = c1
启动:
flume-ng agent --conf conf --conf-file conf/netcat.conf --name a1 -Dflume.root.logger=INFO,console
测试:
telnet localhost 44444
1111 ------》woshidameiniu
error:123----》error:123
- Flume的入门视频的位置
链接:https://pan.baidu.com/s/11IXcvZZm9DOulUaZVC8l-A 密码:p029
