链路追踪 SkyWalking 源码分析 —— Agent 插件体系
点击上方“芋道源码”,选择“设为星标”
做积极的人,而不是积极废人!
源码精品专栏
中文详细注释的开源项目
消息中间件 RocketMQ 源码解析
数据库中间件 Sharding-JDBC 和 MyCAT 源码解析
作业调度中间件 Elastic-Job 源码解析
分布式事务中间件 TCC-Transaction 源码解析
Eureka 和 Hystrix 源码解析
Java 并发源码
摘要: 原创出处 http://www.iocoder.cn/SkyWalking/agent-plugin-system/ 「芋道源码」欢迎转载,保留摘要,谢谢!
本文主要基于 SkyWalking 3.2.6 正式版
1. 概述
2. 插件的加载
3. 插件的匹配
4. 插件的拦截
1. 概述
本文主要分享 SkyWalking Agent 插件体系。主要涉及三个流程 :
插件的加载
插件的匹配
插件的拦截
可能看起来有点抽象,不太容易理解。淡定,我们每个小章节进行解析。
本文涉及到的类主要在 org.skywalking.apm.agent.core.plugin 包里,如下图所示 :

每个流程会涉及到较多的类,我们会贯穿着解析代码实现。
2. 插件的加载
在 《SkyWalking 源码分析 —— Agent 初始化》 一文中,Agent 初始化时,调用 PluginBootstrap#loadPlugins() 方法,加载所有的插件。整体流程如下图 :

PluginBootstrap#loadPlugins() 方法,代码如下 :
第 47 行 :调用
AgentClassLoader#initDefaultLoader()方法,初始化 AgentClassLoader 。在本文 「2.1 AgentClassLoader」 详细解析。第 50 至 56 行 :获得插件定义路径数组。在本文 「2.2 PluginResourcesResolver」 详细解析。
第 59 至 66 行 :获得插件定义( `org.skywalking.apm.agent.core.plugin.PluginDefine` )数组。在本文 「2.3 PluginCfg」 详细解析。
第 69 至 82 行 :创建类增强插件定义( `org.skywalking.apm.agent.core.plugin.AbstractClassEnhancePluginDefine` )对象数组。不同插件通过实现 AbstractClassEnhancePluginDefine 抽象类,定义不同框架的切面,记录调用链路。在本文 「2.4 AbstractClassEnhancePluginDefine」 简单解析。
2.1 AgentClassLoader
org.skywalking.apm.agent.core.plugin.loader.AgentClassLoader ,继承 java.lang.ClassLoader ,Agent 类加载器。
为什么实现自定义的 ClassLoader ?应用透明接入 SkyWalking ,不会显示导入 SkyWalking 的插件依赖。通过实现自定义的 ClassLoader ,从插件 Jar 中查找相关类。例如说,从 apm-dubbo-plugin-3.2.6-2017.jar 查找 org.skywalking.apm.plugin.dubbo.DubboInstrumentation 。
AgentClassLoader 构造方法,代码如下 :
public class AgentClassLoader extends ClassLoader {

    /**
     * The default class loader for the agent.
     */
    private static AgentClassLoader DEFAULT_LOADER;

    /**
     * classpath
     */
    private List classpath;
    /**
     * Jar 数组
     */
    private List allJars;
    /**
     * Jar 读取时的锁
     */
    private ReentrantLock jarScanLock = new ReentrantLock();

    public AgentClassLoader(ClassLoader parent) throws AgentPackageNotFoundException {
        super(parent);
        File agentDictionary = AgentPackagePath.getPath();
        classpath = new LinkedList();
        classpath.add(new File(agentDictionary, "plugins"));
        classpath.add(new File(agentDictionary, "activations"));
    }
}
DEFAULT_LOADER静态属性,默认单例。通过 `#getDefault()` 方法,可以获取到它。classpath属性,Java 类所在的目录。在构造方法中,我们可以看到${AGENT_PACKAGE_PATH}/plugins/${AGENT_PACKAGE_PATH}/activations添加到classpath。在 `#getAllJars()` 方法中,加载该目录下的 Jar 中的 Class 文件。allJars属性,Jar 数组。jarScanLock属性,Jar 读取时的锁。
#initDefaultLoader() 静态方法,初始化默认的 AgentClassLoader ,代码如下 :
public static AgentClassLoader initDefaultLoader() throws AgentPackageNotFoundException {
    DEFAULT_LOADER = new AgentClassLoader(PluginBootstrap.class.getClassLoader());
    return getDefault();
}
使用
org.skywalking.apm.agent.core.plugin.PluginBootstrap的类加载器作为 AgentClassLoader 的父类加载器。
如下方法已经添加相关中文注释,胖友请自行阅读理解 :
`#findResource(name)`
`#findResources(String name)`
`#getAllJars()`
在 ClassLoader 加载资源( 例如,类 ),会调用 #findResource(name) / #findResources(name) 方法。
2.2 PluginResourcesResolver
org.skywalking.apm.agent.core.plugin.PluginResourcesResolver ,插件资源解析器,读取所有插件的定义文件。插件定义文件必须以 skywalking-plugin.def 命名,例如 :
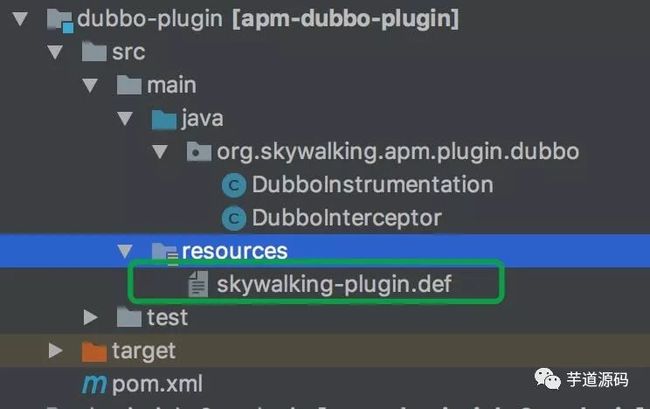
#getResources() 方法,获得插件定义路径数组,代码如下 :
第 50 行 :使用 AgentClassLoader 获得所有
skywalking-plugin.def的路径。
2.3 PluginCfg
org.skywalking.apm.agent.core.plugin.PluginCfg ,插件定义配置,读取 skywalking-plugin.def 文件,生成插件定义( org.skywalking.apm.agent.core.plugin.PluginDefinie )数组。
#load(InputStream) 方法,读取 skywalking-plugin.def 文件,添加到 pluginClassList 。如下是 apm-springmvc-annotation-4.x-plugin-3.2.6-2017.jar 插件的定义文件 :
spring-mvc-annotation-4.x=org.skywalking.apm.plugin.spring.mvc.v4.define.ControllerInstrumentation
spring-mvc-annotation-4.x=org.skywalking.apm.plugin.spring.mvc.v4.define.RestControllerInstrumentation
spring-mvc-annotation-4.x=org.skywalking.apm.plugin.spring.mvc.v4.define.HandlerMethodInstrumentation
spring-mvc-annotation-4.x=org.skywalking.apm.plugin.spring.mvc.v4.define.InvocableHandlerInstrumentation
2.4 AbstractClassEnhancePluginDefine
org.skywalking.apm.agent.core.plugin.AbstractClassEnhancePluginDefine ,类增强插件定义抽象基类。不同插件通过实现 AbstractClassEnhancePluginDefine 抽象类,定义不同框架的切面,记录调用链路。以 Spring 插件为例子,如下是相关类图 :
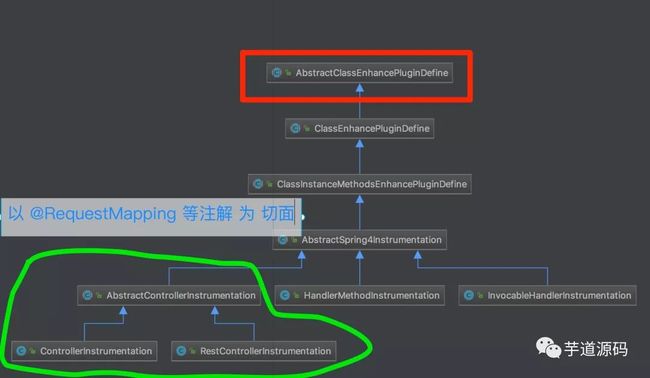
PluginDefine 对象的 defineClass 属性,即对应不同插件对AbstractClassEnhancePluginDefine 的实现类。所以在 PluginBootstrap#loadPlugins() 方法的【第 74 行】,我们看到通过该属性,创建创建类增强插件定义对象。
2.5 小结
胖友,回过头,在看一下流程图,理解理解。
3. 插件的匹配
在 《SkyWalking 源码分析 —— Agent 初始化》 一文,我们提到,SkyWalking Agent 基于 JavaAgent 机制,实现应用透明接入 SkyWalking 。下面笔者默认胖友已经对 JavaAgent 机制已经有一定的了解。如果胖友暂时不了解,建议先阅读如下文章 :
《Instrumentation 新功能》
《JVM源码分析之javaagent原理完全解读》
友情提示 :建议自己手撸一个简单的 JavaAgent ,更容易理解 SkyWalking Agent 。
笔者练手的 JavaAgent 项目地址 :https://github.com/YunaiV/learning/tree/master/javaagent01
通过 JavaAgent 机制,我们可以在 #premain(String, Instrumentation) 方法里,调用 Instrumentation#addTransformer(ClassFileTransformer) 方法,向 Instrumentation 注册 java.lang.instrument.ClassFileTransformer 对象,可以修改 Java 类的二进制,从而动态修改 Java 类的代码实现。
如果胖友使用过 AOP 实现切面记录日志,那么就很容易理解,SkyWalking 通过这样的方式,使用不同框架定义方法切面,从而在在切面记录调用链路。
直接修改 Java 类的二进制,是非常繁杂的。因此,SkyWalking 引入了 byte-buddy 。
byte-buddy是一个代码生成和操作库,用于在 Java 应用程序
运行时创建和修改 Java 类,而徐无需编译器的帮助。除了参与 Java 类库一起提供代码生成工具外,
byte-buddy允许创建任意类,并不限于实现用于创建运行时代理的接口。此外,
byte-buddy提供了一个方便的 API ,用于 Java Agent 或在构建过程中更改类。
下面笔者默认胖友已经对 byte-buddy 有一定的了解。如果胖友暂不了解,建议先阅读如下文章 :
《Java字节码3-使用ByteBuddy实现一个Java-Agent》
《Byte Buddy 教程》
《Easily Create Java Agents with Byte Buddy》
《skywalking源码分析之javaAgent工具ByteBuddy的应用》 搜索 "BYTE BUDDY应用" 部分
友情提示 :建议自己简单使用下
byte-buddy,更容易理解 SkyWalking Agent 。笔者练手的
byte-buddy项目地址 :https://github.com/YunaiV/learning/tree/master/bytebuddy
下面,让我们打开 SkyWalkingAgent#premain(String, Instrumentation) 方法,从【第 79 行】代码开始看 :
第 79 至 104 行 :创建 `net.bytebuddy.agent.builder.AgentBuilder` 对象,并设置相关属性。
第 84 行 :调用 `PluginFinder#find(TypeDescription, ClassLoader)` 方法,获得匹配的 AbstractClassEnhancePluginDefine 数组。因为在【第 79 行】的代码,设置了所有插件需要拦截的类,所以此处需要匹配该类对应的 AbstractClassEnhancePluginDefine 数组。`PluginFinder#find(TypeDescription, ClassLoader)` 方法,在本文 「3.3 PluginFinder」 详细解析。
第 85 行 :判断匹配的 AbstractClassEnhancePluginDefine 数组大于零。从目前的代码看下来,此处属于防御性编程,在【第 79 行】的代码保证一定能匹配到 AbstractClassEnhancePluginDefine 。
第 86 至 100 行 :循环匹配到 AbstractClassEnhancePluginDefine 数组,调用 `AbstractClassEnhancePluginDefine#define(…)` 方法,设置 `net.bytebuddy.dynamic.DynamicType.Builder` 对象。通过该对象,定义如何拦截需要修改的 Java 类。在 `AbstractClassEnhancePluginDefine#define(…)` 方法的内部,会调用 `net.bytebuddy.dynamic.DynamicType.ImplementationDefinition#intercept(Implementation)`方法,本文 「4. 插件的拦截」 也会详细解析。
第 91 行 :为什么会出现返回为空的情况呢?同一个框架在不同的大版本,使用的方式相同,但是实现的代码却不尽相同。举个例子,SpringMVC 3 和 SpringMVC 4 ,都有 `@RequestMapping` 注解定义 URL ,所以【第 84 行】会匹配到 `AbstractSpring3Instrumentation` / `AbstractSpring4Instrumentation` 两个。当应用使用的是 Spring MVC 4 时,调用 `AbstractSpring3Instrumentation#define(…)` 方法会返回空,而调用 `AbstractSpring4Instrumentation#define(…)` 方法会有返回值。这是如何实现的呢?本文 「4. 插件的拦截」 也会详细解析。
AgentBuilder ,提供便利的 API ,创建 Java Agent 。
第 79 行 :调用 `AgentBuilder#type(ElementMatcher)` 方法,实现 `net.bytebuddy.matcher.ElementMatcher` 接口,设置需要拦截的类。`PluginFinder#buildMatch()` 方法,在本文 「3.3 PluginFinder」 详细解析。
第 79 至 104 行 :调用 `AgentBuilder#transform(Transformer)` 方法,设置 Java 类的修改逻辑。
第 105 至 134 行 :调用 `AgentBuilder#with(Listener)` 方法,添加监听器。
`#onTransformation(…)` 方法,当 Java 类的修改成功,进行调用。
`#onError(…)` 方法,当 Java 类的修改失败,进行调用。InstrumentDebuggingClass 在本文 「3.1 InstrumentDebuggingClass」 详细解析。
第 135 行 :调用 `AgentBuilder#installOn(Instrumentation)` 方法,根据上面 AgentBuilder 设置的属性,创建 `net.bytebuddy.agent.builder.ResettableClassFileTransformer` 对象,配置到 Instrumentation 对象上。在
AgentBuilder#installOn(Instrumentation)方法的内部,会调用Instrumentation#addTransformer(ClassFileTransformer)方法。
? 这个方法信息量比较大,笔者对 byte-buddy 不是很熟悉,花费了较多时间梳理与理解。建议,如果胖友此处不是理解的很清晰,可以阅读完全文,在回过头再捋一捋这块的代码实现。
3.1 InstrumentDebuggingClass
org.skywalking.apm.agent.InstrumentDebuggingClass ,Instrument 调试类,用于将被 JavaAgent 修改的所有类存储到 ${JAVA_AGENT_PACKAGE}/debugger 目录下。需要配置 agent.is_open_debugging_class = true ,效果如下图 :
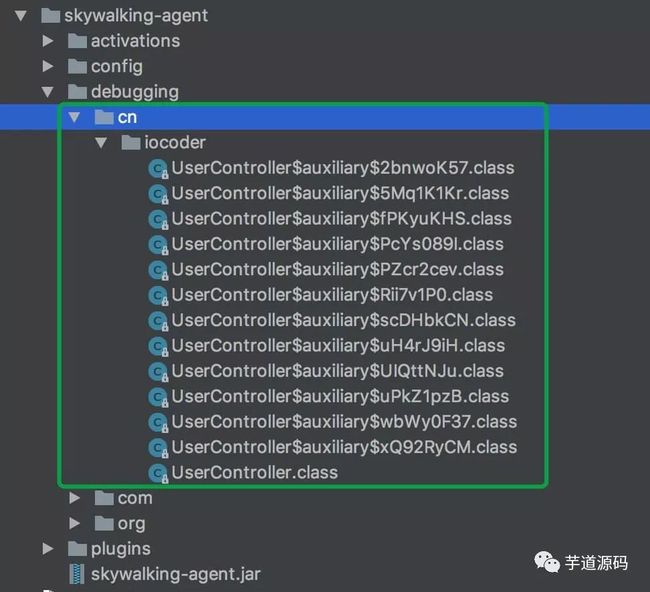
代码比较简单,胖友点击 InstrumentDebuggingClass 理解。
3.2 ClassMatch
在分享本节相关内容之前,我们先来看下 bytebuddy 的 net.bytebuddy.matcher 模块。该模块提供了各种灵活的匹配方法。那么 SkyWalking 为什么实现自己的 org.skywalking.apm.agent.core.plugin.match 模块?笔者认为,仅定位于类级别的匹配,更常用而又精简的 API 。
org.skywalking.apm.agent.core.plugin.match.ClassMatch ,类匹配接口。目前子类如下 :

NameMatch :基于完整的类名进行匹配,例如:
"com.alibaba.dubbo.monitor.support.MonitorFilter"。IndirectMatch :间接匹配接口。相比 NameMatch 来说,确实比较 "委婉" ? 。
ClassAnnotationMatch :基于类注解进行匹配,可设置同时匹配多个。例如:`"@RequestMapping"`。
HierarchyMatch :基于父类 / 接口进行匹配,可设置同时匹配多个。
MethodAnnotationMatch :基于方法注解进行匹配,可设置同时匹配多个。目前项目里主要用于匹配方法上的 `org.skywalking.apm.toolkit.trace.@Trace` 注解。
每个类已经添加详细的代码注释,胖友喜欢哪个点哪个哟。
3.3 PluginFinder
org.skywalking.apm.agent.core.plugin.PluginFinder ,插件发现者。其提供 #find(...) 方法,获得类增强插件定义( org.skywalking.apm.agent.core.plugin.AbstractClassEnhancePluginDefine )对象。
PluginFinder 构造方法,代码如下 :
第 57 至 77 行 :循环 AbstractClassEnhancePluginDefine 对象数组,添加到
nameMatchDefine/signatureMatchDefine属性,方便#find(…)方法查找 AbstractClassEnhancePluginDefine 对象。第 65 至 72 行 :处理 NameMatch 为匹配的 AbstractClassEnhancePluginDefine 对象,添加到 `nameMatchDefine` 属性。
第 74 至 76 行 :处理非 NameMatch 为匹配的 AbstractClassEnhancePluginDefine 对象,添加到 `signatureMatchDefine` 属性。
#find(...) 方法,获得类增强插件定义( org.skywalking.apm.agent.core.plugin.AbstractClassEnhancePluginDefine )对象,代码如下 :
第 92 至 96 行 :以
nameMatchDefine属性来匹配 AbstractClassEnhancePluginDefine 对象。第 98 至 104 行 :以
signatureMatchDefine属性来匹配 AbstractClassEnhancePluginDefine 对象。在这个过程中,会调用IndirectMatch#isMatch(TypeDescription)方法,进行匹配。
#buildMatch() 方法,获得全部插件的类匹配,多个插件的类匹配条件以 or 分隔,代码如下 :
第 117 至 123 行 :以
nameMatchDefine属性来匹配。第 124 至 132 行 :以
signatureMatchDefine属性来匹配。实际上,该方法和 `#find(…)` 方法逻辑是一致的。
4. 插件的拦截
在上文中,我们已经提到,SkyWalking 通过 JavaAgent 机制,对需要拦截的类的方法,使用 byte-buddy 动态修改 Java 类的二进制,从而进行方法切面拦截,记录调用链路。
看具体的代码实现之前,想一下拦截会涉及到哪些元素 :
拦截切面 InterceptPoint
拦截器 Interceptor
拦截类的定义 Define :一个类有哪些拦截切面及对应的拦截器
下面,我们来看看本小节会涉及到的类。如图所示:
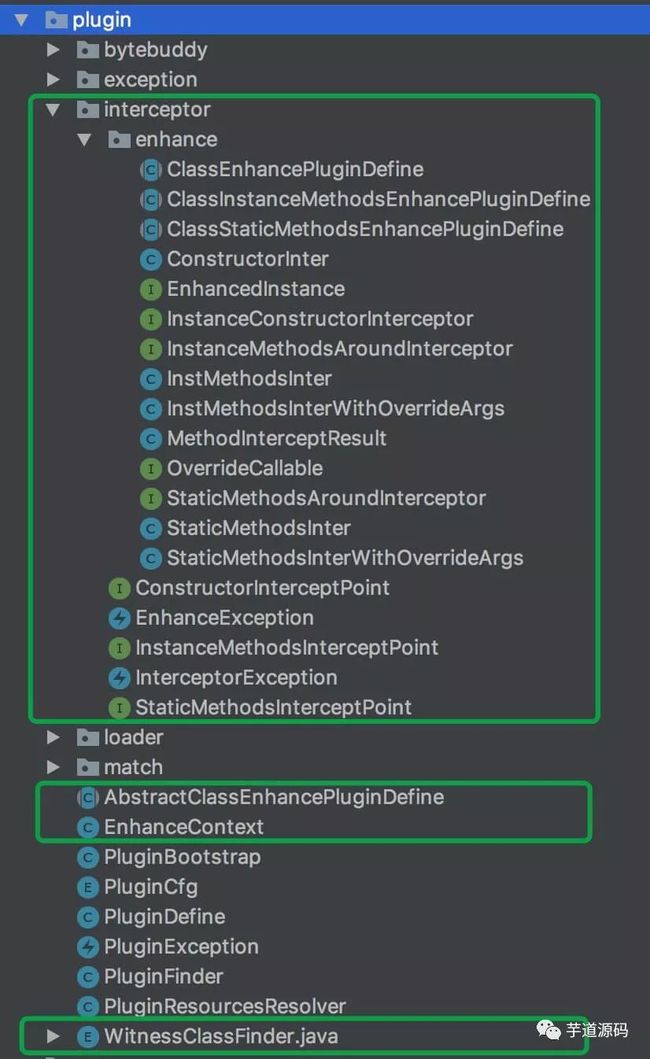
看起来类比想象的多?梳理之,结果如图 :

根据方法类型的不同,使用不同 ClassEnhancePluginDefine 的实现类。其中,构造方法和静态方法使用相同的实现类。
相比上面提到拦截会涉及到的元素,多了一个 Inter ?如下是官方的说明 :
In this class, it provide a bridge between
byte-buddyandsky-walkingplugin.
4.1 ClassEnhancePluginDefine
整体类图如下:
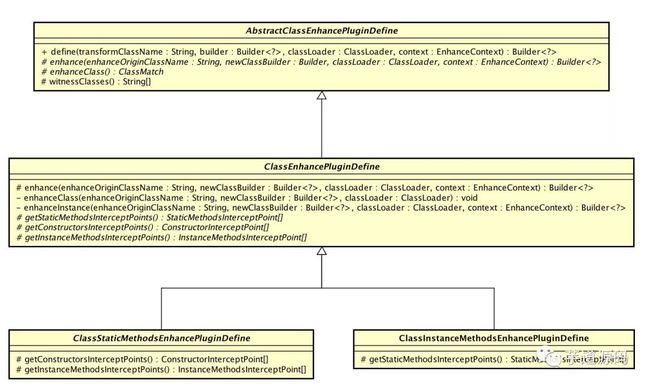
AbstractClassEnhancePluginDefine :SkyWalking 类增强插件定义抽象基类。
ClassEnhancePluginDefine :SkyWalking 类增强插件定义抽象类。
从 UML 图中的方法,我们可以看出,AbstractClassEnhancePluginDefine 注重在定义( Define ),ClassEnhancePluginDefine 注重在增强( Enhance )。
整体流程如下 :
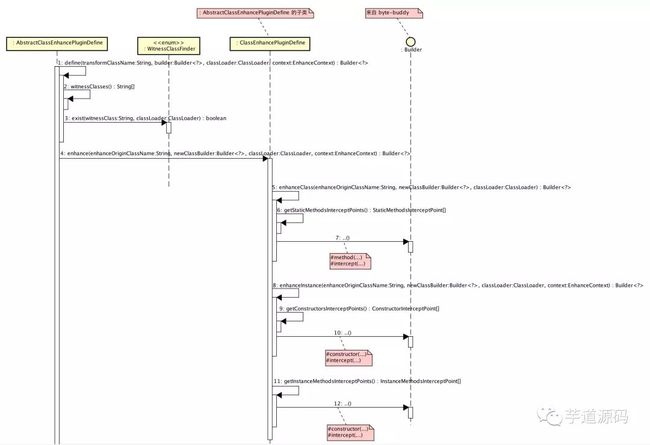
OK ,下面我们开始看看代码是如何实现的。
4.1.1 AbstractClassEnhancePluginDefine
org.skywalking.apm.agent.core.plugin.AbstractClassEnhancePluginDefine ,SkyWalking 类增强插件定义抽象基类。它注重在定义( Define )的抽象与实现。
#enhanceClass() 抽象方法,定义了类匹配( ClassMatch ) 。
#witnessClasses() 方法,见证类列表。当且仅当应用存在见证类列表,插件才生效。什么意思?让我们看看这种情况:一个类库存在两个发布的版本( 如 1.0 和 2.0 ),其中包括相同的目标类,但不同的方法或不同的方法参数列表。所以我们需要根据库的不同版本使用插件的不同版本。然而版本显然不是一个选项,这时需要使用见证类列表,判断出当前引用类库的发布版本。
举个实际的例子,SpringMVC 3 和 SpringMVC 4 ,都有
@RequestMapping注解定义 URL 。通过判断存在 `org.springframework.web.servlet.view.xslt.AbstractXsltView` 类,应用使用 SpringMVC 3 ,使用 `apm-springmvc-annotation-3.x-plugin.jar` 。
通过判断存在 `org.springframework.web.servlet.tags.ArgumentTag` 类,应用使用 SpringMVC 4 ,使用 `apm-springmvc-annotation-4.x-plugin.jar` 。
另外,该方法返回空数组。即默认情况,插件生效,无需见证类列表。
#define(...) 方法,设置 net.bytebuddy.dynamic.DynamicType.Builder 对象。通过该对象,定义如何拦截需要修改的目标 Java 类(方法的 transformClassName 参数)。代码如下 :
第 57 至 70 行 :判断见证类列表是否都存在。若不存在,则插件不生效。
`org.skywalking.apm.agent.core.plugin.WitnessClassFinder` ,已经添加完整注释,胖友点击查看。
第 72 至 76 行 :调用
#enhance(…)抽象方法,使用拦截器增强目标类。
4.1.2 ClassEnhancePluginDefine
org.skywalking.apm.agent.core.plugin.interceptor.enhance.ClassEnhancePluginDefine,SkyWalking 类增强插件定义抽象类。它注重在增强( Enhance )的抽象与实现。包括如下 :
静态方法、构造方法、实例方法的增强
静态方法、构造方法、实例方法的拦截切面
拦截切面,在 「4.2 InterceptPoint」 有相关解析。
#getStaticMethodsInterceptPoints() 抽象方法,获得 StaticMethodsInterceptPoint 数组。 #getConstructorsInterceptPoints() 抽象方法,获得 ConstructorInterceptPoint 数组。 #getInstanceMethodsInterceptPoints() 抽象方法,获得 InstanceMethodsInterceptPoint 数组。
#enhance(...) 方法,增强静态方法、构造方法、实例方法。
4.1.2.1 增强静态方法
调用 #enhanceClass(...) 方法,增强静态方法,代码如下 :
第 206 至 210 行 :调用
#getStaticMethodsInterceptPoints()方法,获得 StaticMethodsInterceptPoint 数组。若为空,不进行增强。第 212 至 238 行 :遍历 StaticMethodsInterceptPoint 数组,逐个增强StaticMethodsInterceptPoint 对应的静态方法。
第 214 至 218 行 :获得拦截器的类名。拦截器的实例,在 Inter 类里获取。
第 221 至 229 行 :当 `StaticMethodsInterceptPoint#isOverrideArgs()` 方法返回 `true` 时,使用 StaticMethodsInterWithOverrideArgs 处理拦截逻辑。在 「4.4.3 静态方法 Inter」 详细解析。
第 230 至 236 行 :当 `StaticMethodsInterceptPoint#isOverrideArgs()` 方法返回 `false` 时,使用 StaticMethodsInter 处理拦截逻辑,在 「4.4.3 静态方法 Inter」 详细解析。
4.1.2.2 增强构造方法和实例方法
调用 #enhanceInstance() 方法,增强构造方法和实例方法,代码如下 :
第 92 至 110 行 :调用
#getConstructorsInterceptPoints()/#getInstanceMethodsInterceptPoints()方法,获得 ConstructorInterceptPoint / InstanceMethodsInterceptPoint 数组。若都为空,不进行增强。第 112 至 128 行 :使用
byte-buddy,为目标 Java 类"自动"实现 `org.skywalking.apm.agent.core.plugin.interceptor.enhance.EnhancedInstance` 接口。这样,目标 Java 类就有一个私有变量,拦截器在执行过程中,可以存储状态到该私有变量。这里如果暂时不理解没关系,后面分享每个插件的实现时,会有实际的例子,更易懂。---------- 构造方法 ----------
第 130 至 143 行 :遍历 ConstructorInterceptPoint 数组,逐个增强 ConstructorInterceptPoint 对应的构造方法。使用 ConstructorInter 处理拦截逻辑,在 「4.4.1 构造方法 Inter」 详细解析。
---------- 实例方法 ----------
第 145 至 175 行 :遍历 InstanceMethodsInterceptPoint 数组,逐个增强 InstanceMethodsInterceptPoint 对应的静态方法。
第 151 至 154 行 :获得拦截器的类名。拦截器的实例,在 Inter 类里获取。
第 156 至 165 行 :当 `InstanceMethodsInterceptPoint#isOverrideArgs()` 方法返回 `true` 时,使用 InstMethodsInterWithOverrideArgs 处理拦截逻辑。在 「4.4.2 实例方法 Inter」 详细解析。
第 166 至 173 行 :当 `InstanceMethodsInterceptPoint#isOverrideArgs()` 方法返回 `false` 时,使用 InstMethodsInter 处理拦截逻辑,在 「4.4.2 实例方法 Inter」 详细解析。
4.1.3 ClassStaticMethodsEnhancePluginDefine
org.skywalking.apm.agent.core.plugin.interceptor.enhance.ClassStaticMethodsEnhancePluginDefine,类增强静态方法的插件定义抽象类,和本文 「4.1.2.1 增强静态方法」 对应。
实现 #getConstructorsInterceptPoints() / #getInstanceMethodsInterceptPoints() 抽象方法,返回空,表示不增强构造方法和实例方法。即只增强静态方法。
4.1.4 ClassInstanceMethodsEnhancePluginDefine
org.skywalking.apm.agent.core.plugin.interceptor.enhance.ClassInstanceMethodsEnhancePluginDefine,类增强构造方法和实例方法的插件定义抽象类,和本文 「4.1.2.2 增强构造方法和实例方法」 对应。
实现 #getStaticMethodsInterceptPoints() 抽象方法,返回空,表示不增强静态方法。即只增强构造方法和实例方法。
4.2 InterceptPoint
| InterceptPoint | 方法类型 | 方法匹配 | 拦截器 | #isOverrideArgs() |
|---|---|---|---|---|
| StaticMethodsInterceptPoint | 静态方法 | #getMethodsMatcher() |
#getMethodsInterceptor() |
有 |
| ConstructorInterceptPoint | 构造方法 | #getConstructorMatcher() |
#getConstructorInterceptor() |
无 |
| InstanceMethodsInterceptPoint | 实例方法 | #getMethodsMatcher() |
#getMethodsInterceptor() |
有 |
XXXInterceptPoint 接口,对应一个 net.bytebuddy.matcher.ElementMatcher 和一个拦截器。
代码比较简单,胖友自己查看。
4.3 Interceptor
在开始分享 Inter 之前,我们先来看看 Interceptor 相关接口。如下图所见:

InstanceConstructorInterceptor ,构造方法拦截器接口。
AroundInterceptor
StaticMethodsAroundInterceptor ,静态方法拦截器接口。
InstanceMethodsAroundInterceptor ,实例方法拦截器接口。
接口方法基本一致,下面 Inter 逻辑也基本一致。
在 「4. 2 InterceptPoint」 里,我们看到 #getXXXInterceptor() 方法返回的拦截器类名,需要通过 org.skywalking.apm.agent.core.plugin.loader.InterceptorInstanceLoader 加载与创建拦截器实例。
4.4 Inter
我们先来看 Inter 的定义 :
In this class, it provide a bridge between byte-buddy and sky-walking plugin.
根据方法类型,将 Inter 整理如下 :
| 方法类型 | ||
|---|---|---|
| 构造方法 | ConstructorInter | |
| 实例方法 | InstMethodsInter | InstMethodsInterWithOverrideArgs |
| 静态方法 | StaticMethodsInter | StaticMethodsInterWithOverrideArgs |
4.4.1 构造方法 Inter
org.skywalking.apm.agent.core.plugin.interceptor.enhance.ConstructorInter ,构造方法 Inter 。
ConstructorInter 构造方法,调用 InterceptorInstanceLoader#load(String, classLoader) 方法,加载构造方法拦截器。
#intercept(Object) 方法,在构造方法执行完成后进行拦截,调用 InstanceConstructorInterceptor#onConstruct(...) 方法。
为什么没有 ConstructorInterWithOverrideArgs?InstanceConstructorInterceptor#onConstruct(...) 方法,是在构造方法执行完成后进行调用拦截,OverrideArgs 用于在调用方法之前,改变传入方法的参数。所以,在此处暂时没这块需要,因而没有 ConstructorInterWithOverrideArgs 。
4.4.2 实例方法 Inter
org.skywalking.apm.agent.core.plugin.interceptor.enhance.InstMethodsInter ,实例方法 Inter 。
ConstructorInter 构造方法,调用 InterceptorInstanceLoader#load(String, classLoader) 方法,加载实例方法拦截器。
#intercept(...) 方法,Before-After 方式拦截实例方法,代码如下 :
第 79 至 86 行 :调用
InstanceMethodsAroundInterceptor#beforeMethod(…)方法,执行在实例方法之前的逻辑。`org.skywalking.apm.agent.core.plugin.interceptor.enhance.MethodInterceptResult` ,方法拦截器执行结果。当调用 `MethodInterceptResult#defineReturnValue(Object)` 方法,设置执行结果,并标记不再继续执行。
第 90 至 92 行 :当 MethodInterceptResult 已经有执行结果,不再执行原有方法,直接返回结果。
第 94 至 96 行 :调用
Callable#call()方法,执行原有实例方法。第 97 至 105 行 :调用
InstanceMethodsAroundInterceptor#handleMethodException(…)方法,处理异常。第 107 至 113 行 :调用
InstanceMethodsAroundInterceptor#afterMethod(…)方法,执行后置逻辑。
org.skywalking.apm.agent.core.plugin.interceptor.enhance.InstMethodsInterWithOverrideArgs,覆写参数的实例方法 Inter 。
不太理解覆写参数?有这样一个场景,InstanceMethodsAroundInterceptor#beforeMethod(...) 方法里,我们修改了方法参数,并且希望原有实例方法执行时,使用的是修改了的方法参数,此时,就需要使用 InstMethodsInterWithOverrideArgs 。
InstMethodsInterWithOverrideArgs#intercept(...) 方法,总体逻辑和 InstMethodsInter 是一致的,下面我们来看看差异点 :
第 76 行 :方法参数类型是 `org.skywalking.apm.agent.core.plugin.interceptor.enhance.OverrideCallable`,并且带有 `net.bytebuddy.implementation.bind.annotation.@Morph` 注解。
第 96 行 :调用 `OverrideCallable#call(args)` 方法,使用被前置方法修改过的参数,执行原有实例方法。
先来瞅瞅 @Morph 注解的定义 :
This annotation instructs Byte Buddy to inject a proxy class that calls a method's super method with explicit arguments.
For this, the {@link Morph.Binder} needs to be installed for an interface type that takes an argument of the array type {@link java.lang.Object} and returns a non-array type of {@link java.lang.Object}.
This is an alternative to using the {@link net.bytebuddy.implementation.bind.annotation.SuperCall} or {@link net.bytebuddy.implementation.bind.annotation.DefaultCall} annotations which call a super method using the same arguments as the intercepted method was invoked with.
简单的来说 :
@Morph注解,注入一个代理对象,该对象会使用传入的参数,调用被代理的方法。例如在 InstMethodsInterWithOverrideArgs 里,调用OverrideCallable#call(args)方法,会调用原有实例方法。需要使用
Morph.Binder设置一个接口,并且该接口的方法定义为Object methodName(Object[])。在 InstMethodsInterWithOverrideArgs 使用的是org.skywalking.apm.agent.core.plugin.interceptor.enhance.OverrideCallable接口。另外,调用Morph.Binder#install(Class)方法的代码如下 :// ClassEnhancePluginDefine.java
//#enhanceInstance(...)方法
newClassBuilder =
newClassBuilder.method(not(isStatic()).and(instanceMethodsInterceptPoint.getMethodsMatcher())) // 匹配
.intercept( // 拦截
MethodDelegation.withDefaultConfiguration()
.withBinders(
Morph.Binder.install(OverrideCallable.class) // 覆写参数
)
.to(new InstMethodsInterWithOverrideArgs(interceptor, classLoader))
);
4.4.3 静态方法 Inter
org.skywalking.apm.agent.core.plugin.interceptor.enhance.StaticMethodsInter 和 org.skywalking.apm.agent.core.plugin.interceptor.enhance.StaticMethodsInterWithOverrideArgs和实例方法 Inter基本一致,胖友可以自己捋一捋,笔者就不瞎比比了。
4.5 小结
总的来说,涉及到的组件,如下图 :
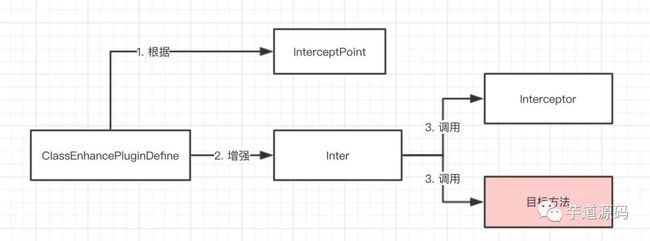
胖友再梳理梳理。
欢迎加入我的知识星球,一起探讨架构,交流源码。加入方式,长按下方二维码噢:
![]()
已在知识星球更新源码解析如下:
![]()
![]()
![]()
如果你喜欢这篇文章,喜欢,转发。
生活很美好,明天见(。・ω・。)ノ♡