IoT-阿里云物接入套件
IoT Hub
IoT Hub帮助设备连接阿里云IoT服务,IoT Hub支持PUB/SUB与RRPC两种通信方式,其中PUB/SUB是基于Topic进行的消息路由。IoT Hub具有以下特点:
- 高性能扩展:支持线性动态扩展,可以支撑十亿设备同时连接
- 全链路加密:整个通信链路以RSA,AES加密,保证数据传输安全
- 消息实时到达:当设备与IoT Hub成功建立数据通道后,两者间将保持长连接,以减少握手时间,保证消息实时达到
- 支持数据透传:IoT Hub支持将数据以二进制透传的方式传到自己服务器上,不保存设备数据,从而保证数据的安全可控性
- 支持多种通信协议:IoT Hub支持RRPC和PUB/SUB两种通信模式
- 支持多种设备接入协议:支持设备使用CoAP、MQTT、HTTPS协议接入物联网平台
阿里云物接入,IoT服务创建
接下来介绍以下阿里云物联网套件接入情况,首先要开通物联网套件服务,阿里云的物联网套件的收费情况和百度天工类似,都是以流量(消息条数进行收费的),并且每月百万条内的消息都是免费,因此研究成本很低,只要花时间即可。
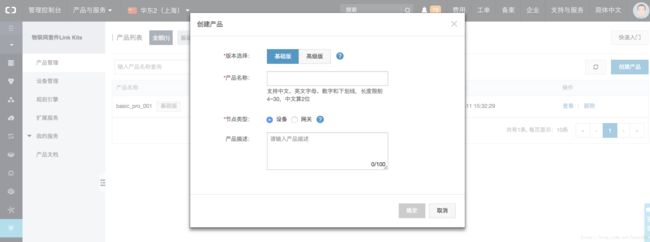
第一步,创建产品,阿里云的产品泛指一批具有相同功能的设备,创建产品是为了批量管理设备。创建产品分基础版和高级版,高级版有更多的功能,可以考虑直接创建高级版。节点类型分设备和网关,设备表示下面挂载的是设备,网关则挂载的是网关,网关下面可以继续挂载设备,网关相当于多了一个分组。 
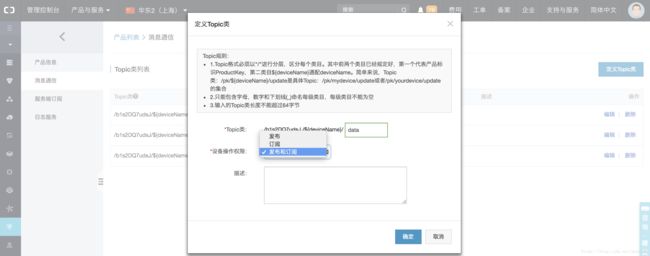
第二步,给产品添加Topic,阿里云默认给了三个Topic,当然我们也可以定义自己的Topic类,在产品查看页面,选择消息通信,就可以定义Topic类了。定义Topic时,和百度天工定义策略一样,也需要指定权限,这里也是有两种:发布、订阅 
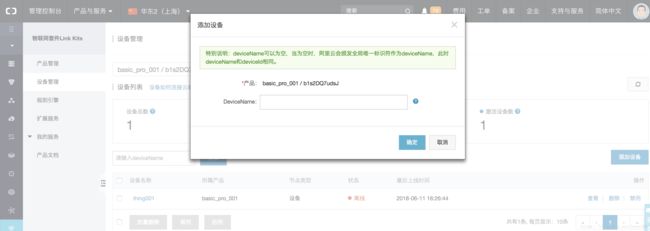
第三步,创建设备,创建时首选要选择一个产品,设备是挂在产品下面的。然后就可以创建设备了,设备创建成功后,界面会弹出一个三元组数据提示:ProductKey(创建产品时生成)、DeviceName(创建设备时填写)、DeviceSecret(设备创建成功后生成,可以在设备中修改),在MQTT的客户端端,我们进行设备接入时,需要通过这个三元组进行认证。 
终端设备物接入
阿里云的IoT接入可以自己使用MQTT协议自己实现,也可以使用阿里云提供的SDK包,目前阿里云支持SDK的版本有:Java、Python、PHP和.Net,其实SDK里面也是对标准MQTT协议的封装而已。
假如自己实现,maven依赖:
   org.eclipse.paho
   org.eclipse.paho.client.mqttv3
   1.1.0


   com.alibaba
   fastjson
   1.2.28
简单客户端连接IoT实现:
/**
 * aliyun.com Inc.
 * Copyright (c) 2004-2017 All Rights Reserved.
 */
package com.aliyun.iot.demo.iothub;

import java.net.InetAddress;
import java.util.HashMap;
import java.util.Map;
import java.util.concurrent.ArrayBlockingQueue;
import java.util.concurrent.ExecutorService;
import java.util.concurrent.ThreadPoolExecutor;
import java.util.concurrent.ThreadPoolExecutor.CallerRunsPolicy;
import java.util.concurrent.TimeUnit;

import javax.net.ssl.SSLContext;
import javax.net.ssl.SSLSocketFactory;
import javax.net.ssl.TrustManager;

import org.eclipse.paho.client.mqttv3.IMqttDeliveryToken;
import org.eclipse.paho.client.mqttv3.IMqttMessageListener;
import org.eclipse.paho.client.mqttv3.MqttCallback;
import org.eclipse.paho.client.mqttv3.MqttClient;
import org.eclipse.paho.client.mqttv3.MqttConnectOptions;
import org.eclipse.paho.client.mqttv3.MqttMessage;
import org.eclipse.paho.client.mqttv3.persist.MemoryPersistence;

import com.aliyun.iot.util.LogUtil;
import com.aliyun.iot.util.SignUtil;

/**
 * IoT套件JAVA版设备接入demo
 */
public class SimpleClient4IOT {

   /******这里是客户端需要的参数即前面说的三元组*******/
    public static String deviceName = "thing001";
    public static String productKey = "b1s2DQ7udsJ";
    public static String secret = "C9LncnlHEYAErdxM0GnubaOURApmrRDle";

    //用于测试的topic
    private static String subTopic = "/" + productKey + "/" + deviceName + "/get";
    private static String pubTopic = "/" + productKey + "/" + deviceName + "/update";

    public static void main(String... strings) throws Exception {
        //客户端设备自己的一个标记,建议是MAC或SN,不能为空,32字符内
        String clientId = InetAddress.getLocalHost().getHostAddress();

        //设备认证
        Map params = new HashMap();
        params.put("productKey", productKey); //这个是对应用户在控制台注册的 设备productkey
        params.put("deviceName", deviceName); //这个是对应用户在控制台注册的 设备name
        params.put("clientId", clientId);
        String t = System.currentTimeMillis() + "";
        params.put("timestamp", t);

        //MQTT服务器地址,TLS连接使用ssl开头
        String targetServer = "ssl://" + productKey + ".iot-as-mqtt.cn-shanghai.aliyuncs.com:1883";

        //客户端ID格式,两个||之间的内容为设备端自定义的标记,字符范围[0-9][a-z][A-Z]
        String mqttclientId = clientId + "|securemode=2,signmethod=hmacsha1,timestamp=" + t + "|";
        String mqttUsername = deviceName + "&" + productKey; //mqtt用户名格式
        String mqttPassword = SignUtil.sign(params, secret, "hmacsha1"); //签名

        System.err.println("mqttclientId=" + mqttclientId);

        connectMqtt(targetServer, mqttclientId, mqttUsername, mqttPassword, deviceName);
    }

    public static void connectMqtt(String url, String clientId, String mqttUsername,
                                   String mqttPassword, final String deviceName) throws Exception {
        MemoryPersistence persistence = new MemoryPersistence();
        SSLSocketFactory socketFactory = createSSLSocket();
        final MqttClient sampleClient = new MqttClient(url, clientId, persistence);
        MqttConnectOptions connOpts = new MqttConnectOptions();
        connOpts.setMqttVersion(4); // MQTT 3.1.1
        connOpts.setSocketFactory(socketFactory);

        //设置是否自动重连
        connOpts.setAutomaticReconnect(true);

        //如果是true,那么清理所有离线消息,即QoS1或者2的所有未接收内容
        connOpts.setCleanSession(false);

        connOpts.setUserName(mqttUsername);
        connOpts.setPassword(mqttPassword.toCharArray());
        connOpts.setKeepAliveInterval(65);

        LogUtil.print(clientId + "进行连接, 目的地: " + url);
        sampleClient.connect(connOpts);

        sampleClient.setCallback(new MqttCallback() {
            @Override
            public void connectionLost(Throwable cause) {
                LogUtil.print("连接失败,原因:" + cause);
                cause.printStackTrace();
            }

            @Override
            public void messageArrived(String topic, MqttMessage message) throws Exception {
                LogUtil.print("接收到消息,来至Topic [" + topic + "] , 内容是:["
                    + new String(message.getPayload(), "UTF-8") + "],  ");
            }

            @Override
            public void deliveryComplete(IMqttDeliveryToken token) {
                //如果是QoS0的消息,token.resp是没有回复的
                LogUtil.print("消息发送成功! " + ((token == null || token.getResponse() == null) ? "null"
                    : token.getResponse().getKey()));
            }
        });
        LogUtil.print("连接成功:---");

        //这里测试发送一条消息
        String content = "{'content':'msg from :" + clientId + "," + System.currentTimeMillis() + "'}";

        MqttMessage message = new MqttMessage(content.getBytes("utf-8"));
        message.setQos(0);
        //System.out.println(System.currentTimeMillis() + "消息发布:---");
        sampleClient.publish(pubTopic, message);

        //一次订阅永久生效
        //这个是第一种订阅topic方式,回调到统一的callback
        sampleClient.subscribe(subTopic);

        //这个是第二种订阅方式, 订阅某个topic,有独立的callback
        //sampleClient.subscribe(subTopic, new IMqttMessageListener() {
        //    @Override
        //    public void messageArrived(String topic, MqttMessage message) throws Exception {
        //
        //        LogUtil.print("收到消息:" + message + ",topic=" + topic);
        //    }
        //});

        //回复RRPC响应
        final ExecutorService executorService = new ThreadPoolExecutor(2,
            4, 600, TimeUnit.SECONDS,
            new ArrayBlockingQueue(100), new CallerRunsPolicy());

        String reqTopic = "/sys/" + productKey + "/" + deviceName + "/rrpc/request/+";
        sampleClient.subscribe(reqTopic, new IMqttMessageListener() {
            @Override
            public void messageArrived(String topic, MqttMessage message) throws Exception {
                LogUtil.print("收到请求:" + message + ", topic=" + topic);
                String messageId = topic.substring(topic.lastIndexOf('/') + 1);
                final String respTopic = "/sys/" + productKey + "/" + deviceName + "/rrpc/response/" + messageId;
                String content = "hello world";
                final MqttMessage response = new MqttMessage(content.getBytes());
                response.setQos(0); //RRPC只支持QoS0
                //不能在回调线程中调用publish,会阻塞线程,所以使用线程池
                executorService.submit(new Runnable() {
                    @Override
                    public void run() {
                        try {
                            sampleClient.publish(respTopic, response);
                            LogUtil.print("回复响应成功,topic=" + respTopic);
                        } catch (Exception e) {
                            e.printStackTrace();
                        }
                    }
                });
            }
        });
    }

    private static SSLSocketFactory createSSLSocket() throws Exception {
        SSLContext context = SSLContext.getInstance("TLSV1.2");
        context.init(null, new TrustManager[] {new ALiyunIotX509TrustManager()}, null);
        SSLSocketFactory socketFactory = context.getSocketFactory();
        return socketFactory;
    }
}