Ansible自动化运维之roles(角色)详解
文章目录
- Ansible roles简介
- roles目录结构
- 创建roles
- 举例
- 利用roles给主机安装并开启httpd服务,并将httpd加入防火墙列表中
- haproxy的部署(实现负载均衡)
- keepalive+haproxy高可用的实现
Ansible roles简介
- Ansible roles是为了层次化、结构化地组织Playbook。
- roles就是通过分别将变量、文件、任务、模块及处理器放置于单独的目录中,并可以便捷地include它们。
- roles一般用于基于主机构建服务的场景中,在企业复杂业务场景中应用的频率很高。
- 以特定的层级目录结构进行组织的tasks、variables、handlers、templates、files等;相当于函数的调用把各个功能切割成片段来执行。
roles目录结构
role_name:定义的role名字
- files:存放copy或script等模块调用的函数
- tasks:定义各种task,要有main.yml,其他文件include包含调用
- handlers:定义各种handlers,要有main.yml,其他文件include包含调用
- vars:定义variables,要有main.yml,其他文件include包含调用
- templates:存储由template模块调用的模板文本
- meta:定义当前角色的特殊设定及其依赖关系,要有main.yml的文件
- defaults:要有main.yml的文件,用于设定默认变量
创建roles
- role存放的路径在配置文件
/etc/ansible/ansible.cfg中定义:roles_path = /etc/ansible/roles
举例
利用roles给主机安装并开启httpd服务,并将httpd加入防火墙列表中
- 切换到普通用户devops,在用户家目录下的ansible目录下新建目录roles。
su - devops
cd ansible
mkdir roles
- 编辑ansible.cfg文件,添加roles的路径
[devops@server1 ansible]$ vim ansible.cfg
[defaults]
inventory = ./inventory
roles_path = ./roles    #当前目录下

[privilege_escalation]
become=True
become_method=sudo
become_user=root
become_ask_pass=False
- 创建一个apache模版
[devops@server1 roles]$ ansible-galaxy init apache
[devops@server1 roles]$ cd apache/
[devops@server1 apache]$ ls
defaults  files  handlers  meta  README.md  tasks  templates  tests  vars
[devops@server1 apache]$ rm -fr README.md  tests     #可以删除这两个文件目录

[devops@server1 ansible]$ pwd
/home/devops/ansible
[devops@server1 ansible]$ ansible-galaxy list     #列出所有的galaxy
- 编辑几个main.yml文件,即将之前的playbook.yml文件中的内容进行拆分。
- 复制模版文件到apache的模版目录下
[devops@server1 apache]$ cp ~/ansible/templates/httpd.conf.j2 templates/
[devops@server1 apache]$ cd templates/
[devops@server1 templates]$ ls
httpd.conf.j2
- 编辑任务tasks的main.yml文件
[devops@server1 apache]$ \vi tasks/main.yml
---
 - name: install httpd
  yum:
    name: httpd
    state: present
 - name: copy httpd
  copy:
    content: "{{ ansible_facts['hostname'] }}"
    dest: /var/www/html/index.html

 - name: configure httpd
  template:
    src: httpd.conf.j2    #注意修改路径
    dest: /etc/httpd/conf/httpd.conf
    owner: root
    group: root
    mode: 644
  notify: restart httpd

 - name: start httpd and firewalld
  service:
    name: "{{ item }}"
    state: started
  loop:
    - httpd
    - firewalld
 - name: configure firewalld
  firewalld:
    service: http
    permanent: yes
    immediate: yes
    state: enabled
- 编辑触发器handles的main.yml文件
[devops@server1 apache]$ \vi handlers/main.yml
---
 - name: restart httpd
  service:
    name: httpd
    state: restarted
- 编辑变量的main.yml文件
[devops@server1 ansible]$ vim roles/apache/vars/main.yml
---
http_host: "{{ ansible_facts['default_ipv4']['address'] }}"
http_port: 80
- 新建apache.yml文件
[devops@server1 ansible]$ vim apache.yml
---
 - hosts: webserver
  roles:
    - apache
- 修改inventory文件为如下。
[devops@server1 ansible]$ vim inventory
[test]
server2

[prod]
server3
server4

[webserver:children]
test
prod
- 进行检测并执行
[devops@server1 ansible]$ ansible-playbook apache.yml -C		#只检测,不做任何修改
[devops@server1 ansible]$ ansible-playbook apache.yml
haproxy的部署(实现负载均衡)
- 创建一个haproxy模版
[devops@server1 roles]$ ansible-galaxy init haproxy
 - haproxy was created successfully
[devops@server1 roles]$ ls
apache  haproxy
- 编辑触发器的main.yml文件
[devops@server1 haproxy]$ \vi handlers/main.yml
---
 - name: restart haproxy
  service:
    name: haproxy
    state: restarted
- 复制模版文件到haproxy的模版目录下
[devops@server1 haproxy]$ cp ~/ansible/templates/haproxy.cfg.j2 templates/
[devops@server1 haproxy]$ cd templates/
[devops@server1 templates]$ ls
haproxy.cfg.j2
- 编辑任务的main.yml文件
[devops@server1 haproxy]$ \vi tasks/main.ym
---
 - name: install haproxy
  yum:
    name: haproxy
    state: present

 - name: configure haproxy
  template:
    src: haproxy.cfg.j2    #注意修改路径
    dest: /etc/haproxy/haproxy.cfg
  notify: restart haproxy

 - name: start haproxy
  service:
    name: haproxy
    state: started
- 在刚才apache.yml文件的基础上进行编辑,增加判断条件。
---
 - hosts: all
  tasks:
    - import_role:
        name: apache
      when: ansible_hostname in groups['webserver']
    - import_role:
        name: haproxy
      when: ansible_hostname in groups['lb']
- 编辑inventory文件
[devops@server1 ansible]$ vim inventory
[lb]
server1     #写localhost则会提示skipping

[test]
server2

[prod]
server3

[webserver:children]
test
prod
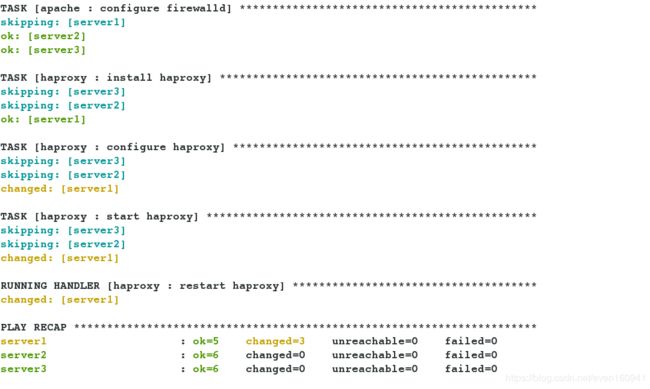
- 执行:
[devops@server1 ansible]$ ansible-playbook apache.yml
- 执行成功后查看haproxy服务状态以及端口(我们模版文件中修改端口为80)。
[devops@server1 ansible]$ systemctl status haproxy
[devops@server1 ansible]$ netstat -antlp
keepalive+haproxy高可用的实现
在博客https://blog.csdn.net/even160941/article/details/99128262中。


