制作简单的WPF时钟
分享一下我老师大神的人工智能教程!零基础,通俗易懂!http://blog.csdn.net/jiangjunshow
也欢迎大家转载本篇文章。分享知识,造福人民,实现我们中华民族伟大复兴!
在很早之前,我曾经写过一个GDI+的时钟,见“C#时钟控件 (C# Clock Control)” http://blog.csdn.net/johnsuna/archive/2006/02/13/597746.aspx及“使用C#编写LED样式时钟控件”(http://blog.csdn.net/johnsuna/archive/2006/02/14/598867.aspx),进入WPF时代了,如何用WPF绘制一个时钟呢?
先看效果: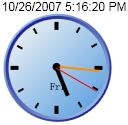
上面显示的是时间值,下面是图形版的时钟。
制作要点:
1. 首先在Expression Blend中画出时钟的样式;
2. 建立时钟的程序辅助类;
3. 将此时钟样式需要动态换掉的部分改成相应的绑定值。
由于具体步骤很多,这里只说说技术难点和要点,着重说明上述第2点部分。
// 时钟控件类:Clock.cs
using System;
using System.Windows;
using System.Windows.Controls;
using System.Windows.Controls.Primitives;
using System.Windows.Data;
using System.Windows.Documents;
using System.Windows.Media;
using System.Windows.Media.Imaging;
using System.Windows.Shapes;
using System.Timers;
using System.Windows.Threading;
namespace BrawDraw.Com.WPF.Clock.ControlLibrary
{
///
///
public class Clock : Control
{
private DispatcherTimer timer;
static Clock()
{
DefaultStyleKeyProperty.OverrideMetadata(typeof(Clock), new FrameworkPropertyMetadata(typeof(Clock)));
}
protected override void OnInitialized(EventArgs e)
{
base.OnInitialized(e);
timer = new DispatcherTimer();
timer.Tick += new EventHandler(Timer_Tick);
timer.Start();
}
private void Timer_Tick(object sender, EventArgs e)
{
UpdateDateTime();
timer.Interval = TimeSpan.FromMilliseconds(1000 - DateTime.Now.Millisecond);
}
private void UpdateDateTime()
{
this.DateTime = System.DateTime.Now;
}
#region DateTime property
public DateTime DateTime
{
get
{
return (DateTime)GetValue(DateTimeProperty);
}
private set
{
SetValue(DateTimeProperty, value);
}
}
public static DependencyProperty DateTimeProperty = DependencyProperty.Register(
"DateTime",
typeof(DateTime),
typeof(Clock),
new PropertyMetadata(DateTime.Now, new PropertyChangedCallback(OnDateTimeInvalidated)));
public static readonly RoutedEvent DateTimeChangedEvent =
EventManager.RegisterRoutedEvent("DateTimeChanged", RoutingStrategy.Bubble, typeof(RoutedPropertyChangedEventHandler
protected virtual void OnDateTimeChanged(DateTime oldValue, DateTime newValue)
{
RoutedPropertyChangedEventArgs
args.RoutedEvent = Clock.DateTimeChangedEvent;
RaiseEvent(args);
}
private static void OnDateTimeInvalidated(DependencyObject d, DependencyPropertyChangedEventArgs e)
{
Clock clock = (Clock)d;
DateTime oldValue = (DateTime)e.OldValue;
DateTime newValue = (DateTime)e.NewValue;
clock.OnDateTimeChanged(oldValue, newValue);
}
#endregion
}
}
// 时钟内部时针、分针、秒针角度计算及星期显示的类: ClockConverters.cs
// 由于WPF中旋转角度是以度单位,计算为绕一个圆周时,为360度。所以,计算时以360度来计算。
using System;
using System.Globalization;
using System.Windows.Data;
namespace BrawDraw.Com.WPF.Clock
{
// 一分钟60秒,一周为360度,所以,一秒钟就占6度,所以是:秒数×6。
[ValueConversion(typeof(DateTime), typeof(int))]
public class SecondsConverter : IValueConverter
{
public object Convert(object value, Type targetType, object parameter, CultureInfo culture)
{
DateTime date = (DateTime)value;
return date.Second * 6;
}
public object ConvertBack(object value, Type targetType, object parameter, CultureInfo culture)
{
return null;
}
}
// 一小时是60分钟,一周为360度,所以,一分钟就占6度,所以是:分钟数×6。
[ValueConversion(typeof(DateTime), typeof(int))]
public class MinutesConverter : IValueConverter
{
public object Convert(object value, Type targetType, object parameter, CultureInfo culture)
{
DateTime date = (DateTime)value;
return date.Minute * 6;
}
public object ConvertBack(object value, Type targetType, object parameter, CultureInfo culture)
{
return null;
}
}
// 时钟上显示12小时,一周为360度,这样,每小时占30度,考虑分钟所占角度是分钟数/2,所以结果是:小时数×30 + 分钟数/2。
[ValueConversion(typeof(DateTime), typeof(int))]
public class HoursConverter : IValueConverter
{
public object Convert(object value, Type targetType, object parameter, CultureInfo culture)
{
DateTime date = (DateTime)value;
return (date.Hour * 30) + (date.Minute / 2);
}
public object ConvertBack(object value, Type targetType, object parameter, CultureInfo culture)
{
return null;
}
}
[ValueConversion(typeof(DateTime), typeof(string))]
public class WeekdayConverter : IValueConverter
{
public object Convert(object value, Type targetType, object parameter, CultureInfo culture)
{
DateTime date = (DateTime)value;
return date.DayOfWeek.ToString().Substring(0,3);
}
public object ConvertBack(object value, Type targetType, object parameter, CultureInfo culture)
{
return null;
}
}
}
剩下的就十分简单,程序的显示部分(XAML代码):
// MainWindow.xaml
xmlns:x="http://schemas.microsoft.com/winfx/2006/xaml"
xmlns:customControl="clr-namespace:BrawDraw.Com.WPF.Clock.ControlLibrary;assembly=CustomControlLibrary"
xmlns:local="clr-namespace:BrawDraw.Com.WPF.Clock"
x:Class="BrawDraw.Com.WPF.Clock.Window1"
Title="WPF Clock" Height="394" Width="332"
>
(已用粗体标注重要的部分)
比较一下使用GDI+和WPF的方便性,从设计的角度来讲,WPF显得更方便,更快捷。从编程的代码量相比,两者差别不是太多,我统计了一下总体代码量,GDI+甚至比WPF更少。运行效率方面,暂未做测试。
给我老师的人工智能教程打call!http://blog.csdn.net/jiangjunshow

新的改变
我们对Markdown编辑器进行了一些功能拓展与语法支持,除了标准的Markdown编辑器功能,我们增加了如下几点新功能,帮助你用它写博客:
- 全新的界面设计 ,将会带来全新的写作体验;
- 在创作中心设置你喜爱的代码高亮样式,Markdown 将代码片显示选择的高亮样式 进行展示;
- 增加了 图片拖拽 功能,你可以将本地的图片直接拖拽到编辑区域直接展示;
- 全新的 KaTeX数学公式 语法;
- 增加了支持甘特图的mermaid语法1 功能;
- 增加了 多屏幕编辑 Markdown文章功能;
- 增加了 焦点写作模式、预览模式、简洁写作模式、左右区域同步滚轮设置 等功能,功能按钮位于编辑区域与预览区域中间;
- 增加了 检查列表 功能。
功能快捷键
撤销:Ctrl/Command + Z
重做:Ctrl/Command + Y
加粗:Ctrl/Command + B
斜体:Ctrl/Command + I
标题:Ctrl/Command + Shift + H
无序列表:Ctrl/Command + Shift + U
有序列表:Ctrl/Command + Shift + O
检查列表:Ctrl/Command + Shift + C
插入代码:Ctrl/Command + Shift + K
插入链接:Ctrl/Command + Shift + L
插入图片:Ctrl/Command + Shift + G
合理的创建标题,有助于目录的生成
直接输入1次#,并按下space后,将生成1级标题。
输入2次#,并按下space后,将生成2级标题。
以此类推,我们支持6级标题。有助于使用TOC语法后生成一个完美的目录。
如何改变文本的样式
强调文本 强调文本
加粗文本 加粗文本
标记文本
删除文本
引用文本
H2O is是液体。
210 运算结果是 1024.
插入链接与图片
链接: link.
图片: 
带尺寸的图片:
当然,我们为了让用户更加便捷,我们增加了图片拖拽功能。
如何插入一段漂亮的代码片
去博客设置页面,选择一款你喜欢的代码片高亮样式,下面展示同样高亮的 代码片.
// An highlighted block var foo = 'bar'; 生成一个适合你的列表
- 项目
- 项目
- 项目
- 项目
- 项目1
- 项目2
- 项目3
- 计划任务
- 完成任务
创建一个表格
一个简单的表格是这么创建的:
| 项目 | Value |
|---|---|
| 电脑 | $1600 |
| 手机 | $12 |
| 导管 | $1 |
设定内容居中、居左、居右
使用:---------:居中
使用:----------居左
使用----------:居右
| 第一列 | 第二列 | 第三列 |
|---|---|---|
| 第一列文本居中 | 第二列文本居右 | 第三列文本居左 |
SmartyPants
SmartyPants将ASCII标点字符转换为“智能”印刷标点HTML实体。例如:
| TYPE | ASCII | HTML |
|---|---|---|
| Single backticks | 'Isn't this fun?' |
‘Isn’t this fun?’ |
| Quotes | "Isn't this fun?" |
“Isn’t this fun?” |
| Dashes | -- is en-dash, --- is em-dash |
– is en-dash, — is em-dash |
创建一个自定义列表
- Markdown
- Text-to- HTML conversion tool
- Authors
- John
- Luke
如何创建一个注脚
一个具有注脚的文本。2
注释也是必不可少的
Markdown将文本转换为 HTML。
KaTeX数学公式
您可以使用渲染LaTeX数学表达式 KaTeX:
Gamma公式展示 Γ ( n ) = ( n − 1 ) ! ∀ n ∈ N \Gamma(n) = (n-1)!\quad\forall n\in\mathbb N Γ(n)=(n−1)!∀n∈N 是通过欧拉积分
Γ ( z ) = ∫ 0 ∞ t z − 1 e − t d t . \Gamma(z) = \int_0^\infty t^{z-1}e^{-t}dt\,. Γ(z)=∫0∞tz−1e−tdt.
你可以找到更多关于的信息 LaTeX 数学表达式here.
新的甘特图功能,丰富你的文章
gantt
        dateFormat  YYYY-MM-DD
        title Adding GANTT diagram functionality to mermaid
        section 现有任务
        已完成               :done,    des1, 2014-01-06,2014-01-08
        进行中               :active,  des2, 2014-01-09, 3d
        计划一               :         des3, after des2, 5d
        计划二               :         des4, after des3, 5d
- 关于 甘特图 语法,参考 这儿,
UML 图表
可以使用UML图表进行渲染。 Mermaid. 例如下面产生的一个序列图::
这将产生一个流程图。:
- 关于 Mermaid 语法,参考 这儿,
FLowchart流程图
我们依旧会支持flowchart的流程图:
- 关于 Flowchart流程图 语法,参考 这儿.
导出与导入
导出
如果你想尝试使用此编辑器, 你可以在此篇文章任意编辑。当你完成了一篇文章的写作, 在上方工具栏找到 文章导出 ,生成一个.md文件或者.html文件进行本地保存。
导入
如果你想加载一篇你写过的.md文件或者.html文件,在上方工具栏可以选择导入功能进行对应扩展名的文件导入,
继续你的创作。
mermaid语法说明 ↩︎
注脚的解释 ↩︎