Android之MediaCodec使用经验分享
Android之MediaCodec使用经验分享
本文地址:http://blog.csdn.net/forest_world
参考学习资料:
http://www.cnblogs.com/Xiegg/p/3428529.html MediaCodec文档翻译&&一些FAQ和例子
摘录:
MediaCodec codec = MediaCodec.createDecoderByType(type);
 codec.configure(format, ...);
 codec.start();
 ByteBuffer[] inputBuffers = codec.getInputBuffers();
 ByteBuffer[] outputBuffers = codec.getOutputBuffers();
 for (;;) {
   int inputBufferIndex = codec.dequeueInputBuffer(timeoutUs);
   if (inputBufferIndex >= 0) {
     // fill inputBuffers[inputBufferIndex] with valid data
     ...
     codec.queueInputBuffer(inputBufferIndex, ...);
   }

   int outputBufferIndex = codec.dequeueOutputBuffer(timeoutUs);
   if (outputBufferIndex >= 0) {
     // outputBuffer is ready to be processed or rendered.
     ...
     codec.releaseOutputBuffer(outputBufferIndex, ...);
   } else if (outputBufferIndex == MediaCodec.INFO_OUTPUT_BUFFERS_CHANGED) {
     outputBuffers = codec.getOutputBuffers();
   } else if (outputBufferIndex == MediaCodec.INFO_OUTPUT_FORMAT_CHANGED) {
     // Subsequent data will conform to new format.
     MediaFormat format = codec.getOutputFormat();
     ...
   }
 }
 codec.stop();
 codec.release();
 codec = null;
http://blog.csdn.net/xipiaoyouzi/article/details/37599759 Android MediaCodec小结
http://www.cnblogs.com/Sharley/p/5610778.html Android MediaCodec 使用例子
http://blog.csdn.net/gh_home/article/details/52143102 android 使用MediaCodec 编解码总结
http://blog.csdn.net/shawnkong/article/details/16337381 Android 新API 之 MediaCodec使用笔记 <一>
http://blog.csdn.net/u013366022/article/details/44994489 Android MediaCodec小结
http://blog.csdn.net/stn_lcd/article/details/53689657 Android中使用MediaCodec硬件解码,高效率得到YUV格式帧
http://blog.csdn.net/sdvch/article/details/38348673 用MediaCodec实现多段视音频的截取与拼接
http://blog.csdn.net/dahuaishu2010_/article/details/14103289 Android 媒体编解码器
http://www.oschina.net/code/snippet_1997485_47999 使用MediaCodec解码
摘录:
private final String TAG = "MediaCodeSample";
    /** 用来解码 */
    private MediaCodec mMediaCodec;
    /** 用来读取音频文件 */
    private MediaExtractor extractor;
    private MediaFormat format;
    private String mime = null;
    private int sampleRate = 0, channels = 0, bitrate = 0;
    private long presentationTimeUs = 0, duration = 0;
    public void decode(String url)
    {

        extractor = new MediaExtractor();
        // 根据路径获取源文件
        try
        {
            extractor.setDataSource(url);
        } catch (Exception e)
        {
            Log.e(TAG, " 设置文件路径错误" + e.getMessage());
        }
        try
        {
            // 音频文件信息
            format = extractor.getTrackFormat(0);
            mime = format.getString(MediaFormat.KEY_MIME);
            sampleRate = format.getInteger(MediaFormat.KEY_SAMPLE_RATE);
            // 声道个数:单声道或双声道
            channels = format.getInteger(MediaFormat.KEY_CHANNEL_COUNT);
            // if duration is 0, we are probably playing a live stream
            duration = format.getLong(MediaFormat.KEY_DURATION);
            // System.out.println("歌曲总时间秒:"+duration/1000000);
            bitrate = format.getInteger(MediaFormat.KEY_BIT_RATE);
        } catch (Exception e)
        {
            Log.e(TAG, "音频文件信息读取出错:" + e.getMessage());
            // 不要退出,下面进行判断
        }
        Log.d(TAG, "Track info: mime:" + mime + " 采样率sampleRate:" + sampleRate + " channels:" + channels + " bitrate:"
                + bitrate + " duration:" + duration);
        // 检查是否为音频文件
        if (format == null || !mime.startsWith("audio/"))
        {
            Log.e(TAG, "不是音频文件 end !");
            return;
        }
        // 实例化一个指定类型的解码器,提供数据输出
        // Instantiate an encoder supporting output data of the given mime type
        mMediaCodec = MediaCodec.createDecoderByType(mime);

        if (mMediaCodec == null)
        {
            Log.e(TAG, "创建解码器失败!");
            return;
        }
        mMediaCodec.configure(format, null, null, 0);

        mMediaCodec.start();
        // 用来存放目标文件的数据
        ByteBuffer[] inputBuffers = mMediaCodec.getInputBuffers();
        // 解码后的数据
        ByteBuffer[] outputBuffers = mMediaCodec.getOutputBuffers();
        // 设置声道类型:AudioFormat.CHANNEL_OUT_MONO单声道,AudioFormat.CHANNEL_OUT_STEREO双声道
        int channelConfiguration = channels == 1 ? AudioFormat.CHANNEL_OUT_MONO : AudioFormat.CHANNEL_OUT_STEREO;
        Log.i(TAG, "channelConfiguration=" + channelConfiguration);
        extractor.selectTrack(0);
        // ==========开始解码=============
        boolean sawInputEOS = false;
        boolean sawOutputEOS = false;
        final long kTimeOutUs = 10;
        MediaCodec.BufferInfo info = new MediaCodec.BufferInfo();
        while (!sawOutputEOS)
        {
            try
            {
                if (!sawInputEOS)
                {
                    int inputBufIndex = mMediaCodec.dequeueInputBuffer(kTimeOutUs);
                    if (inputBufIndex >= 0)
                    {
                        ByteBuffer dstBuf = inputBuffers[inputBufIndex];

                        int sampleSize = extractor.readSampleData(dstBuf, 0);
                        if (sampleSize < 0)
                        {
                            Log.d(TAG, "saw input EOS. Stopping playback");
                            sawInputEOS = true;
                            sampleSize = 0;
                        } else
                        {
                            presentationTimeUs = extractor.getSampleTime();
                        }

                        mMediaCodec.queueInputBuffer(inputBufIndex, 0, sampleSize, presentationTimeUs,
                                sawInputEOS ? MediaCodec.BUFFER_FLAG_END_OF_STREAM : 0);

                        if (!sawInputEOS)
                        {
                            extractor.advance();
                        }

                    } else
                    {
                        Log.e(TAG, "inputBufIndex " + inputBufIndex);
                    }
                } // !sawInputEOS

                // decode to PCM and push it to the AudioTrack player
                int res = mMediaCodec.dequeueOutputBuffer(info, kTimeOutUs);

                if (res >= 0)
                {
                    int outputBufIndex = res;
                    ByteBuffer buf = outputBuffers[outputBufIndex];
                    final byte[] chunk = new byte[info.size];
                    buf.get(chunk);
                    buf.clear();
                    if (chunk.length > 0)
                    {

                        // chunk解码后的音频流
                        // TODO:处理...
                    }
                    mMediaCodec.releaseOutputBuffer(outputBufIndex, false);
                    if ((info.flags & MediaCodec.BUFFER_FLAG_END_OF_STREAM) != 0)
                    {
                        Log.d(TAG, "saw output EOS.");
                        sawOutputEOS = true;
                    }

                } else if (res == MediaCodec.INFO_OUTPUT_BUFFERS_CHANGED)
                {
                    outputBuffers = mMediaCodec.getOutputBuffers();
                    Log.w(TAG, "[AudioDecoder]output buffers have changed.");
                } else if (res == MediaCodec.INFO_OUTPUT_FORMAT_CHANGED)
                {
                    MediaFormat oformat = mMediaCodec.getOutputFormat();
                    Log.w(TAG, "[AudioDecoder]output format has changed to " + oformat);
                } else
                {
                    Log.w(TAG, "[AudioDecoder] dequeueOutputBuffer returned " + res);
                }

            } catch (RuntimeException e)
            {
                Log.e(TAG, "[decodeMP3] error:" + e.getMessage());
            }
        }
        // =================================================================================
        if (mMediaCodec != null)
        {
            mMediaCodec.stop();
            mMediaCodec.release();
            mMediaCodec = null;
        }
        if (extractor != null)
        {
            extractor.release();
            extractor = null;
        }
        // clear source and the other globals
        duration = 0;
        mime = null;
        sampleRate = 0;
        channels = 0;
        bitrate = 0;
        presentationTimeUs = 0;
        duration = 0;
    }
http://blog.csdn.net/leif_/article/details/50971616 Android MediaCodec使用介绍
http://www.4byte.cn/question/71902/mediacodec-buffer-underflow-exce.html MediaCodec Buffer Underflow exce
http://www.xuebuyuan.com/1541892.html 详解YUV数据格式
http://www.cnblogs.com/Sharley/p/5610778.html Android MediaCodec 使用例子
摘录:
   public void offerEncoder(byte[] input) {
     try {
         ByteBuffer[] inputBuffers = mediaCodec.getInputBuffers();
         ByteBuffer[] outputBuffers = mediaCodec.getOutputBuffers();
         int inputBufferIndex = mediaCodec.dequeueInputBuffer(-1);
         if (inputBufferIndex >= 0) {
             ByteBuffer inputBuffer = inputBuffers[inputBufferIndex];
             inputBuffer.clear();
             inputBuffer.put(input);
             mediaCodec.queueInputBuffer(inputBufferIndex, 0, input.length, 0, 0);
         }

         MediaCodec.BufferInfo bufferInfo = new MediaCodec.BufferInfo();
         int outputBufferIndex = mediaCodec.dequeueOutputBuffer(bufferInfo,0);
         while (outputBufferIndex >= 0) {
             ByteBuffer outputBuffer = outputBuffers[outputBufferIndex];
             byte[] outData = new byte[bufferInfo.size];
             outputBuffer.get(outData);
             outputStream.write(outData, 0, outData.length);
             Log.i("AvcEncoder", outData.length + " bytes written");

             mediaCodec.releaseOutputBuffer(outputBufferIndex, false);
             outputBufferIndex = mediaCodec.dequeueOutputBuffer(bufferInfo, 0);

         }
     } catch (Throwable t) {
         t.printStackTrace();
     }
http://www.cnblogs.com/welhzh/p/6079631.html
Android中使用MediaCodec硬件解码,高效率得到YUV格式帧,快速保存JPEG图片(不使用OpenGL)(附Demo)
摘录:
MediaCodec的使用demo:
https://github.com/vecio/MediaCodecDemo
    int outIndex = decoder.dequeueOutputBuffer(info, 10000);
                switch (outIndex) {
                case MediaCodec.INFO_OUTPUT_BUFFERS_CHANGED:
                    Log.d("DecodeActivity", "INFO_OUTPUT_BUFFERS_CHANGED");
                    outputBuffers = decoder.getOutputBuffers();
                    break;
                case MediaCodec.INFO_OUTPUT_FORMAT_CHANGED:
                    Log.d("DecodeActivity", "New format " + decoder.getOutputFormat());
                    break;
                case MediaCodec.INFO_TRY_AGAIN_LATER:
                    Log.d("DecodeActivity", "dequeueOutputBuffer timed out!");
                    break;
                default:
                    ByteBuffer buffer = outputBuffers[outIndex];
                    Log.v("DecodeActivity", "We can't use this buffer but render it due to the API limit, " + buffer);
https://github.com/taehwandev/MediaCodecExample
http://bigflake.com/mediacodec/
摘录:
EncodeDecodeTest.java (requires 4.3, API 18)
CTS test. There are three tests that do essentially the same thing, but in different ways. Each test will:

    Generate video frames
    Encode frames with AVC codec
    Decode generated stream
    Test decoded frames to see if they match the original

The generation, encoding, decoding, and checking are near-simultaneous: frames are generated and fed to the encoder, and data from the encoder is fed to the decoder as soon as it becomes available.

The three tests are:

    Buffer-to-buffer. Buffers are software-generated YUV frames in ByteBuffer objects, and decoded to the same. This is the slowest (and least portable) approach, but it allows the application to examine and modify the YUV data.
    Buffer-to-surface. Encoding is again done from software-generated YUV data in ByteBuffers, but this time decoding is done to a Surface. Output is checked with OpenGL ES, using glReadPixels().
    Surface-to-surface. Frames are generated with OpenGL ES onto an input Surface, and decoded onto a Surface. This is the fastest approach, but may involve conversions between YUV and RGB.

Each test is run at three different resolutions: 720p (1280x720), QCIF (176x144), and QVGA (320x240).

The buffer-to-buffer and buffer-to-surface tests can be built with Android 4.1 (API 16). However, because the CTS tests did not exist until Android 4.3, a number of devices shipped with broken implementations.

NOTE: the setByteBuffer() usage may not be strictly correct, as it doesn't set "csd-1".

(For an example that uses the Android 5.x asynchronous API, see mstorsjo's android-decodeencodetest project.)
http://blog.csdn.net/u013547134/article/details/41009603 openCV人脸识别,yuv420sp格式转BGR传入Mat矩阵
摘录:
安卓摄像头采集的图像数据是yuv420sp(NV21)格式的,需要转换成jpg或bitmap格式的数据传到jni中,传给Mat矩阵
//YUV420SP转BGR
JNIEXPORT int JNICALL Java_com_facedetect_nativecaller_FaceNative_readYUV420SP(JNIEnv *env, jclass clz, jbyteArray yuv,jint len,jint height,jint width)
{
jbyte * pBuf = (jbyte*)env->GetByteArrayElements(yuv, 0);

Mat image(height + height/2,width,CV_8UC1,(unsigned char *)pBuf);
Mat mBgr;
cvtColor(image, mBgr, CV_YUV2BGR_NV21);
imwrite("/mnt/sdcard/readYuv.jpg",mBgr);

env->ReleaseByteArrayElements(yuv, pBuf, 0);

return 0;
}
//转换成BGR
cvtColor(image,bgr,CV_RGBA2BGR);
imwrite(“/mnt/sdcard/readBitmap.jpg”,bgr);
//转换成GRAY
// cvtColor(bgr,gray,CV_BGR2GRAY);
// imwrite(“/mnt/sdcard/gray.jpg”,gray);
http://www.cnblogs.com/azraelly/archive/2013/01/01/2841269.html
摘录:
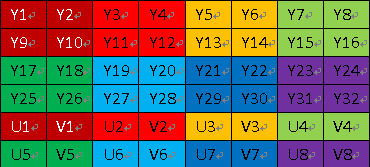
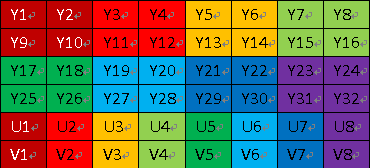
图文详解YUV420数据格式
NV12、NV21(属于YUV420)
NV12和NV21属于YUV420格式,是一种two-plane模式,即Y和UV分为两个Plane,但是UV(CbCr)为交错存储,而不是分为三个plane。其提取方式与上一种类似,即Y’00、Y’01、Y’10、Y’11共用Cr00、Cb00
YUV420 数据在内存中的长度是 width * hight * 3 / 2,
假设一个分辨率为8X4的YUV图像,它们的格式如下图:
YUV420sp格式

YUV420p数据格式

http://blog.sina.com.cn/s/blog_7dbac1250101nps0.html
Android中Bitmap,byte[],Drawable,InputStream相互转化工具类
申明:本文为博主在研究工作中经验分享,包括学习笔记、摘录、研究成果,以备以后工作参考之用,欢迎交流和批评;其中参考资料的标注、引用难免会有疏漏之处,以及其它欠妥之处,如有请告知,立马更正,致歉,谢谢;未经博主允许不得转载。转载请注明:http://blog.csdn.net/forest_world