android屏幕适配之dimens适配
安卓的适配方式有很多种,今天讲一下dimens适配:
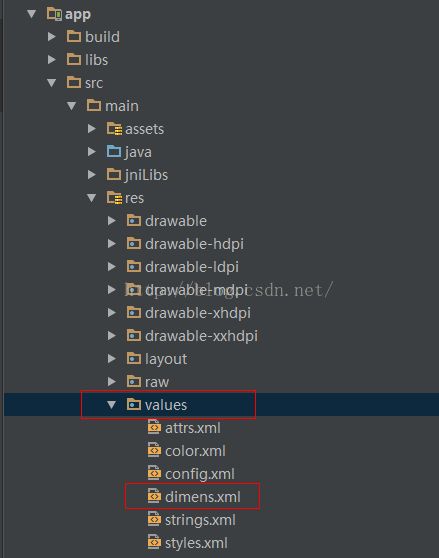
一般来讲,一个项目里会有一个values文件夹,如下图所示:
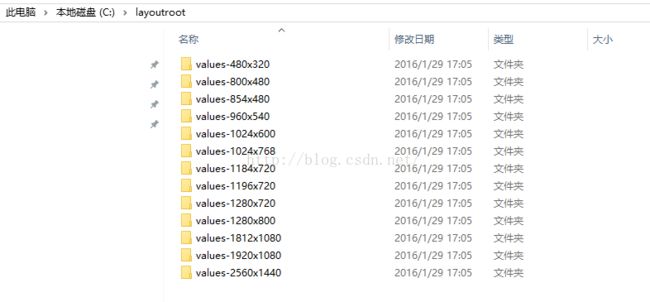
做好dimens适配后的项目图如下:
效果图已经发给大家看了,那我们来看看如何写dimens适配
也许会有同学想,难道这要我自己新建好多个文件夹吗?然后每个文件里在自己写上具体的dimen吗?
nonono,不可能这么麻烦的啦
可以使用自动化的工具来生成
import java.io.File;
import java.io.FileNotFoundException;
import java.io.FileOutputStream;
import java.io.PrintWriter;
/**
* Created by kongqw on 2015/11/21.
*/
public class MakeXml {
// 生成地址 C盘layoutroot目录下,这个路径可以更改
private final static String rootPath = "C:\\layoutroot\\values-{0}x{1}\\";
/**
* 设置基准分辨率
* 一般标注按照多大的图标,这里我们就设置多大尺寸
*/
private final static float dw = 1080f;
private final static float dh = 1920f;
private final static String WTemplate = "
private final static String HTemplate = "
// 手机分辨率
public static void main(String [] args){
makeString(320, 480);
makeString(480, 800);
makeString(480, 854);
makeString(540, 960);
makeString(600, 1024);
makeString(720, 1184);
makeString(720, 1196);
makeString(720, 1280);
makeString(768, 1024);
makeString(800, 1280);
makeString(1080, 1812);
makeString(1080, 1920);
makeString(1440, 2560);
}
public static void makeString(int w, int h) {
StringBuffer sb = new StringBuffer();
sb.append("\n");
sb.append("
float cellw = w / dw;
for (int i = 1; i < dw; i++) {
sb.append(WTemplate.replace("{0}", i + "").replace("{1}", change(cellw * i) + ""));
}
//此处可将1080换为自己的基准尺寸宽度
sb.append(WTemplate.replace("{0}", "1080").replace("{1}", w + ""));
sb.append("");
StringBuffer sb2 = new StringBuffer();
sb2.append("\n");
sb2.append("
float cellh = h / dh;
for (int i = 1; i < dh; i++) {
sb2.append(HTemplate.replace("{0}", i + "").replace("{1}", change(cellh * i) + ""));
}
//此处可将1920换为自己的基准尺寸高度
sb2.append(HTemplate.replace("{0}", "1920").replace("{1}", h + ""));
sb2.append("");
String path = rootPath.replace("{0}", h + "").replace("{1}", w + "");
File rootFile = new File(path);
if (!rootFile.exists()) {
rootFile.mkdirs();
}
File layxFile = new File(path + "lay_x.xml");
File layyFile = new File(path + "lay_y.xml");
try {
PrintWriter pw = new PrintWriter(new FileOutputStream(layxFile));
pw.print(sb.toString());
pw.close();
pw = new PrintWriter(new FileOutputStream(layyFile));
pw.print(sb2.toString());
pw.close();
} catch (FileNotFoundException e) {
e.printStackTrace();
}
}
public static float change(float a) {
int temp = (int) (a * 100);
return temp / 100f;
}
}
那么代码有了,怎么运行呢?
第一步:将这段代码复制到一个txt文本中,然后改后缀名为.java,即本案例中的MakeXml.java,(MakeXml为我自己命名的,你也可以命名成不一样的)出现提示是否要更改后缀名,点击是
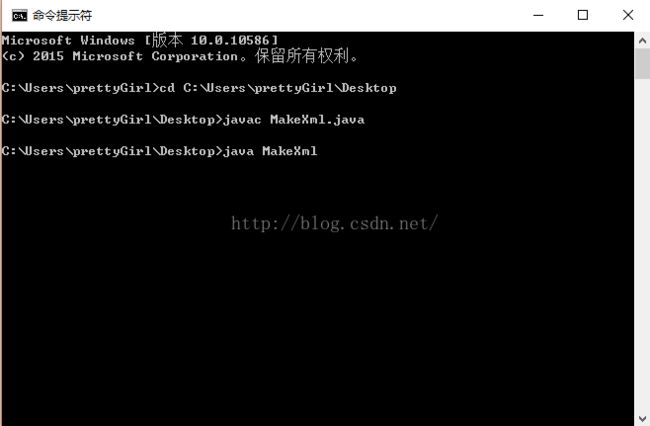
第二步,输入cmd,打开命令提示符:
第三步:cd 后面的是你文件所在的路径文件夹,我是把该文件放在桌面上的,直接用鼠标把文件拖到这里来就行了,将后面的\xxx.java去掉即可,然后按下回车键
第四步:按下回车键之后
第五步:输入如下的命令:其中 MakeXml为我自己命名的文件名,
第六步:按下回车键后,会生成一个.class的字节文件:
第7步:在命令行里输入如下命令:
然后就大功告成啦
再将这些复制到你的studio工程下即可


