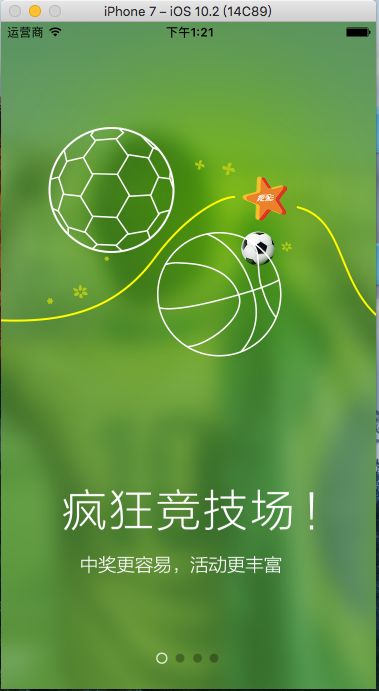
本文主要讲解使用UICollectionView来完成应用引导页的实现
应用引导页在项目中的使用还是比较频繁的,一般用于版本更新后进入新版本的介绍,现在对于引导页的实现方式一般为两种:UICollectionView和UIScrollView。这两者在使用上差别不大,UICollecitonView比UIScrollView多了一个cell重用,以及每个Cell都是通过数据源方法设置。而UIScrollView则是一次性完成整个scrollView的初始化。本文主要讲解UICollecitonView的实现方法,如果您想用UIScrollView实现的话,也可以参照本文讲述的方式进行实现。
首先我们使用UICollectionViewController来实现,添加图片元素
public partial class ViewController : UICollectionViewController
    {
        UIImageView bigView;
        UIImageView largeTxtView;
        UIImageView smallTxtView;
        float pageNumber;
        static NSString reuseIdentifier = new NSString("GuideCell");
        public ViewController()
        {
        }
        public ViewController(UICollectionViewFlowLayout layout) : base(layout)
        {
        }
        protected ViewController(IntPtr handle) : base(handle)
        {
            // Note: this .ctor should not contain any initialization logic.
        }

        public override void ViewDidLoad()
        {
            base.ViewDidLoad();
            this.CollectionView.RegisterClassForCell(typeof(MYGuideViewCell),reuseIdentifier);
            //设置分页样式
            this.CollectionView.PagingEnabled = true;
            //取消水平滚动条
            this.CollectionView.ShowsHorizontalScrollIndicator = false;
            //取消弹性效果
            this.CollectionView.Bounces = false;

            UIImageView blView = new UIImageView(UIImage.FromBundle("guideLine"));
            CGRect rectbl =  blView.Frame;
            rectbl.X = -150;
            blView.Frame = rectbl;
            Console.WriteLine(blView.Frame);
            this.CollectionView.AddSubview(blView);

            bigView = new UIImageView(UIImage.FromBundle("guide1"));
            Console.WriteLine(bigView.ContentMode);
            Console.WriteLine(bigView.Frame);
            this.CollectionView.AddSubview(bigView);

            largeTxtView = new UIImageView(UIImage.FromBundle("guideLargeText1"));
            CGRect rectlarge = largeTxtView.Frame;
            rectlarge.X = 27.5f;
            rectlarge.Y = (System.nfloat)(this.CollectionView.Frame.Height * 0.7);
            largeTxtView.Frame = rectlarge;
            this.CollectionView.AddSubview(largeTxtView);

            smallTxtView = new UIImageView(UIImage.FromBundle("guideSmallText1"));
            CGRect rectsmall = smallTxtView.Frame;
            rectsmall.X = 27.5f;
            rectsmall.Y = (System.nfloat)(this.CollectionView.Frame.Height * 0.8);
            smallTxtView.Frame = rectsmall;
            this.CollectionView.AddSubview(smallTxtView);

            bigView.Layer.BorderColor = UIColor.Blue.CGColor;
            bigView.Layer.BorderWidth = 2.0f;
            // Perform any additional setup after loading the view, typically from a nib.
        }
注意事项:
1.在使用UICollectionViewController和使用UITableViewController使用的注意情况一样,我们新建一个ViewController后,修改父类为UICollectionViewController,还需要修改相应的.xib文件中的UIViewController改为UICollectionViewController。
2.修改UICollectionViewController的重用标识符和绑定的.cs文件。
3.在ViewDidLoad中注册相应的cell,可以直接代码实现也可以使用.xib文件实现。
接着我们自定义CollectionView的cell
using System;
using UIKit;
namespace test_jianshu
{
    public class MYGuideViewCell : UICollectionViewCell
    {
        private UIImage image;
        private UIImageView imageView;
        public UIImage Image
        {
            get
            {
                return image;
            }

            set
            {
                this.ImageView.Image = value;
                image = value;
            }
        }

        private UIImageView ImageView
        {
            get
            {
                if (imageView == null)
                {
                    imageView = new UIImageView();
                    imageView.Frame = new CoreGraphics.CGRect(UIScreen.MainScreen.Bounds.Location,UIScreen.MainScreen.Bounds.Size);
                    this.AddSubview(imageView);
                }

                return imageView;
            }

            set
            {
                imageView = value;
            }
        }


        protected MYGuideViewCell(IntPtr handle) : base(handle)
        {

        }

    }
}
然后实现CollectionView的数据源代理方法
        public override nint NumberOfSections(UICollectionView collectionView)
        {
            return 1;
        }

        public override nint GetItemsCount(UICollectionView collectionView, nint section)
        {
            return 4;
        }

        public override UICollectionViewCell GetCell(UICollectionView collectionView, NSIndexPath indexPath)
        {
            MYGuideViewCell cell = (MYGuideViewCell)collectionView.DequeueReusableCell(reuseIdentifier,indexPath);

            string imageName = string.Format("guide{0}Background568h", indexPath.Row + 1);

            //NSString imageName = NSString.LocalizedFormat("guide%zdBackground", indexPath.Row + 1);

            cell.Image = UIImage.FromBundle(imageName);

            //cell.BackgroundColor = UIColor.Red;

            return cell;
        }
接着我们重写滑动结束执行的方法
        public override void DecelerationEnded(UIScrollView scrollView)
        {
            nfloat offsetX = scrollView.ContentOffset.X;

            int page = (int)(offsetX / UIScreen.MainScreen.Bounds.Width);

            if (pageNumber < page)
            {
                //向左滑动
                CGRect rectbl = bigView.Frame;
                rectbl.X = offsetX + this.CollectionView.Frame.Width;
                bigView.Frame = rectbl;

                CGRect rectlarge = largeTxtView.Frame;
                rectlarge.X = offsetX + this.CollectionView.Frame.Width;
                largeTxtView.Frame = rectlarge;

                CGRect rectsmall = smallTxtView.Frame;
                rectsmall.X = offsetX + this.CollectionView.Frame.Width;
                smallTxtView.Frame = rectsmall;

                //bigView.x = offsetX + this.CollectionView.Frame.Width;
                //largeTxtView.x = offsetX + this.CollectionView.Frame.Width;
                //smallTxtView.x = offsetX + this.CollectionView.Frame.Width;
            }
            else
            {
                //向右滑动

                CGRect rectbl = bigView.Frame;
                rectbl.X = offsetX - this.CollectionView.Frame.Width;
                bigView.Frame = rectbl;

                CGRect rectlarge = largeTxtView.Frame;
                rectlarge.X = offsetX - this.CollectionView.Frame.Width;
                largeTxtView.Frame = rectlarge;

                CGRect rectsmall = smallTxtView.Frame;
                rectsmall.X = offsetX - this.CollectionView.Frame.Width;
                smallTxtView.Frame = rectsmall;

                //self.bigView.x = offsetX - self.collectionView.width;
                //self.largeTxtView.x = offsetX - self.collectionView.width;
                //self.smallTxtView.x = offsetX - self.collectionView.width;
            }

            string bigImageName = string.Format("guide{0}", page + 1);
            string largeImageName = string.Format("guideLargeText{0}", page + 1);
            string smallImageName = string.Format("guideSmallText{0}", page + 1);

            bigView.Image = UIImage.FromBundle(bigImageName);
            largeTxtView.Image = UIImage.FromBundle(largeImageName);
            smallTxtView.Image = UIImage.FromBundle(smallImageName);

            UIView.Animate(0.25, () => {

                CGRect rectbl = bigView.Frame;
                rectbl.X = offsetX ;
                bigView.Frame = rectbl;

                CGRect rectlarge = largeTxtView.Frame;
                rectlarge.X = 27.5f+offsetX ;
                largeTxtView.Frame = rectlarge;

                CGRect rectsmall = smallTxtView.Frame;
                rectsmall.X = 27.5f + offsetX ;
                smallTxtView.Frame = rectsmall;
            });

            pageNumber = page;

        }
在这里实例代码中的耦合性太高,对于设置frame的时候重复代码太多,这里在OC中使用分类就能实现,在Xamarin中也有分类的相应实现方式,但是却不能在分类中使用this获取到相应的属性,这里就没用分类实现。可以自己再去试试用分类实现的方式。这里我给出OC中分类的代码,大家可以自动转换分类。
声明x,y,width,height四个属性,只是用其get和set方法
#import "UIView+Frame.h"

@implementation UIView (Frame)


-(void)setX:(CGFloat)x
{
    CGRect rect = self.frame;

    rect.origin.x = x;

    self.frame = rect;

}

-(CGFloat )x
{
    return self.frame.origin.x;
}

-(void)setY:(CGFloat)y
{
    CGRect rect = self.frame;

    rect.origin.y = y;

    self.frame = rect;

}

-(CGFloat )y
{
    return self.frame.origin.y;
}

-(void)setWidth:(CGFloat)width
{
    CGRect rect = self.frame;

    rect.size.width = width;

    self.frame = rect;

}

-(CGFloat )width
{
    return self.frame.size.width;
}

-(void)setHeight:(CGFloat)height
{
    CGRect rect = self.frame;

    rect.size.height = height;

    self.frame = rect;

}

-(CGFloat )height
{
    return self.frame.size.height;
}

@end
在此处实例没有添加按钮,没有附加获取版本号的部分,这里你可以自行添加。

