Android设计模式之策略模式在项目中的实际使用总结
文章目录
- 1前言
- 2.策略模式
- 2.1定义
- 2.2 策略模式使用场景
- 2.3 策略模式模式UML类图
- 3. 策略模式简单实现
- 4 应用场景
- 4.1 动画中的时间插值器
- 4.2 ListAdapter
- 4.3 volley的超时重发重发机制
- 4.4 其他应用场景
- 5 策略模式的优点与缺点
- 6 总结
1前言
策略模式在开发中也常常用到,当实现某一个功能时如支付功能时,支付功能可以有多种实现方式,比如微信支付、支付宝支付、一网通支付。再比如实现分享时也可以有多种策略,可以分享到QQ、微信、微博等社交平台。
在众多的实现方式中,可以将功能中涉及到的通用方法或策略提取出来,提供一个统一的接口,不同的算法或者策略有不同的实现类,这次在程序客户端就可以通过注入不同的实现对象来实现算法或者策略的动态策略,这种模式的可维护性、或扩展性更好。这就是本文要介绍的策略模式。
2.策略模式
2.1定义
策略模式定义了一系列的算法,并将每一个封装起来,而且使它们可以相互替换。策略模式让算法模式独立于使用它的客户而独立变化。
2.2 策略模式使用场景
- 针对同一类型的问题的多种处理方式,仅仅是具体行为有差别时。
- 需要安全地的封装多种同一类型的操作时。
- 出现同一抽象类有多个子类,而又需要
if-else或者switch-case来选择具体子类时。
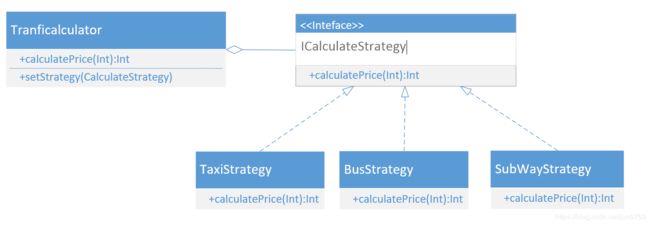
2.3 策略模式模式UML类图
上图的角色介绍:
- Context :用来操作策略的上下文环境;
- Stragety:策略的抽象;
- StagetyA、StagetyB:具体的策略的实现
3. 策略模式简单实现
以《Android源码设计模式解析与实战》书中的公共交通票价定价策略为例,本文用kotlin实现。
1.首先定义策略的接口
/**
 * 定义策略的接口
 * 计算价格的接口
 */
interface ICalculateStrategy {
    fun calculatePrice(km:Int):Int
}
2.然后定义一个用来操作策略的上下文环境。
注: TranficCalculator 中引用的是接口,当更换具体实现类时,此内不用修改代码,这就是针对接口编程的好处。
//定义一个用来操作策略的上下文环境
class TranficCalculator {
    lateinit var mStategy:ICalculateStrategy

    fun setStrategy(stategy:ICalculateStrategy):TranficCalculator{
        mStategy = stategy
        return this
    }
    fun calculatePrice(km:Int):Int{
        return mStategy.calculatePrice(km)
    }
}
3.接着定义不同的策略出租车、公交车和地铁票价
/**
 * 出租车策略
 * 价格简化为公里数的2倍
 */
class TaxiStrategy : ICalculateStrategy {
    override fun calculatePrice(km: Int): Int {
        return 2 * km
    }
}

/**
 *  公交车价格计算的策略
 */
class BusStrategy : ICalculateStrategy {
    override fun calculatePrice(km: Int): Int {
        //超过10公里的总距离
        val extraTotal = km - 10
        //超过的距离是5公里的倍数
        val extraFactor = extraTotal / 5
        //超过的距离对5公里取余
        val fraction = extraTotal % 5
        //价格计算
        var price = 1 + extraFactor * 1
        return if (fraction > 0) ++price; else price
    }
}

/**
 * 地铁价格计算的策略
 * 6公里(含)内3元; 6-12公里(含)4元;12-22公里(含)5元;22-32公里(含)6元;其余简化为7元
 */
class SubwayStrategy:ICalculateStrategy {
    override fun calculatePrice(km: Int): Int {
        return when {
            km <= 6 -> 3
            km in 7..11 -> 4
            km in 12..21 -> 5
            km in 22..31 -> 6
            else -> 7
        }
    }
}
4.最后写一个测试
package designPatters

//注意Test类中,直接新建File类 不要class
fun main() {
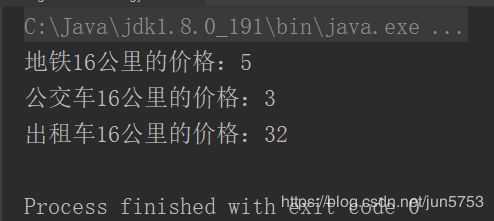
    println("地铁16公里的价格:" + TranficCalculator().setStrategy(SubwayStrategy()).calculatePrice(16))

    println("公交车16公里的价格:" + TranficCalculator().setStrategy(BusStrategy()).calculatePrice(16))

    println("出租车16公里的价格:"+TranficCalculator().setStrategy(TaxiStrategy()).calculatePrice(16))
}
通过策略模式简化了类的结构,方便了程序的扩展性、和解耦性,当我们在定义一个新的策略时候,只需要通过setStrategy 就可以轻松实现策略的替换,而不是用if-else 来做条件判断。这样保证了系统的简化逻辑以及接口,方便系统的可读性,对于业务的复杂逻辑也显得更加直观。
4 应用场景
Android源码中的策略模式实现分析
4.1 动画中的时间插值器
日常的Android开发中经常会用到动画,Android中最简单的动画就是Tween Animation了,当然帧动画和属性动画也挺方便的,但是基本原理都类似,毕竟动画的本质都是一帧一帧的展现给用户的,只不要当fps小于60的时候,人眼基本看不出间隔,也就成了所谓的流畅动画。(注:属性动画是3.0以后才有的,低版本可采用NineOldAndroids来兼容。而动画的动态效果往往也取决于插值器Interpolator不同,我们只需要对Animation对象设置不同的Interpolator就可以实现不同的效果,这是怎么实现的呢?
首先要想知道动画的执行流程,还是得从View入手,因为Android中主要针对的操作对象还是View,所以我们首先到View中查找,我们找到了View.startAnimation(Animation animation)这个方法。
	public void startAnimation(Animation animation) {
		//初始化动画开始时间
        animation.setStartTime(Animation.START_ON_FIRST_FRAME);
		//对View设置动画
        setAnimation(animation);
		//刷新父类缓存
        invalidateParentCaches();
		//刷新View本身及子View
        invalidate(true);
    }
考虑到View一般不会单独存在,都是存在于某个ViewGroup中,所以google使用动画绘制的地方选择了在ViewGroup中的drawChild(Canvas canvas, View child, long drawingTime)方法中进行调用子View的绘制。
	protected boolean drawChild(Canvas canvas, View child, long drawingTime) {
        return child.draw(canvas, this, drawingTime);
    }
再看下View中的draw(Canvas canvas, ViewGroup parent, long drawingTime)方法中是如何调用使用Animation的
	boolean draw(Canvas canvas, ViewGroup parent, long drawingTime) {
		//...

		//查看是否需要清除动画信息
		final int flags = parent.mGroupFlags;
        if ((flags & ViewGroup.FLAG_CLEAR_TRANSFORMATION) == ViewGroup.FLAG_CLEAR_TRANSFORMATION) {
            parent.getChildTransformation().clear();
            parent.mGroupFlags &= ~ViewGroup.FLAG_CLEAR_TRANSFORMATION;
        }

		//获取设置的动画信息
	   	final Animation a = getAnimation();
        if (a != null) {
			//绘制动画
            more = drawAnimation(parent, drawingTime, a, scalingRequired);
            concatMatrix = a.willChangeTransformationMatrix();
            if (concatMatrix) {
                mPrivateFlags3 |= PFLAG3_VIEW_IS_ANIMATING_TRANSFORM;
            }
            transformToApply = parent.getChildTransformation();
        } else {
			//...
		}
	}
可以看出在父类调用View的draw方法中,会先判断是否设置了清除到需要做该表的标记,然后再获取设置的动画的信息,如果设置了动画,就会调用View中的drawAnimation方法,具体如下:
	private boolean drawAnimation(ViewGroup parent, long drawingTime,
            Animation a, boolean scalingRequired) {

		Transformation invalidationTransform;
        final int flags = parent.mGroupFlags;
		//判断动画是否已经初始化过
        final boolean initialized = a.isInitialized();
        if (!initialized) {
            a.initialize(mRight - mLeft, mBottom - mTop, parent.getWidth(), parent.getHeight());
            a.initializeInvalidateRegion(0, 0, mRight - mLeft, mBottom - mTop);
            if (mAttachInfo != null) a.setListenerHandler(mAttachInfo.mHandler);
            onAnimationStart();
        }

		//判断View是否需要进行缩放
		final Transformation t = parent.getChildTransformation();
        boolean more = a.getTransformation(drawingTime, t, 1f);
        if (scalingRequired && mAttachInfo.mApplicationScale != 1f) {
            if (parent.mInvalidationTransformation == null) {
                parent.mInvalidationTransformation = new Transformation();
            }
            invalidationTransform = parent.mInvalidationTransformation;
            a.getTransformation(drawingTime, invalidationTransform, 1f);
        } else {
            invalidationTransform = t;
        }

		if (more) {
			//根据具体实现,判断当前动画类型是否需要进行调整位置大小,然后刷新不同的区域
            if (!a.willChangeBounds()) {
				//...

			}else{
				//...
			}
		}
		return more;
	}
其中主要的操作是动画始化、动画操作、界面刷新。动画的具体实现是调用了Animation中的getTransformation(long currentTime, Transformation outTransformation,float scale)方法。
	public boolean getTransformation(long currentTime, Transformation outTransformation,
            float scale) {
        mScaleFactor = scale;
        return getTransformation(currentTime, outTransformation);
    }
在上面的方法中主要是获取缩放系数和调用Animation.getTransformation(long currentTime, Transformation outTransformation)来计算和应用动画效果。
	Interpolator mInterpolator;  //成员变量
	public boolean getTransformation(long currentTime, Transformation outTransformation) {
			//计算处理当前动画的时间点...
            final float interpolatedTime = mInterpolator.getInterpolation(normalizedTime);
			//后续处理,以此来应用动画效果...
            applyTransformation(interpolatedTime, outTransformation);
	    return mMore;
    }
很容易发现Android系统中在处理动画的时候会调用插值器中的getInterpolation(float input)方法来获取当前的时间点,依次来计算当前变化的情况。这就不得不说到Android中的插值器Interpolator,它的作用是根据时间流逝的百分比来计算出当前属性值改变的百分比,系统预置的有LinearInterpolator(线性插值器:匀速动画)、AccelerateDecelerateInterpolator(加速减速插值器:动画两头慢中间快)和DecelerateInterpolator(减速插值器:动画越来越慢)等,如图:
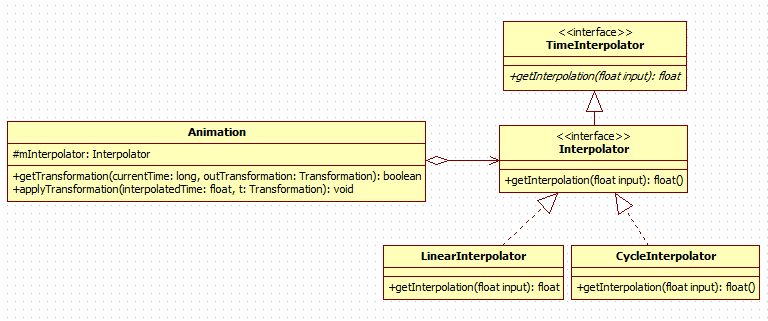
由于初期比较旧的版本采用的插值器是TimeInterpolator抽象,google采用了多加一层接口继承来实现兼容也不足为怪了。很显然策略模式在这里作了很好的实现,Interpolator就是处理动画时间的抽象,LinearInterpolator、CycleInterpolator等插值器就是具体的实现策略。插值器与Animation的关系图如下:
这里以LinearInterpolator和CycleInterpolator为例:
-
LinearInterpolator
public float getInterpolation(float input) { return input; } -
CycleInterpolator
	public float getInterpolation(float input) {
      return (float)(Math.sin(2 * mCycles * Math.PI * input));
  }
可以看出LinearInterpolator中计算当前时间的方法是做线性运算,也就是返回input*1,所以动画会成直线匀速播放出来,而CycleInterpolator是按照正弦运算,所以动画会正反方向跑一次,其它插值器依次类推。不同的插值器的计算方法都有所差别,用户设置插值器以实现动画速率的算法替换。
4.2 ListAdapter
在Android中策略模式的其中一个典型应用就是Adapter,在我们平时使用的时候,一般情况下我们可能继承BaseAdapter,然后实现不同的View返回,getView里面实现不同的算法。外部使用的时候也可以根据不同的数据源,切换不同的Adapter。
//简单布局
mListView.setAdapter(new ArrayAdapter<>(),this,R.layout.item_text),Arrays.asList("one","two","threee"));

//复杂布局
mListView.setAdapter(new BaseAdapter)(){
    @override
    public int getCount(){return mData.size();}

    @override
    public Object getItem(int position){
        return mData.get(position);
    }
    @override
    public long getItemId(int position){return position;}

    @override
    public View getView(int position,View converView,ViewGroup parent){
        converView = LayoutInflater,from(SettingActivity.this).inflate(R.layout.item_sample,parent);
        return converView;
    }
}
ListAdapter源码分析:
/**
 * Extended {@link Adapter} that is the bridge between a {@link ListView}
 * and the data that backs the list. Frequently that data comes from a Cursor,
 * but that is not
 * required. The ListView can display any data provided that it is wrapped in a
 * ListAdapter.
 */
public interface ListAdapter extends Adapter {
    public boolean areAllItemsEnabled();
    boolean isEnabled(int position);
}
BaseAdapter源码分析:
/**
 * Common base class of common implementation for an {@link Adapter} that can be
 * used in both {@link ListView} (by implementing the specialized
 * {@link ListAdapter} interface) and {@link Spinner} (by implementing the
 * specialized {@link SpinnerAdapter} interface).
 */
public abstract class BaseAdapter implements ListAdapter, SpinnerAdapter {
    private final DataSetObservable mDataSetObservable = new DataSetObservable();
    private CharSequence[] mAutofillOptions;

    public boolean hasStableIds() {
        return false;
    }
    //……
}
public class ArrayAdapter<T> extends BaseAdapter implements Filterable, ThemedSpinnerAdapter {
    private final Object mLock = new Object();

    private final LayoutInflater mInflater;

    private final Context mContext;
    //……
}
可以看到 ListAdapter 是一个接口,ArrayAdapter 和 BaseAdapter 是它的一个实现类。对比文章开始给出的 策略模式 UML 图,可以发现 ListAdapter 就是 strategy 接口,ArrayAdpater 等就是具体的实现类,可以分别实现简单的布局和复杂的布局。而在 ListView 中引用的是 接口 ListAdapter,可以证实这就是一个 策略模式 的使用。
ListView中还涉及到了一个重要的设计模式:适配器模式,后期有时间再深入研究总结。
4.3 volley的超时重发重发机制
1.首先定义重试策略接口
public interface RetryPolicy {
    public int getCurrentTimeout();//获取当前请求用时

    public int getCurrentRetryCount();//获取已经重试的次数

    public void retry(VolleyError error) throws VolleyError;//确定是否重试,参数为这次异常的具体信息。在请求异常时此接口会被调用,可在此函数实现中抛出传入的异常表示停止重试。
}
2.实现具体策略类。在Volley中,该接口有一个默认的实现DefaultRetryPolicy,Volley 默认的重试策略实现类。
主要通过在 retry(…) 函数中判断重试次数是否达到上限确定是否继续重试。
public class DefaultRetryPolicy implements RetryPolicy {
   ...
    public static final int DEFAULT_TIMEOUT_MS = 2500;
	private int mCurrentTimeoutMs;
    /** The default number of retries */
    public static final int DEFAULT_MAX_RETRIES = 0;

    /** The default backoff multiplier */
    public static final float DEFAULT_BACKOFF_MULT = 1f;

   //代表省略掉的代码

    @Override
    public int getCurrentTimeout() {
        return mCurrentTimeoutMs;
    }

    @Override
    public int getCurrentRetryCount() {
        return mCurrentRetryCount;
    }

    @Override
    public void retry(VolleyError error) throws VolleyError {
        mCurrentRetryCount++;
        mCurrentTimeoutMs += (mCurrentTimeoutMs * mBackoffMultiplier);
        if (!hasAttemptRemaining()) {
            throw error;
        }
    }
}
3.设置使用某种策略类。
Request.java 请求类,持有一个抽象策略类RetryPolicy 的引用,最终给客户端调用
public abstract class Request<T> implements Comparable<Request<T>> {
	 private RetryPolicy mRetryPolicy; //持有策略类的引用

	// ...

	public Request(int method, String url, Response.ErrorListener listener) {
        mMethod = method;
        mUrl = url;
        mIdentifier = createIdentifier(method, url);
        mErrorListener = listener;
        setRetryPolicy(new DefaultRetryPolicy());  //设置策略类

        mDefaultTrafficStatsTag = findDefaultTrafficStatsTag(url);
    }
	//...

	 public Request<?> setRetryPolicy(RetryPolicy retryPolicy) {
        mRetryPolicy = retryPolicy;
        return this;
    }

	//...

	public final int getTimeoutMs() {
        return mRetryPolicy.getCurrentTimeout();
    }
}
4.4 其他应用场景
实际中的使用还有很多体现方式,除了文中提到的票价计算策略、源码分析中的Adapter、网络重发机制外用到了策略模式,还有比较接地气的一点使用场景:比如请求网络数据时在界面中涉及到的几种状态:数据为空、加载中、数据异常、数据为空、请求成功有数据。此时需要显示相应的布局界面。
最后这个场景可能更实用一点,后期会完善进来。
5 策略模式的优点与缺点
策略模式主要用来分离算法,根据相同的行为抽象来做不同的具体策略实现。很好的实现了开闭原则,也就是定义抽象,注入具体实现,从而达到很好的可扩展性。
优点
-
使用了组合,使架构更加灵活
-
富有弹性,可以较好的应对变化(开闭原则)
-
更好的代码复用性(相对于继承)
-
消除大量的条件语句
缺点
-
随着策略的增加,子类也会变得繁多。
-
选择何种算法需要客户端来创建对象,增加了耦合,这里可以通过与工厂模式结合解决该问题;
策略模式设计原则:
- 找出应用中需要变化的部分,把它们独立出来,不要和那些不需要变化的代码混在一起
- 面向接口编程,而不是面向实现编程
- 多用组合,少用继承
6 总结
策略模式在开发应用场景很多,平时有意识的运用好策略模式,可以很好的提高的程序的可维护性和可扩展性。
参考资料:
1.Android设计模式源码解析之策略模式
2.Android 中的那些策略模式
3.实际项目运用之Strategy模式(策略模式)
4.何红辉,关爱民. Android 源码设计模式解析与实战[M]. 北京:人民邮电出版社


