ELK日志分析平台之kibana以及借助ELK平台实现网站访问量统计
kibana
Kibana是一个开源的分析与可视化平台,设计出来用于和Elasticsearch一起使用的。你可以用kibana搜索、查看、交互存放在Elasticsearch索引里的数据,使用各种不同的图表、表格、地图等kibana能够很轻易地展示高级数据分析与可视化。
Kibana让我们理解大量数据变得很容易。它简单、基于浏览器的接口使你能快速创建和分享实时展现Elasticsearch查询变化的动态仪表盘。安装Kibana非常快,你可以在几分钟之内安装和开始探索你的Elasticsearch索引数据,不需要写任何代码,没有其他基础软件依赖。
1.安装kibana:
[root@server6 ~]# rpm -ivh kibana-4.5.1-1.x86_64.rpm
Preparing...                ########################################### [100%]
   1:kibana                 ########################################### [100%]
编辑配置文件:
[root@server6 ~]# cd /opt/kibana/config/
[root@server6 config]# vim kibana.yml
设定:
 15 elasticsearch.url: "http://172.25.17.4:9200"
 23 kibana.index: ".kibana"
开启服务:
[root@server6 config]# /etc/init.d/kibana start
kibana started
[root@server6 config]# netstat -antlp |grep kibana
[root@server6 config]# netstat -antlp |grep 5601
tcp        0      0 0.0.0.0:5601                0.0.0.0:*                   LISTEN      2105/node
浏览器中访问5601端口:

链接到[apache-]YYYY.MM.DD:
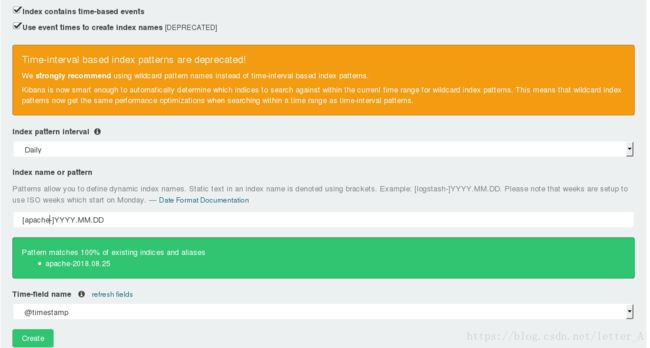
可以查看到apache的访问情况:

功能实现:将来自nginx的数据输出到redis端,redis交给elasticsearch,再由kibana进行显示
在server5端安装redis并开启服务:
[root@server5 ~]# tar zxf redis-3.0.6.tar.gz
[root@server5 ~]# cd redis-3.0.6
[root@server5 redis-3.0.6]# yum install gcc -y
[root@server5 redis-3.0.6]# make
[root@server5 redis-3.0.6]# make install
[root@server5 redis-3.0.6]# cd utils/
[root@server5 utils]# ./install_server.sh
server4端安装nginx:
[root@server4 ~]# rpm -ivh nginx-1.8.0-1.el6.ngx.x86_64.rpm
warning: nginx-1.8.0-1.el6.ngx.x86_64.rpm: Header V4 RSA/SHA1 Signature, key ID 7bd9bf62: NOKEY
Preparing...                ########################################### [100%]
   1:nginx                  ########################################### [100%]
----------------------------------------------------------------------

Thanks for using nginx!

Please find the official documentation for nginx here:
* http://nginx.org/en/docs/

Commercial subscriptions for nginx are available on:
* http://nginx.com/products/

----------------------------------------------------------------------
复制文件:
[root@server4 ~]# cd -
/etc/logstash/conf.d
[root@server4 conf.d]# ls
aaa.conf  es.conf
[root@server4 conf.d]# cp aaa.conf nginx.conf
停掉apache开启nginx,并在浏览器中访问nginx使其生成访问日志:
[root@server4 conf.d]# /etc/init.d/httpd stop
Stopping httpd:                                            [  OK  ]
[root@server4 conf.d]# /etc/init.d/nginx start
Starting nginx:                                            [  OK  ]
给nginx日志权限:
[root@server4 conf.d]# chmod 644 /var/log/nginx/access.log
编辑文件nginx.conf:
[root@server4 conf.d]# vim nginx.conf
内容:
  1 input {
  2         file {
  3                 path => "/var/log/nginx/access.log"
  4                 start_position => "beginning"
  5         }
  6 }
  7
  8 filter {
  9         grok {
 10                 match => { "message" => "%{COMBINEDAPACHELOG} %{QS:x_forwarded_for}"}
 11         }
 12 }
 13
 14 output {
 15         redis  {
 16                 host => ["172.25.17.5"]
 17                 port => 6379
 18                 data_type=> "list"
 19                 key => "logstash:redis"
 20         }
 21         stdout {
 22                 codec => rubydebug
 23         }
 24 }
执行:
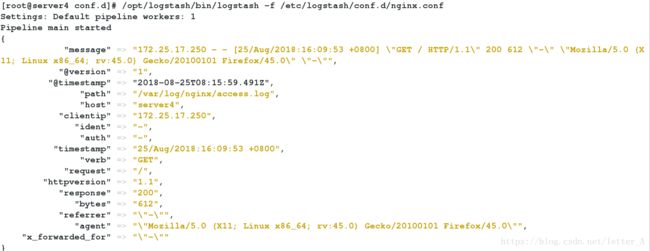
[root@server4 conf.d]# /opt/logstash/bin/logstash -f /etc/logstash/conf.d/nginx.conf
在server5端安装logstash:
[root@server5 ~]# rpm -ivh logstash-2.3.3-1.noarch.rpm
Preparing...                ########################################### [100%]
   1:logstash               ########################################### [100%]
编辑文件es.conf:
[root@server5 ~]# cd /etc/logstash/
[root@server5 logstash]# vim es.conf
文件内容:
  1 input {
  2         redis  {
  3             host => ["172.25.17.5"]
  4                  port => 6379
  5                  data_type=> "list"
  6                  key => "logstash:redis"
  7          }
  8
  9 }
 10
 11 output {
 12         elasticsearch {
 13                 hosts => ["172.25.17.4"]
 14                 index => "nginx-%{+YYYY.MM.dd}"
 15         }
 16 }
执行:
[root@server5 logstash]# /opt/logstash/bin/logstash -f /etc/logstash/es.conf
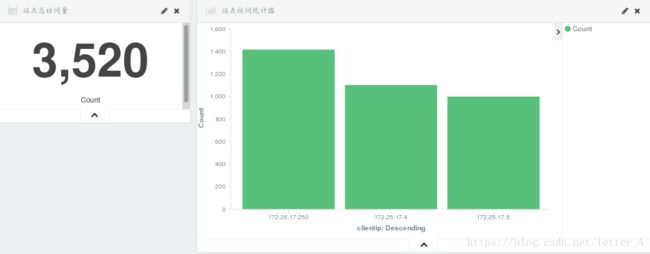
结果测试:大屏幕显示
添加访问量统计:

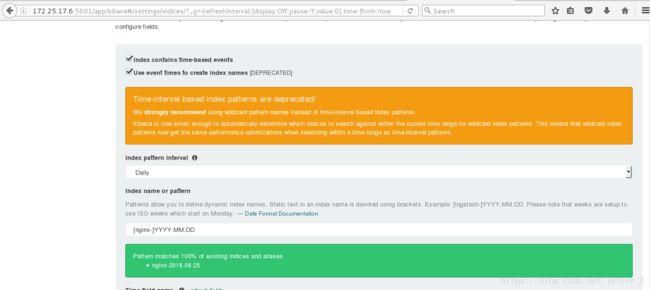
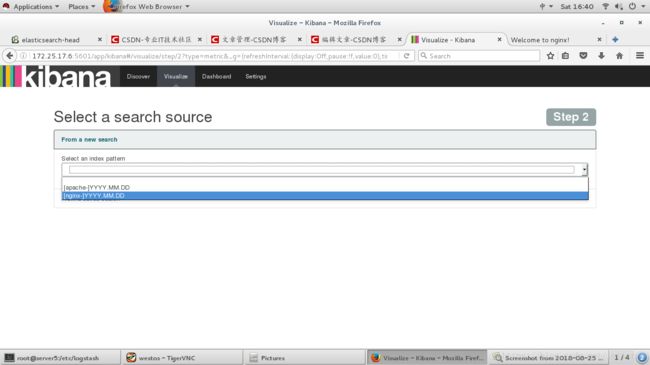
选择nginx:
访问量显示:

保存:

添加:

动态测试:
在其他服务器端访问:
[root@server5 ~]# ab -c 1 -n 900 http://172.25.17.4/index.html
