使用IDEA开发RabbitMQ教程系列(三)RabbitMQ Exchange交换机的详细使用
1、简介
前面第一章我们已经初步了解了什么是Exchange,简单来说它主要目的是为了接收消息,并根据路由键转发到所绑定的队列Queue,下面我用一张图来解释
![]()
1、首先Send Massage 作为生产者 投递消息至Exchange;
2、Exchange 根据黄色区域 RoutingKey 对应将消息路由到Queue;
3、Receive Message 作为消费者,它会和Queue建立一个监听,然后接收消息
2、构建Exchange
构建Exchange 我们通过channel 的 exchangeDeclare 方法进行,参数如下
 exchangeDeclare(
		 String exchange,
		 String type,
		 boolean durable,
		 boolean autoDelete,
		 boolean internal,
		 Map arguments) throws IOException ;
//这个方法的返回值是 Exchange.DeclaeOK 用来标识成功声明了一个交换器,也就是说:在客户端声明了一个交换器之后,需要等待服务器的返回(服务器会返回 Exchange.Declare-Ok 这个 AMQP 命令)
各个参数详细说明
- exchange 交换器的名称
- type 交换器的类型,常见的有fanout、direct、topic、headers这四种
- durable 设置是否持久 durab 设置为 true 表示持久化, 反之是非持久,设置为true则将Exchange存盘,即使服务器重启数据也不会丢失
- autoDelete 设置是否自动删除,当最后一个绑定到Exchange上的队列删除后,自动删除该Exchange,简单来说也就是如果该Exchange没有和任何队列Queue绑定则删除
- internal 设置是否是RabbitMQ内部使用,默认false。如果设置为 true ,则表示是内置的交换器,客户端程序无法直接发送消息到这个交换器中,只能通过交换器路由到交换器这种方式。
- argument 扩展参数,用于扩展AMQP协议自制定化使用
3、Exchange的各种TYPE - Fanout Exchange
Fanout Exchange : 不处理任何的路由键,它会把所有发送到该交换器的消息路由到所有与该交换器绑定的队列中
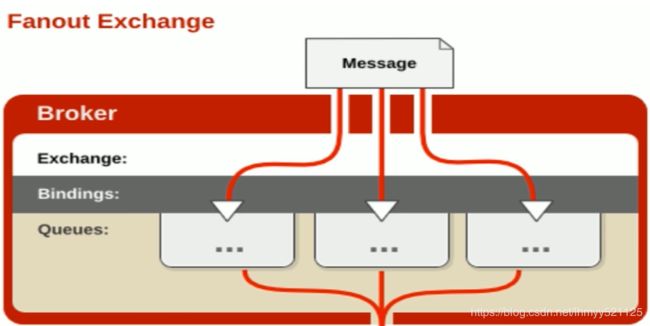
下面我们使用样例来详细理解
首先编写生产者
public class FanoutExchangeProducer {

	public static void main(String[] args) throws Exception {
		//1 创建ConnectionFactory
		ConnectionFactory connectionFactory = new ConnectionFactory();
		connectionFactory.setHost("192.168.1.28");
		connectionFactory.setPort(5672);
		connectionFactory.setVirtualHost("/");
		connectionFactory.setUsername("toher");
		connectionFactory.setPassword("toher888");
		//2 创建Connection
		Connection connection = connectionFactory.newConnection();
		//3 创建Channel
		Channel channel = connection.createChannel();
		//4 声明
		String exchangeName = "test_fanout_exchange";
		//5 发送
		for(int i = 0; i < 10; i ++) {
			String msg = "Test Fanout Exchange Message";
			channel.basicPublish(exchangeName, "", null , msg.getBytes());
		}
		channel.close();
        connection.close();
	}

}
再写一个消费者
public class FanoutExchangeConsumer {

	public static void main(String[] args) throws Exception {
        //1 创建一个ConnectionFactory, 并进行配置
        ConnectionFactory connectionFactory = new ConnectionFactory() ;
        connectionFactory.setHost("192.168.1.28");
        connectionFactory.setPort(5672);
        connectionFactory.setVirtualHost("/");
        connectionFactory.setUsername("toher");
        connectionFactory.setPassword("toher888");
        //2 通过连接工厂创建连接
        Connection connection = connectionFactory.newConnection();
        Channel channel = connection.createChannel();
		//4 定义
		String exchangeName = "test_fanout_exchange";
		//5 指定类型为fanout
		String exchangeType = "fanout";
		String queueName = "test_fanout_queue";
		//不设置路由键,没有路由情况下也能收到证明并不处理任何的路由键
		String routingKey = "";
		channel.exchangeDeclare(exchangeName, exchangeType, true, false, false, null);
		channel.queueDeclare(queueName, false, false, false, null);
		channel.queueBind(queueName, exchangeName, routingKey);
        //5 创建消费者
        Consumer consumer = new DefaultConsumer(channel){
            @Override
            public void handleDelivery(String consumerTag, Envelope envelope, AMQP.BasicProperties properties, byte[] body)
                    throws IOException {
                String msg = new String(body, "UTF-8");
                System.out.println("消费端:" + msg);
            }
        };
        //参数:队列名称、是否自动ACK、Consumer
        channel.basicConsume(queueName, true,
上述代码 channel.queueBind(queueName, exchangeName, routingKey) 中routingKey为空但是依然可以把消息路由到队列,说明Fanout类型并不处理路由键;
运行效果:
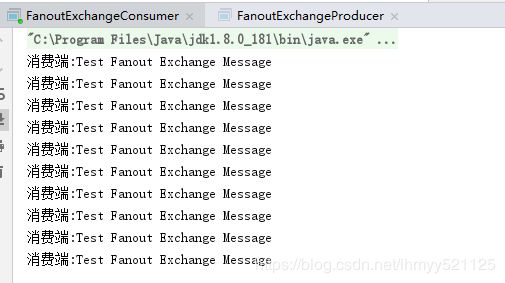
4、Exchange的各种TYPE - Direct Exchange
Direct Exchange 直连的方式 把消息路由到那些 BindingKey RoutingKey 完全匹配的队列中
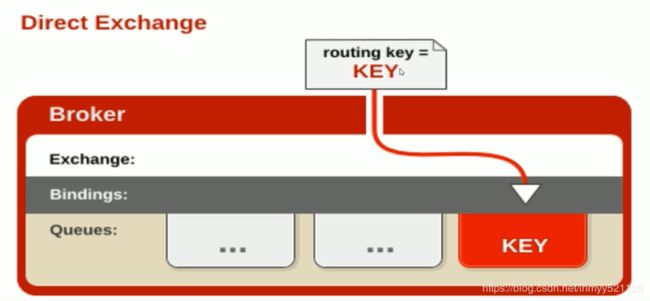
下面我们使用样例来详细理解
首先编写生产者
public class DirectExchangeProducer {

	public static void main(String[] args) throws Exception {
		//1 创建ConnectionFactory
		ConnectionFactory connectionFactory = new ConnectionFactory();
		connectionFactory.setHost("192.168.1.28");
		connectionFactory.setPort(5672);
		connectionFactory.setVirtualHost("/");
		connectionFactory.setUsername("toher");
		connectionFactory.setPassword("toher888");
		//2 创建Connection
		Connection connection = connectionFactory.newConnection();
		//3 创建Channel
		Channel channel = connection.createChannel();
		//4 声明
		String exchangeName = "test_direct_exchange";
		//可以修改routingKey的值使其和消费端的bingingKey不一致来测试 直连的方式
		String routingKey = "test.direct";
		//5 发送
		String msg = "Test Direct Exchange Message";
		channel.basicPublish(exchangeName, routingKey , null , msg.getBytes());
	}

}
再写一个消费者
public class DirectExchangeConsumer {

	public static void main(String[] args) throws Exception {
        //1 创建ConnectionFactory
        ConnectionFactory connectionFactory = new ConnectionFactory() ;
        connectionFactory.setHost("192.168.1.28");
        connectionFactory.setPort(5672);
        connectionFactory.setVirtualHost("/");
        connectionFactory.setUsername("toher");
        connectionFactory.setPassword("toher888");
        //2 创建Connection
        Connection connection = connectionFactory.newConnection();
        //3 创建Channel
        Channel channel = connection.createChannel();
		//4 声明
		String exchangeName = "test_direct_exchange";
		//定义为直连
		String exchangeType = "direct";
		//定义队列名
		String queueName = "test_direct_queue";
		//设置routingKey 也可以说是 bindingKey 很多时候我们可以理解成同一个东西
		String routingKey = "test.direct";
		//表示声明了一个交换机
		channel.exchangeDeclare(exchangeName, exchangeType, true, false, false, null);
		//表示声明了一个队列
		channel.queueDeclare(queueName, false, false, false, null);
		//建立一个绑定关系:
		channel.queueBind(queueName, exchangeName, routingKey);
        //5 创建消费者
        Consumer consumer = new DefaultConsumer(channel){
            @Override
            public void handleDelivery(String consumerTag, Envelope envelope, AMQP.BasicProperties properties, byte[] body)
                    throws IOException {
                String msg = new String(body, "UTF-8");
                System.out.println("消费端:" + msg);
            }
        };
        //参数:队列名称、是否自动ACK、Consumer
        channel.basicConsume(queueName, true, consumer);
	}

}
上述代码可以讲生产者代码中可以修改routingKey的值使其和消费端的bingingKey不一致来测试 直连的方式
运行效果
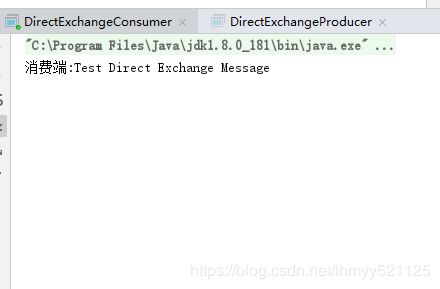
5、Exchange的各种TYPE - Topic Exchange
Topic Exchange Topic类型的交换器在匹配规则上进行了扩展,它有一定的约束条件:
1、RoutingKey 为一个点号" . “分隔的字符串(被点号”.“分隔开的每段独立的字符串称为一个单词) 如:com.toher.user 和 org.toher.product
2、BindingKey和RoutingKey同样也是点号”."分隔的字符串;
3、BindingKey 中可以存在两种特殊字符串 * 和 #,用于做模糊匹配,其中 * 代表一个单词,# 可以用于匹配多规格单词(可以是零个)
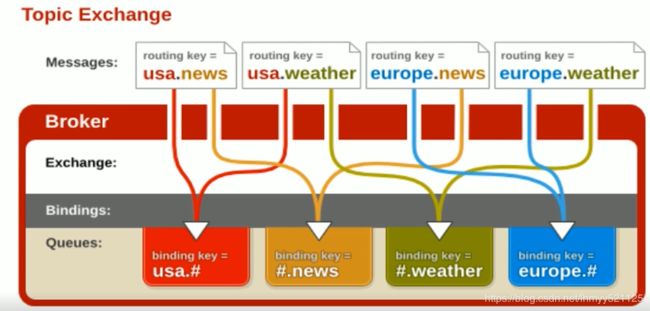
下面我们使用样例来详细理解
首先编写生产者
public class TopicExchangeProducer {

	public static void main(String[] args) throws Exception {
		//1 创建ConnectionFactory
		ConnectionFactory connectionFactory = new ConnectionFactory();
		connectionFactory.setHost("192.168.1.28");
		connectionFactory.setPort(5672);
		connectionFactory.setVirtualHost("/");
		connectionFactory.setUsername("toher");
		connectionFactory.setPassword("toher888");
		//2 创建Connection
		Connection connection = connectionFactory.newConnection();
		//3 创建Channel
		Channel channel = connection.createChannel();
		//4 声明
		String exchangeName = "test_topic_exchange";
		//定义三个routingKey 其中第三个我们再消费者中故意匹配不成功
		String routingKey1 = "user.save";
		String routingKey2 = "user.update";
		String routingKey3 = "user.delete.one";
		//5 发送
		String msg = "Test Topic Exchange Message";
		channel.basicPublish(exchangeName, routingKey1 , null , msg.getBytes());
		channel.basicPublish(exchangeName, routingKey2 , null , msg.getBytes());
		channel.basicPublish(exchangeName, routingKey3 , null , msg.getBytes());
		channel.close();
        connection.close();
	}

}
再写一个消费者
public class TopicExchangeConsumer {

	public static void main(String[] args) throws Exception {
        //1 创建ConnectionFactory
        ConnectionFactory connectionFactory = new ConnectionFactory() ;
        connectionFactory.setHost("192.168.1.28");
        connectionFactory.setPort(5672);
        connectionFactory.setVirtualHost("/");
        connectionFactory.setUsername("toher");
        connectionFactory.setPassword("toher888");
        //2 创建Connection
        Connection connection = connectionFactory.newConnection();
        //3 创建Channel
        Channel channel = connection.createChannel();
		//4 声明
		String exchangeName = "test_topic_exchange";
		//指定类型为topic
		String exchangeType = "topic";
		String queueName = "test_topic_queue";
		//因为*号代表匹配一个单词,生产者中routingKey3将匹配不到
		String routingKey = "user.*";
        //表示声明了一个交换机
		channel.exchangeDeclare(exchangeName, exchangeType, true, false, false, null);
        //表示声明了一个队列
		channel.queueDeclare(queueName, false, false, false, null);
        //建立一个绑定关系:
		channel.queueBind(queueName, exchangeName, routingKey);
        //5 创建消费者
        Consumer consumer = new DefaultConsumer(channel){
            @Override
            public void handleDelivery(String consumerTag, Envelope envelope, AMQP.BasicProperties properties, byte[] body)
                    throws IOException {
                String msg = new String(body, "UTF-8");
                System.out.println("消费端:" + msg);
            }
        };
        //参数:队列名称、是否自动ACK、Consumer
        channel.basicConsume(queueName, true, consumer);
	}

}
大家可以将生产者代码中可以修改routingKey1,routingKey2,routingKey3的值进行调整,消费端的bingingKey用不同的" # “号或” * "来进行测试; 注意:再每次修改bingingKey测试的时候,注意再页面控制台讲上次的bingingKey解绑
运行效果:

6、总结
本文详细介绍了交换机Exchange的工作原理、属性以及三种常见TYPE,还有一种 headers 不是很常用这里就不多介绍了,感兴趣的朋友可以上官网进行查阅或百度,谢谢大家~
7、导航
上一篇:RabbitMQ的Hello World之旅
下一篇:RabbitMQ的Queue队列和Message详细使用