- 从底层驱动到 OpenCV:深入解析 Linux 摄像头完整技术栈
嵌入式Jerry
嵌入式硬件opencvlinux人工智能计算机视觉开发语言服务器
1.引言在嵌入式Linux(如树莓派、NXPi.MX8MPlus)上,摄像头数据的完整处理链涉及多个层次:底层驱动层:设备树(DeviceTree)、MIPICSI-2协议、V4L2(Video4Linux2)中间件层:libcamera(现代化ISP处理)、GStreamer(多媒体流处理)用户空间应用层:OpenCV(计算机视觉)、AI框架(如TensorFlow、YOLO)本篇文章将深入剖析
- riscv运行linux,首款基于RISC-V,支持Linux的PC——HiFive Unleashed已诞生!
扎伊德
riscv运行linux
对于常在开源硬件界混的小伙伴,相信对市面上的一些单板计算机都不陌生,什么树莓派、香蕉派、BeagleBoneBlack、UpBoard等等,这些大多数都是采用ARMCoretx-A系列应用处理器或者更高端一些会采用x86系列处理器,无论性能或是功能都基本上可以满足现在小伙伴的需求。但是,不觉得少了点什么吗?整个被ARM围绕的世界是如此单一,我们就没有更好或者更别具一格的选择了吗?有!HiFiveU
- Linux操作系统:基于Linux的智能安防系统
暮雨哀尘
Linux的那点事linux运维服务器大数据集群技术
基于Linux的智能安防系统开发文档1.项目概述本项目旨在开发一个基于Linux的智能安防系统,集成火灾报警、门禁控制和传感器数据采集功能。系统通过多种传感器实时监测环境状态,并在检测到异常时触发报警,同时将数据上传至云平台供远程监控。该系统适用于家庭、办公室、仓库等场景,能够有效提升安全性和管理效率。2.系统架构系统的整体架构分为硬件部分和软件部分,具体如下:2.1硬件架构核心控制器:树莓派(推
- deepseek-r1系列模型私有化部署分别需要的最低硬件配置
Sophie'sCookingLab
大模型deepseek
DeepSeek-R1系列模型部署所需的最低硬件配置如下:DeepSeek-R1-1.5BCPU:最低4核(推荐多核处理器)内存:8GB+硬盘:3GB+存储空间(模型文件约1.5-2GB)显卡:非必需(纯CPU推理),若GPU加速可选4GB+显存(如GTX1650)适用场景:低资源设备部署(如树莓派、旧款笔记本)、实时文本生成(聊天机器人、简单问答)、嵌入式系统或物联网
- 树莓派部署syncthing实现私有云 | 树莓派小无相系列
TuTuTu_
树莓派树莓派
手机上存着不少照片,自己又时常折腾手机,总有数据丢失的问题,又对市面上的云盘不怎么放心,所以打算在家里利用树莓派搭建一个私有云。一番查找之后,发现了syncthing。Syncthing是一个跨平台,开源且免费的基于P2P的文件同步解决方案,支持Windows,Mac,Linux,Android,syncthing官方暂不支持iOS平台,但在AppStore有可用的第三方客户端。安装syncthi
- 基于旭日派的Ros系统小车的再开发——使用python脚本Astra调用深度相机(学习笔记)
Z._ Yang
python嵌入式硬件个人开发python
1、Ros系统的简要介绍:ROS是你的机器人的操作系统。它运行在各种不同类型的计算机上的标准Linux系统之上,如树莓派或其他的一些单片机、以及笔记本电脑或台式电脑。ROS中可执行的程序的基本单位是:节点(node)节点之间通过消息机制进行通信,这就组成了:算图(abac)节点之间通过收发消息进行通信,消息的收发机制分为:话题(topic)、服务(service)和动作(action)1.ROS提
- 树莓派通过手机热点,无线连接PC端电脑,进行远程操作
Epiphany_ZZW
树莓派智能手机
树莓派通过手机热点实现无线连接具有以下几点优势:1.该方式能够联网,方便在项目开发时下载一些数据包。2.该方式能够通过手机端查看树莓派IP地址(有些情况树莓派ip地址会发生改变)借鉴链接如下:树莓派的使用网线及无线连接方法及手机连接树莓派_opencv镜像具体操作方式如下:打开终端:pi@raspberrypi:~$sudonano/etc/wpa_supplicant/wpa_supplican
- 树莓派VNC服务和串口的开启方法
诚信爱国敬业友善
树莓派树莓派
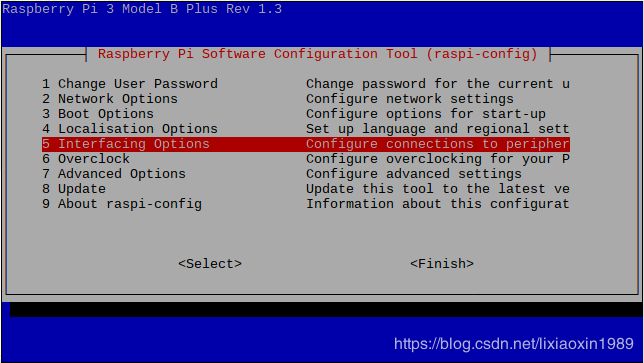
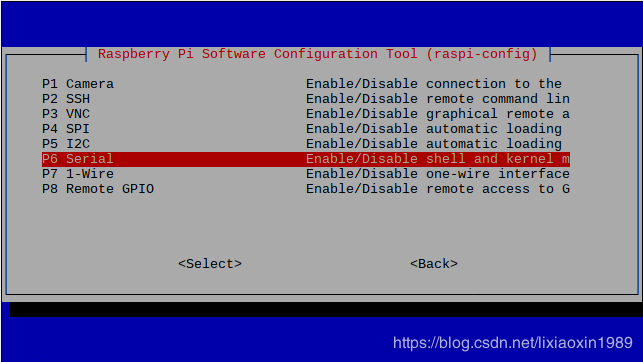
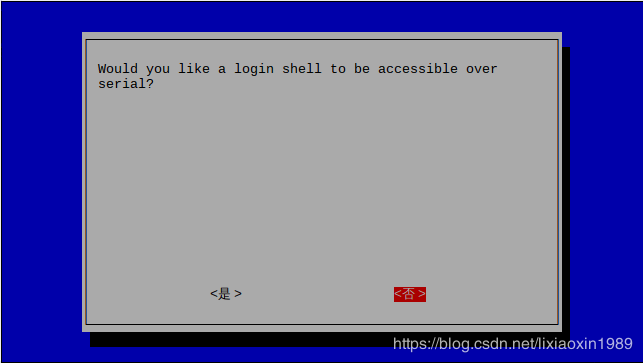
树莓派VNC服务开启方法通过树莓派配置界面开启在树莓派终端输入sudoraspi-config命令进入配置界面。依次选择InterfacingOptions->VNC->Yes,系统会提示是否安装VNC服务,输入y后回车,等待系统自动下载安装完成,VNC服务就启动了。使用命令行安装和启动安装VNC服务器:在树莓派终端运行sudoapt-getinstallreal_vnc_vnc_server命令
- 监控系统和AI辅助建议功能的实现
后端
家里小朋友养了一只小乌龟,到了冬天就冬眠了,早早地准备了一个冬眠箱,铺上椰土,在室温低于15℃时,就把小乌龟放到冬眠箱里,不一会儿它就自己钻入土中把自己藏了起来。按照惯例,需要每隔一定时间,对冬眠箱进行补水,以保持土壤湿润,防止小乌龟缺水,但有时候也会忘记补水的工作,造成冬眠箱过于干燥,不利于乌龟健康。翻箱倒柜,找到一个9年前买的树莓派2ModelB,32位,4核1GB的设备,正好可以利用起来,做
- OpenCV开发笔记(八十一):通过棋盘格使用鱼眼方式标定相机内参矩阵矫正摄像头图像
长沙红胖子Qt(技术Q群4597637)
Qt开发图形图像处理OpenCV图像处理opencv鱼眼畸变矫正鱼眼摄像头标定
若该文为原创文章,转载请注明原文出处本文章博客地址:https://hpzwl.blog.csdn.net/article/details/142614975长沙红胖子Qt(长沙创微智科)博文大全:开发技术集合(包含Qt实用技术、树莓派、三维、OpenCV、OpenGL、ffmpeg、OSG、单片机、软硬结合等等)持续更新中…OpenCV开发专栏(点击传送门)上一篇:《OpenCV开发笔记(八十)
- 2025年2月10日(树莓派1.44inch LCD HAT)
Mason Lin
Python学习计算机外设
安装记录hdmi_force_hotplug=1hdmi_cvt=300300601000hdmi_group=2hdmi_mode=87display_rotate=0这些配置参数通常用于树莓派(RaspberryPi)的`config.txt`文件中,用于调整HDMI输出的设置。以下是每个参数的含义:1.**hdmi_force_hotplug=1**强制树莓派认为HDMI显示器已连接,即使未
- 第 1 课 树莓派5介绍
嵌入式老牛
树莓派之基本应用单片机嵌入式硬件
详细的介绍可参见:https://www.raspberrypi.com/documentation/computers/raspberry-pi.htmlRaspberryPi,中文名为“树莓派”,简写为Rpi,是一款只有信用卡大小的计算机的计算机,由英国的树莓派基金会所开发,被赋予的希望是能够帮助全世界的孩子学习编程,并能够了解计算机是如何工作的。树莓派可连接键盘、鼠标和网线,同时拥有视觉模拟
- 在树莓派5上安装opencv的时候出现报错ImportError: numpy.core.multiarray failed to import
听说你还在搞什么原创~
opencv人工智能numpy
>>>importcv2AmodulethatwascompiledusingNumPy1.xcannotberuninNumPy2.0.2asitmaycrash.Tosupportboth1.xand2.xversionsofNumPy,modulesmustbecompiledwithNumPy2.0.Somemodulemayneedtorebuildinsteade.g.with'pyb
- 在树莓派5上安装dlib库报错
听说你还在搞什么原创~
计算机视觉
解决办法:先安装cmake,在终端输入:pipinstallcmake安装成功后再安装dlib库,命令:pipinstalldlib(安装过程有点慢,请耐心等待)或者下载轮子安装。成功解决
- 06 在MSYS2中编译树莓派裸机程序,并在QEMU中运行
才鲸嵌入式
9嵌入式QEMU教程嵌入式单片机armMCUlinux
作者将狼才鲸创建日期2022-11-14Gitee源码和工程地址:才鲸嵌入式/开源安防摄像机(嵌入式软件)CSDN文章地址:项目介绍:开源安防摄像机(嵌入式软件)4)完整的环境安装步骤写在前面,我会提供已经安装好各种工具的MSYS2环境,如果你没用过Linux,建议你直接下载本系统压缩包cj_msys64.zip,解压后使用,或者自行使用VMwarePlayer虚拟机+Ubuntu安装开发环境,因
- ROS2(Robot Operating System 2)与树莓派(Raspberry Pi)
Covirtue
ROS2ROS2
ROS2与树莓派一、ROS2简介ROS2是一个为机器人提供硬件抽象、设备驱动、函数库、可视化工具、消息通信以及软件包管理等多种功能的开源操作系统。它支持分布式计算,允许多个节点(即进程)在局域网内自由通信,非常适合用于多机器人协作和复杂机器人系统的开发。二、树莓派简介树莓派是一款基于ARM架构的微型电脑主板,以SD卡为内存硬盘,卡片主板周围有1/2/4个USB接口和一个10/100以太网接口(A型
- OpenMV和K210(fron ChatGPT)
overwizard
个人图像处理计算机视觉学习自动化机器人
文章目录OpenMV特点:学习资源:K210(KendryteK210)特点:学习资源:选择建议1.OpenCV简介安装OpenCV2.树莓派(RaspberryPi)与OpenCV安装OpenCV学习资源3.香橙派(OrangePi)与OpenCV安装OpenCV学习资源综合学习资源OpenMV和K210是两个流行的嵌入式视觉平台,各自有其独特的特点和应用场景。以下是对这两个平台的介绍及其学习资
- 2025年2月4日(i2c和spi树莓派oled sdd1306)
Mason Lin
RaspberryPiZero2W树莓派
树莓派使用I2C和SPI通信协议来与OLED屏幕(如SSD1306)进行连接。你可以根据自己的需求选择适合的通信协议来与OLED屏幕进行通信。1.I2C连接SSD1306OLED屏幕硬件连接:SDA(数据线)连接到树莓派的GPIO2(即SDA引脚)SCL(时钟线)连接到树莓派的GPIO3(即SCL引脚)OLED屏幕的电源引脚VCC连接到树莓派的3.3V或5V(取决于你的OLED屏幕电压要求)GND
- Linux学习笔记-正点原子阿尔法开发板V2.4学习记录
@bjtuhbxy_17813263
学习笔记
目录1.安装编译器2.imdownload烧录问题1.安装编译器树莓派3B+做服务器,安装GCC编译器指令:aptinstallgcc-arm-linux-gnueabihf参考链接:树莓派安装ubuntu后怎样编译imx6ul板子的程序-OpenEdv-开源电子网2.imdownload烧录问题树莓派3B+搭建的Ubuntu编译环境,在使用imdownload烧录时,提示-bash:./imxd
- 聊聊树莓派RaspiCam,libcamera,rpicam套件区别,及CSI/USB Camera推流
techfuture
树莓派使用物联网pythonubuntu
文章目录1.树莓派平台Camera工具套件变更历史2.识别Camera(适用CSI和USBCamera)3.CSICamera推流4.USBCamera推流背景:最近想玩下树莓派视频推流,翻出了尘封的树莓派4B和CSI接口摄像头,因为后续想玩下ROS2,ROS2对Ubuntu支持较好,所以装了个Ubuntu22.04。然后折腾了2天…为了让后来的小伙伴少走弯路,这里简单记录下,供大伙参考。日期:2
- 无线电罗盘 改进自KerberosSDR 平替KrakenSDR
老邵的科创世界
KerberosSDRkrakensdrkerberossdr无线电测向
大约5年前,一款易上手的无线电测向机——KerberosSDR横空出世。它是一款多通道相参接收机,由4通道rtlsdr组成。相信大家都是知道,要实现无线电测向,除了硬件上需要特殊的电路设计外,还需要一些软件校准算法。而KerberosSDR相比之前其它同类SDR(如USRPQR210,X310或LimeSDRQPCIe),它的优势就在于事先做好了这个软件,用户只需要把树莓派烧录好配套镜像就能使用。
- 树莓派命令行配置wifi无线密码
张文君
phplinux服务器
这个是我测试过的可以使用用感叹号标记的是ok的命令okoksystemctllist-units--type=service|grep-inetwork查看附近wifi信号!!!nmclidevicewifilistnmclidevicewificonnect"你的Wi-Fi名称"password"你的Wi-Fi密码"!!!nmclidevicewificonnectbbbbbbbbpasswor
- docker直接运行arm下的docker
张文君
dockerarm开发容器
运行环境是树莓派A+处理器是arm32v6安装了docker,运行lamp编译安装php的时候发现要按天来算,于是用电脑vm下的Ubuntu系统运行arm的docker然后打包到a+直接导入运行就可以了第一种方法sudoaptinstallqemu-user-static导入直接运行就可以了第二种方法运行arm的dockerwget-chttps://github.com/multiarch/qe
- 树莓派控制步进电机(上):硬件连接
神一样的老师
树莓派单片机嵌入式硬件stm32iot
目录说明硬件连接DM542的连接方法树莓派的连接方法参考文献说明最近需要测试树莓派控制步进电机的功能,在查阅网上资料的基础上做了一些整理和测试,特别记录在此。这里我们使用的是树莓派4B开发板,步进电机为6线两相步进电机,驱动器采用的是DM542。硬件连接DM542的连接方法DM542(图1)是数字式两相步进电机驱动器,采用PI控制算法,低噪音、低振动、低发热,低中高速运行都很平稳。图1DM542的
- 当在树莓派上运行 OpenCV 摄像头代码时出现摄像头打不开
李宇杰28
opencv开发语言
当在树莓派上运行OpenCV摄像头代码时出现“libv4l2:erroropeningvideodevice”报错,通常表示在打开视频设备(即摄像头)时遇到了问题。以下是一些可能的原因及解决办法:1.摄像头连接问题物理连接检查:首先确保摄像头与树莓派的物理连接是稳固的。对于树莓派摄像头模块(如官方的CSI摄像头),要检查连接线是否正确插入到树莓派对应的接口上,并且没有松动或损坏。如果是通过USB接
- 在树莓派安装arm gcc工具链
zili09
linuxarmgnulinux
InstallGCC需要将gnu工具在树莓派重新编译,具体流程见文档:ThebuildprocessofGNUtoolsforARMembeddedprocessors由于编译需要的时间较长,Github上已经有人将编译过的文件放出来,直接拷贝进/usr/即可,见安装步骤。安装好之后,只需要在厂商提供的工具链build_debug.sh中将ARMGCC_DIR的值改为/usr即可,之后运行脚本将调
- Ubuntu Server 连接WiFi
RyanKONG
wifiubuntu
文章目录前言配置参考链接:前言最近又在把树莓派3B拿出来玩折腾,原本的PiOS不原生支持64x系统,而CentOS就不说了,目前是安装的UbuntuServer。PiOS是基于Debian系统,配置WiFi就直接在wpa_supplican进行配置即可。UbuntuServer舍弃了wpa_supplican做为网络配置工具,常规配置方法在wpa_supplicant是找不到配置文件的,取而代之的
- 【树莓派入门系列】opencv安装
^Mark_Zhang^
pythonopencv人工智能
树莓派入门之Opencv库安装提示:本文树莓派4B所搭载的系统是Raspi11本教程不需要任何换源,直接用树莓派自带的源就行文章目录一、树莓派版本查看二、Opencv库安装1.扩大系统文件(常规操作)2.安装aptitude软件包3.CMake工具安装4.基础库安装5.opencv-python库5.注意点一、树莓派版本查看代码如下:uanme-a或lsb_release-a二、Opencv库安装
- 树莓派pico搭建开发环境的报错及解决
2401_86161528
raspberrypipicolinuxc语言bash
1.更新cmake报错:--Usingthesingle-headercodefrompico/picotool/picotool-src/lib/nlohmann_json/single_include/CMakeDeprecationWarningatpico/pico-sdk/lib/mbedtls/CMakeLists.txt:23(cmake_minimum_required):Comp
- 树莓派4基于Debian GNU/Linux 12 (Bookworm)配置静态ipv4网络
Christal_pyy
debianlinux网络
【注意】此版本的树莓派桌面系统是使用NetworkManager的网络管理工具1.查看当前网络连接配置nmclidevshoweth0使用上面指令查看网络配置如果在执行nmclidevshoweth0时,只显示了IP4.GATEWAY,而没有显示IP4.ADDRESS,这通常意味着NetworkManager没有为eth0接口配置静态IP地址1)首先,确保网络连接配置正确,并检查是否配置了静态IP
- rust的指针作为函数返回值是直接传递,还是先销毁后创建?
wudixiaotie
返回值
这是我自己想到的问题,结果去知呼提问,还没等别人回答, 我自己就想到方法实验了。。
fn main() {
let mut a = 34;
println!("a's addr:{:p}", &a);
let p = &mut a;
println!("p's addr:{:p}", &a
- java编程思想 -- 数据的初始化
百合不是茶
java数据的初始化
1.使用构造器确保数据初始化
/*
*在ReckInitDemo类中创建Reck的对象
*/
public class ReckInitDemo {
public static void main(String[] args) {
//创建Reck对象
new Reck();
}
}
- [航天与宇宙]为什么发射和回收航天器有档期
comsci
地球的大气层中有一个时空屏蔽层,这个层次会不定时的出现,如果该时空屏蔽层出现,那么将导致外层空间进入的任何物体被摧毁,而从地面发射到太空的飞船也将被摧毁...
所以,航天发射和飞船回收都需要等待这个时空屏蔽层消失之后,再进行
&
- linux下批量替换文件内容
商人shang
linux替换
1、网络上现成的资料
格式: sed -i "s/查找字段/替换字段/g" `grep 查找字段 -rl 路径`
linux sed 批量替换多个文件中的字符串
sed -i "s/oldstring/newstring/g" `grep oldstring -rl yourdir`
例如:替换/home下所有文件中的www.admi
- 网页在线天气预报
oloz
天气预报
网页在线调用天气预报
<%@ page language="java" contentType="text/html; charset=utf-8"
pageEncoding="utf-8"%>
<!DOCTYPE html PUBLIC "-//W3C//DTD HTML 4.01 Transit
- SpringMVC和Struts2比较
杨白白
springMVC
1. 入口
spring mvc的入口是servlet,而struts2是filter(这里要指出,filter和servlet是不同的。以前认为filter是servlet的一种特殊),这样就导致了二者的机制不同,这里就牵涉到servlet和filter的区别了。
参见:http://blog.csdn.net/zs15932616453/article/details/8832343
2
- refuse copy, lazy girl!
小桔子
copy
妹妹坐船头啊啊啊啊!都打算一点点琢磨呢。文字编辑也写了基本功能了。。今天查资料,结果查到了人家写得完完整整的。我清楚的认识到:
1.那是我自己觉得写不出的高度
2.如果直接拿来用,很快就能解决问题
3.然后就是抄咩~~
4.肿么可以这样子,都不想写了今儿个,留着作参考吧!拒绝大抄特抄,慢慢一点点写!
- apache与php整合
aichenglong
php apache web
一 apache web服务器
1 apeche web服务器的安装
1)下载Apache web服务器
2)配置域名(如果需要使用要在DNS上注册)
3)测试安装访问http://localhost/验证是否安装成功
2 apache管理
1)service.msc进行图形化管理
2)命令管理,配
- Maven常用内置变量
AILIKES
maven
Built-in properties
${basedir} represents the directory containing pom.xml
${version} equivalent to ${project.version} (deprecated: ${pom.version})
Pom/Project properties
Al
- java的类和对象
百合不是茶
JAVA面向对象 类 对象
java中的类:
java是面向对象的语言,解决问题的核心就是将问题看成是一个类,使用类来解决
java使用 class 类名 来创建类 ,在Java中类名要求和构造方法,Java的文件名是一样的
创建一个A类:
class A{
}
java中的类:将某两个事物有联系的属性包装在一个类中,再通
- JS控制页面输入框为只读
bijian1013
JavaScript
在WEB应用开发当中,增、删除、改、查功能必不可少,为了减少以后维护的工作量,我们一般都只做一份页面,通过传入的参数控制其是新增、修改或者查看。而修改时需将待修改的信息从后台取到并显示出来,实际上就是查看的过程,唯一的区别是修改时,页面上所有的信息能修改,而查看页面上的信息不能修改。因此完全可以将其合并,但通过前端JS将查看页面的所有信息控制为只读,在信息量非常大时,就比较麻烦。
- AngularJS与服务器交互
bijian1013
JavaScriptAngularJS$http
对于AJAX应用(使用XMLHttpRequests)来说,向服务器发起请求的传统方式是:获取一个XMLHttpRequest对象的引用、发起请求、读取响应、检查状态码,最后处理服务端的响应。整个过程示例如下:
var xmlhttp = new XMLHttpRequest();
xmlhttp.onreadystatechange
- [Maven学习笔记八]Maven常用插件应用
bit1129
maven
常用插件及其用法位于:http://maven.apache.org/plugins/
1. Jetty server plugin
2. Dependency copy plugin
3. Surefire Test plugin
4. Uber jar plugin
1. Jetty Pl
- 【Hive六】Hive用户自定义函数(UDF)
bit1129
自定义函数
1. 什么是Hive UDF
Hive是基于Hadoop中的MapReduce,提供HQL查询的数据仓库。Hive是一个很开放的系统,很多内容都支持用户定制,包括:
文件格式:Text File,Sequence File
内存中的数据格式: Java Integer/String, Hadoop IntWritable/Text
用户提供的 map/reduce 脚本:不管什么
- 杀掉nginx进程后丢失nginx.pid,如何重新启动nginx
ronin47
nginx 重启 pid丢失
nginx进程被意外关闭,使用nginx -s reload重启时报如下错误:nginx: [error] open() “/var/run/nginx.pid” failed (2: No such file or directory)这是因为nginx进程被杀死后pid丢失了,下一次再开启nginx -s reload时无法启动解决办法:nginx -s reload 只是用来告诉运行中的ng
- UI设计中我们为什么需要设计动效
brotherlamp
UIui教程ui视频ui资料ui自学
随着国际大品牌苹果和谷歌的引领,最近越来越多的国内公司开始关注动效设计了,越来越多的团队已经意识到动效在产品用户体验中的重要性了,更多的UI设计师们也开始投身动效设计领域。
但是说到底,我们到底为什么需要动效设计?或者说我们到底需要什么样的动效?做动效设计也有段时间了,于是尝试用一些案例,从产品本身出发来说说我所思考的动效设计。
一、加强体验舒适度
嗯,就是让用户更加爽更加爽的用你的产品。
- Spring中JdbcDaoSupport的DataSource注入问题
bylijinnan
javaspring
参考以下两篇文章:
http://www.mkyong.com/spring/spring-jdbctemplate-jdbcdaosupport-examples/
http://stackoverflow.com/questions/4762229/spring-ldap-invoking-setter-methods-in-beans-configuration
Sprin
- 数据库连接池的工作原理
chicony
数据库连接池
随着信息技术的高速发展与广泛应用,数据库技术在信息技术领域中的位置越来越重要,尤其是网络应用和电子商务的迅速发展,都需要数据库技术支持动 态Web站点的运行,而传统的开发模式是:首先在主程序(如Servlet、Beans)中建立数据库连接;然后进行SQL操作,对数据库中的对象进行查 询、修改和删除等操作;最后断开数据库连接。使用这种开发模式,对
- java 关键字
CrazyMizzz
java
关键字是事先定义的,有特别意义的标识符,有时又叫保留字。对于保留字,用户只能按照系统规定的方式使用,不能自行定义。
Java中的关键字按功能主要可以分为以下几类:
(1)访问修饰符
public,private,protected
p
- Hive中的排序语法
daizj
排序hiveorder byDISTRIBUTE BYsort by
Hive中的排序语法 2014.06.22 ORDER BY
hive中的ORDER BY语句和关系数据库中的sql语法相似。他会对查询结果做全局排序,这意味着所有的数据会传送到一个Reduce任务上,这样会导致在大数量的情况下,花费大量时间。
与数据库中 ORDER BY 的区别在于在hive.mapred.mode = strict模式下,必须指定 limit 否则执行会报错。
- 单态设计模式
dcj3sjt126com
设计模式
单例模式(Singleton)用于为一个类生成一个唯一的对象。最常用的地方是数据库连接。 使用单例模式生成一个对象后,该对象可以被其它众多对象所使用。
<?phpclass Example{ // 保存类实例在此属性中 private static&
- svn locked
dcj3sjt126com
Lock
post-commit hook failed (exit code 1) with output:
svn: E155004: Working copy 'D:\xx\xxx' locked
svn: E200031: sqlite: attempt to write a readonly database
svn: E200031: sqlite: attempt to write a
- ARM寄存器学习
e200702084
数据结构C++cC#F#
无论是学习哪一种处理器,首先需要明确的就是这种处理器的寄存器以及工作模式。
ARM有37个寄存器,其中31个通用寄存器,6个状态寄存器。
1、不分组寄存器(R0-R7)
不分组也就是说说,在所有的处理器模式下指的都时同一物理寄存器。在异常中断造成处理器模式切换时,由于不同的处理器模式使用一个名字相同的物理寄存器,就是
- 常用编码资料
gengzg
编码
List<UserInfo> list=GetUserS.GetUserList(11);
String json=JSON.toJSONString(list);
HashMap<Object,Object> hs=new HashMap<Object, Object>();
for(int i=0;i<10;i++)
{
- 进程 vs. 线程
hongtoushizi
线程linux进程
我们介绍了多进程和多线程,这是实现多任务最常用的两种方式。现在,我们来讨论一下这两种方式的优缺点。
首先,要实现多任务,通常我们会设计Master-Worker模式,Master负责分配任务,Worker负责执行任务,因此,多任务环境下,通常是一个Master,多个Worker。
如果用多进程实现Master-Worker,主进程就是Master,其他进程就是Worker。
如果用多线程实现
- Linux定时Job:crontab -e 与 /etc/crontab 的区别
Josh_Persistence
linuxcrontab
一、linux中的crotab中的指定的时间只有5个部分:* * * * *
分别表示:分钟,小时,日,月,星期,具体说来:
第一段 代表分钟 0—59
第二段 代表小时 0—23
第三段 代表日期 1—31
第四段 代表月份 1—12
第五段 代表星期几,0代表星期日 0—6
如:
*/1 * * * * 每分钟执行一次。
*
- KMP算法详解
hm4123660
数据结构C++算法字符串KMP
字符串模式匹配我们相信大家都有遇过,然而我们也习惯用简单匹配法(即Brute-Force算法),其基本思路就是一个个逐一对比下去,这也是我们大家熟知的方法,然而这种算法的效率并不高,但利于理解。
假设主串s="ababcabcacbab",模式串为t="
- 枚举类型的单例模式
zhb8015
单例模式
E.编写一个包含单个元素的枚举类型[极推荐]。代码如下:
public enum MaYun {himself; //定义一个枚举的元素,就代表MaYun的一个实例private String anotherField;MaYun() {//MaYun诞生要做的事情//这个方法也可以去掉。将构造时候需要做的事情放在instance赋值的时候:/** himself = MaYun() {*
- Kafka+Storm+HDFS
ssydxa219
storm
cd /myhome/usr/stormbin/storm nimbus &bin/storm supervisor &bin/storm ui &Kafka+Storm+HDFS整合实践kafka_2.9.2-0.8.1.1.tgzapache-storm-0.9.2-incubating.tar.gzKafka安装配置我们使用3台机器搭建Kafk
- Java获取本地服务器的IP
中华好儿孙
javaWeb获取服务器ip地址
System.out.println("getRequestURL:"+request.getRequestURL());
System.out.println("getLocalAddr:"+request.getLocalAddr());
System.out.println("getLocalPort:&quo


