【学习笔记】QT从入门到实战完整版(按钮和信号槽)(1)
介绍说明
学习 QT 的目的只是为了可以实现跨平台的具有GUI 的程序,以前用的 MFC,但是无法应用在嵌入式平台。后来在全志的 Tina 系统中有看到 QT ,因此特地去了解了QT,挺有意思的,UI也可以做到很漂亮,因此开始学习 QT 之旅。
按照视频课程顺序,摘录比较重要的知识点以及心得,下图给出的代码并非完全照搬视频示例代码,而是根据自己的好奇所编写的测试代码。
本着先学会用,再深入的原则,因此本系列笔记不会太过深入QT的内部实现原理。
前置环境
视频教程:https://www.bilibili.com/video/av54523708
下载连接:https://mirrors.tuna.tsinghua.edu.cn/qt/archive/qt/5.14/5.14.1/qt-opensource-windows-x86-5.14.1.exe
帮助文档:X:\Qt\Qt5.14.1\5.14.1\mingw73_64\bin\assistant.exe
安装之后,会发现代码提示失效,搜了一下资料,只需要移除 ClangCodeModel 插件即可(原因还不清楚):
【帮助】->【关于插件】->【已安装的插件】->[ClangCodeModel] 的勾去掉,再重启IDE即可。
工程代码
将会以此为基础来做各种各样的实验
main.cpp
#include "widget.h"
#include widget.h
#ifndef WIDGET_H
#define WIDGET_H
#include widget.cpp
 #include "widget.h"

Widget::Widget(QWidget *parent)
      : QWidget(parent)
{
}

Widget::~Widget()
{
}
按钮实现
一个较为直观的按钮使用和按钮事件响应的方法
实现源码
widget.cpp
#include 实现效果
如何知道有什么信号?
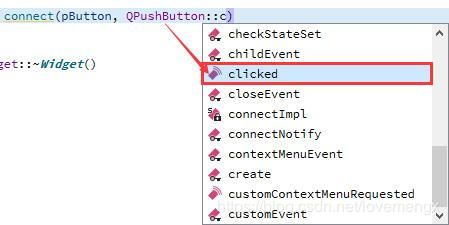
1. 通过 QtCreator 的代码提示(注意那个小图标)
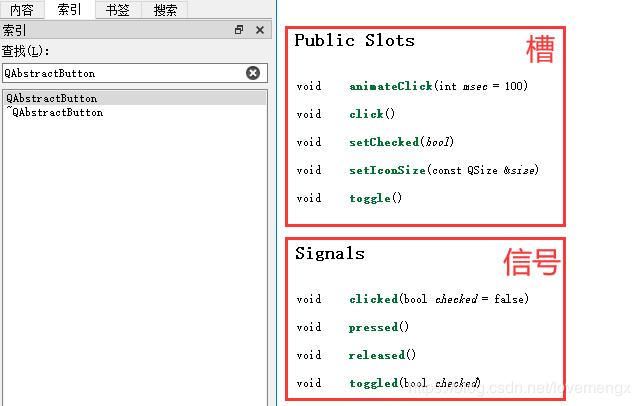
2. 查阅帮助文档
如果该类没有找到信号描述,那么就找它的父类看看,如 QPushButton

QT信号槽
QT 信号槽是一个很有意思的机制,它提供一种对象与对象之间完全解耦的通讯机制。
下面是以 CAEEngine 来作为信号源,AudioProcess 作为接受源和提供信号处理方法。
1. 自定义信号
caeengine.h
#ifndef CAEENGINE_H
#define CAEENGINE_H
#include caeengine.cpp
#include 2. 自定义槽
audioprocess.h
#ifndef AUDIOPROCESS_H
#define AUDIOPROCESS_H
#include audioprocess.cpp
#include 3. 使用方法
widget.cpp
#include "caeengine.h"
#include "audioprocess.h"

Widget::Widget(QWidget *parent)
    : QWidget(parent)
{
    this->testButton();
    this->testSignal();
}


void Widget::testSignal()
{
    CAEEngine       *pCAEEngine = new CAEEngine();
    AudioProcess    *pAudioProcess = new AudioProcess();

    // 方式一: 没有函数重载的方式
    connect(pCAEEngine, CAEEngine::onSignalLoadASRCommand, pAudioProcess, AudioProcess::onLocalASRCommandMessage);


    #if 0
     // 方式二: 有函数重载的方式, 不能采用方式一, 因为名称相同无法确定是使用哪个函数, 需要借助函数指针来确定是哪种类型
    void (CAEEngine::*pFuncWakeSignal)() = CAEEngine::onSignalWake;
    void (AudioProcess::*pFuncWakeMessage)() = AudioProcess::onWakeMessage;
    connect(pCAEEngine, pFuncWakeSignal, pAudioProcess, pFuncWakeMessage);

    void (CAEEngine::*pFuncWakeSignalAnglePower)(int angle, float power) = CAEEngine::onSignalWake;
    void (AudioProcess::*pFuncWakeMessageAnglePower)(int angle, float power) = AudioProcess::onWakeMessage;
    connect(pCAEEngine, pFuncWakeSignalAnglePower, pAudioProcess, pFuncWakeMessageAnglePower);

    #endif

    #if 0

    // 方式三:可以只保留参数类型,这样看起会简短些
    void (CAEEngine::*pFuncWakeSignalAnglePower)(int, float) = CAEEngine::onSignalWake;
    void (AudioProcess::*pFuncWakeMessageAnglePower)(int, float) = AudioProcess::onWakeMessage;
    connect(pCAEEngine, pFuncWakeSignalAnglePower, pAudioProcess, pFuncWakeMessageAnglePower);

    #endif


    #if 0

    // 方式四:可以不需要定义中间变量,直接通过类型强制转换的方式来指明信号类型和信号处理函数
    connect(pCAEEngine, ( void (CAEEngine::*)() )CAEEngine::onSignalWake, pAudioProcess, ( void (AudioProcess::*)() )AudioProcess::onWakeMessage);
    connect(pCAEEngine, ( void (CAEEngine::*)(int angle, float power) )CAEEngine::onSignalWake, pAudioProcess, (void (AudioProcess::*)(int angle, float power))AudioProcess::onWakeMessage);

    #endif

    #if 1

    // 方式五:结合方式三和方式四,通过强转和只保留参数类型来实现, 更加简洁
    connect(pCAEEngine, ( void (CAEEngine::*)() )CAEEngine::onSignalWake, pAudioProcess, ( void (AudioProcess::*)() )AudioProcess::onWakeMessage);
    connect(pCAEEngine, ( void (CAEEngine::*)(int, float) )CAEEngine::onSignalWake, pAudioProcess, ( void (AudioProcess::*)(int, float) )AudioProcess::onWakeMessage);

    #endif

    // 开始启动线程进行周期性触发信号
    pCAEEngine->test();

}
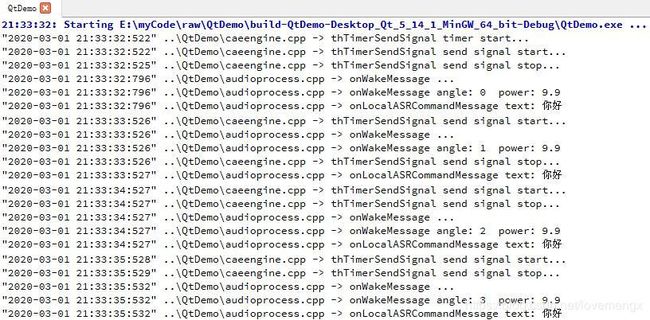
实现效果
从输出的 “send signal start ” 和 “send signal end” 时间可以发现,QT 的信号槽是异步机制,不是直接的函数回调方式。
在信号处理函数中延时实验
widget.cpp(删除其他信号,方便观察打印信息)
void Widget::testSignal()
{
    CAEEngine       *pCAEEngine = new CAEEngine();
    AudioProcess    *pAudioProcess = new AudioProcess();

    // 方式一: 没有函数重载的方式
    connect(pCAEEngine, CAEEngine::onSignalLoadASRCommand, pAudioProcess, AudioProcess::onLocalASRCommandMessage);

    // 开始启动线程进行周期性触发信号
    pCAEEngine->test();

}
实现效果
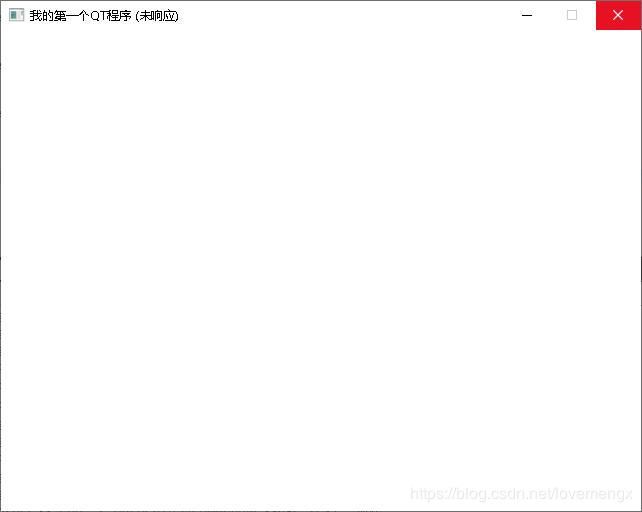
一开始程序界面处于无响应状态
输出的调试消息(注意打印的时间):
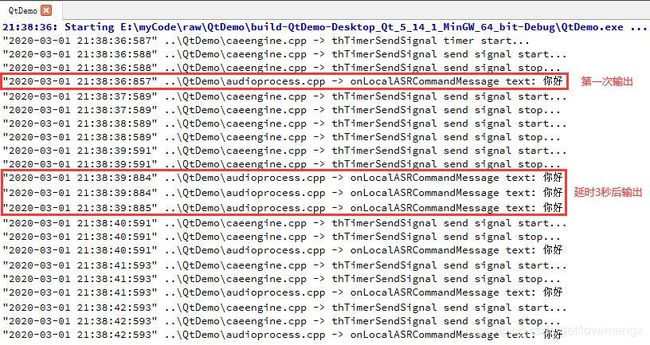
还没有看相应的源代码,因此根据实验现象大胆推测如下几点:
- QT 的信号处理应该是基于 UI 主消息循环中处理
- QT 的信号发送不受槽函数的阻塞影响,应该有一个栈或者队列来存储这些信号
- QT 的 UI 线程应该是定期或者被触发的方式从栈或者队列中取出信号后调用对于的槽函数。
所以,耗时的动作应该有子线程进行,槽函数通过唤醒子线程的方式来做,就不会影响 GUI。
信号如果给出具体实现会怎么样?
信号触发信号
caeengine.h
#ifndef CAEENGINE_H
#define CAEENGINE_H
#include audioprocess.cpp
void AudioProcess::onCAEEnableMessage(bool is)
{
    qDebug() << QDateTime::currentDateTime().toString("yyyy-MM-dd hh:mm:ss:zzz") << __FILE__ << "->" << __FUNCTION__ << "is:" << is;
}

void AudioProcess::onCAEDisableMessage(bool is)
{
    qDebug() << QDateTime::currentDateTime().toString("yyyy-MM-dd hh:mm:ss:zzz") << __FILE__ << "->" << __FUNCTION__ << "is:" << is;
}
widget.cpp
void Widget::testSignal2()
{
    CAEEngine       *pCAEEngine = new CAEEngine();
    AudioProcess    *pAudioProcess = new AudioProcess();

    // 连接信号
    connect(pCAEEngine, CAEEngine::onSignalCAEEnable, pAudioProcess, AudioProcess::onCAEEnableMessage);
    connect(pCAEEngine, CAEEngine::onSignalCAEDisable, pAudioProcess, AudioProcess::onCAEDisableMessage);

    // 创建一个按钮
    QPushButton *pButton = new QPushButton();
    pButton->setText("触发信号");         // 设置按钮文本
    pButton->setParent(this);

    // 按钮点击信号触发 CAEEngine 的 onSignalCAEEnable 和 onSignalCAEDisable  信号
    connect(pButton, QPushButton::clicked, pCAEEngine, CAEEngine::onSignalCAEEnable);
    connect(pButton, QPushButton::clicked, pCAEEngine, CAEEngine::onSignalCAEDisable);
}
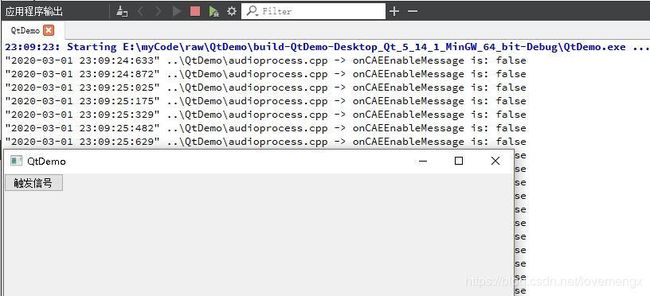
实现效果
也可以断开信号
widget.cpp
void Widget::testSignal2()
{
    CAEEngine       *pCAEEngine = new CAEEngine();
    AudioProcess    *pAudioProcess = new AudioProcess();

    // 连接信号
    connect(pCAEEngine, CAEEngine::onSignalCAEEnable, pAudioProcess, AudioProcess::onCAEEnableMessage);
    connect(pCAEEngine, CAEEngine::onSignalCAEDisable, pAudioProcess, AudioProcess::onCAEDisableMessage);

    // 创建一个按钮
    QPushButton *pButton = new QPushButton();
    pButton->setText("触发信号");         // 设置按钮文本
    pButton->setParent(this);

    // 按钮点击信号触发 CAEEngine 的 onSignalCAEEnable 和 onSignalCAEDisable  信号
    connect(pButton, QPushButton::clicked, pCAEEngine, CAEEngine::onSignalCAEEnable);
    connect(pButton, QPushButton::clicked, pCAEEngine, CAEEngine::onSignalCAEDisable);

    // 断开 onSignalCAEDisable 信号
    disconnect(pButton, QPushButton::clicked, pCAEEngine, CAEEngine::onSignalCAEDisable);
}
总结一下
- 可以信号与信号建立连接关系
- 可以信号与槽建立连接关系
- 可以一个信号与多个信号建立连接关系
- 可以一个信号与多个槽建立连接关系
- 信号和槽函数的参数必须一一对于
- 信号参数可以比槽函数的参数个数多
- 信号只能被声明而不能被定义,且需要在 signals: 关键字之下,由 emi 触发。
- 槽函数被声明后需要被定义,信号或槽函数如果有重载则需要通过类型强转的方式连接。
- 耗时的动作应该有子线程进行,槽函数通过唤醒子线程的方式来做,否则会导致 GUI 无响应。
- 信号或槽函数的参数类型需要是 QT 已经识别的类型,如果使用自定义或者 std 的类型需要注册,否则信号连接将会失败,并且只在运行时才会提示(检查 connect() 返回值没有用)。如下面的图如果没有:qRegisterMetaTypestd::string(“std::string”); 将会报错:


