Tensorflow之CNN实现CIFAR-10图像的分类python
这个还是18年做的,当时被老师逼着三天速成,也是无奈的很呀,哭唧唧。但是现在想想还是老师逼迫的时候效率高哈哈哈哈哈,感谢努力push我们的老师~
CNN原理
卷积神经网络(Convolutional Neural Network,简称CNN),是一种前馈神经网络,算是多层感知机的一个变种。由生物学家休博尔和维瑟尔在早期关于猫视觉皮层的研究发展而来。它最大的优势和特点就是采用了局部链接和权值共享的方式减少权值数量,让其容易优化,也减小了过拟合风险。CNN主要由卷积层、池化层、全连接层构成,我们依次来介绍:
卷积层
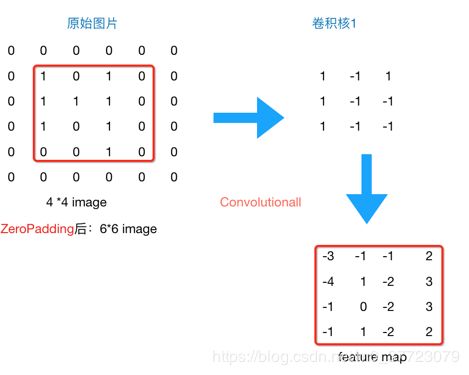
在卷积层中,我们通过卷积核依次与原样本依次对应相乘(矩阵点乘)提取特征,过程如下,比如:
f e a t u r e − m a p ( 1 , 1 ) = i m a g e ( 1 : 2 , 1 : 2 ) ⋅ F i l t e r 1 = 1 ∗ 1 + 0 ∗ ( − 1 ) + 1 ∗ 1 + 1 ∗ ( − 1 ) = 1 feature-map(1,1)=image(1:2,1:2)\cdot Filter1=1*1+0*(-1)+1*1+1*(-1)=1 feature−map(1,1)=image(1:2,1:2)⋅Filter1=1∗1+0∗(−1)+1∗1+1∗(−1)=1
f e a t u r e − m a p ( 1 , 2 ) = i m a g e ( 1 : 2 , 2 : 3 ) ⋅ F i l t e r 1 = 0 ∗ 1 + 1 ∗ ( − 1 ) + 1 ∗ 1 + 1 ∗ ( − 1 ) = − 1 feature-map(1,2)=image(1:2,2:3)\cdot Filter1=0*1+1*(-1)+1*1+1*(-1)=-1 feature−map(1,2)=image(1:2,2:3)⋅Filter1=0∗1+1∗(−1)+1∗1+1∗(−1)=−1
- 从这个简单的小例子中我们可以看到,同一层的神经元可以共享卷积核,那么对于高位数据的处理将会变得非常简单。并且使用卷积核后图片的尺寸变小,方便后续计算,并且我们不需要手动去选取特征,只用设计好卷积核的尺寸,数量,滑动的步长和初始化权重就可以让它自己去训练了。
- 我们这里计算卷积的方式只是其中不中,不是所有的都必须这样算,卷积核在数字信号处理里也叫滤波器,包括均值滤波器,高斯滤波器,拉普拉斯滤波器等等。但不论是什么滤波器,本质只是一种数学运算,无非就是计算更复杂一点。
- 关于卷积核数目问题,一般来说,越接近输入层的卷积核数目越小,主要是为了提取一些简单的共性特征,比如提取横线、竖线这些特征;而越到后面,我们希望提取的特征越细致,比如半圆、折线这些,卷积核的数目也就设置的更多。
- 关于卷积核大小问题,卷积核的大小不是越大越好的!我们可以来做个比较,A是三层的卷积层,每层卷积层设置卷积核大小为33,步长为1,B是单层卷积层,卷积核大小为77。那么第一层我们看到的视野就是 ( 3 ∗ 3 ) (3*3) (3∗3)大小,第二层看到为 ( 1 + 3 + 1 ) ∗ ( 1 + 3 + 1 ) = 5 ∗ 5 (1+3+1)*(1+3+1)=5*5 (1+3+1)∗(1+3+1)=5∗5大小,第三层看到 ( 1 + 5 + 1 ) ∗ ( 1 + 1 + 1 ) = 7 ∗ 7 (1+5+1)*(1+1+1)=7*7 (1+5+1)∗(1+1+1)=7∗7大小,这其实看上去和B一样。但A也经过三层的Relu,得到的非线性组合要比B多得多,其模型表达力更强!还有值得注意的是参数数目问题,A的参数有 3 ∗ ( C ∗ ( 3 ∗ 3 ∗ C ) ) = 27 ∗ C 2 3*(C*(3*3*C))=27*C^2 3∗(C∗(3∗3∗C))=27∗C2个,而B有 C ∗ ( 7 ∗ 7 ∗ C ) ) = 49 ∗ C 2 C*(7*7*C))=49*C^2 C∗(7∗7∗C))=49∗C2个。
- 关于权重初始化问题,我们不同设置完全相同的权,或者直接都设置为0,这样的话反向传播过程中梯度都相同,无差异化,使得网络无学习能力,我们应该设置为满足均值为0,方差较小的高斯分布随机数列,这样也能防止误差曲线平缓区域训练慢的问题。
池化层
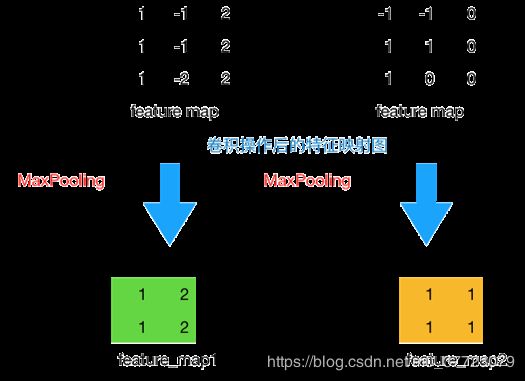
池化层主要是通过降采样的方式,在不影响图片质量的情况下,压缩图片,只保留重要信息,从而减少了参数数量,手段主要包括最大池化和平均池化。比如下图,采用窗口2*2,步长为1的最大池化:
f e a t u r e − m a p 1 ( 1 , 1 ) = m a x ( f e a t u r e − m a p ( 1 : 2 , 1 : 2 ) ) = m a x ( 1 , − 1 , 1 , − 1 ) = 1 feature-map1(1,1)=max(feature-map(1:2,1:2))=max(1,-1,1,-1)=1 feature−map1(1,1)=max(feature−map(1:2,1:2))=max(1,−1,1,−1)=1
f e a t u r e − m a p 1 ( 1 , 2 ) = m a x ( f e a t u r e − m a p ( 1 : 2 , 2 : 3 ) ) = m a x ( − 1 , 2 , − 1 , 2 ) = 2 feature-map1(1,2)=max(feature-map(1:2,2:3))=max(-1,2,-1,2)=2 feature−map1(1,2)=max(feature−map(1:2,2:3))=max(−1,2,−1,2)=2
zero-padding
这里我们需要注意一个小问题,卷积和池化的窗口在滑动到最后时,可能长度不够,不补0的话就直接舍弃了这些信息,所以最好是进行补零操作。
全连接层
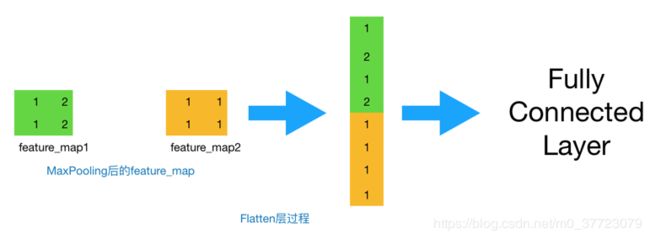
最后,我们就会把这些数据“拍平”,丢到Flatten层,然后把Flatten层的output放到全连接中,采用softmax对其进行分类。
网络结构
我们来总结一下CNN的网络结构:

这里说一下为什么选择Relu函数:
- 首先引入这个激励函数是为了增加非线性的意义,让其能逼近任意函数而不仅仅限于线性函数,不加的话传输的都是线性结果,这和没有隐藏层是一样的效果,也就是最原始的感知机模型;
- 其次就是为啥不引入sigmoid,sigmoid的梯度值在(0,0.25)区间内,在反向传播时,会导致梯度消失问题,从而无法完成深层网络的训练。而Relu函数不会,其在非负区间内梯度为常数,模型的收敛速度维持在稳定状态内;并且ReLU会使一部分神经元的输出为0,这样就造成了网络的稀疏性,并且减少了参数的相互依存关系,缓解了过拟合问题的发生。
好啦,理论部分介绍这么多,一起来动手试试吧,代码和数据都放最后哦~
数据处理
我们采用CIFAR-10的数据集,其主要包括10类不同的图片,共60000张,其中50000作为训练集,10000作为测试集,每张图片大小为32323(彩色照片通道RGB)。我们来加载数据。
import tensorflow as tf
import pickle
import numpy as np
import pandas as pd

train_data = {b'data':[], b'labels':[]} #两个items都是list形式
# 5*10000的训练数据和1*10000的测试数据,数据为dict形式,train_data[b'data']为10000 * 3072的numpy向量
# 3072个数字表示图片特征,前1024个表示红色通道,中间1024表示绿色通道,最后1024表示蓝色通道
# train[b'labels']为长度为10000的list,每一个list数字对应以上上3072维的一个特征

# 加载训练数据
for i in range(5):
    with open("C:/Users/29811/Desktop/cifar10/data/cifar-10-batches-py/data_batch_" + str(i + 1), mode='rb') as file:
        data = pickle.load(file, encoding='bytes')
        train_data[b'data'] += list(data[b'data'])
        train_data[b'labels'] += data[b'labels']

# 加载测试数据
with open("C:/Users/29811/Desktop/cifar10/data/cifar-10-batches-py/test_batch", mode='rb') as file:
    test_data = pickle.load(file, encoding='bytes')

# 定义一些变量
NUM_LABLES = 10 # 分类结果为10类
FC_SIZE = 384   # 全连接隐藏层节点个数
BATCH_SIZE = 32 # 每次训练batch数
lamda = 0.004   # 正则化系数,这里还未用正则化处理
sess = tf.InteractiveSession()
接下来我们初始化权重,
# 卷积层权重初始化,随机初始化均值为0,方差为0.1
def weight_variable(shape):
    initial = tf.truncated_normal(shape, stddev = 0.1)
    return tf.Variable(initial)

# 卷积层偏置初始化为常数0.1
def bias_variable(shape):
    initial = tf.constant(0.1, shape = shape)
    return tf.Variable(initial)
网络构建
我做了一个详细的流程图,以一张图片为例,详细的给出经过每一步其维度的变化。详细介绍在代码中给了注释:
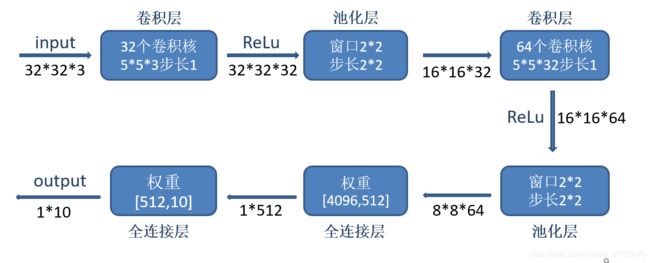
# 定义卷积操作,卷积步长为1. padding = 'SAME' 表示全0填充
def conv2d(x, W):
    return tf.nn.conv2d(x, W, strides = [1, 1, 1, 1], padding = 'SAME')

# 定义最大池化操作,尺寸为2,步长为2,全0填充
def max_pool_2x2(x):
    return tf.nn.max_pool(x, ksize = [1, 2, 2, 1],strides = [1, 2, 2, 1], padding = 'SAME')

# 对输入进行占位操作,输入为BATCH*3072向量,输出为BATCH*10向量
x = tf.placeholder(tf.float32, [None, 3072])
y_ = tf.placeholder(tf.float32, [None, NUM_LABLES])
# 对输入进行reshape,转换成3*32*32格式
x_image = tf.reshape(x, [-1, 3, 32, 32])
# 转置操作,转换成滤波器做卷积所需格式:32*32*3,32*32为其二维卷积操作维度
x_image = tf.transpose(x_image, [0, 2, 3, 1])

# 第一层卷积,滤波器参数5*5*3, 32个
W_conv1 = weight_variable([5, 5, 3, 32])
b_conv1 = bias_variable([32])
h_conv1 = tf.nn.relu(conv2d(x_image, W_conv1) + b_conv1) # 卷积
h_pool1 = max_pool_2x2(h_conv1)  # 池化

# 第二层卷积,滤波器参数5 * 5 * 32, 64个
W_conv2 = weight_variable([5, 5, 32, 64])
b_conv2 = bias_variable([64])
h_conv2 = tf.nn.relu(conv2d(h_pool1, W_conv2) + b_conv2)
h_pool2 = max_pool_2x2(h_conv2)

# 将8 * 8 * 64 三维向量拉直成一行向量
h_pool2_flat = tf.reshape(h_pool2, [-1, 8 * 8 * 64])

# 第一层全连接
W_fc1 = weight_variable([8 * 8 * 64, FC_SIZE])
b_fc1 = bias_variable([FC_SIZE])
h_fc1 = tf.nn.relu(tf.matmul(h_pool2_flat, W_fc1) + b_fc1)
# 对隐藏层使用dropout
keep_prob = tf.placeholder(tf.float32)
h_fc1_drop = tf.nn.dropout(h_fc1, keep_prob)

# 第二层全连接
W_fc2 = weight_variable([FC_SIZE, NUM_LABLES])
b_fc2 = bias_variable([NUM_LABLES])
y = tf.nn.softmax(tf.matmul(h_fc1_drop, W_fc2) + b_fc2)
w1_loss = lamda * tf.nn.l2_loss(W_fc1)  # 对W_fc1使用L2正则化
w2_loss = lamda * tf.nn.l2_loss(W_fc2)  # 对W_fc2使用L2正则化
# 交叉熵损失
cross_entropy = tf.reduce_mean(-tf.reduce_sum(y_ * tf.log(y), reduction_indices = [1]))
# 总损失
loss = w1_loss + w2_loss + cross_entropy
# 用AdamOptimizer优化器训练
train_step = tf.train.AdamOptimizer(1e-4).minimize(cross_entropy)

# 计算准确率
correct_prediction = tf.equal(tf.argmax(y, 1), tf.argmax(y_, 1))
accuracy = tf.reduce_mean(tf.cast(correct_prediction, tf.float32)) #tf.cast将数据转换成指定类型
训练及测试
接下来我们训练我们的简单模型:
# 开始训练
# tf.global_variables_initializer().run()
sess.run(tf.initialize_all_variables())

# 对数据范围为0-255的训练数据做归一化处理使其范围为0-1,并将list转成numpy向量
x_train = np.array(train_data[b'data']) / 255
# 将训练输出标签变成one_hot形式并将list转成numpy向量
y_train = np.array(pd.get_dummies(train_data[b'labels']))

# 对数据范围为0-255的测试数据做归一化处理使其范围为0-1,并将list转成numpy向量
x_test = test_data[b'data'] / 255
# 将测试输出标签变成one_hot形式并将list转成numpy向量
y_test = np.array(pd.get_dummies(test_data[b'labels']))

# 训练
for i in range(1000):
    # 100条数据为1个batch,轮流训练
    start = i * BATCH_SIZE % 50000
    train_step.run(feed_dict = {x: x_train[start: start + BATCH_SIZE],
                                    y_: y_train[start: start + BATCH_SIZE], keep_prob: 0.5})
    # 每迭代100次在前200条个测试集上测试训练效果
    if i % 100 == 0:
        # 测试准确率
        train_accuracy = accuracy.eval(feed_dict={x: x_test[0: 200],
                                                  y_: y_test[0: 200], keep_prob: 1.0})
        # 该次训练的损失
        loss_value = cross_entropy.eval(feed_dict = {x: x_train[start: start + BATCH_SIZE],
                                    y_: y_train[start: start + BATCH_SIZE], keep_prob: 0.5})
        print("step %d, trainning accuracy, %g loss %g" % (i, train_accuracy, loss_value))

#测试
test_accuracy = accuracy.eval(feed_dict = {x: x_test, y_: y_test, keep_prob: 1.0})
print("test accuracy %g" % test_accuracy)
得到结果:

得到一个很一般的结果0.6745,训练时长大概67min,电脑有点弱哦!毕竟模型太简单了,接下来继续改进~
模型优化
数据处理
首先在权重初始化这里,做正则化处理:给权重增加一个L2的正则化处理,筛选出重要的特征。
def variable_with_weight_loss(shape,std,w1):
    var = tf.Variable(tf.truncated_normal(shape,stddev=std),dtype=tf.float32)
    if w1 is not None:
        weight_loss = tf.multiply(tf.nn.l2_loss(var),w1,name="weight_loss")
        tf.add_to_collection("losses",weight_loss)
    return var

def loss_func(logits,labels):
    labels = tf.cast(labels,tf.int32)
    cross_entropy = tf.nn.sparse_softmax_cross_entropy_with_logits(logits=logits,
                           labels=labels,name="cross_entropy_per_example")
    cross_entropy_mean = tf.reduce_mean(tf.reduce_sum(cross_entropy))
    tf.add_to_collection("losses",cross_entropy_mean)
    return tf.add_n(tf.get_collection("losses"),name="total_loss")
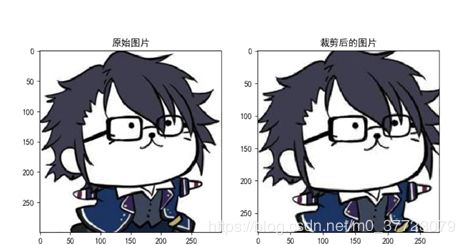
接下来就是一个重要的trick,数据增强:利用工具类cifar_input进行数据增强,对3232的图片进行裁剪、翻转、对比度、亮度的设置,裁剪后图片为2828:比如这样的图片
    #获取数据增强后的训练集数据
    images_train,labels_train = cifar10_input.distorted_inputs(cifar10_dir,batch_size)
    #获取裁剪后的测试数据
    images_test,labels_test = cifar10_input.inputs(eval_data=True,data_dir=cifar10_dir
                                                   ,batch_size=batch_size)
网络构建
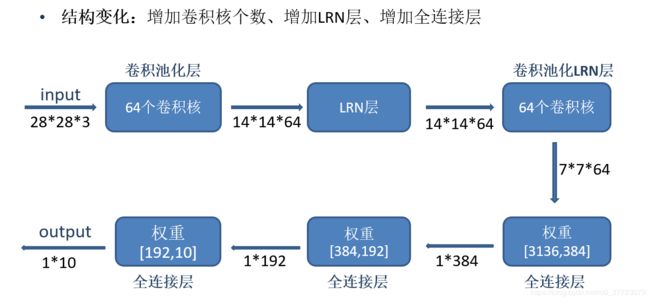
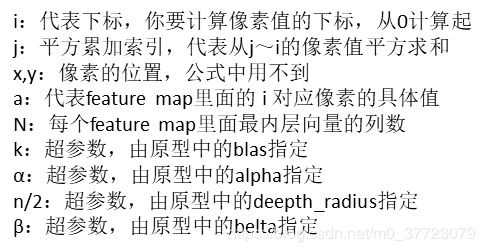
特别的,我们增加LRN层,其对局部神经元的活动创建竞争机制,使其中响应比较大的值变得更大,并抑制其他反馈小的神经元,增加模型泛化能力。公式如下:

#设计第一层卷积
    weight1 = variable_with_weight_loss(shape=[5,5,3,64],std=5e-2,w1=0)
    kernel1 = tf.nn.conv2d(image_holder,weight1,[1,1,1,1],padding="SAME")
    bais1 = tf.Variable(tf.constant(0.0,dtype=tf.float32,shape=[64]))
    conv1 = tf.nn.relu(tf.nn.bias_add(kernel1,bais1))
    pool1 = tf.nn.max_pool(conv1,[1,3,3,1],[1,2,2,1],padding="SAME")
    norm1 = tf.nn.lrn(pool1,4,bias=1.0,alpha=0.001 / 9,beta=0.75)

    #设计第二层卷积
    weight2 = variable_with_weight_loss(shape=[5,5,64,64],std=5e-2,w1=0)
    kernel2 = tf.nn.conv2d(norm1,weight2,[1,1,1,1],padding="SAME")
    bais2 = tf.Variable(tf.constant(0.1,dtype=tf.float32,shape=[64]))
    conv2 = tf.nn.relu(tf.nn.bias_add(kernel2,bais2))
    norm2 = tf.nn.lrn(conv2,4,bias=1.0,alpha=0.01 / 9,beta=0.75)
    pool2 = tf.nn.max_pool(norm2,[1,3,3,1],[1,2,2,1],padding="SAME")

    #第一层全连接层
    reshape = tf.reshape(pool2,[batch_size,-1])
    dim = reshape.get_shape()[1].value
    weight3 = variable_with_weight_loss([dim,384],std=0.04,w1=0.004)
    bais3 = tf.Variable(tf.constant(0.1,shape=[384],dtype=tf.float32))
    local3 = tf.nn.relu(tf.matmul(reshape,weight3)+bais3)

    #第二层全连接层
    weight4 = variable_with_weight_loss([384,192],std=0.04,w1=0.004)
    bais4 = tf.Variable(tf.constant(0.1,shape=[192],dtype=tf.float32))
    local4 = tf.nn.relu(tf.matmul(local3,weight4)+bais4)

    #最后一层
    weight5 = variable_with_weight_loss([192,10],std=1/192.0,w1=0)
    bais5 = tf.Variable(tf.constant(0.0,shape=[10],dtype=tf.float32))
    logits = tf.add(tf.matmul(local4,weight5),bais5)
训练及测试
得到结果如下:

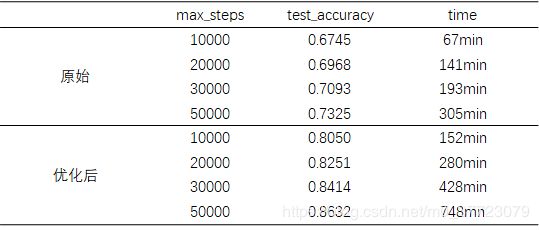
结果0.805还是比之前提升不少的,但是时间也长不少152min,主要是数据增强那里对电脑要求也是有点高哦。
我们来看看优化前后的对比:(PS:真的跑的心疼我的小电脑)
利用GPU加速
跑的实在太慢了,我就装了gpu版本的tensorflow,真的快很多的!安装参考我另一个文章吧,anaconda不用手动装cuda和cudnn也能快速安装tensorflow-gpu(PS:我第一次装是手动安的cuda和cudnn,差别我还不太知道,有待发现)来看看结果吧,我们先跑一个最简单的不作数据增强的模型,看看时间对比:
| max_steps | time | |
|---|---|---|
| CPU | 10000 | 67min |
| GPU | 10000 | 4min |
哇喔,我信了网上说的15倍!这里酱酱给出全部的数据和代码~或者点这里
接下来我还做了Resnet v1模型的测试,精度达到0.9139,在这里:Keras之ResNet v1 实现CIFAR-10图像的分类python
文献参考:
Krizhevsky A, Sutskever I, Hinton G. ImageNet Classification with Deep Convolutional Neural Networks[C]//NIPS. Curran Associates Inc.2012.
He K, Zhang X, Ren S, et al. Deep Residual Learning for Image Recognition[J].2015.
学习参考:
https://www.cnblogs.com/WaitingForU/p/9039034.html
https://www.cnblogs.com/charlotte77/p/7759802.html
https://blog.csdn.net/sinat_29957455/article/details/80615738?ops_request_misc=%257B%2522request%255Fid%2522%253A%2522158937088119724846400396%2522%252C%2522scm%2522%253A%252220140713.130102334.pc%255Fblog.%2522%257D&request_id=158937088119724846400396&biz_id=0&utm_medium=distribute.pc_search_result.none-task-blog-2blogfirst_rank_v2~rank_v25-1-80615738.nonecase&utm_term=cifar10

