使用Entity Framework Core,Swagger和Postman创建ASP.NET Core Web API的分步指南
目录
介绍
背景
第1步:创建一个新项目
第2步:添加模型类
第3步:使用Entity Framework Core
第4步:添加数据库上下文和控制器
步骤5:在Package Manager控制台中添加迁移
步骤6:在ASP.NET Core中添加和配置Swagger
步骤7.使用Swagger和Postman测试您的Web API
介绍
这是我的ASP.NET Core Web API基础性文章,它将教您如何使用Scaffolding功能和Code First方法构建带有Entity Framework的ASP.NET Core Web API。本文对初学者和中级.NET开发人员/架构师都有帮助,他们对ASP.NET的Web开发有一定的了解,因为我们将使用Visual Studio 2017,专注于使用CRUD(创建,读取,更新和删除)操作开发ASP.NET核心应用程序,以及支持ASP.NET Core项目的整个角色。
背景
ASP.NET Web API是Microsoft提供的用于构建任何类型的HTTP服务的优秀框架。在本文中,您将学习如何:
- 在ASP.NET Core中创建一个新的Web API项目
- 添加模型类
- 使用实体框架核心
- 将迁移添加到Scaffold代码以进行数据库操作
- 使用DBContext和Entity Framework Core以及使用所有CRUD操作方法创建控制器
- 在ASP.NET Core中添加和配置Swagger
- 使用Swagger和Postman测试Web API
我们将创建一个简单的应用程序来为2个表'Product'和'Category' 执行CRUD操作。
第1步:创建一个新项目
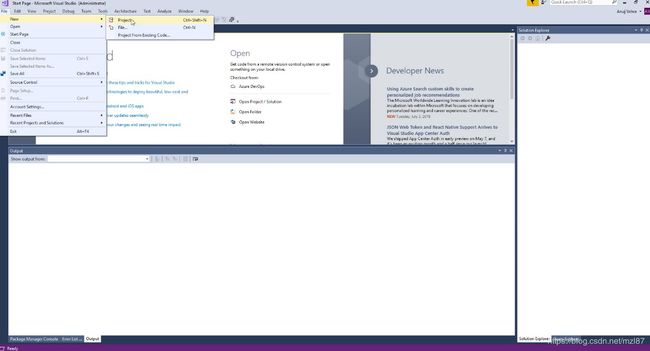
- 打开Visual Studio - >单击文件 - > 新建项目
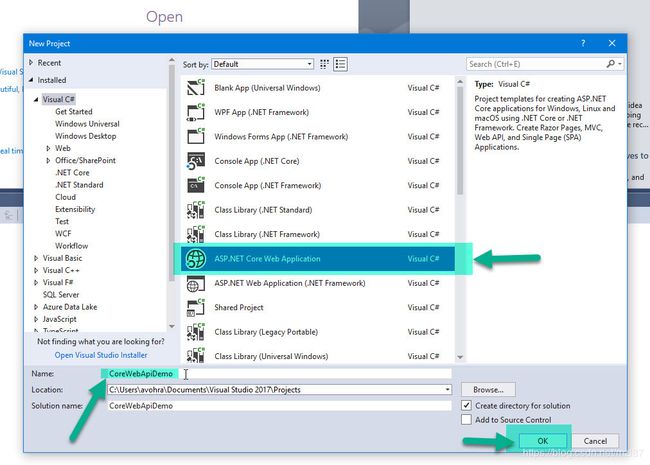
- 从模板和选择ASP.NET核心Web应用程序中选择Visual C#。
- 为应用程序指定任何名称,并选择要将项目保存到本地目录的位置,然后单击“确定”。
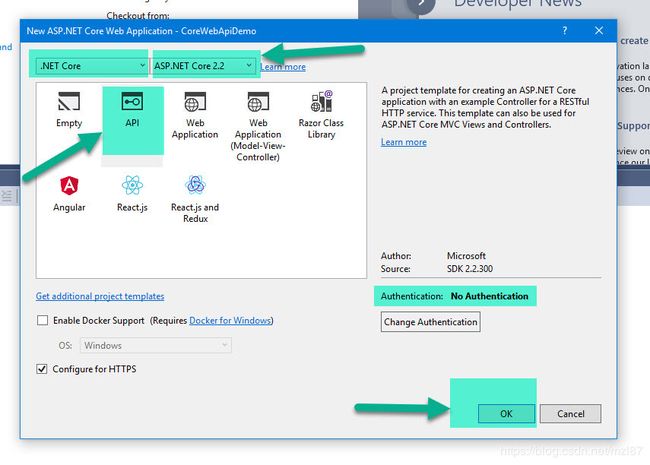
- 在顶部,选择.NET Core和ASP.NET Core 2.2。
- 选择模板作为'API',然后单击确定。
- 点击确定后,将创建一个默认应用程序。
第2步:添加模型类
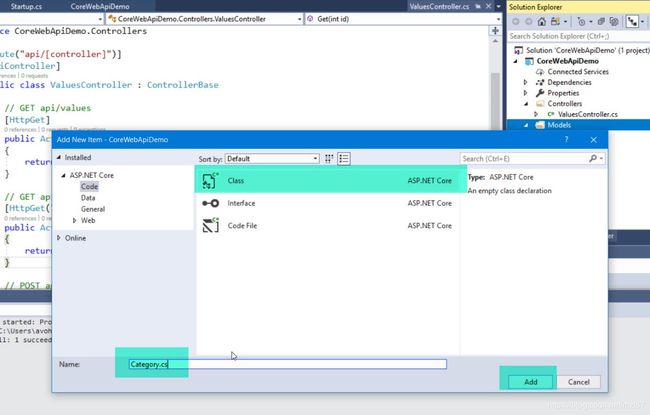
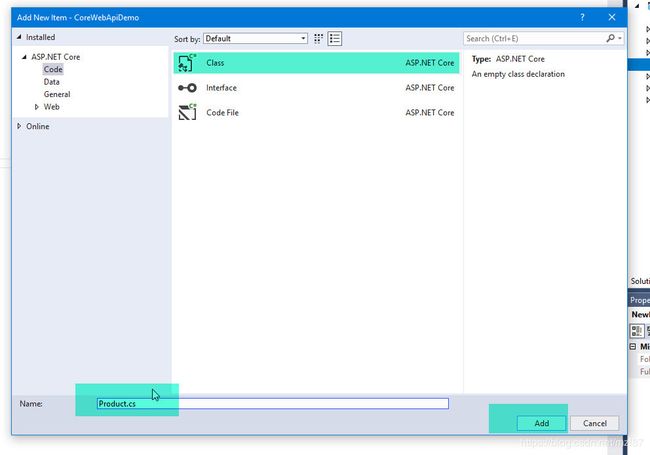
停止调试并将名为Models的新文件夹添加到项目中,并在其中添加2个类——'Product'&'Category'。
using System;
using System.Collections.Generic;
using System.Linq;
using System.Threading.Tasks;

namespace CoreWebApiDemo.Models
{
    public class Category
    {

        public int Id { get; set; }

        public string CategoryName { get; set; }
    }
}
构建您的解决方案 (Ctrl + Shift + B)
构建项目并在Models文件夹中添加另一个类作为Product.cs:
using System;
using System.Collections.Generic;
using System.Linq;
using System.Threading.Tasks;

namespace CoreWebApiDemo.Models
{
    public class Product
    {

        public int Id { get; set; }

        public String ProductName { get; set; }

        public decimal Price { get; set; }

        public int CategoryId { get; set; }
    }
}
保存并构建解决方案。
因此,大部分基本工作都已完成。现在,我们将走向包装部分。
第3步:使用Entity Framework Core
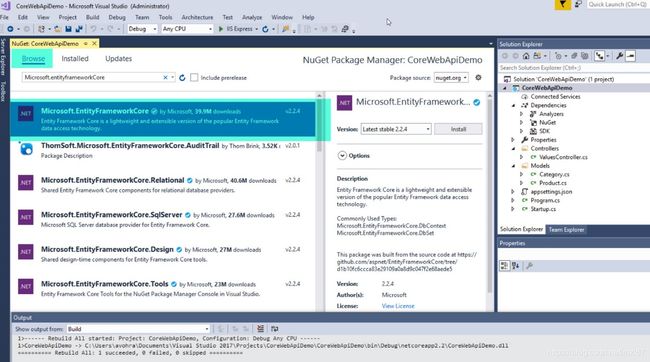
我们可以使用Nuget Packet Manager或Package Manager控制台安装实体框架。
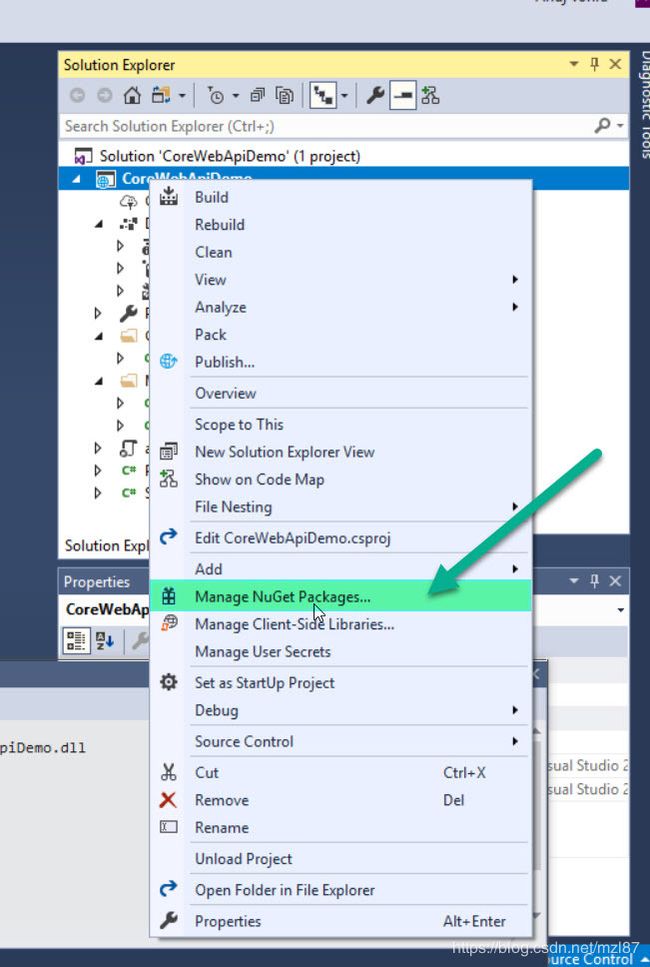
首先,右键单击您的项目,然后单击Manage Nuget Packages ...
- 转到“浏览”选项卡
- 搜索并安装这3个包:
- Microsoft.EntityFrameworkCore
- Microsoft.EntityFrameworkCore.SqlServer
- Microsoft.EntityFrameworkCore.SqlServer.Design
第4步:添加数据库上下文和控制器
DbContext表示与数据库的会话,可用于查询实体实例并将其保存到数据库。DbContext是工作单元和存储库模式的组合。
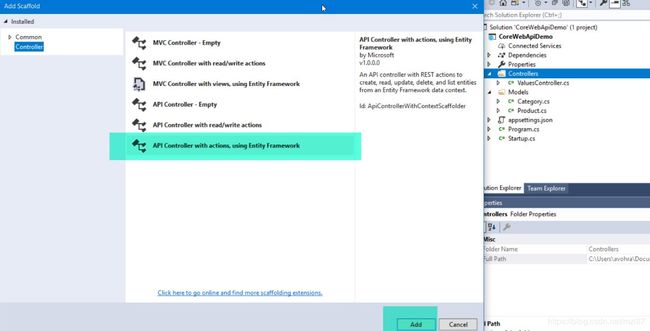
右键单击Controllers文件夹以添加控制器:控制器 - >添加 - >控制器
- 选择Model类作为类别
- 对于Data Context类,它将为空,单击+按钮添加新的DB上下文类。点击添加弹出窗口,然后再次单击添加按钮。
接下来会发生什么?
- Visual Studio将开始脚手架代码:
- appSettings.json将自动更新,并且可能会出现提示以保存未保存的更改:
新的Db连接字符串将添加到appSettings.json文件中(需要修改其中的server 为本地的服务器名称,也可以修改数据库名称,同时可以使用修改登录方式,如添加userid和pwd):
"ConnectionStrings": {
    "CoreWebApiDemoContext": "Server=(localdb)\\mssqllocaldb;
     Database=CoreWebApiDemoContext-9225644b-7c5e-44f3-8d39-e607e8d10ea0;
     Trusted_Connection=True;MultipleActiveResultSets=true"
}- 将创建一个新文件夹Data ,并在Data文件夹中生成一个名为CoreWebApiDemoContext的DbContext文件。
- 同样,Product使用脚手架和实体框架选项为CRUD操作添加另一个控制器。选择我们之前创建的现有DBContext文件。
Db Context文件将自动更新。
using System;
using System.Collections.Generic;
using System.Linq;
using System.Threading.Tasks;
using Microsoft.EntityFrameworkCore;
using CoreWebApiDemo.Models;

namespace CoreWebApiDemo.Models
{
    public class CoreWebApiDemoContext : DbContext
    {
        public CoreWebApiDemoContext (DbContextOptions options)
            : base(options)
        {
        }

        public DbSet Category { get; set; }

        public DbSet Product { get; set; }
    }
}
步骤5:在Package Manager控制台中添加迁移
软件包管理器控制台是一个用于与互动的NuGet和自动化的Visual Studio Visual Studio中的PowerShell 控制台。您可以从Visual Studio中访问工具 - >库包管理器 - > 包管理器控制台,从而访问包管理器控制台。
要么:
您可以键入程序包管理器控制台并在搜索选项中查找。
键入get-help migration 并按下回车键:
PM> get-help migration在程序包管理器控制台中运行另一个命令add-migration 以添加新的迁移。我们必须为迁移命名。
PM> add-migration FirstMigrationToCreateDB- 将生成一个迁移文件,以包括所有Db操作,例如基于来自appsettings.json的连接字符串创建数据库,基于模型创建表以及基于数据注释和它们之间的所有关系。
- 接下来,运行另一个命令update-database,该命令将运行此迁移并执行DB脚本。
PM> update-database- 根据您的连接字符串验证数据库和表。转到视图 - > SQL Server对象资源管理器
步骤6:在ASP.NET Core中添加和配置Swagger
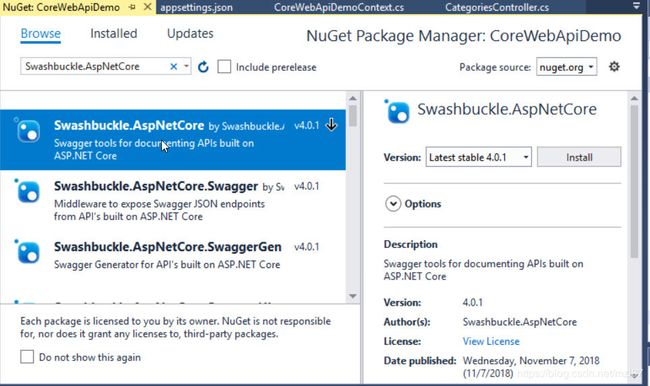
- 右键单击您的项目,然后单击Manage Nuget Packages并浏览 Swashbuckle.AspNetCore
- 安装最新版本 Swashbuckle.AspNetCore
在Startup类中,导入以下命名空间以使用Info类:
using Swashbuckle.AspNetCore.Swagger;将Swagger生成器添加到Startup.ConfigureServices方法中的services集合:
services.AddSwaggerGen(c=>
            {
                c.SwaggerDoc("v1", new Info { Title = "Core Web API", Version = "v1" });
});在该Startup.Configure方法中,启用中间件以提供生成的JSON文档和Swagger UI:
using System;
using System.Collections.Generic;
using System.Linq;
using System.Threading.Tasks;
using Microsoft.AspNetCore.Builder;
using Microsoft.AspNetCore.Hosting;
using Microsoft.AspNetCore.HttpsPolicy;
using Microsoft.AspNetCore.Mvc;
using Microsoft.Extensions.Configuration;
using Microsoft.Extensions.DependencyInjection;
using Microsoft.Extensions.Logging;
using Microsoft.Extensions.Options;
using Microsoft.EntityFrameworkCore;
using CoreWebApiDemo.Models;
using Swashbuckle.AspNetCore.Swagger;

namespace CoreWebApiDemo
{
    public class Startup
    {
        public Startup(IConfiguration configuration)
        {
            Configuration = configuration;
        }

        public IConfiguration Configuration { get; }

        // This method gets called by the runtime. Use this method to add services to the container.
        public void ConfigureServices(IServiceCollection services)
        {
            services.AddMvc().SetCompatibilityVersion(CompatibilityVersion.Version_2_2);

            services.AddDbContext(options =>
                    options.UseSqlServer(Configuration.GetConnectionString("CoreWebApiDemoContext")));

            services.AddSwaggerGen(c=>
            {
                c.SwaggerDoc("v1", new Info { Title = "Core Web API", Version = "v1" });
            });
        }

        // This method gets called by the runtime. Use this method to configure the HTTP request pipeline.
        public void Configure(IApplicationBuilder app, IHostingEnvironment env)
        {
            if (env.IsDevelopment())
            {
                app.UseDeveloperExceptionPage();
            }
            else
            {
                // The default HSTS value is 30 days. You may want to change this for production scenarios, see https://aka.ms/aspnetcore-hsts.
                app.UseHsts();
            }

            // Enable middleware to serve generated Swagger as a JSON endpoint.
            app.UseSwagger();

            // Enable middleware to serve swagger-ui (HTML, JS, CSS, etc.),
            // specifying the Swagger JSON endpoint.
            app.UseSwaggerUI(c=>
            {
                c.SwaggerEndpoint("/swagger/v1/swagger.json", "Core Web API");
            });

            app.UseHttpsRedirection();
            app.UseMvc();
        }
    }
}
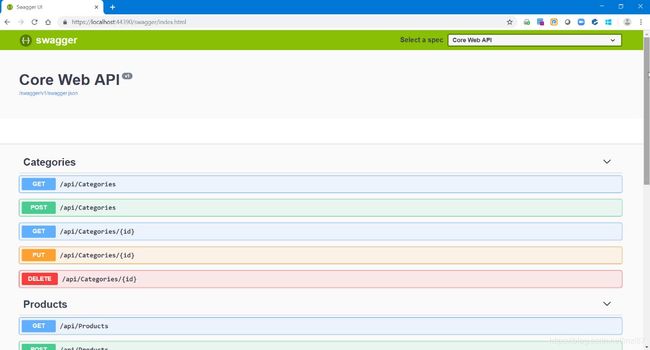
构建和运行项目并更换URL /api/values为/swagger。结果如下:
步骤7.使用Swagger和Postman测试您的Web API
Postman是一款免费的API调试工具。您可以将其安装在Chrome浏览器或Mac上。从这里为Chrome安装它:
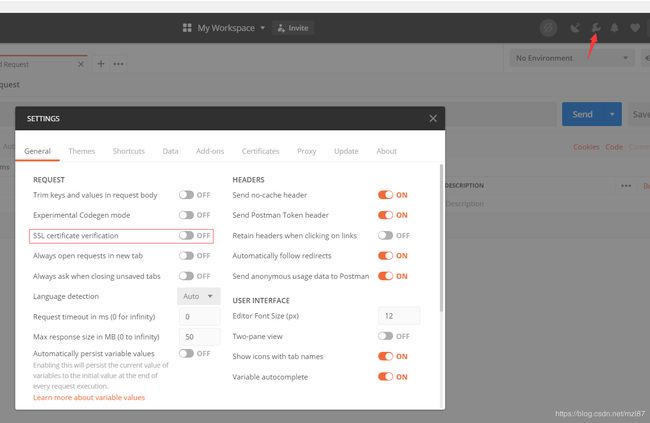
成功安装后,需要进行一些设置,否则进行Get等操作时无法完成。我们需要关闭”SSL certificate verification”选项。
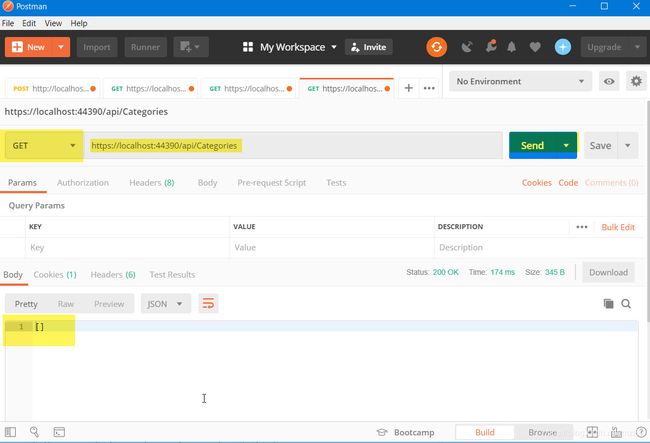
修改设置后,打开一个tab,选择HTTP方法(GET、PUT等)并输入您的Web API的URL。
- 选择GET操作
- 输入网址
- 单击“发送”按钮
- 结果将显示在正文部分中。由于我们还没有任何类别。结果显示为空白。
我们试试POST(插入一个类别)
在我们通过POSTMAN插入新类别之前,在Category Controller中更新PostCategory方法并在参数中添加前缀[FromBody]。
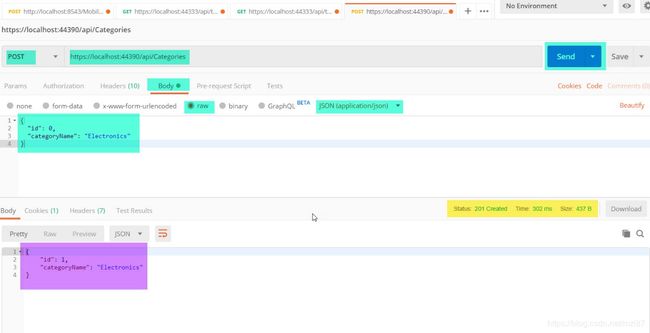
打开postman,更改GET为POST,输入URL,单击正文,选择原始,然后选择application/json。
在正文中,Category以下面的格式输入对象以插入新类别。
{
  "id": 0,
  "categoryName": "Electronics"
}单击SEND按钮,新结果的Category对象将显示在结果部分中。
如果已插入记录,请验证数据库:
以相同的方式插入更多类别。
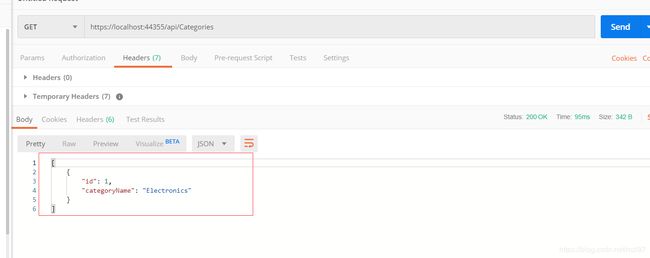
现在,在POSTMAN中尝试GET操作。
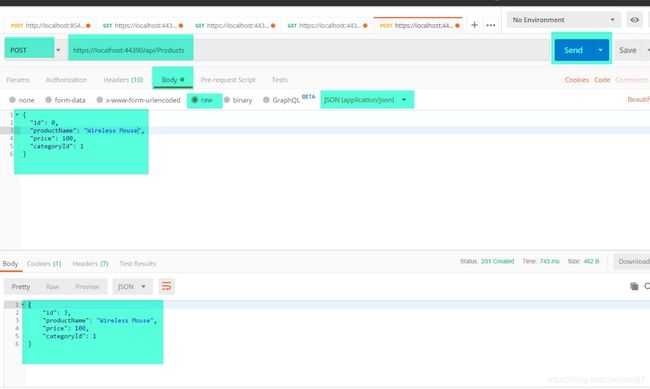
同样,您可以执行CRUD操作Products。
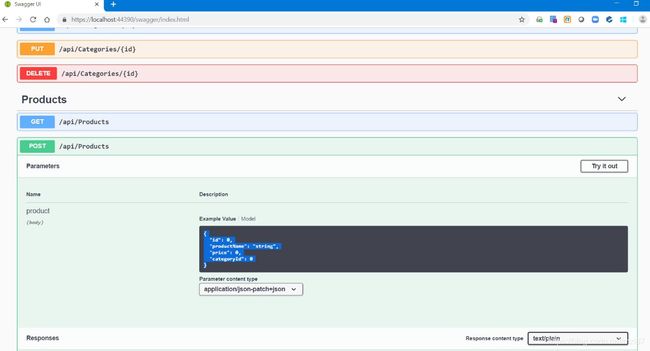
让我们从Swagger中获取Products对象JSON数据形式并通过POSTMAN 执行POST 。
在数据库product表中验证。
PS:对于初学者或者第一次解除Core的朋友,还是建议按照步骤一步一步的自己做一下
