Python实现网站自动登录---傻瓜教程
本文介绍使用谷歌浏览器chrome自动登录网页,
下载谷歌浏览器:https://www.google.cn/chrome/,找到对应电脑操作系统(我的是WIN7 64位)的版本下载并安装。
1.首先下载驱动chromedriver
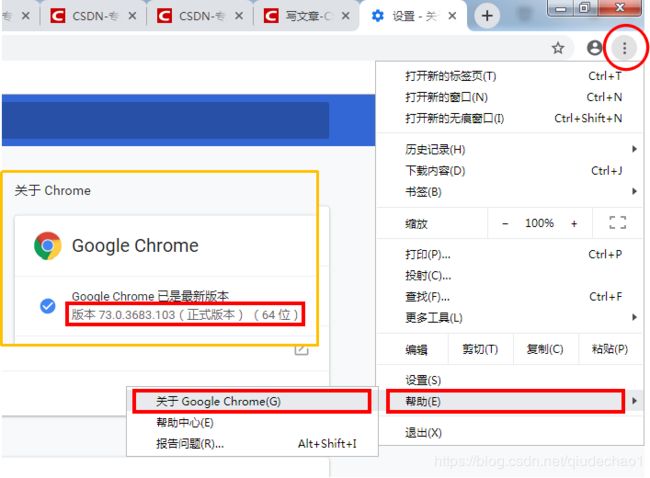
查看谷歌浏览器版本如图,可以看到我的版本是73.0.3683.103
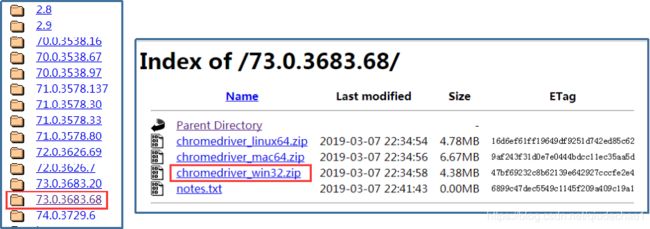
下载对应版本的chromedriver(下载地址:http://chromedriver.storage.googleapis.com/index.html)
解压后,将chromedriver.exe分别放进chrome浏览器目录 和 Python根目录下,
chrome浏览器目录(如:C:\Program Files (x86)\Google\Chrome\Application)
Python根目录(如:D:\Python\Python37)
参考:https://blog.csdn.net/weixin_37185329/article/details/80493281
还可以采用修改函数调用来实现,参考:https://www.cnblogs.com/stin/p/7929601.html
2.编写基本程序如下,
import time
import os
from selenium import webdriver
#先安装pywin32,才能导入下面两个包
import win32api
import win32con
#导入处理alert所需要的包
from selenium.common.exceptions import NoAlertPresentException
import traceback

#环境配置
chromedriver = "C:\Program Files (x86)\Google\Chrome\Application"
os.environ["webdriver.ie.driver"] = chromedriver

driver=webdriver.Chrome() # 选择Chrome浏览器
driver.get('https://fnzz.aoyang.com/login') # 打开网站
driver.maximize_window() #最大化谷歌浏览器
#处理alert弹窗
try:
    alert1 = driver.switch_to.alert #switch_to.alert点击确认alert
except NoAlertPresentException as e:
    print("no alert")
    traceback.print_exc()
else:
    at_text1 = alert1.text
    print("at_text:" + at_text1)

time.sleep(1)

#driver.find_element_by_link_text('登录').click() # 点击“账户登录”

username = "18888888888" # 请替换成你的用户名
password = "123456" # 请替换成你的密码

driver.find_element_by_id('username').click() # 点击用户名输入框
driver.find_element_by_id('username').clear() #清空输入框
driver.find_element_by_id('username').send_keys(username) # 自动敲入用户名

driver.find_element_by_id('password').click() # 点击密码输入框
driver.find_element_by_id('password').clear() #清空输入框
driver.find_element_by_id('password').send_keys(password) # 自动敲入密码

#采用class定位登陆按钮
#driver.find_element_by_class_name('ant-btn').click() # 点击“登录”按钮
#采用xpath定位登陆按钮,
driver.find_element_by_xpath('//*[@id="root"]/div/div[3]/form/button').click()

time.sleep(1)

#driver.find_element_by_id('signIn').click() # 点击“签到”

win32api.keybd_event(122,0,0,0)  #F11的键位码是122,按F11浏览器全屏
win32api.keybd_event(122,0,win32con.KEYEVENTF_KEYUP,0) #释放按键

#driver.close()

# 代码调用:
# python.exe JDSignup.py
# 可以将这行命令添加到Windows计划任务,每天运行,从而实现每日自动签到领取京豆。
在cmd命令行模式下,输入pip install pyinstaller安装pyinstaller模块。
在py程序所在文件夹,打开cmd,输入pyinstaller -F auto_chrome.py,打包为一个可运行程序。
3.调试知识点
一开始编写,driver.find_element_by_id('submit').click() ,实现点击登录功能失败,
原因是此标签没有定义id,只有type定义为submit
![]()
因此使用class定位方法,修改为,driver.find_element_by_class_name('ant-btn').click(),运行成功,
当然还可以采用XPath定位,即绝对路径定位,driver.find_element_by_xpath('//*[@id="root"]/div/div[3]/form/button').click()
chrome查看XPath方法
参考:https://jingyan.baidu.com/article/da1091fb71365f027949d658.html
找到对应元素,右键点击-->Copy-->Copy XPath,即可拿到XPath。
4.webdriver定位网页元素的8种方法
参考:https://www.cnblogs.com/minieye/p/5803640.html
5.Python模拟键盘输入的键值码
参考:https://blog.csdn.net/smallsmallmouse/article/details/78689675
https://blog.csdn.net/daxialeesuper/article/details/79470487
| 字母和数字键 | 数字小键盘的键 | 功能键 | 其它键 | ||||
| 键 | 键码 | 键 | 键码 | 键 | 键码 | 键 | 键码 |
| A | 65 | 0 | 96 | F1 | 112 | Backspace | 8 |
| B | 66 | 1 | 97 | F2 | 113 | Tab | 9 |
| C | 67 | 2 | 98 | F3 | 114 | Clear | 12 |
| D | 68 | 3 | 99 | F4 | 115 | Enter | 13 |
| E | 69 | 4 | 100 | F5 | 116 | Shift | 16 |
| F | 70 | 5 | 101 | F6 | 117 | Control | 17 |
| G | 71 | 6 | 102 | F7 | 118 | Alt | 18 |
| H | 72 | 7 | 103 | F8 | 119 | CapsLock | 20 |
| I | 73 | 8 | 104 | F9 | 120 | Esc | 27 |
| J | 74 | 9 | 105 | F10 | 121 | Spacebar | 32 |
| K | 75 | * | 106 | F11 | 122 | PageUp | 33 |
| L | 76 | + | 107 | F12 | 123 | PageDown | 34 |
| M | 77 | Enter | 108 | End | 35 | ||
| N | 78 | - | 109 | Home | 36 | ||
| O | 79 | . | 110 | LeftArrow | 37 | ||
| P | 80 | / | 111 | UpArrow | 38 | ||
| Q | 81 | RightArrow | 39 | ||||
| R | 82 | DownArrow | 40 | ||||
| S | 83 | Insert | 45 | ||||
| T | 84 | Delete | 46 | ||||
| U | 85 | Help | 47 | ||||
| V | 86 | NumLock | 144 | ||||
| W | 87 | ||||||
| X | 88 | ||||||
| Y | 89 | ||||||
| Z | 90 | ||||||
| 0 | 48 | ||||||
| 1 | 49 | ||||||
| 2 | 50 | ||||||
| 3 | 51 | ||||||
| 4 | 52 | ||||||
| 5 | 53 | ||||||
| 6 | 54 | ||||||
| 7 | 55 | ||||||
| 8 | 56 | ||||||
| 9 | 57 |
|
|||||
另外还可以将程序添加到windows计划任务,让系统每日自动运行,
参考:https://blog.csdn.net/mooncrystal123/article/details/83586780

