GlusterFS 配置及使用 二 :Windows挂载GlusterFS
前言:GlusterFS服务器搭建完成后,Client可以采用NFS、GlusterFS、Samba方式提供给客户端,NFS、Samba方式适用于Windows、Linux
一、安装GlusterFS和rpcbind(他是一个RPC服务,主要是在nfs共享时候负责通知客户端,服务器的nfs端口号的。简单理解rpc就是一个中介服务。)
yum install -y glusterfs-server samba rpcbind
systemctl start glusterd.service
systemctl enable glusterd.service
systemctl start rpcbind // rpcbind 用于以nfs方式挂载
systemctl enable rpcbind
systemctl status rpcbind
二、开启卷glusterFS volume的nfs服务,如下:
gluster volume list
gluster volume set gvz00 nfs.disable off
gluster volume info gvz00
=====================================================================
一、windows client端操作
1、cmd 下 mount 192.168.120.128:/gv1 Z:
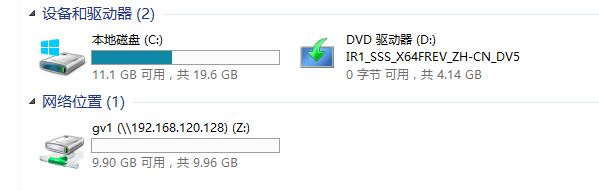
成功挂载,打开我的点脑,你即可在你网络位置看到 Z:盘了

解释:gv1为共享的目录、Z为挂载的网络盘符
2、取消挂载:
直接在 我的电脑 里面鼠标点击取消映射网络驱动器 Z:
或者: win+R->cmd
输入: umount X:
(umount -a 取消所有网络驱动器)
3、修改windows对nfs分区只读属性
Windows NFS客户端使用mount命令挂载NFS服务之后,文件系统对Win只读,无法写入文件,无法新建文件夹,此时使用mount命令可以查看到如下状态:

可以看到UID=-2由于在存储设备上共享出来的NFS文件系统归属于root权限,并且无法修改该所属用户,而Windows通过UID=-2的用户去写,肯定写不进去。
解决办法就是让Win在挂载NFS的时候将UID和GID改成0即可:打开注册表:HKEY_LOCAL_MACHINE\SOFTWARE\Microsoft\ClientForNFS\CurrentVersion\Default,增加两项:AnonymousUid,AnonymousGid,如图:

重新启动计算机,重新mount即可。此时就能在win7下对nfs文件系统进行读写操作了,跟本地磁盘一样。
查看mount属性,如下:

mount命令在win下的具体用法如下:

打开网络磁盘、默认多了个.trashcan、这个文件默认linux是没有的、这是Gluster的回收站、这是3.7版本的功能
Trashcan
暂时保存删除的数据,可指定删除的时间段,避免误删文件

二、如果windows出现 Network Error -53报错,需检查windows到GlusterFS服务器2049端口是否可达,rpcbind服务是否正常
C:\Users\fooadmin>mount -o anon 10.10.10.10:/share/ z:
Network Error - 53
Type 'NET HELPMSG 53' for more information.
三、windows默认未打开NFS读写权限 ,打开读写权限参考文章尾部 IBM Support 网站步骤
Open a command prompt with administrative rights. Run the following command:
For IBM Docs:
umount –f W:
umount –f Y:
For Document Format Conversion:
umount –f W:
umount –f Y:Copier
Run:
nfsadmin client stop
Open Regedit and navigate to the following branch:
HKEY_LOCAL_MACHINE\SOFTWARE\Microsoft\ClientForNFS\CurrentVersion\Default
In the main window, right-click and select New > DWORD 32-bit Value. Set the name as AnonymousGID.
Right-click and select New > DWORD 32-bit Value again. Set the name as AnonymousUID.
Double-click on AnonymousGID and AnonymousUID, set the value as 0 and the base as Decimal respectively.
Click OK.
Close Regedit.
In the command prompt, run:
nfsadmin client start
Close the Windows Powershell Console.
Open a command prompt.
Run the following command in a command prompt (not Powershell) to set the NFS configuration:
nfsadmin client localhost config fileaccess=755 SecFlavors=+sys -krb5 -krb5i
Windows挂载Gluster复制卷
https://www.cnblogs.com/w787815/p/6888950.html
Windows_Server_2008_配置NFS服务器
https://wenku.baidu.com/view/c986f0bf5901020207409ce6.html
Windows_Server_2008_配置NFS服务器 IBM Support网站
https://www.ibm.com/support/knowledgecenter/en/SSFHJY_2.0.0/deploy/mount_the_nfs_share_on_windows_servers.html
Linux共享文件夹目录三种方法-NFS远程挂载,GlusterFS共享存储和samba共享目
https://www.freehao123.com/linux-gongxiang-nfs-guazai-glusterfs-s/