- LangChain中的向量数据库接口-Weaviate
洪城叮当
langchain数据库经验分享笔记交互人工智能知识图谱
文章目录前言一、原型定义二、代码解析1、add_texts方法1.1、应用样例2、from_texts方法2.1、应用样例3、similarity_search方法3.1、应用样例三、项目应用1、安装依赖2、引入依赖3、创建对象4、添加数据5、查询数据总结前言 Weaviate是一个开源的向量数据库,支持存储来自各类机器学习模型的数据对象和向量嵌入,并能无缝扩展至数十亿数据对象。它提供存储文档嵌
- Python的科学计算库NumPy(一)
linlin_1998
pythonnumpy开发语言
NumPy(NumericalPython)是Python中最基础、最重要的科学计算库之一,提供了高性能的多维数组(ndarray)对象和大量数学函数,是许多数据科学、机器学习库(如Pandas、SciPy、TensorFlow等)的基础依赖。1.创建一个numpy里面的一维数组importnumpyasnp###通过array方法创建一个ndarrayarray1=np.array([1,2,3
- 微算法科技的前沿探索:量子机器学习算法在视觉任务中的革新应用
MicroTech2025
量子计算算法
在信息技术飞速发展的今天,计算机视觉作为人工智能领域的重要分支,正逐步渗透到我们生活的方方面面。从自动驾驶到人脸识别,从医疗影像分析到安防监控,计算机视觉技术展现了巨大的应用潜力。然而,随着视觉任务复杂度的不断提升,传统机器学习算法在处理大规模、高维度数据时遇到了计算瓶颈。在此背景下,量子计算作为一种颠覆性的计算模式,以其独特的并行处理能力和指数级增长的计算空间,为解决这一难题提供了新的思路。微算
- 在mac m1基于llama.cpp运行deepseek
lama.cpp是一个高效的机器学习推理库,目标是在各种硬件上实现LLM推断,保持最小设置和最先进性能。llama.cpp支持1.5位、2位、3位、4位、5位、6位和8位整数量化,通过ARMNEON、Accelerate和Metal支持Apple芯片,使得在MACM1处理器上运行Deepseek大模型成为可能。1下载llama.cppgitclonehttps://github.com/ggerg
- 【机器学习笔记Ⅰ】9 特征缩放
巴伦是只猫
机器学习机器学习笔记人工智能
特征缩放(FeatureScaling)详解特征缩放是机器学习数据预处理的关键步骤,旨在将不同特征的数值范围统一到相近的尺度,从而加速模型训练、提升性能并避免某些特征主导模型。1.为什么需要特征缩放?(1)问题背景量纲不一致:例如:特征1:年龄(范围0-100)特征2:收入(范围0-1,000,000)梯度下降的困境:量纲大的特征(如收入)会导致梯度更新方向偏离最优路径,收敛缓慢。量纲小的特征(如
- 深度学习实战-使用TensorFlow与Keras构建智能模型
程序员Gloria
Python超入门TensorFlowpython
深度学习实战-使用TensorFlow与Keras构建智能模型深度学习已经成为现代人工智能的重要组成部分,而Python则是实现深度学习的主要编程语言之一。本文将探讨如何使用TensorFlow和Keras构建深度学习模型,包括必要的代码实例和详细的解析。1.深度学习简介深度学习是机器学习的一个分支,使用多层神经网络来学习和表示数据中的复杂模式。其广泛应用于图像识别、自然语言处理、推荐系统等领域。
- 【大模型与机器学习解惑】什么是A/B测试,为何进行A/B测试?
以下内容将围绕机器学习中的A/B测试展开,从概念与背景到实施细节、示例代码、优化思路和未来建议,并在最后给出一个整体的“输出目录”供参考。目录什么是机器学习的A/B测试为何要进行A/B测试A/B测试的实施流程示例代码与详细解释优化方向与未来建议结语1.什么是机器学习的A/B测试A/B测试(也常被称作对照试验、SplitTest)最早多用于互联网产品的功能或界面迭代中,指的是将用户或样本随机分为两组
- 详解LLMOps,将DevOps用于大语言模型开发
大家好,在机器学习领域,随着技术的不断发展,将大型语言模型(LLMs)集成到商业产品中已成为一种趋势,同时也带来了许多挑战。为了有效应对这些挑战,数据科学家们转向了一种新型的DevOps实践LLM-OPS,专为大型语言模型的开发和维护而设计。本文将介绍LLM-OPS的核心思想,并分析这一策略如何帮助数据科学家更高效地运用DevOps的优秀实践,从而在语言模型的开发和部署过程中,提升工作效率和成果的
- 搜广推校招面经九十一
美团机器学习/数据挖掘算法工程师_二面一、介绍一下ESMM模型,是否有进行过函数推导传统的转化率建模方式:只用发生点击(click=1)的样本来训练CVR模型。CVR定义如下:CVR=P(y=1∣x,z=1)CVR=P(y=1|x,z=1)CVR=P(y=1∣x,z=1)y=1表示用户发生了转化(如购买)z=1表示用户点击了广告这样做的问题:样本选择偏差(SampleSelectionBias,S
- python 计算生态概览的概述
文章目录前言python计算生态库的介绍1.网络爬虫2.数据分析3.文本处理4.数据可视化5.机器学习6.图形用户界面7.游戏开发8.网络应用开发前言python计算生态概览的解释Python计算生态概览是对Python作为一门强大而广泛使用的编程语言所拥有的庞大软件集合的整体描述和概述。这个生态体系不仅包含了Python的标准库(stdlib),即随Python解释器安装的基本模块,还涵盖了极其
- Google机器学习实践指南(模型预测偏差)
AI_Auto
人工智能机器学习人工智能
Google机器学习(31)-模型预测偏差预测偏差:模型为何总是"猜不准"的真相揭秘你的模型预测准确率高达95%,却总是与实际情况差那么一点点?这可能是预测偏差在作祟!本文将带你深入探索这个被忽视的模型"隐形杀手"。一、什么是预测偏差?一个生活化案例想象一下,你网购了一个智能体重秤,连续一周称重显示都是60kg。但你去健身房用专业设备测量,实际是62kg。这种系统性的测量偏差,就是预测偏差在现实中
- 【机器学习|学习笔记】用 Python 结合 graphviz 生成 ID3、C4.5、CART 三种决策树的结构示意图。
【机器学习|学习笔记】用Python结合graphviz生成ID3、C4.5、CART三种决策树的结构示意图【机器学习|学习笔记】用Python结合graphviz生成ID3、C4.5、CART三种决策树的结构示意图文章目录【机器学习|学习笔记】用Python结合graphviz生成ID3、C4.5、CART三种决策树的结构示意图用Python结合graphviz生成ID3、C4.5、CART三种
- 智能产品经理的核心能力
AI天才研究院
AgenticAI实战AI人工智能与大数据AI大模型企业级应用开发实战计算科学神经计算深度学习神经网络大数据人工智能大型语言模型AIAGILLMJavaPython架构设计AgentRPA
智能产品经理的核心能力1.背景介绍在当今快节奏的数字时代,产品经理扮演着至关重要的角色,他们负责确保产品满足用户需求,实现商业目标,并保持竞争优势。随着人工智能(AI)和机器学习(ML)技术的不断发展,智能产品经理的概念应运而生。智能产品经理需要将传统的产品管理技能与新兴技术相结合,以创建具有创新性和智能化的产品体验。智能产品不仅需要满足功能需求,还需要提供个性化、智能化和无缝的用户体验。这对产品
- 使用Python进行机器学习入门指南
软考和人工智能学堂
Python开发经验python机器学习开发语言
使用Python进行机器学习入门指南机器学习(MachineLearning)是人工智能(ArtificialIntelligence,AI)的一个重要分支,旨在通过算法和统计模型,使计算机系统能够自动从数据中学习和改进。Python作为机器学习领域的主流编程语言,提供了丰富的库和工具来实现各种机器学习任务。本文将介绍如何使用Python进行机器学习,包括基本概念、常用库以及一个实战项目示例。目录
- 【亲测免费】 CatBoost 教程项目使用指南
CatBoost教程项目使用指南tutorials项目地址:https://gitcode.com/gh_mirrors/tutorials1/tutorials1.项目介绍CatBoost是一个高效、灵活且易于使用的梯度提升库,特别适用于处理分类特征。它由Yandex开发,广泛应用于机器学习和数据科学领域。CatBoost提供了丰富的功能,包括自动处理分类特征、支持GPU训练、内置的交叉验证和模
- Python自动化机器学习平台库之mindsdb使用详解
概要MindsDB是一个开源的自动化机器学习平台,它通过SQL接口简化了机器学习模型的创建、训练和预测过程。该库的核心理念是将机器学习功能直接集成到数据库中,让开发者无需深入了解复杂的机器学习算法,就能够快速构建和部署预测模型。MindsDB支持多种数据源连接,包括MySQL、PostgreSQL、MongoDB等主流数据库,同时提供了丰富的PythonAPI接口,使得数据科学家和开发者能够在熟悉
- 堡垒机操作行为异常检测的机器学习算法应用
一、传统检测模式的困境与机器学习的破局价值在数字化转型浪潮中,堡垒机作为运维安全的核心防线,面临着操作行为复杂度激增与检测能力滞后的双重挑战。传统检测手段主要依赖静态规则库与统计模型,存在三大致命缺陷:规则固化与误报泛滥:某金融机构曾因规则库未及时更新,导致运维人员正常批量操作被误判为“暴力破解”,单日误报量超2000次,消耗安全团队60%的精力。动态行为适应性弱:微服务架构下,运维人员访问路径呈
- 最全 自动驾驶数据集 (11/4号已更新)
数据猎手小k
自动驾驶人工智能机器学习
自动驾驶是一个快速发展的行业,它融合了人工智能、机器学习、传感器技术、高精度地图和先进的计算平台等多种技术。技术方面,自动驾驶汽车依赖于先进的传感器、如激光雷达、摄像头、毫米波雷达等,以及强大的计算平台来处理大量数据,自动驾驶数据集是训练和验证自动驾驶系统的关键资源,它提供了丰富的场景和条件,使算法能够学习和适应复杂的真实世界驾驶环境。一、研究背景自动驾驶技术的发展需要大量的数据来训练和优化算法,
- 机器学习深度学习驱动在光子学设计中的应用与未来【专题培训会议邀您共探科技前沿】
软研科技
信息与通信信号处理量子计算人工智能
一、背景介绍在智能科技飞速发展的今天,光子学设计与智能算法的结合正成为科研创新的热点。深度学习、机器学习等算法在光子器件的逆向设计、超构表面材料设计、光学神经网络构建等方面展现出巨大潜力。二、会议亮点由北京软研国际信息技术研究院主办的“智能算法驱动的光子学设计与应用”专题培训会议,将深入探讨以下核心内容:光子器件的逆向设计:利用深度学习优化多参数光子器件设计。超构表面与超材料设计:智能算法在新型光
- 机器学习与光子学的融合正重塑光学器件设计范式
m0_75133639
光电智能电视二维材料电子半导体人工智能顶刊nature
Nature/Science最新研究表明,该交叉领域聚焦六大前沿方向:光子器件逆向设计、超构材料智能优化、光子神经网络加速器、非线性光学芯片开发、多任务协同优化及光谱智能预测。系统掌握该领域需构建四维知识体系:1、基础融合——从空间/集成光学系统切入,解析机器学习赋能光学的理论必然性,涵盖光学神经网络构建原理2、逆向设计革命——通过AnsysOptics实战,掌握FDTD算法与粒子群/拓扑优化技术
- AI模型训练新范式:基于同态加密的隐私保护方案
AIGC应用创新大全
人工智能同态加密区块链ai
AI模型训练新范式:基于同态加密的隐私保护方案技术解析关键词同态加密(HomomorphicEncryption)、隐私保护机器学习(PPML)、全同态加密(FHE)、安全多方计算(MPC)、加密数据训练摘要本报告系统解析基于同态加密的AI模型训练新范式,覆盖从理论基础到工程实践的全生命周期。首先通过第一性原理推导同态加密的数学本质,对比传统隐私保护技术的局限性;其次构建“加密-训练-解密”全流程
- 量子机器学习入门:从理论到实践
量子机器学习入门:从理论基石到实践路径元数据框架标题量子机器学习入门:从理论基石到实践路径——连接量子计算与人工智能的未来桥梁关键词量子计算;机器学习;量子算法;量子神经网络;Qiskit;PennyLane;量子变分算法摘要量子机器学习(QuantumMachineLearning,QML)是量子计算与机器学习的交叉领域,通过量子计算的叠加态、纠缠和并行性解决传统机器学习的计算瓶颈(如高维数据处
- 全球人工智能与机器学习大会PPT
a flying bird
论文解读和大咖技术号记录人工智能
大会演讲PPT合集https://ppt.infoq.cn/list/93PPT分享|ppt|人工智能|aicon|infoq|机器学习PPT分享,前段时间的AICon北京站2021全球人工智能与机器学习大会(https://aicon.infoq.cn/2021/beijing),汇集了很多业界大佬,工业界多个方向的从业人员分享了他们在实际业……https://xw.qq.com/cmsid/2
- 人工智能基础知识PPT课件
智慧化智能化数字化方案
方案解读馆人工智能入门人工智能学习人工智能课件人工智能PPT
人工智能基础知识定义与概念:人工智能是研究、开发用于模拟、延伸和扩展人类智能行为的综合性科学,其目的是让计算机系统具备执行人类智能任务的能力。涉及计算机科学、数学等多学科,研究对象是让系统具备智能,智能包括认知、适应和自主能力等维度。学派与方法学派:有符号主义、联结主义、行为主义等学派,分别从不同角度研究人工智能。方法:包括基于知识、学习和仿生的方法,如专家系统、机器学习、深度学习等。分类与发展分
- 数据挖掘:从理论到实践的深度探索
代码老y
数据挖掘人工智能
在当今数字化时代,数据已经成为企业决策的重要依据。数据挖掘作为一门从大量数据中提取有价值信息的技术,已经广泛应用于各个领域,如金融、医疗、零售、互联网等。本文将深入探讨数据挖掘的基本概念、主要技术和实际应用案例,帮助读者更好地理解数据挖掘的价值和应用。一、数据挖掘的基本概念(一)数据挖掘的定义数据挖掘(DataMining)是从大量数据中提取有用信息的过程。它结合了统计学、机器学习、数据库技术和人
- 开发智能化的企业并购风险评估模型
开发智能化的企业并购风险评估模型关键词:企业并购、风险评估、人工智能、机器学习、深度学习、数学建模摘要:本文详细探讨了开发智能化企业并购风险评估模型的背景、核心概念、算法原理、系统架构设计以及项目实战。通过结合机器学习和深度学习技术,提出了一种基于数据驱动的智能化风险评估方法,旨在帮助企业更准确地识别和预测并购过程中的潜在风险,提升决策的科学性和有效性。第1章:企业并购风险评估模型的背景与问题描述
- 机器学习手写字体识别系统:技术演进与应用实践
万能小贤哥
机器学习人工智能
引言:手写字体识别的技术定位与价值在信息处理领域,人工录入手写文本的低效性与机器识别的高效性形成鲜明对比。例如,医疗处方的人工处理需约5分钟/张,而采用手写字体识别技术可将时间缩短至10秒/张,显著提升处理效率。作为计算机视觉与人工智能的重要分支,手写字体识别技术通过将手写文本转换为可编辑电子文本,不仅大幅减少人工输入时间和错误,降低人工处理成本,还能在大量数据处理时保持高于人工录入的准确性,是人
- 机器学习算法:核心原理与前沿发展综述
fmvrj34202
机器学习算法人工智能
机器学习算法作为人工智能的核心驱动力,正在重塑我们解决问题的范式。本文将系统性地探讨机器学习算法的分类体系、数学基础、优化方法以及最新发展趋势,为从业者提供技术参考。一、算法分类体系根据学习范式,机器学习算法可分为三大类:监督学习:基于标注数据的建模方法线性回归:最小化平方误差的闭式解θ=(XᵀX)⁻¹Xᵀy支持向量机:通过核技巧实现非线性分类,优化目标为max(0,1-yᵢ(w·xᵢ+b))决策
- 「日拱一码」020 机器学习——数据处理
胖达不服输
「日拱一码」机器学习人工智能数据处理python
目录数据清洗缺失值处理删除缺失值:填充缺失值:重复值处理检测重复值处理重复值异常值处理Z-score方法IQR方法(四分位距)数据一致性检查数据转换规范化(归一化)Min-Max归一化MaxAbsScaler标准化离散化等宽离散化等频离散化数据清洗数据清洗是数据处理的第一步,目的是去除噪声数据、处理缺失值和异常值,使数据更加干净、可用缺失值处理删除缺失值:如果数据集中缺失值较少,可以直接删除包含缺
- 机器学习每周挑战——二手车车辆信息&交易售价数据
梦想成为一名机器学习高手
机器学习python人工智能
这是数据集的截图目录背景描述数据说明车型对照:燃料类型对照:老规矩,第一步先导入用到的库第二步,读入数据:第三步,数据预处理第四步:对数据的分析第五步:模型建立前的准备工作第六步:多元线性回归模型的建立第七步:随机森林模型的建立问题:背景描述本数据爬取自印度最大的二手车交易平台CARS24,包含8000+该平台上交易车辆的关键评估信息。CARS24成立于2015年,总部位于印度古尔冈,是一个在印度
- [黑洞与暗粒子]没有光的世界
comsci
无论是相对论还是其它现代物理学,都显然有个缺陷,那就是必须有光才能够计算
但是,我相信,在我们的世界和宇宙平面中,肯定存在没有光的世界....
那么,在没有光的世界,光子和其它粒子的规律无法被应用和考察,那么以光速为核心的
&nbs
- jQuery Lazy Load 图片延迟加载
aijuans
jquery
基于 jQuery 的图片延迟加载插件,在用户滚动页面到图片之后才进行加载。
对于有较多的图片的网页,使用图片延迟加载,能有效的提高页面加载速度。
版本:
jQuery v1.4.4+
jQuery Lazy Load v1.7.2
注意事项:
需要真正实现图片延迟加载,必须将真实图片地址写在 data-original 属性中。若 src
- 使用Jodd的优点
Kai_Ge
jodd
1. 简化和统一 controller ,抛弃 extends SimpleFormController ,统一使用 implements Controller 的方式。
2. 简化 JSP 页面的 bind, 不需要一个字段一个字段的绑定。
3. 对 bean 没有任何要求,可以使用任意的 bean 做为 formBean。
使用方法简介
- jpa Query转hibernate Query
120153216
Hibernate
public List<Map> getMapList(String hql,
Map map) {
org.hibernate.Query jpaQuery = entityManager.createQuery(hql);
if (null != map) {
for (String parameter : map.keySet()) {
jp
- Django_Python3添加MySQL/MariaDB支持
2002wmj
mariaDB
现状
首先,
[email protected] 中默认的引擎为 django.db.backends.mysql 。但是在Python3中如果这样写的话,会发现 django.db.backends.mysql 依赖 MySQLdb[5] ,而 MySQLdb 又不兼容 Python3 于是要找一种新的方式来继续使用MySQL。 MySQL官方的方案
首先据MySQL文档[3]说,自从MySQL
- 在SQLSERVER中查找消耗IO最多的SQL
357029540
SQL Server
返回做IO数目最多的50条语句以及它们的执行计划。
select top 50
(total_logical_reads/execution_count) as avg_logical_reads,
(total_logical_writes/execution_count) as avg_logical_writes,
(tot
- spring UnChecked 异常 官方定义!
7454103
spring
如果你接触过spring的 事物管理!那么你必须明白 spring的 非捕获异常! 即 unchecked 异常! 因为 spring 默认这类异常事物自动回滚!!
public static boolean isCheckedException(Throwable ex)
{
return !(ex instanceof RuntimeExcep
- mongoDB 入门指南、示例
adminjun
javamongodb操作
一、准备工作
1、 下载mongoDB
下载地址:http://www.mongodb.org/downloads
选择合适你的版本
相关文档:http://www.mongodb.org/display/DOCS/Tutorial
2、 安装mongoDB
A、 不解压模式:
将下载下来的mongoDB-xxx.zip打开,找到bin目录,运行mongod.exe就可以启动服务,默
- CUDA 5 Release Candidate Now Available
aijuans
CUDA
The CUDA 5 Release Candidate is now available at http://developer.nvidia.com/<wbr></wbr>cuda/cuda-pre-production. Now applicable to a broader set of algorithms, CUDA 5 has advanced fe
- Essential Studio for WinRT网格控件测评
Axiba
JavaScripthtml5
Essential Studio for WinRT界面控件包含了商业平板应用程序开发中所需的所有控件,如市场上运行速度最快的grid 和chart、地图、RDL报表查看器、丰富的文本查看器及图表等等。同时,该控件还包含了一组独特的库,用于从WinRT应用程序中生成Excel、Word以及PDF格式的文件。此文将对其另外一个强大的控件——网格控件进行专门的测评详述。
网格控件功能
1、
- java 获取windows系统安装的证书或证书链
bewithme
windows
有时需要获取windows系统安装的证书或证书链,比如说你要通过证书来创建java的密钥库 。
有关证书链的解释可以查看此处 。
public static void main(String[] args) {
SunMSCAPI providerMSCAPI = new SunMSCAPI();
S
- NoSQL数据库之Redis数据库管理(set类型和zset类型)
bijian1013
redis数据库NoSQL
4.sets类型
Set是集合,它是string类型的无序集合。set是通过hash table实现的,添加、删除和查找的复杂度都是O(1)。对集合我们可以取并集、交集、差集。通过这些操作我们可以实现sns中的好友推荐和blog的tag功能。
sadd:向名称为key的set中添加元
- 异常捕获何时用Exception,何时用Throwable
bingyingao
用Exception的情况
try {
//可能发生空指针、数组溢出等异常
} catch (Exception e) {
- 【Kafka四】Kakfa伪分布式安装
bit1129
kafka
在http://bit1129.iteye.com/blog/2174791一文中,实现了单Kafka服务器的安装,在Kafka中,每个Kafka服务器称为一个broker。本文简单介绍下,在单机环境下Kafka的伪分布式安装和测试验证 1. 安装步骤
Kafka伪分布式安装的思路跟Zookeeper的伪分布式安装思路完全一样,不过比Zookeeper稍微简单些(不
- Project Euler
bookjovi
haskell
Project Euler是个数学问题求解网站,网站设计的很有意思,有很多problem,在未提交正确答案前不能查看problem的overview,也不能查看关于problem的discussion thread,只能看到现在problem已经被多少人解决了,人数越多往往代表问题越容易。
看看problem 1吧:
Add all the natural num
- Java-Collections Framework学习与总结-ArrayDeque
BrokenDreams
Collections
表、栈和队列是三种基本的数据结构,前面总结的ArrayList和LinkedList可以作为任意一种数据结构来使用,当然由于实现方式的不同,操作的效率也会不同。
这篇要看一下java.util.ArrayDeque。从命名上看
- 读《研磨设计模式》-代码笔记-装饰模式-Decorator
bylijinnan
java设计模式
声明: 本文只为方便我个人查阅和理解,详细的分析以及源代码请移步 原作者的博客http://chjavach.iteye.com/
import java.io.BufferedOutputStream;
import java.io.DataOutputStream;
import java.io.FileOutputStream;
import java.io.Fi
- Maven学习(一)
chenyu19891124
Maven私服
学习一门技术和工具总得花费一段时间,5月底6月初自己学习了一些工具,maven+Hudson+nexus的搭建,对于maven以前只是听说,顺便再自己的电脑上搭建了一个maven环境,但是完全不了解maven这一强大的构建工具,还有ant也是一个构建工具,但ant就没有maven那么的简单方便,其实简单点说maven是一个运用命令行就能完成构建,测试,打包,发布一系列功
- [原创]JWFD工作流引擎设计----节点匹配搜索算法(用于初步解决条件异步汇聚问题) 补充
comsci
算法工作PHP搜索引擎嵌入式
本文主要介绍在JWFD工作流引擎设计中遇到的一个实际问题的解决方案,请参考我的博文"带条件选择的并行汇聚路由问题"中图例A2描述的情况(http://comsci.iteye.com/blog/339756),我现在把我对图例A2的一个解决方案公布出来,请大家多指点
节点匹配搜索算法(用于解决标准对称流程图条件汇聚点运行控制参数的算法)
需要解决的问题:已知分支
- Linux中用shell获取昨天、明天或多天前的日期
daizj
linuxshell上几年昨天获取上几个月
在Linux中可以通过date命令获取昨天、明天、上个月、下个月、上一年和下一年
# 获取昨天
date -d 'yesterday' # 或 date -d 'last day'
# 获取明天
date -d 'tomorrow' # 或 date -d 'next day'
# 获取上个月
date -d 'last month'
#
- 我所理解的云计算
dongwei_6688
云计算
在刚开始接触到一个概念时,人们往往都会去探寻这个概念的含义,以达到对其有一个感性的认知,在Wikipedia上关于“云计算”是这么定义的,它说:
Cloud computing is a phrase used to describe a variety of computing co
- YII CMenu配置
dcj3sjt126com
yii
Adding id and class names to CMenu
We use the id and htmlOptions to accomplish this. Watch.
//in your view
$this->widget('zii.widgets.CMenu', array(
'id'=>'myMenu',
'items'=>$this-&g
- 设计模式之静态代理与动态代理
come_for_dream
设计模式
静态代理与动态代理
代理模式是java开发中用到的相对比较多的设计模式,其中的思想就是主业务和相关业务分离。所谓的代理设计就是指由一个代理主题来操作真实主题,真实主题执行具体的业务操作,而代理主题负责其他相关业务的处理。比如我们在进行删除操作的时候需要检验一下用户是否登陆,我们可以删除看成主业务,而把检验用户是否登陆看成其相关业务
- 【转】理解Javascript 系列
gcc2ge
JavaScript
理解Javascript_13_执行模型详解
摘要: 在《理解Javascript_12_执行模型浅析》一文中,我们初步的了解了执行上下文与作用域的概念,那么这一篇将深入分析执行上下文的构建过程,了解执行上下文、函数对象、作用域三者之间的关系。函数执行环境简单的代码:当调用say方法时,第一步是创建其执行环境,在创建执行环境的过程中,会按照定义的先后顺序完成一系列操作:1.首先会创建一个
- Subsets II
hcx2013
set
Given a collection of integers that might contain duplicates, nums, return all possible subsets.
Note:
Elements in a subset must be in non-descending order.
The solution set must not conta
- Spring4.1新特性——Spring缓存框架增强
jinnianshilongnian
spring4
目录
Spring4.1新特性——综述
Spring4.1新特性——Spring核心部分及其他
Spring4.1新特性——Spring缓存框架增强
Spring4.1新特性——异步调用和事件机制的异常处理
Spring4.1新特性——数据库集成测试脚本初始化
Spring4.1新特性——Spring MVC增强
Spring4.1新特性——页面自动化测试框架Spring MVC T
- shell嵌套expect执行命令
liyonghui160com
一直都想把expect的操作写到bash脚本里,这样就不用我再写两个脚本来执行了,搞了一下午终于有点小成就,给大家看看吧.
系统:centos 5.x
1.先安装expect
yum -y install expect
2.脚本内容:
cat auto_svn.sh
#!/bin/bash
- Linux实用命令整理
pda158
linux
0. 基本命令 linux 基本命令整理
1. 压缩 解压 tar -zcvf a.tar.gz a #把a压缩成a.tar.gz tar -zxvf a.tar.gz #把a.tar.gz解压成a
2. vim小结 2.1 vim替换 :m,ns/word_1/word_2/gc
- 独立开发人员通向成功的29个小贴士
shoothao
独立开发
概述:本文收集了关于独立开发人员通向成功需要注意的一些东西,对于具体的每个贴士的注解有兴趣的朋友可以查看下面标注的原文地址。
明白你从事独立开发的原因和目的。
保持坚持制定计划的好习惯。
万事开头难,第一份订单是关键。
培养多元化业务技能。
提供卓越的服务和品质。
谨小慎微。
营销是必备技能。
学会组织,有条理的工作才是最有效率的。
“独立
- JAVA中堆栈和内存分配原理
uule
java
1、栈、堆
1.寄存器:最快的存储区, 由编译器根据需求进行分配,我们在程序中无法控制.2. 栈:存放基本类型的变量数据和对象的引用,但对象本身不存放在栈中,而是存放在堆(new 出来的对象)或者常量池中(字符串常量对象存放在常量池中。)3. 堆:存放所有new出来的对象。4. 静态域:存放静态成员(static定义的)5. 常量池:存放字符串常量和基本类型常量(public static f
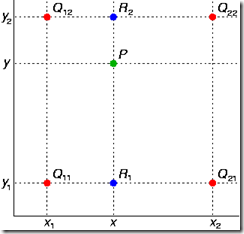
![]() 的四个已知点坐标分别为 (0, 0)、(0, 1)、(1, 0) 和 (1, 1),那么插值公式就可以化简为
的四个已知点坐标分别为 (0, 0)、(0, 1)、(1, 0) 和 (1, 1),那么插值公式就可以化简为![]()
![]()
