【目标检测】YOLOv2代码实现之TensorFlow
文章目录
- 一.代码资源下载:
- 二、源码解析
- 2.1 yolo2_data文件夹
- 2.2 yolo2_model文件夹
- 2.3 config.py
- 2.4 decode.py
- 2.5 Loss.py
- 2.6 main.py
- 2.7model_darknet19.py
- 2.8utils.py
一.代码资源下载:
1.代码下载:https://github.com/KOD-Chen/YOLOv2-Tensorflow
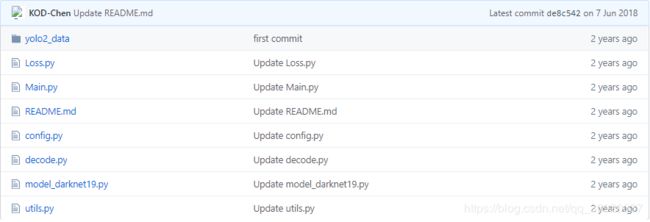
2.模型下载:https://pan.baidu.com/s/1ZeT5HerjQxyUZ_L9d3X52w
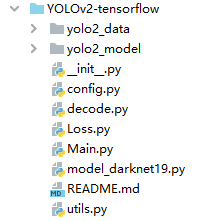
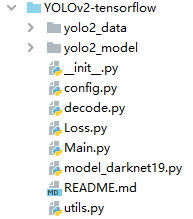
3.打开下载的项目,并新建文件夹yolo2_model
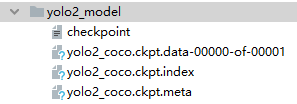
4.将下载好的模型放入yolo2_model
文件夹下。
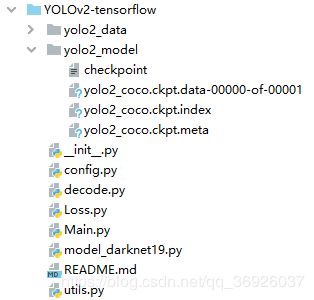
5.一些改动:
1)将项目转变为sources root
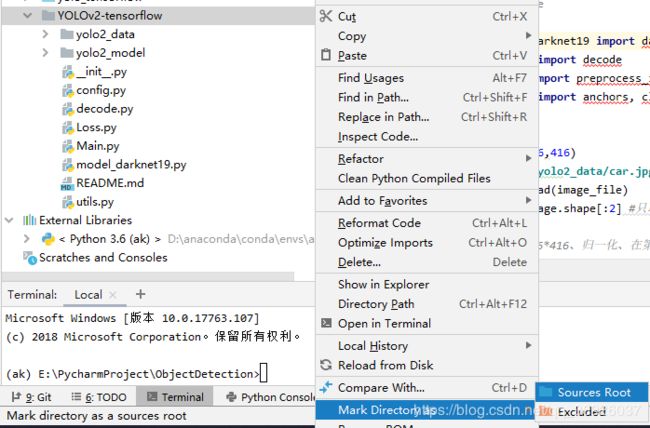
2)修改main.py


二、源码解析
2.1 yolo2_data文件夹
2.2 yolo2_model文件夹
2.3 config.py
配置信息
#anchor boxes的尺寸
anchors = [[0.57273, 0.677385],
           [1.87446, 2.06253],
           [3.33843, 5.47434],
           [7.88282, 3.52778],
           [9.77052, 9.16828]]
#coco数据集的80个classes类别名称
def read_coco_labels():
    f = open("./yolo2_data/coco_classes.txt")
    class_names = []
    for l in f.readlines():
        l = l.strip() # 去掉回车'\n'
        class_names.append(l)#将类别一个一个读入列表
    return class_names

class_names = read_coco_labels()#class_names为数据集的80个类别名组成的列表
2.4 decode.py
解码darknet19网络的特征图,得到边界框信息,置信度以及类别概率。
import tensorflow as tf
#本py文件,将darknet的输出即特征图,转化为预测的边界框信息:(边界框左上即右下坐标,置信度,类别概率)

def decode(model_output,output_sizes=(13,13),num_class=80,anchors=None):
	'''
	 model_output:darknet19网络输出的特征图
	 output_sizes:darknet19网络输出的特征图大小,默认是13*13(输入416*416,下采样32)
	'''
	H, W = output_sizes
	num_anchors = len(anchors) # 这里的anchor是在configs文件中设置的,论文中的anchor boxes是通过dimension cluster得到的,这里做出了简化
	anchors = tf.constant(anchors, dtype=tf.float32)  # 将传入的anchors转变成tf格式的常量列表


	'''将darknet19网络的输出进行处理:张量(批量大小,图征图高,特征图宽,anchor box数量,边界框信息+置信度+类别)'''
	# 将darknet最后一层卷积输出的特征图进行reshape得到张量: 13*13*num_anchors*(num_class+5),第一个维度自适应batchsize
	##张量:(批量大小,图征图高,特征图宽,anchor box数量,边界框信息+置信度+类别)即(-1,13,13,num_anchors,4+1+80)
	detection_result = tf.reshape(model_output , [-1,H*W,num_anchors,num_class+5])


	'''将darknet19网络的输出转化为预测信息  ——  边界框偏移量、置信度、类别概率'''
	xy_offset = tf.nn.sigmoid(detection_result[:,:,:,0:2]) # 中心坐标相对于该cell左上角的偏置,sigmoid函数归一化到0-1
	wh_offset = tf.exp(detection_result[:,:,:,2:4]) #相对于anchor box的高和宽偏置
	obj_probs = tf.nn.sigmoid(detection_result[:,:,:,4]) # 置信度,sigmoid函数归一化到0-1
	class_probs = tf.nn.softmax(detection_result[:,:,:,5:]) # 类别'得分',用softmax转变成类别概率

	# 构建特征图每个cell的左上角的xy坐标
	height_index = tf.range(H,dtype=tf.float32) # range(0,13)
	width_index = tf.range(W,dtype=tf.float32) # range(0,13)
	#用法: [A,B]=Meshgrid(a,b),生成size(b)Xsize(a)大小的矩阵A和B。
	# 它相当于a从一行重复增加到size(b)行,把b转置成一列再重复增加到size(a)列
	# 变成x_cell=[[0,1,...,12],...,[0,1,...,12]]和y_cell=[[0,0,...,0],[1,...,1]...,[12,...,12]]
	x_cell,y_cell = tf.meshgrid(height_index,width_index)
	x_cell = tf.reshape(x_cell,[1,-1,1]) # 和上面[H*W,num_anchors,num_class+5]对应
	y_cell = tf.reshape(y_cell,[1,-1,1])

	'''将预测的边界框转变为相对于整张图片的位置和大小:4个值均在0和1之间'''
	bbox_x = (x_cell + xy_offset[:,:,:,0]) / W
	bbox_y = (y_cell + xy_offset[:,:,:,1]) / H
	bbox_w = (anchors[:,0] * wh_offset[:,:,:,0]) / W
	bbox_h = (anchors[:,1] * wh_offset[:,:,:,1]) / H


	# 中心坐标+宽高box(x,y,w,h) -> xmin=x-w/2 -> 左上+右下box(xmin,ymin,xmax,ymax)
	'''将边界框由(中心x,中心y,w,h)表示,转换为(左上x,左上y,右下x,右下y)表示'''
	bboxes = tf.stack([bbox_x-bbox_w/2, bbox_y-bbox_h/2,
					   bbox_x+bbox_w/2, bbox_y+bbox_h/2], axis=3)

	return bboxes, obj_probs, class_probs#返回边界框左上和右下坐标,置信度信息,类别预测信息
2.5 Loss.py
损失函数计算,由于本项目只是yolov2的检测实现,使用预训练好的模型,因此不包含网络训练,不需要使用loss函数,此部分只是有助于理解损失函数。
import numpy as np
import tensorflow as tf

def compute_loss(predictions,targets,anchors,scales,num_classes=20,output_size=(13,13)):
    '''
    :param predictions: 预测边框
    :param targets: 真值框
    :param anchors: anchor box列表,列表中的每一个元素包含一个anchor box的高和宽
    :param scales:
    :param num_classes: 类别的数量
    :param output_size: darknet网络输出特征图的尺寸
    :return:
    '''

    W,H = output_size#darknet输出特征图的尺寸
    C = num_classes#类别数量


    B = len(anchors)#anchor box的数量
    anchors = tf.constant(anchors,dtype=tf.float32)#将anchor box转变为tf的常量
    anchors = tf.reshape(anchors,[1,1,B,2]) # 存放anchors box的高和宽


    '''【1】真值框信息处理'''
    '''真值边界框:'''
    sprob,sconf,snoob,scoor = scales # loss不同部分的前面系数
    _coords = targets["coords"]  #真实坐标xywh
    _probs = targets["probs"]  # 类别概率——one hot形式,C维
    _confs = targets["confs"]  #置信度,每个边界框一个
    '''真值框转变为(左上x,左上y,右下x,右下y)的形式,计算真值框面积:'''
    # ground truth计算IOU-->_up_left, _down_right
    _wh = tf.pow(_coords[:, :, :, 2:4], 2) * np.reshape([W, H], [1, 1, 1, 2])
    _areas = _wh[:, :, :, 0] * _wh[:, :, :, 1]#真值框的面积
    _centers = _coords[:, :, :, 0:2]#真值框的中心坐标
    _up_left, _down_right = _centers - (_wh * 0.5), _centers + (_wh * 0.5)#真值框的左上及右下坐标
    '''真值框信息汇总'''
    # ground truth汇总
    # tf.expand_dims((input, axis=None,)在第axis位置增加一个维度
    #tf.concat([tensor1, tensor2, tensor3,...], axis)
    truths = tf.concat([_coords, tf.expand_dims(_confs, -1), _probs], 3)#拼接张量的函数tf.concat()


    '''【2】预测边界框信息处理'''
    '''获取预测边界框的信息:此部分代码在decode.py文件中也有类似的代码'''
    # 将darknet19网络的输出进行处理:张量(批量大小,图征图高,特征图宽,anchor box数量,边界框信息+置信度+类别)
    predictions = tf.reshape(predictions,[-1,H,W,B,(5+C)])
    # 将darknet19网络的输出转化为预测信息  ——  边界框偏移量、置信度、类别概率
    coords = tf.reshape(predictions[:,:,:,:,0:4],[-1,H*W,B,4])
    coords_xy = tf.nn.sigmoid(coords[:,:,:,0:2]) # xy是相对于cell左上角的偏移量
    coords_wh = tf.sqrt(tf.exp(coords[:,:,:,2:4])*anchors/np.reshape([W,H],[1,1,1,2])) # 除以特征图的尺寸13,将高和宽解码成相对于整张图片的wh
    coords = tf.concat([coords_xy,coords_wh],axis=3) # [batch_size, H*W, B, 4]
    '''获取预测边界框的置信度'''
    confs = tf.nn.sigmoid(predictions[:,:,:,:,4])
    confs = tf.reshape(confs,[-1,H*W,B,1]) # 每个边界框一个置信度,每个cell有B个边界框
    '''获取预测边界框的类别概率'''
    probs = tf.nn.softmax(predictions[:,:,:,:,5:]) # 网络最后输出是"得分",通过softmax变成概率
    probs = tf.reshape(probs,[-1,H*W,B,C])
    '''预测边界框转变为(左上x,左上y,右下x,右下y)的形式,计算预测边界框面积:'''
    # prediction计算IOU-->up_left, down_right
    wh = tf.pow(coords[:, :, :, 2:4], 2) * np.reshape([W, H], [1, 1, 1, 2])
    areas = wh[:, :, :, 0] * wh[:, :, :, 1]
    centers = coords[:, :, :, 0:2]
    up_left, down_right = centers - (wh * 0.5), centers + (wh * 0.5)
    '''预测边界框信息汇总'''
    preds = tf.concat([coords,confs,probs],axis=3) # [-1, H*W, B, (4+1+C)]


    '''【3】计算真值框和预测边界框的IOU:'''
    # 计算IOU只考虑形状,先将anchor与ground truth的中心点都偏移到同一位置(cell左上角),然后计算出对应的IOU值。
    # ①IOU值最大的那个anchor与ground truth匹配,对应的预测框用来预测这个ground truth:计算xywh、置信度c(目标值为1)、类别概率p误差。
    # ②IOU小于某阈值的anchor对应的预测框:只计算置信度c(目标值为0)误差。
    # ③剩下IOU大于某阈值但不是max的anchor对应的预测框:丢弃,不计算任何误差。
    inter_upleft = tf.maximum(up_left, _up_left)#(预测框左上角,真值框左上角)
    inter_downright = tf.minimum(down_right, _down_right)#(预测框右下角,真值框右下角)
    inter_wh = tf.maximum(inter_downright - inter_upleft, 0.0)
    intersects = inter_wh[:, :, :, 0] * inter_wh[:, :, :, 1]
    ious = tf.truediv(intersects, areas + _areas - intersects)

    best_iou_mask = tf.equal(ious, tf.reduce_max(ious, axis=2, keep_dims=True))
    best_iou_mask = tf.cast(best_iou_mask, tf.float32)
    mask = best_iou_mask * _confs  # [-1, H*W, B]
    mask = tf.expand_dims(mask, -1)  # [-1, H*W, B, 1]

    # 【4】计算各项损失所占的比例权重weight
    confs_w = snoob * (1 - mask) + sconf * mask
    coords_w = scoor * mask
    probs_w = sprob * mask
    weights = tf.concat([coords_w, confs_w, probs_w], axis=3)

    # 【5】计算loss:ground truth汇总和prediction汇总均方差损失函数,再乘以相应的比例权重
    loss = tf.pow(preds - truths, 2) * weights
    loss = tf.reduce_sum(loss, axis=[1, 2, 3])
    loss = 0.5 * tf.reduce_mean(loss)

    return loss
2.6 main.py
本py文件使用预训练好的模型进行检测。
import tensorflow as tf
import cv2
from model_darknet19 import darknet
from decode import decode
from utils import preprocess_image, postprocess, draw_detection
from config import anchors, class_names

def main():
    input_size = (416,416)#设置输入图片的大小
    image_file = './yolo2_data/car.jpg'#图片路径
    image = cv2.imread(image_file)#读取图片
    image_shape = image.shape[:2] #只取wh,channel=3不取

    # 调用utils.py中的preprocess_image函数,对输入图片进行预处理:copy、resize至416*416、归一化、在第0维增加存放batchsize维度
    image_cp = preprocess_image(image,input_size)

    #设置输入的占位placeholder
    tf_image = tf.placeholder(tf.float32,[1,input_size[0],input_size[1],3])#s设置输入图像的占位placeholder

    '''【1】获取网络预测图片的所有边界框'''
    '''将图片输入darknet19网络,得到图片的特征图'''
    model_output = darknet(tf_image) # darknet19网络输出的特征图
    #图片的特征图大小:特征图是对原图下采样32倍得到的
    output_sizes = input_size[0]//32, input_size[1]//32 # 特征图尺寸是图片下采样32倍

    '''#特征图解码:调用decode.py的decode函数得到 边界框左上和右下坐标 、置信度、类别概率'''
    output_decoded = decode(model_output=model_output,output_sizes=output_sizes,num_class=len(class_names),anchors=anchors)  # 解码

    model_path = "./yolo2_model/yolo2_coco.ckpt"
    saver = tf.train.Saver()#TensorFlow通过tf.train.Saver类实现神经网络模型的保存和提取。tf.train.Saver() 模型保存和加载https://blog.csdn.net/qq_35290785/article/details/89646248
    with tf.Session() as sess:
        #模型的恢复用的是restore()函数,它需要两个参数restore(sess, save_path),
        # save_path指的是保存的模型路径。我们可以使用tf.train.latest_checkpoint()来自动获取最后一次保存的模型。如:
        saver.restore(sess,model_path)
        #获取边界框,置信度,类别概率信息
        bboxes,obj_probs,class_probs = sess.run(output_decoded,feed_dict={tf_image:image_cp})#将图片传入计算图


    '''【2】筛选网络预测的边界框——NMS(post process后期处理)'''
    #调用utils.py 的 postprocess函数进行非极大值抑制处理
    bboxes,scores,class_max_index = postprocess(bboxes,obj_probs,class_probs,image_shape=image_shape)

    '''【3】绘制筛选后的边界框'''
    #调用utils.py的draw_detection函数
    img_detection = draw_detection(image, bboxes, scores, class_max_index, class_names)
    cv2.imwrite("./yolo2_data/detection.jpg", img_detection)
    print('YOLO_v2 detection has done!')
    cv2.imshow("detection_results", img_detection)
    cv2.waitKey(0)

if __name__ == '__main__':
    main()
2.7model_darknet19.py
本py文件用来构建darknet网络,通过网络来对输入图像进行特征提取。
import tensorflow as tf
################# 基础层:conv/pool/reorg(带passthrough的重组层) #############################################
'''# 激活函数'''
def leaky_relu(x):
	return tf.nn.leaky_relu(x,alpha=0.1,name='leaky_relu') # 或者tf.maximum(0.1*x,x)

'''卷积+批量归一化层:yolo2中每个卷积层后面都有一个BN层'''
def conv2d(x,filters_num,filters_size,pad_size=0,stride=1,batch_normalize=True,
		   activation=leaky_relu,use_bias=False,name='conv2d'):
	# padding,注意: 不用padding="SAME",否则可能会导致坐标计算错误
	if pad_size > 0:
		x = tf.pad(x,[[0,0],[pad_size,pad_size],[pad_size,pad_size],[0,0]])#填充
	# 卷积层
	out = tf.layers.conv2d(x,filters=filters_num,kernel_size=filters_size,strides=stride,padding='VALID',activation=None,use_bias=use_bias,name=name)
	# 批量归一化:如果BN,将卷积层conv的输出进行批量归一化
	if batch_normalize:
		# 批量归一化层
		out = tf.layers.batch_normalization(out,axis=-1,momentum=0.9,training=False,name=name+'_bn')
	#将卷积层或者批量归一化后的输出进行激励函数处理
	if activation:
		out = activation(out)
	return out#此函数进行一次conv+BN处理,得到输出

'''最大池化层'''
def maxpool(x,size=2,stride=2,name='maxpool'):
	return tf.layers.max_pooling2d(x,pool_size=size,strides=stride)

'''透传层的数据准备:'''
# reorg layer(带passthrough的重组层)
def reorg(x,stride):
	#tf.space_to_depth(x,block_size=2)相当于在高和宽的方向上每隔(block_size-1)像素采样
	#将x特征图进行处理,使其能够与下层特征图进行拼接
	return tf.space_to_depth(x,block_size=stride)
#########################################################################################################


################################### Darknet19 ###########################################################
# 默认是coco数据集,最后一层维度是anchor_num*(class_num+5)=5*(80+5)=425
'''darknet网络构建'''
def darknet(images,n_last_channels=425):
	net = conv2d(images, filters_num=32, filters_size=3, pad_size=1, name='conv1')#调用自定义的conv+BN层
	net = maxpool(net, size=2, stride=2, name='pool1')

	net = conv2d(net, 64, 3, 1, name='conv2')
	net = maxpool(net, 2, 2, name='pool2')

	net = conv2d(net, 128, 3, 1, name='conv3_1')
	net = conv2d(net, 64, 1, 0, name='conv3_2')
	net = conv2d(net, 128, 3, 1, name='conv3_3')
	net = maxpool(net, 2, 2, name='pool3')

	net = conv2d(net, 256, 3, 1, name='conv4_1')
	net = conv2d(net, 128, 1, 0, name='conv4_2')
	net = conv2d(net, 256, 3, 1, name='conv4_3')
	net = maxpool(net, 2, 2, name='pool4')

	net = conv2d(net, 512, 3, 1, name='conv5_1')
	net = conv2d(net, 256, 1, 0,name='conv5_2')
	net = conv2d(net,512, 3, 1, name='conv5_3')
	net = conv2d(net, 256, 1, 0, name='conv5_4')
	net = conv2d(net, 512, 3, 1, name='conv5_5')


	'''透传层的特征图存储及处理'''
	shortcut = net # 存储这一层特征图,以便后面passthrough层
	# shortcut增加了一个中间卷积层,先采用64个1*1卷积核进行卷积,然后再进行passthrough处理
	# 这样26*26*512 -> 26*26*64 -> 13*13*256的特征图
	shortcut = conv2d(shortcut, 64, 1, 0, name='conv_shortcut')
	shortcut = reorg(shortcut, 2)#将透传层特征图由26*26*64转变为 13*13*256的特征图


	net = maxpool(net, 2, 2, name='pool5')
	net = conv2d(net, 1024, 3, 1, name='conv6_1')
	net = conv2d(net, 512, 1, 0, name='conv6_2')
	net = conv2d(net, 1024, 3, 1, name='conv6_3')
	net = conv2d(net, 512, 1, 0, name='conv6_4')
	net = conv2d(net, 1024, 3, 1, name='conv6_5')
	net = conv2d(net, 1024, 3, 1, name='conv7_1')
	net = conv2d(net, 1024, 3, 1, name='conv7_2')

	'''将透传层处理后的特征图和net特征图进行拼接'''
	net = tf.concat([shortcut, net], axis=-1)


	net = conv2d(net, 1024, 3, 1, name='conv8')
	'''最后一层detection layer:用一个1*1卷积去调整channel,该层没有BN层和激活函数'''
	output = conv2d(net, filters_num=n_last_channels, filters_size=1, batch_normalize=False, activation=None, use_bias=True, name='conv_dec')
	return output
#########################################################################################################

if __name__ == '__main__':
	x = tf.random_normal([1, 416, 416, 3])
	model_output = darknet(x)

	saver = tf.train.Saver()
	with tf.Session() as sess:
		# 必须先restore模型才能打印shape;导入模型时,上面每层网络的name不能修改,否则找不到
		saver.restore(sess, "./yolo2_model/yolo2_coco.ckpt")
		print(sess.run(model_output).shape) # (1,13,13,425)
2.8utils.py
本py文件是工具文件,包含图片预处理函数,NMS非极大值抑制函数,边界框绘图函数。
# -*- coding: utf-8 -*-
# --------------------------------------
# @Time    : 2018/5/16$ 14:48$
# @Author  : KOD Chen
# @Email   : [email protected]
# @File    : utils$.py
# Description :功能函数,包含:预处理输入图片、筛选边界框NMS、绘制筛选后的边界框。
# --------------------------------------

import random
import colorsys
import cv2
import numpy as np

# 【1】图像预处理(pre process前期处理)
def preprocess_image(image,image_size=(416,416)):
	# 复制原图像
	image_cp = np.copy(image).astype(np.float32)
	# resize image
	image_rgb = cv2.cvtColor(image_cp,cv2.COLOR_BGR2RGB)#opencv读取的图片是BGR形式,将图片转换为RGB格式
	image_resized = cv2.resize(image_rgb,image_size)#将图片resize至固定的大小

	# normalize归一化
	image_normalized = image_resized.astype(np.float32) / 225.0#将图片进行规范化处理

	# 增加一个维度在第0维——batch_size
	image_expanded = np.expand_dims(image_normalized,axis=0)

	return image_expanded

# 【2】筛选解码后的回归边界框——NMS(post process后期处理)
def postprocess(bboxes,obj_probs,class_probs,image_shape=(416,416),threshold=0.5):

	'''bboxes边界框处理:'''
	# bboxes包含的信息:图片中预测的box,包含几个边界框就有几行;4列分别是box(xmin,ymin,xmax,ymax)
	bboxes = np.reshape(bboxes,[-1,4])
	# 将所有box还原成图片中真实的位置,因为decode的边界框信息,是相对于原图的大小在0-1之间,本操作找到边界框的真实位置信息
	bboxes[:,0:1] *= float(image_shape[1]) # xmin*width
	bboxes[:,1:2] *= float(image_shape[0]) # ymin*height
	bboxes[:,2:3] *= float(image_shape[1]) # xmax*width
	bboxes[:,3:4] *= float(image_shape[0]) # ymax*height
	bboxes = bboxes.astype(np.int32)

	# (1)cut the box:将边界框超出整张图片的部分cut掉
	bbox_min_max = [0,0,image_shape[1]-1,image_shape[0]-1]
	bboxes = bboxes_cut(bbox_min_max,bboxes)#调用bboxes_cut()函数

	'''obj_probs置信度处理:'''
	# ※※※置信度*max类别概率=类别置信度scores※※※
	obj_probs = np.reshape(obj_probs,[-1])


	'''class_probs类别概率处理:'''
	class_probs = np.reshape(class_probs,[len(obj_probs),-1])#转换为边界框数量行,类别数量列
	class_max_index = np.argmax(class_probs,axis=1) # 找到类别概率最大值对应的位置
	class_probs = class_probs[np.arange(len(obj_probs)),class_max_index]


	'''置信度×类别概率=类别置信度'''
	scores = obj_probs * class_probs


	'''类别置信度大于一定阈值的边界框保留,否者抛弃'''
	# ※※※类别置信度scores>threshold的边界框bboxes留下※※※
	keep_index = scores > threshold
	class_max_index = class_max_index[keep_index]
	scores = scores[keep_index]
	bboxes = bboxes[keep_index]

	# 按类别置信度scores降序,对边界框进行排序并仅保留top_k,排序top_k(默认为400)
	class_max_index,scores,bboxes = bboxes_sort(class_max_index,scores,bboxes)
	# ※※※(3)NMS※※※
	class_max_index,scores,bboxes = bboxes_nms(class_max_index,scores,bboxes)

	return bboxes,scores,class_max_index

# 【3】绘制筛选后的边界框
def draw_detection(im, bboxes, scores, cls_inds, labels, thr=0.3):
	# Generate colors for drawing bounding boxes.
	hsv_tuples = [(x/float(len(labels)), 1., 1.)  for x in range(len(labels))]
	colors = list(map(lambda x: colorsys.hsv_to_rgb(*x), hsv_tuples))
	colors = list(
		map(lambda x: (int(x[0] * 255), int(x[1] * 255), int(x[2] * 255)),colors))
	random.seed(10101)  # Fixed seed for consistent colors across runs.
	random.shuffle(colors)  # Shuffle colors to decorrelate adjacent classes.
	random.seed(None)  # Reset seed to default.
	# draw image
	imgcv = np.copy(im)
	h, w, _ = imgcv.shape
	for i, box in enumerate(bboxes):
		if scores[i] < thr:
			continue
		cls_indx = cls_inds[i]

		thick = int((h + w) / 300)
		cv2.rectangle(imgcv,(box[0], box[1]), (box[2], box[3]),colors[cls_indx], thick)
		mess = '%s: %.3f' % (labels[cls_indx], scores[i])
		if box[1] < 20:
			text_loc = (box[0] + 2, box[1] + 15)
		else:
			text_loc = (box[0], box[1] - 10)
		# cv2.rectangle(imgcv, (box[0], box[1]-20), ((box[0]+box[2])//3+120, box[1]-8), (125, 125, 125), -1)  # puttext函数的背景
		cv2.putText(imgcv, mess, text_loc, cv2.FONT_HERSHEY_SIMPLEX, 1e-3*h, (255,255,255), thick//3)
	return imgcv


# 将边界框超出整张图片的部分cut掉
def bboxes_cut(bbox_min_max,bboxes):
	bboxes = np.copy(bboxes)
	bboxes = np.transpose(bboxes)
	bbox_min_max = np.transpose(bbox_min_max)
	# cut the box
	bboxes[0] = np.maximum(bboxes[0],bbox_min_max[0]) # xmin
	bboxes[1] = np.maximum(bboxes[1],bbox_min_max[1]) # ymin
	bboxes[2] = np.minimum(bboxes[2],bbox_min_max[2]) # xmax
	bboxes[3] = np.minimum(bboxes[3],bbox_min_max[3]) # ymax
	bboxes = np.transpose(bboxes)
	return bboxes

# 按类别置信度scores降序,对边界框进行排序并仅保留top_k
def bboxes_sort(classes,scores,bboxes,top_k=400):
	index = np.argsort(-scores)
	classes = classes[index][:top_k]
	scores = scores[index][:top_k]
	bboxes = bboxes[index][:top_k]
	return classes,scores,bboxes


# 计算两个box的IOU
def bboxes_iou(bboxes1,bboxes2):
	bboxes1 = np.transpose(bboxes1)
	bboxes2 = np.transpose(bboxes2)

	# 计算两个box的交集:交集左上角的点取两个box的max,交集右下角的点取两个box的min
	int_ymin = np.maximum(bboxes1[0], bboxes2[0])
	int_xmin = np.maximum(bboxes1[1], bboxes2[1])
	int_ymax = np.minimum(bboxes1[2], bboxes2[2])
	int_xmax = np.minimum(bboxes1[3], bboxes2[3])

	# 计算两个box交集的wh:如果两个box没有交集,那么wh为0(按照计算方式wh为负数,跟0比较取最大值)
	int_h = np.maximum(int_ymax-int_ymin,0.)
	int_w = np.maximum(int_xmax-int_xmin,0.)

	# 计算IOU
	int_vol = int_h * int_w # 交集面积
	vol1 = (bboxes1[2] - bboxes1[0]) * (bboxes1[3] - bboxes1[1]) # bboxes1面积
	vol2 = (bboxes2[2] - bboxes2[0]) * (bboxes2[3] - bboxes2[1]) # bboxes2面积
	IOU = int_vol / (vol1 + vol2 - int_vol) # IOU=交集/并集
	return IOU


# NMS,或者用tf.image.non_max_suppression(boxes, scores,self.max_output_size, self.iou_threshold)
def bboxes_nms(classes, scores, bboxes, nms_threshold=0.5):
	keep_bboxes = np.ones(scores.shape, dtype=np.bool)
	for i in range(scores.size-1):
		if keep_bboxes[i]:
			# Computer overlap with bboxes which are following.
			overlap = bboxes_iou(bboxes[i], bboxes[(i+1):])
			# Overlap threshold for keeping + checking part of the same class
			keep_overlap = np.logical_or(overlap < nms_threshold, classes[(i+1):] != classes[i])
			keep_bboxes[(i+1):] = np.logical_and(keep_bboxes[(i+1):], keep_overlap)

	idxes = np.where(keep_bboxes)
	return classes[idxes], scores[idxes], bboxes[idxes]
论文理解:https://editor.csdn.net/md/?articleId=105588117
