- Java基础(2)
>> IO 流
~ 输入 / 输出流、字节 / 字符流
字节流:
InputStream、OutputStream
FileInputStream 、FileOutputStream
BufferedInputStream、BufferedOutputStream
字符流:
Reader、Writer
FileReader、FileWriter
BufferedReader、BufferedWriter
1、输入流和输出流相对于内存设备而言:
输入:将外围设备中的数据读取到内存中;
输出:将内存的数写入到外设中;
2、字符流的由来: 字节流+编码表;
字节流读取文字字节数据后,不直接操作而是先查指定的编码表,获取对应的文字,再对这个文字进行操作;
3、字节流的两个顶层父类: InputStream、OutputStream
字符流的两个顶层父类:Reader、Writer
4、这些体系的子类都以父类名作为后缀,而且子类名的前缀就是该对象的功能;
~ 字符流 FileWriter
1、需求: 将一些文字存储到硬盘一个文件中;
2、思路: 要操作文字数据,优先考虑字符流;要将数据从内存中写入到硬盘上,要使用字符流中的输出流Writer,硬盘上的数据基本体现是文件,所以需要一个能操作文件的输出流,也就是文件输出流FileWriter;
3、步骤:
(1)创建一个可以往文件中写入字符数据的字符输出流对象,既然是往一个文件中写入文字数据,就要在创建输出流对象时就明确该文件(用于存储数据的目的地),所以创建对象时需要传入参数:文件的存储路径+文件名;如果文件不存在,则会自动创建,若文件已经存在,则会覆盖;
若构造函数中传入参数true,可以实现对文件的续写,不加上true,每次执行代码都会重新创建文件,覆盖原来文件的内容;
(2)调用字符输出流对象的write(str)方法,写入数据;(写入到临时存储缓冲区中)
(3)fw.flush(); :进行刷新,将数据直接写到目的地中;
flush相当于修改文件之后随时做的保存操作;
(4)fw.close();: 关闭流,关闭资源;在关闭前会先调用flush刷新缓冲中的数据到目的地;
close相当于关闭文件之前提示的是否保存操作;
4、IO异常处理:
(1)创建流对象一般在try外面创建引用变量,在try里面进行初始化;
(2)创建对象、写入、close三句话都会出现异常;
(3)close必须执行,写入finally,单独try catch;
class test {
	private static final String LINE_SEPARATOR = System.getProperty("line.separator");
	public static void main(String[] args) throws IOException {
		// FileWriter fw = new FileWriter("E:\\demo.txt",true); // 创建字符输出流对象;
		FileWriter fw = null; // 在try外面创建引用变量;
		try {
			fw = new FileWriter("E:\\demo.txt"); // 在try里面进行初始化
			fw.write("abcde" + LINE_SEPARATOR + "hahaha");
		} catch (Exception e) {
			System.out.println(e.toString());
		}finally{
			if(fw!=null){ // 必须判断是否为空,否则空指针异常
				try {
					fw.close();
				} catch (Exception e2) {
					throw new RuntimeException("流 关闭失败!");
				}
			}
		}
	}
}
~ 字符流 FileReader
需求:读取一个文本文件,将读取到的字符打印到控制台;
同上,找到了FileReader;
过程:
(1)创建读取字符数据的流对象,必须要明确被读取的文件,确定该文件是否存在;
(2)用一个读取流关联一个已存在文件,用Reader中的read方法读取字符;
1、读取数据方式一:
public static void main(String[] args) throws IOException {
	FileReader fr = new FileReader("E:\\demo.txt");
	int ch = 0;
	while((ch = fr.read())!=-1){  System.out.println((char)ch); }
	fr.close();
}
2、读取数据方式二: 先创建字符数组,使用read(char[])读取文本文件数据;
public static void main(String[] args) throws IOException {
	FileReader fr = new FileReader("E:\\demo.txt");
	char[] buf = new char[1024]; // 指定字符数组的初始化长度;
	int len = 0;
	while((len=fr.read(buf))!=-1){ // 将数据读取到buf字符数组中存储;
		System.out.println(new String(buf, 0, len));
	}
	fr.close();
}
~ 字符流 练习
需求: 将c盘的一个文本文件复制到d盘;
思路:
①需要读取源;
②将读到的源数据写入到目的地;
③既然是操作文本数据,使用字符流
过程:
①读取一个已有的文本文件,使用字符读取流和文件相关联;
②创建一个目的,用于存储读到数据;
③频繁的读写操作;
④关闭流资源;
public static void main(String[] args) throws IOException {
	// 读取一个已有的文本文件,使用字符读取流和文件相关联;
	FileReader fr = new FileReader("c:\\demo.txt");
	// 创建一个目的,用于存储读到数据;
	FileWriter fw = new FileWriter("e:\\d.txt");
	// 频繁的读写操作;
	int ch = 0;
	while((ch=fr.read())!=-1){ fw.write(ch);}
	// 关闭流资源;
	fr.close();
	fw.close();
}
class test {
	private static final int BUFFER_SIZE = 1024;
	public static void main(String[] args) throws IOException {
		FileReader fr = null;
		FileWriter fw = null;
		try {
			fr = new FileReader("c:\\demo.txt");
			fw = new FileWriter("e:\\d.txt");
			//创建一个临时容器,用于缓存读取到的字符;
			char[] buf = new char[BUFFER_SIZE]; // 这就是缓冲区
			int len = 0;
			while((len=fr.read(buf))!=-1){
				fw.write(buf, 0, len);
			}
		} catch (Exception e) {
			throw new RuntimeException("读写失败!");
		} finally{
			if(fr!=null){
				try { fr.close(); }
				catch (IOException e) {	e.printStackTrace();}
			}
			if(fw!=null){
				try { fw.close(); }
				catch (IOException e) { e.printStackTrace(); }
			}
		}
	}
}
~ 字符流缓冲区 BufferedWriter
BufferedWriter :newLine();
步骤:
①创建写入流的对象;
②创建了一个字符写入流的缓冲区对象,并和指定要被缓冲的流对象相关联;
③使用缓冲区的写入方法将数据先写入到缓冲区中;
④使用缓冲区的刷新方法将数据刷目的地中;
⑤关闭缓冲区;其实关闭的就是被缓冲的流对象;
缓冲区只是封装了数组在提高了流中数据的操作效率,没有调用底层资源,真正调用底层资源的是字符流对象,缓冲区仅仅起到提高效率的作用,所以执行缓冲区对象的close操作关闭的是字符流资源;
public static void main(String[] args) throws IOException {
	FileWriter fw = new FileWriter("E:\\demo.txt");
	// 使用字符流的缓冲区:提高了写入效率;
	// 创建了一个字符写入流的缓冲区对象,并和指定要被缓冲的流对象相关联;
	BufferedWriter bufw = new BufferedWriter(fw);
	bufw.write("abcde"); // 使用缓冲区的写入方法将数据先写入到缓冲区中;
	bufw.newLine(); // //直接使用newLine方法换行,不用再定义常量LINE_SEPARATOR了
	bufw.write("fgh");
	bufw.flush(); // 使用缓冲区的刷新方法将数据刷目的地中
	// 循环写入
//		for (int x = 1; x <= 4; x++) {
//			bufw.write("abcdef" + x);
//			bufw.newLine();
//			bufw.flush();
//		}
	bufw.close(); // 关闭缓冲区,其实关闭的就是被缓冲的流对象
}
~ 字符流缓冲区 BufferedReader
BufferedReader: readLine();
1、读取文件内容输出到控制台:
public static void main(String[] args) throws IOException {
	FileReader fr = new FileReader("e:\\demo.txt");
	BufferedReader bufr = new BufferedReader(fr);
	String line = null;
	while((line=bufr.readLine())!=null){ // 读取一行数据赋值给line变量;
		System.out.println(line);
	}
	bufr.close();
}
~ 字符流缓冲区 练习
复制文本文件:
public static void main(String[] args) throws IOException {
	FileReader fr = new FileReader("c:\\demo.txt");
	BufferedReader bufr = new BufferedReader(fr);
	FileWriter fw = new FileWriter("E:\\demo_copy.txt");
	BufferedWriter bufw = new BufferedWriter(fw);
	String line = null;
	while((line=bufr.readLine())!=null){
		bufw.write(line);
		bufw.newLine();
		bufw.flush();
	}
	bufr.close();
	bufw.close();
}
~ 字符流缓冲区 自定义读取缓冲区的方法
自定义的读取缓冲区,其实就是模拟一个BufferedReader,直线read / readLine方法;
分析:缓冲区中无非就是封装了一个数组,并对外提供了更多的方法对数组进行访问;其实这些方法最终操作的都是数组的角标;
缓冲的原理:其实就是从源中获取一批数据装进缓冲区中,再从缓冲区中不断的取出一个一个数据;在此次取完后,再从源中继续取一批数据进缓冲区;当源中的数据取光时,用-1作为结束标记;
步骤:
①定义一个字符数组作为缓冲区;
②定义一个指针用于操作这个数组中的元素,当操作到最后一个元素后,指针应该归零;
③定义一个计数器用于记录缓冲区中的数据个数,当该数据减到0,就从源中继续获取数据到缓冲区中;
class test {
	public static void main(String[] args) throws IOException {
		 FileReader fr = new FileReader("e:\\demo.txt");
		 MyBufferedReader bufr = new MyBufferedReader(fr);
		 String line = null;
		 while((line=bufr.myReadLine())!=null){
			 System.out.println(line);
		 }
		 bufr.myClose();
	}
}
class MyBufferedReader{
	private Reader r;
	// 定义一个字符数组作为缓冲区;
	private char[] buf = new char[1024];
	// 定义一个指针用于操作这个数组中的元素,当操作到最后一个元素后,指针应该归零;
	private int pos = 0;
	// 定义一个计数器用于记录缓冲区中的数据个数,当该数据减到0,就从源中继续获取数据到缓冲区中;
	private int count = 0;
	MyBufferedReader(Reader r){ this.r = r; }
	public int myReader() throws IOException{
		if(count==0){ // 需先做判断:只有count=0时,才需从源中获取一批数据到缓冲区中;
			count = r.read(buf); // 将数据读取到buf中;若源中没有数据返回-1;
			pos = 0; // 每次获取数据到缓冲区后,角标归零;
		}
		if(count<0) return -1;  // 源中没有数据时,读取时返回-1给count;
		char ch = buf[pos++];
		count--;
		return ch;
	}
	public String myReadLine() throws IOException{
		StringBuilder sb = new StringBuilder();
		int ch = 0;
		while((ch=myReader())!=-1){
			if(ch=='\r') continue;
			if(ch=='\n') return sb.toString();
			sb.append((char)ch); // 将从缓冲区中读到的字符,存储到缓存行数据的缓冲区中;
		}
		if(sb.length()!=0) return sb.toString();
		return null;
	}
	public void myClose() throws IOException{ r.close(); }
}
~ 字符流缓冲区 装饰设计模式
1、装饰设计模式: 对一组对象的功能进行增强时,就可以使用该模式进行问题的解决;
装饰特点:装饰类和被装饰类都必须所属同一个接口或者父类;
2、装饰和继承的相同点: 都能实现一样的特点 - 进行功能的扩展增强;
3、装饰和继承的区别: 装饰比继承灵活;
继承:是让缓冲和具体的对象相结合;
装饰设计模式:将缓冲进行单独封装,哪个对象需要缓冲就将哪个对象和缓冲关联;
(1)首先有一个继承体系:
Writer
| - - - TextWriter:用于操作文本;
| - - - MediaWriter:用于操作媒体;
想要对操作的动作进行效率的提高,效率提高需要加入缓冲技术,按照面向对象,可以通过继承对具体的进行功能的扩展;
Writer
| - - - TextWriter:用于操作文本;
| - - - | - - - BufferTextWriter:加入了缓冲技术的操作文本的对象;
| - - - MediaWriter:用于操作媒体;
| - - - | - - - BufferMediaWriter:
到这里就哦了,但是这样做好像并不理想:如果这个体系进行功能扩展,又多了流对象,那么这个流要提高效率,是不是也要产生子类呢?是;这时就会发现只为提高功能而进行的继承,会导致继承体系越来越臃肿;不够灵活;
(2)重新思考这个问题:
既然加入的都是同一种技术 - 缓冲;继承是让缓冲和具体的对象相结合;
可不可以将缓冲进行单独的封装,哪个对象需要缓冲就将哪个对象和缓冲关联?
class Buffer{
	Buffer(TextWriter w){}
	Buffer(MediaWirter w){}
}
Buffer类不好:每次继承体系增加一个流对象,buffer类中就需要添加一个流对象类型的属性;
改进:创建一个修饰类,因为这个修饰类的作用就是提高写入流的效率的,所做的所有操作都是写的操作,所以需要继承Writer;在这个修饰类中只定义一个属性Writer,所有继承writer的类都可以作为参数传进来;
class BufferWriter extends Writer{
	BufferWriter(Writer w){}
}
这样writer继承体系中只需加入一个修饰类,即可完成提高流对象的效率问题;
Writer
| - - - TextWriter:用于操作文本;
| - - - MediaWriter:用于操作媒体;
| - - - BufferWriter:用于提高效率;
class Person{
	public void chiFan(){ System.out.println("吃饭"); }
}
class NewPerson1{ // 修饰类,和Person类平级,都继承同一个父类Object
	private Person p;
	public NewPerson1(Person p){ this.p = p; }
	public void chiFan(){  // 定义自己的吃饭的方法;
		System.out.println("开胃酒");
		p.chiFan();
		System.out.println("饭后甜点");
	}
}
class NewPerson2 extends Person{ // 继承类
	public void chiFan(){ // 覆盖父类的吃饭的方法;
		System.out.println("开胃酒");
		super.chiFan();
		System.out.println("饭后甜点");
	}
}
class test {
	public static void main(String[] args) throws IOException {
		Person p = new Person();
 		p.chiFan();
		NewPerson1 p1 = new NewPerson1(p); //用装饰的思想来完成功能的增强
		p1.chiFan();
		NewPerson2 p2 = new NewPerson2();  //用继承的思想来完成
		p2.chiFan();
	}
}
~ 字符流缓冲区 LineNumberReader
public static void main(String[] args) throws IOException {
	FileReader fr = new FileReader("e:\\demo.txt");
	LineNumberReader lnr = new LineNumberReader(fr);
	String line = null;
	lnr.setLineNumber(100);
	while((line=lnr.readLine())!=null){ System.out.println(lnr.getLineNumber()+":"+line); }
	lnr.close();
}
~ 字节流 FileInputStream / FileOutputStream
1、操作文件基本演示:
public static void demo_read() throws Exception{
	// 创建一个读取流对象,和指定文件进行关联;
	FileInputStream fis = new FileInputStream("e:\\demo.txt");
	// (1)一次读取一个字符;一个汉字需要读取两次;
	int ch1 = fis.read();
	System.out.println("ch:"+ch1);
	// (2)循环读取文件;
	int ch2 = 0;
	while((ch2=fis.read())!=-1){ System.out.println("ch:"+ch2); }
	// (3)使用缓冲区;建议使用这种方式读取数据;
	byte[] buf = new byte[1024];
	int len = 0;
	while((len=fis.read(buf))!=-1){ System.out.println(new String(buf,0,len)); }
	// (4)
	System.out.println(fis.available());
	byte[] buf1 = new byte[fis.available()];
	fis.read(buf1);
	System.out.println(new String(buf1));
	fis.close();
}
public static void demo_write() throws Exception{
	// 1、创建字节输出流对象,用于操作文件,并指定输出文件的存储位置;
	FileOutputStream fos = new FileOutputStream("e:\\d.txt");
	// 2、写数据:直接写入到目的地中;
	fos.write("abcdefg".getBytes());
	// fos.flush(); // flush里面没有内容,因为不需要缓冲,不需要刷新
	fos.close();    // 关闭资源动作要完成;
}
2、练习:复制mp3
public static void copy1() throws Exception{ // 输入输出字节流+字符数组缓冲
	FileInputStream fis = new FileInputStream("F:\\音乐\\冬雪.mp3");
	FileOutputStream fos = new FileOutputStream("E:\\冬雪.mp3");
	byte[] buf = new byte[1024];
	int len = 0;
	while((len=fis.read(buf))!=-1){ fos.write(buf); }
	fis.close(); fos.close();
}
public static void copy2() throws Exception{ // 输入输出字节流+字符数组缓冲+available
	FileInputStream fis = new FileInputStream("F:\\音乐\\冬雪.mp3");
	FileOutputStream fos = new FileOutputStream("E:\\冬雪.mp3");
	byte[] buf = new byte[fis.available()];
	fis.read(buf); fos.write(buf);
	fis.close(); fos.close();
}
public static void copy3() throws Exception{ // 输入输出字节流+缓冲流对象
	FileInputStream fis = new FileInputStream("F:\\音乐\\冬雪.mp3");
	BufferedInputStream bufis = new BufferedInputStream(fis);
	FileOutputStream fos = new FileOutputStream("E:\\冬雪.mp3");
	BufferedOutputStream bufos = new BufferedOutputStream(fos);
	int ch = 0;
	while((ch=bufis.read())!=-1){ bufos.write(ch); }
	bufis.close(); bufos.close();
}
~ 转换流 InputStreamReader / OutputStreamWriter
1、键盘录入: 读取一个键盘录入的数据 a+回车,并打印在控制台上;
键盘本身就是一个标准的输入设备,对于java而言,对于这种输入设备都有对应的对象:System.in;
标准输入输出是系统的对象,随系统的消失而消失,随系统的出现而出现,所以不需要close;
System.in 是从系统获取的标准输入流对象,整个只有一个,关闭之后再赋值给流对象就没有了;所以System.in对象不需要执行close关闭流操作,执行关闭之后,要想再使用System.in对象,需要重启系统;
一个回车操作是两个字符:’\r’=13,’\n’=10;所以输入字符a之后回车,有三个字符,需要读取三次即结束;
public static void readKey() throws IOException{
	InputStream in = System.in; // 获取系统流对象,不需要自己创建可以直接拿来使用;
	// 输入a+回车
	int ch1 = in.read(); // in.read是阻塞式方法:没有数据就等待,知道有读到数据为止;
	System.out.println(ch1); // 97
	int ch2 = in.read();
	System.out.println(ch2); // 97
	int ch3 = in.read();
	System.out.println(ch3); // 97
//		in.close(); // close之后再创建对象,输入,出现异常
//		InputStream in2 = System.in;
//		int ch = in2.read();
}
2、读取键盘录入:
要求:获取用户键盘录入的数据,并将数据变成大写显示在控制台上,如果用户输入的是over,结束键盘录入;
思路:
①因为键盘录入只读取一个字节,要判断是否是over,需要将读取到的字节拼成字符串;
②那就需要一个容器:StringBuilder;
③在用户回车之前将录入的数据变成字符串判断即可;
步骤:
①用StringBuilder创建容器;
②获取键盘读取流InputStream in = System.in;
③定义变量记录读取到的字节,并循环获取;
④在存储之前需要判断是否是换行标记 ,因为换行标记不存储;\r回车,\n换行
⑤将读取到的字节存储到StringBuilder中;
public static void readKey() throws IOException{
	// 用StringBuilder创建容器;
	StringBuilder sb = new StringBuilder();
	// 获取键盘读取流
	InputStream in = System.in;
	// 定义变量记录读取到的字节,并循环获取;
	int ch = 0;
	while((ch=in.read())!=-1){
		if(ch=='\r') continue; // 在存储之前需判断是否是换行标记 ,换行标记不存储
		if(ch=='\n'){ // 是换行,将缓存区的字节转换成字符串
			String temp = sb.toString();
			if("over".equals(temp)) break; // 若输入的是over,break结束循环
			System.out.println(temp.toUpperCase()); // 字符串不是over,就直接输出到控制台;
			sb.delete(0, sb.length()); // 输出之后清空容器;
		}else{ // 输入的不是换行或回车就存入容器中;
			sb.append((char)ch);
		}
	}
}
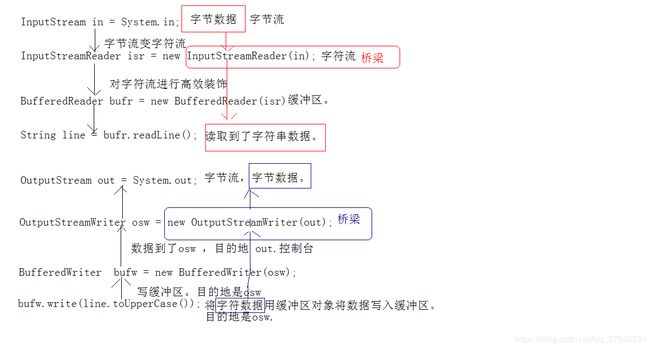
3、代码优化:使用转换流
InputStreamReader:字节到字符的桥梁;解码;
OutputStreamWriter:字符到字节的桥梁;编码;
public static void main(String[] args) throws Exception {
	InputStream in = System.in;
	InputStreamReader isr = new InputStreamReader(in);
	BufferedReader bufr = new BufferedReader(isr);
	OutputStream out = System.out;
	OutputStreamWriter osw = new OutputStreamWriter(out);
	BufferedWriter bufw = new BufferedWriter(osw);
	String line = null;
	while((line=bufr.readLine())!=null){
		if("over".equals(line)) break;
		bufw.write(line.toUpperCase());
		bufw.newLine();
		bufw.flush();
	}
}
4、转换流三行代码简写成一行:
// 1、将键盘录入的数据写入到一个文件中
BufferedReader bufr1 = new BufferedReader(new InputStreamReader(System.in));
BufferedWriter bufw1 = new BufferedWriter(new OutputStreamWriter(new FileOutputStream("e:\\d.txt")));
// 2、将一个文本文件内容显示在控制台上
BufferedReader bufr2 = new BufferedReader(new InputStreamReader(new FileInputStream("e:\\d.txt")));
BufferedWriter bufw2 = new BufferedWriter(new OutputStreamWriter(System.out));
// 3、将一个文件文件中的内容复制到的另一个文件中
BufferedReader bufr3 = new BufferedReader(new InputStreamReader(new FileInputStream("e:\\d.txt")));
BufferedWriter bufw3 = new BufferedWriter(new OutputStreamWriter(new FileOutputStream("e\\d.txt")));
~ 流的选择规律
1、流的选择规律: 流对象太多,开发时不知用哪个对象合适;想要知道开发时用到哪些对象,只要通过四个明确即可:
(1)明确源和目的:
源:InputStream、Reader
目的:OutputStream、Writer
(2)明确数据是否是纯文本数据:
纯文本:Reader、Writer
非纯文本:InputStream、OutputStream
(3)明确具体的设备:
硬盘:File
键盘:System.in、System.out
内存:数组
网络:Socket流
(4)是否需要其他额外功能:
高效(缓冲区):buffer
转换流:InputStreamReader、OutputStreamWriter
2、需求:
(1)复制一个文本文件:
①明确源和目的:
②是否是纯文本:是,Reader+Writer
③明确具体设备:
源:硬盘,File; FileReader fr = new FileReader("a.txt");
目的:硬盘,File; FileWriter fw = new FileWriter("b.txt");
④需要额外功能吗:需要高效;
BufferedReader bufr = new BufferedReader(new FileReader("a.txt"));
BufferedWriter bufw = new BufferedWriter(new FileWriter("b.txt"));
(2)读取键盘录入信息,并写入到一个文件中:
①明确源和目的:
②是否是纯文本:是,Reader+Writer
③明确设备:
源: 键盘,System.in; InputStream in = System.in;
目的: 硬盘,File; FileWriter fw = new FileWriter("b.txt");
这样做可以完成,但是麻烦;将读取的字节数据转成字符串,再由字符流操作;
④需要额外功能吗:需要转换+高效;
将字节流转成字符流:因为名确的源是Reader,这样操作文本数据做便捷;所以要将已有的字节流转成字符流;使用字节 --> 字符:InputStreamReader
InputStreamReader isr = new InputStreamReader(System.in);
FileWriter fw = new FileWriter("b.txt");
BufferedReader bufr = new BufferedReader(new InputStreamReader(System.in));
BufferedWriter bufw = new BufferedWriter(new FileWriter("b.txt"));
(3)将一个文本文件数据显示在控制台上:
①明确源和目的:
②是否是纯文本:是,Reader+Writer
③明确具体设备:
源: 硬盘,File; FileReader fr = new FileReader("a.txt");
目的: 控制台,System.out; OutputStream out = System.out; //PrintStream
④需要额外功能:需要转换+高效
FileReader fr= new FileReader("a.txt");
OutputStreamWriter osw = new OutputStreamWriter(System.out);
BufferedReader bufr = new BufferedReader(new FileReader("a.txt"));
BufferedWriter bufw = new BufferedWriter(new OutputStreamWriter(System.out));
(4)读取键盘录入数据,显示在控制台上:
①明确源和目的:
②是否是纯文本:是,Reader+Writer
③明确具体设备:
源: 键盘,System.in; InputStream in = System.in;
目的: 控制台,System.out; OutputStream out = System.out;
④明确额外功能:转换+高效
需要转换,因为都是字节流,但是操作的却是文本数据,所以使用字符流操作起来更为便捷;
InputStreamReader isr = new InputStreamReader(System.in);
OutputStreamWriter osw = new OutputStreamWriter(System.out);
BufferedReader bufr = new BufferedReader(new InputStreamReader(System.in));
BufferedWriter bufw = new BufferedWriter(new OutputStreamWriter(System.out));
3、转换流的编码解码:
需求:将一个中文字符串数据按照指定的编码表写入到一个文本文件中;
①目的:OutputStream、Writer
②是纯文本:Writer
③设备:硬盘File,FileWriter fw = new FileWriter("a.txt");、fw.write("你好");
注意:既然需求中已经明确了指定编码表的动作,那就不可以使用FileWriter,因为FileWriter内部是使用默认的本地码表GBK;只能使用其父类OutputStreamWriter:接收一个字节输出流对象,既然是操作文件,那么该对象应该是FileOutputStream;
OutputStreamWriter osw = new OutputStreamWriter(new FileOutputStream("a.txt"),charsetName);
④高效:
BufferedWriter bufw = new BufferedWriter (new OutputStreamWriter(new FileOutputStream("a.txt"),charsetName));
注意:什么时候使用转换流呢?
①源或者目的对应的设备是字节流,但是操作的却是文本数据,可以使用转换作为桥梁,提高对文本操作的便捷;
②一旦操作文本涉及到具体的指定编码表时,必须使用转换流 ,转换流具有制定编码表的功能;
gbk编码的文件用utf-8解码,会出现不能解析的编码,用问好?表示,utf-8编码的文件,用gbk解码,解析出来的是汉字;
public static void readText1() throws IOException{
	// FileReader fr = new FileReader("e:\\d.txt");
	InputStreamReader isr = new InputStreamReader(new FileInputStream("e:\\d.txt"), "utf-8");
	char[] buf = new char[20];
	int len = isr.read(buf);
	String str = new String(buf,0,len);
	System.out.println(str);
	isr.close();
}
public static void writeText1() throws IOException{
	FileWriter fr = new FileWriter("e:\\write.txt");
	fr.write("你好");
	fr.close();
}
public static void writeText2() throws IOException{
	// 等价于FileWriter fw = new FileWriter("gbk_1.txt");
	// FileWriter:其实就是转换流指定了本机默认码表gbk的体现,而且这个转换流的子类对象,可以方便操作文本文件;
	// 简单说:操作文件的字节流+本机默认的编码表;
	// FileWriter 是按照默认码表来操作文件的便捷类;
	// 如果操作文本文件需要明确具体的编码,FileWriter就不行了,必须用转换流;
	OutputStreamWriter osw = new OutputStreamWriter(new FileOutputStream("e:\\write.txt"));
	osw.write("哈喽");
	osw.close();
}
~ File 对象
1、构造函数: File对象可以将一个已存在的,或者不存在的文件或者目录封装成file对象;
public static void main(String[] args) throws Exception {
	File file1 = new File("e:\\a.txt"); // 文件不存在,也不会创建;
	File file2 = new File("e:\\", "a.txt");
	File file3 = new File("e:\\");
	File file4 = new File(file3,"a.txt");
	File file5 = new File("c:"+File.separator+"abc"+File.separator+"a.txt");
	System.out.println(file5); // c:\abc\a.txt
}
2、常见功能 - 获取:
public static void main(String[] args) throws Exception {
	File file = new File("E:\\java0331\\day22e\\a.txt");
	String name = file.getName(); // 获取文件名称
	String absPath = file.getAbsolutePath(); // 绝对路径:带盘符的
	String path = file.getPath(); // 相对路径:new中字符串是什么就获取什么
	String parent = file.getParent(); // 上级目录的路径
	long len = file.length();	  // 获取文件大小
	long time = file.lastModified(); // 获取文件修改时间
	Date date = new Date(time);
	DateFormat dateFormat = DateFormat.getDateTimeInstance(DateFormat.LONG,DateFormat.LONG);
	String str_time = dateFormat.format(date);
}
3、常见功能 - 创建、删除:
文件的删除和输出流不一样,如果文件不存在,则创建,如果文件存在,则不创建;
public static void main(String[] args) throws Exception {
	File file = new File("e:\\a.txt"); // 将文件封装成File对象;
	boolean b1 = file.createNewFile();// 调用File对象的方法创建文件,若文件存在,返回false,不覆盖;
	boolean b2 = file.delete();       // 删除文件
	File dir = new File("e:\\ab");
	boolean b3 = dir.mkdir();  // 创建文件夹
	boolean b4 = dir.delete(); // 删除文件夹
	File dirs = new File("abc\\q\\e\\c\\z\\r\\w\\y\\f\\e\\g\\s");
	boolean b5 = dir.mkdirs();  //创建多级目录
	boolean b6 = dir.delete();  //从里往外删除,文件夹里面有文件,删除失败
}
4、常见功能 - 判断文件是否存在:
判断文件是否是文件或目录时,最好先判断文件是否存在,若文件不存在,都返回false;
public static void main(String[] args) throws Exception {
	File f = new File("e:\\aaa.txt");
	f.mkdir();           // f是目录,true
	f.createNewFile();   // f是文件,false
	boolean b = f.exists();	// true
	System.out.println("b="+b);
	System.out.println(f.isFile());   // false 最好先判断是否存在;
	System.out.println(f.isDirectory()); // true
}
5、常见功能 - 重命名:
public static void main(String[] args) throws Exception {
	File f1 = new File("e:\\9.mp3");
	File f2 = new File("e:\\aa.mp3");
	boolean b = f1.renameTo(f2); // f1改名字成f2,若不是同一盘符,同时修改所在盘符
	System.out.println("b="+b);
}
6、常见功能 - 系统根目录和容量获取:
public static void main(String[] args) throws Exception {
	File file = new File("d:\\");
	System.out.println("getFreeSpace:"+file.getFreeSpace());
	System.out.println("getTotalSpace:"+file.getTotalSpace());
	System.out.println("getUsableSpace:"+file.getUsableSpace());
	File[] files  = File.listRoots();	// 获取系统根目录,输出C:\ 、D:\
	for(File file : files){
		System.out.println(file);
	}
}
7、常见功能 - 获取目录内容、过滤器:
file.list(); 获取当前目录下的文件以及文件夹的名称,包含隐藏文件,不包括文件夹里面的内容;
可以添加过滤器,过滤器类需要实现FilenameFilter接口;
(1)调用list方法的File对象中封装的必须是目录,否则会发生NullPointerException;
(2)如果访问的系统级目录(隐藏目录)也会发生空指针异常;
(3)如果目录存在但是没有内容,会返回一个数组,但是长度为0;
// (1)获取指定目录下所有内容
public static void listDemo(){
	File file = new File("f:\\");
	String[] names = file.list();
	System.out.println("names.length: "+names.length);
	for(String name:names){ System.out.println(name); }
}
// (2)按照文件后缀名进行过滤
class test {
	public static void main(String[] args) throws Exception {
		File file = new File("e:\\");
		String[] names = file.list(new SuffixFilter(".txt"));
		for(String name:names){ System.out.println(name); }
	}
}
class SuffixFilter implements FilenameFilter{
	private String suffix;
	public SuffixFilter(String suffix){ this.suffix = suffix; }
	public boolean accept(File dir, String name) {
		return name.endsWith(suffix); // 返回指定后缀名的文件名称
	}
}
// (3)过滤隐藏文件
class test {
	public static void main(String[] args) throws Exception {
		File dir = new File("e:\\");
		File[] files = dir.listFiles(new FilterByHidden());
		for(File file:files){ System.out.println(file); }
	}
}
class FilterByHidden implements FileFilter{
	public boolean accept(File pathname) {
		return !pathname.isHidden();
	}
}
8、常见功能 - 深度遍历文件夹:
获取指定目录下当前的所有文件夹或者文件对象;
需求:对指定目录进行所有内容的列出(包含子目录中的内容)
也可以理解为 深度遍历(最好不要深度遍历cde盘,易出空指针异常)
class test {
	public static void main(String[] args) throws Exception {
		File dir = new File("f:\\文档");
		listAll(dir,0);
	}
	public static void listAll(File dir, int level){
		System.out.println(getSpace(level)+dir.getName());
		level++;
		File[] files = dir.listFiles();
		for(int x=0; x<files.length; x++){
			if(files[x].isDirectory()){	listAll(files[x],level);	}
			else System.out.println(getSpace(level)+files[x].getName());
		}
	}
	public static String getSpace(int level){
		StringBuilder sb = new StringBuilder();
		sb.append("|--");
		for(int x=0; x<level; x++){	sb.insert(0,"|  ");	}
		return sb.toString();
	}
}
9、练习:递归
(1)递归:函数自身直接或者间接的调用到了自身;
(2)一个功能在被重复使用,并每次使用时,参与运算的结果和上一次调用有关,这时可以用递归来解决问题;
(3)注意:
①递归一定明确条件,否则容易栈溢出;
②注意一下递归的次数;
public class DiGuiDemo {
	public static void main(String[] args) {
		toBin(6);
		int sum = getSum(9000);   //溢出
		System.out.println(sum);	}
	public static int getSum(int num){
		int x = 9;
		if(num==1)	return 1;
		return num+getSum(num-1);
	}
	public static void toBin(int num){
		if(num>0){
			toBin(num/2);
			System.out.println(num%2);
		}
	}
}
10、练习:删除一个带内容的目录
原理:必须从最里面往外删, 需要进行深度遍历;
class test {
	public static void main(String[] args) throws Exception {
		File dir = new File("e:\\demodir");
		removeDir(dir);
	}
	public static void removeDir(File dir) {
		File[] files = dir.listFiles();
		for(File file : files){
			if(file.isDirectory()){ removeDir(file); }
			else{ System.out.println(file+":"+file.delete()); }
		}
		System.out.println(dir+":"+dir.delete());
	}
}
~ Properties 集合
Map -- HashTable -- Properties
1、Properties集合: 通常该集合用来操作以键值对形式存在的配置文件;
特点:该集合中键值对都是字符串类型;集合中的数据可以保存到流中,或者从流中获取;
2、Properties集合常用方法:
(1)存储元素: prop.setProperty("wangwu ","30");
(2)修改元素: prop.setProperty("wangwu","26"); 直接覆盖;
(3)取出所有元素: prop.stringPropertyNames();
(4)通过键获取值: prop.getProperty(name);
(5)Properties集合和流对象相结合: prop.list(System.out);,把集合中的数据整到输出流(控制台)里面去;
(6)获取系统的属性信息 赋值给prop: prop = System.getProperties();
(7)持久化存储: prop.store(fos, "info"); 将集合中的字符串键值信息持久化存储到文件中,需要关联输出流;
(8)从文件中获取数据到集合中: prop.load(fis);,集合中的数据来自于一个文件,必须要保证该文件中的数据是键值对,并且需要与输入流关联;
public static void main(String[] args) throws IOException {
	Properties prop = new Properties(); // 创建一个properties集合;
	prop.setProperty("zhangsan", "21"); // 存储元素;
	prop.setProperty("lisi", "22");
	prop.setProperty("wangwu", "23");
	prop.setProperty("zhangsan", "24"); // 修改元素;键存在时,直接覆盖元素值;
	Set<String> names = prop.stringPropertyNames(); // 取出所有元素(键值)
	for(String name:names) {
		String value = prop.getProperty(name); // 通过键获取值
		System.out.println(name+":"+value);
	}

	prop.list(System.out);  // 把集合的数据整到输出流(控制台)里面去
	prop = System.getProperties(); // 获取系统的属性信息,也是prop类型的

	// 想要将这些集合中的字符串键值信息持久化存储到文件中,需要关联输出流;
	FileOutputStream fos = new FileOutputStream("a.txt");
	prop.store(fos, "a"); // 将集合中数据存储到文件中;
	fos.close();

	FileInputStream fis = new FileInputStream("a.txt");
	prop.load(fis);
	fis.close();
}
3、练习一: 模拟load方法从文件中加载数据到集合中;
public static void main(String[] args) throws IOException {
	Properties prop = new Properties();
	BufferedReader bufr = new BufferedReader(new FileReader("a.txt")); // 常见缓冲读取流关联a文件;
	String line = null;
	while((line=bufr.readLine())!=null) {
		if(line.startsWith("#")) continue;
		String[] arr = line.split("=");
		prop.setProperty(arr[0], arr[1]);
	}
	prop.list(System.out);
	bufr.close();
}
4、练习二: 对已有的配置文件中的信息进行修改;
public static void main(String[] args) throws IOException {
	Properties prop = new Properties(); // 创建集合存储配置信息;
	File file = new File("a.txt"); // 讲文件a封装成对象,方便使用对象的方法;
	if(!file.exists()) file.createNewFile(); // 若文件不存在,则创建;
	FileReader fr = new FileReader(file); // 讲文件与输入流关联;
	prop.load(fr); // 讲与读取流关键的文件的内容存储到集合中;
	prop.setProperty("王五", "26"); // 修改集合中数据;
	FileWriter fw = new FileWriter(file); // 将文件a与输出流关联;
	prop.store(fw, ""); // 通过流讲修改后的数据存储到与流关联的文件a中;
	fr.close();
	fw.close();
}
5、练习三:
定义功能:获取一个应用程序运行的次数,如果超过5次,给出‘使用次数已到,请注册’的提示,并不要再运行程序;
思路:
(1)应该有计数器,每次程序启动都需要计数一次,并且在原有基础上进行计数;
(2)计数器就是一个变量,程序启动时进行计数,计数器必须存在于内存并进行运算;可是程序一结束,计数器消失了,那么再次启动该程序,计数器又重新被初始化了,而我们需要多次启动同一个应用程序,使用的是同一个计数器,这就需要计数器的生命周期变长,从内存存储到硬盘文件中;
(3)如何使用这个计数器呢:首先,程序启动时,应该先读取这个用于记录计数器信息的配置文件,获取上一次计数器次数,并进行试用次数的判断;其次,对该次数进行自增,并自增后的次数重新存储到配置文件中;
④文件中的信息该如何进行存储并体现:直接存储次数值可以,但是不明确该数据的含义,所以起名字就变得很重要,这就有了名字和值的对应,所以可以使用键值对,可使映射关系map集合搞定,又需读取硬盘上的数据,所以map+io = Properties;
public static void main(String[] args) throws IOException {
	File config = new File("count.properties"); // 将配置文件封装成file对象;
	if(!config.exists()) config.createNewFile(); // 若文件不存在,则创建
	FileInputStream fis = new FileInputStream(config); // 将file对象与读取流关联
	Properties prop = new Properties();
	prop.load(fis); // 将流中信息存储到集合中
	String value = prop.getProperty("time"); // 从集合中根据键获取值
	System.out.println(value);
	System.out.println(value!=null);
	int count = 0; // 定义计数器,记录获取到的次数
	if(value!=null) {
		count = Integer.parseInt(value); // 将value转换为int型赋值给计数器
		if(count>=5) { throw new RuntimeException("使用次数已达到,请注册,给钱!"); }
	}
	count++; // 计数器加一
	prop.setProperty("time", count+""); // 修改键为time的属性值
	FileOutputStream fos = new FileOutputStream(config);
	prop.store(fos, "");
	fis.close();
	fos.close();
}
6、练习四: 文件清单列表;
要求:获取指定目录下,指定扩展名的文件(包含子目录中的),这些文件的绝对路径写入到一个文本文件中;简单说,就是建立一个指定扩展名的文件的列表;;
思路:
①必须进行深度遍历;
②要在遍历的过程中进行过滤,将符合条件的内容都存储到容器中;
③对容器中的内容进行遍历并将绝对路径写入到文件中;
class test{
	public static void main(String[] args) throws IOException {
		File dir = new File("e:\\java0331");
		FilenameFilter filter = new FilenameFilter() {
			public boolean accept(File dir, String name) {
				return name.endsWith(".java");
			}
		};
		List<File> list = new ArrayList<File>(); // 创建List集合存储文件绝对路径名;
		getFiles(dir,filter,list);
		File destFile = new File(dir,"javalist.txt");
		write2File(list, destFile);
	}
	// 对指定目录中的内容进行深度遍历,并按照指定过滤器,进行过滤,将过滤后的内容存储到指定容器List中
	public static void getFiles(File dir, FilenameFilter filter, List<File> list) {
		File[] files = dir.listFiles();
		for(File file:files) {
			if(file.isDirectory()) { getFiles(dir,filter,list); }
			else { // 对遍历到的文件进行过滤器的过滤,将符合条件File对象,存储到List集合中
				if(filter.accept(dir, file.getName())) list.add(file)	;
			}
		}
	}
	public static void write2File(List<File> list, File destFile) {
		BufferedWriter bufw = null;
		try {
			bufw = new BufferedWriter(new FileWriter(destFile));
			for(File file:list) {
				bufw.write(file.getAbsolutePath());
				bufw.newLine();
				bufw.flush();
			}
		} catch (Exception e) { throw new RuntimeException("写入异常!");
		} finally {
			if(bufw!=null)
				try { bufw.close(); }
			    catch (IOException e) { throw new RuntimeException("关闭失败!");}
		}
	}
}
~ 打印流 PrintStream / PrintWriter
1、PrintStream: 字节打印流; 继承于OutputStream - FileOutputStream
(1)提供了打印方法可以对多种数据类型值进行打印,并保持数据的表示形式;
(2)它不抛IOException;
(3)构造函数,接收三种类型的值: 字符串路径,File对象,字节输出流;
2、PrintStream 为其他输出流添加了功能,使它们能够方便的打印各种数据值表示形式;它还提供了其他两项功能:(1)与其他输出流不同,它永远不抛IO异常;(2)自动刷新+out.println();换行;
PrintStream打印的所有字符都是用平台的默认字符编码转换为字节;在需要写入字符时,使用PrintWriter 类;
3、可以直接将数据打印到文件中,意味着输出流中有直接操作文件的流对象PrintStream;
4、打印流和FileOutputStream/FileWriter区别:
(1)打印流是OutputStream的子类,具备所有OutputStream类具备的write方法的特点,此外,打印流对象 目的除了文件以外,还能是一个流,也就是能把数据直接打印到另外一个流里面去,而OutputStream流只能将数据打印到文件中
5、PrintStream既有write方法,也有print方法;write方法是继承父类OutputStream的方法,不是原样打印;print方法是自己独有的,原样打印;
6、什么时候使用打印流: 当想要将数据原样打印到目的地时使用;
例如:将97原样打印到文件中,而不是97转换成字符a打印到文件中;
public static void main(String[] args) throws Exception {
	PrintStream out = new PrintStream("e:\\print.txt");
	out.write(610); // 0000 0010 0110 0010  只写最低8位,保存b
	out.write(97);  // a
	out.print(97); // 97  将97先变成字符串保持原样,再将字符串打印到目的地中
	out.close();  // 输出ba
}
7、PrintWriter: 字符打印流;
构造函数参数:字符串路径,File对象,字节输出流,字符输出流;
public static void main(String[] args) throws Exception {
	BufferedReader bufr = new BufferedReader(new InputStreamReader(System.in));
	PrintWriter out = new PrintWriter(new FileWriter("e:\\print.txt"),true);
	String line =  null;
	while((line=bufr.readLine())!=null){
		if("over".equals(line))	break;
		out.println(line.toUpperCase());
//			out.flush();
	}
	out.close();
	bufr.close();
}
~ 序列流 SequenceInputStream
序列流: 多个源合并成一个源;各个流在序列流中是有序的,谁先进来谁就在前面;
SequenceInputStream是字节流,不只能合并文本,还能合并其它枚举文件;源不确定是字节还是枚举,所以只能使用字节流;

1、文件合并 - 枚举和迭代
需求:将1.txt、2.txt、3.txt文件中的数据合并到一个文件中;
public static void main(String[] args) throws Exception {
	Vector<FileInputStream> v = new Vector<FileInputStream>(); // Vector中有枚举类型,SequenceInputStream构造函数需要枚举类型
	v.add(new FileInputStream("e:\\1.txt"));
	v.add(new FileInputStream("e:\\2.txt"));
	v.add(new FileInputStream("e:\\3.txt"));
	Enumeration<FileInputStream> en = v.elements(); // 枚举的数据来自于Vector集合的元素
	SequenceInputStream sis = new SequenceInputStream(en); // 需要枚举类型的参数
	FileOutputStream fos = new FileOutputStream("e:\\4.txt");
	byte[] buf = new byte[1024];
	int len = 0;
	while((len=sis.read(buf))!=-1){
		fos.write(buf,0,len);
	}
	fos.close();
	sis.close();  // 将序列流中的每个小的流都关闭;
}
改进:使用Vector效率太低,改使用ArrayList,效率高;
但是ArrayList没有枚举,所以只能自己new一个枚举对象,实现枚举的两个方法;但是取出容器中的元素要依赖于容器的结构来定,所以没办法单独实现枚举的两个操作容器元素的方法;枚举被迭代器取代了,它俩的功能是重复的,所以ArrayList虽然没有枚举,但是有迭代器,可以用迭代器来完成功能的实现;
public static void main(String[] args) throws Exception {
	ArrayList<FileInputStream> al = new ArrayList<FileInputStream>();
	for(int x=1; x<=3; x++){
		System.out.println("e:\\"+x+".txt");
		al.add(new FileInputStream("e:\\"+x+".txt"));
	} // 集合工具类中的静态方法enumeration接收集合类型的参数,返回枚举类型;实现原理如下:
	Enumeration<FileInputStream> en = Collections.enumeration(al);
//		final Iterator it = al.iterator(); // 内部类访问局部变量时,局部变量要定义成final
//		Enumeration en = new Enumeration() {
//			@Override
//			public boolean hasMoreElements() { return it.hasNext(); }
//			@Override
//			public FileInputStream nextElement() { return it.next(); }
//		};
	SequenceInputStream sis = new SequenceInputStream(en);
	FileOutputStream fos = new FileOutputStream("e:\\1234.txt");
	byte[] buf = new byte[1024];
	int len = 0;
	while((len=sis.read(buf))!=-1){
		fos.write(buf,0,len);
	}
	fos.close();
	sis.close();
}
2、文件切割+配置文件:
class test {
	private static final int SIZE = 1024*1024;
	public static void main(String[] args) throws Exception {
		File file = new File("e:\\冬雪.mp3"); // 将待切割的文件封装成file对象;
		FileInputStream fis = new FileInputStream(file); // 用读取流关联源文件
		FileOutputStream fos = null; // 创建目的.使用时再创建;
		File dir = new File("e:\\partfiles"); // 创建目录,用于存放切割文件
		if(!dir.exists()) dir.mkdirs();  // 若目录不存在,则创建
		byte[] buf = new byte[SIZE]; // 定义一个1M的缓冲区
		int count = 1;  // 用来定义切割后的文件的命名
		int len = 0;
		//切割文件时,必须记录住被切割文件的名称,以及切割出来碎片文件的个数, 以方便于合并
		//这个信息为了进行描述,使用键值对的方式;用到了properties对象
		Properties prop = new Properties();

		while((len=fis.read(buf))!=-1){
			fos = new FileOutputStream(new File(dir,(count++)+".part"));
			fos.write(buf, 0, len);
			fos.close();
		}
		// 将被切割文件的信息保存到prop集合中
		prop.setProperty("partcount", count+"");
		prop.setProperty("filename", file.getName());
		fos = new FileOutputStream(new File(dir,count+".properties"));
		prop.store(fos, "save file info");
		fis.close(); fos.close();
	}
}
3、文件合并+配置文件:
class test {
	private static final int SIZE = 1024*1024;
	public static void main(String[] args) throws Exception {
		File dir = new File("e:\\partfiles");
		// 获取指定目录下的配置文件对象,通过配置文件获取要合并的文件的个数;
		File[] files = dir.listFiles(new SuffixFilter(".properties"));
		if(files.length!=1) throw new RuntimeException(dir+",该目录下无properties扩展名的文件或不唯一");
		File config = files[0]; // 将配置文件封装成file对象;
		// 获取配置文件中的配置信息=====================================
		Properties prop = new Properties();
		prop.load(new FileInputStream(config)); // 将于配置文件关联的流的内容存储到集合中;
		String filename = prop.getProperty("filename");
		int count = Integer.parseInt(prop.getProperty("partcount"));
		//获取该目录下的所有碎片文件=====================================
		File[] partFiles = dir.listFiles(new SuffixFilter(".part"));
		if(partFiles.length!=(count-1)) throw new RuntimeException(" 碎片文件个数不对!应该"+count+"个");
		// 将碎片文件和流对象关联 并存储到集合中
		ArrayList<FileInputStream> al = new ArrayList<FileInputStream>();
		for(int x=0; x<partFiles.length; x++){
			al.add(new FileInputStream(partFiles[x]));
		}
		Enumeration<FileInputStream> en = Collections.enumeration(al);
		SequenceInputStream sis = new SequenceInputStream(en);
		FileOutputStream fos = new FileOutputStream(new File(dir,filename));
		byte[] buf = new byte[1024];
		int len = 0;
		while((len=sis.read(buf))!=-1){
			fos.write(buf, 0, len);
		}
		fos.close(); sis.close();
	}
}
class SuffixFilter implements FilenameFilter{
	private String suffix;
	public SuffixFilter(String suffix){ this.suffix = suffix; }
	public boolean accept(File dir, String name) {
		return name.endsWith(suffix);
	}
}
~ 对象的序列化与反序列化
对象的序列化:ObjectOutputStream
对象的反序列化:ObjectInputStream
对象的反序列化只能读取对象的序列化存储的对象;
class Person implements Serializable{ //对象序列化,被序列化的对象必须实现Serializable接口
	private String name;
	private int age;
	public Person(String name, int age) { this.name = name; 	this.age = age; 	}
}
class test {
	public static void main(String[] args) throws Exception {
		 writeObj(); // 对象的序列化:将对象从内存中读取到硬盘上进行永久性存储;
		 readObj();  // 对象的反序列化:根据序列化生产的文件+对象的class文件,将对象从硬盘上读取到内存中
	}
	public static void writeObj() throws FileNotFoundException, IOException {
		// Object是操作对象的装饰,FileOutputStream:要将对象以文件的形式存储到硬盘上,硬盘对应File
		ObjectOutputStream oos = new ObjectOutputStream(new FileOutputStream("e:\\obj.object"));
		oos. writeObject(new Person("zhangsan",21));
		oos.close();
	}
	public static void readObj() throws FileNotFoundException, IOException, ClassNotFoundException {
		ObjectInputStream ois = new ObjectInputStream(new FileInputStream("e:\\obj.object"));
		Person p = (Person)ois.readObject();
		System.out.println(p.getName()+":"+p.getAge());
		ois.close();
	}
}
~ 序列化接口 Serializable
1、Serializable:是一个标记接口,不用实现任何方法,用于给被序列化的类加入ID号,用于判断类和对象是否是同一个版本;
2、当一个类进行序列化时,都会给该类分配一个ID号(序列号),该序列号在反序列化过程中用于验证序列化对象的发送者和接受者是否为该对象加载了与序列化兼容的类;也就是说,验证序列化对象和生成序列化对象的类是否是同一版本;不是同一版本,反序列化就会失败,产生异常;
对象类实现序列化接口时就隐式的生成了序列号,对象类具备了序列号之后,再通过该类生成的序列化对象就带了这个序列号;类修改后序列号也会发生改变;
3、序列号的生成:根据类的特征和类的签名计算出来的;根据类中成员的数字签名就完成了序列号的定义;
4、建议使用显示声明序列号的方式来生成类的序列号,因为编译器是分版本的,不同版本的编译器可能导致同一个类编译完的序列号不一样,在反序列化的过程中会出错,类的对象取不出来;通过显示声明的方式生成的序列号,修改类的内容时,不会发生改变;
5、transient关键字:非静态数据不想被序列化可以使用这个关键字修饰;
在序列化时静态成员变量不会写入到硬盘上,但是有时需要某个属性不写入到硬盘上,但是又不能使用静态,因为不是公共数据,这时候可以使用transient关键字;
~ 随机访问文件 RandomAccessFile
随机访问文件 RandomAccessFile :自身具备读写的方法;不是io体系中的子类;
特点:
(1)该对象即能读,又能写;
(2)该对象内部维护了一个大型的byte数组,并通过指针可以操作数组中的元素;
(3)可以通过getFilePointer方法获取指针的位置,通过seek方法设置指针的位置;
(4)其实该对象就是将字节输入流和输出流进行了封装:读需要流,写也需要流,而且操作的是一个byte类型的数组,所以需要字节流;
(5)该对象的源或者目的只能是文件,通过构造函数就可以看出:构造函数第一个参数要么接收字符串路径,要么接收文件;第二个参数指定用以打开文件的访问模式:r/rw/rws/rwd;
(6)要求写入的数据要有规律,方便存取操作;
(7)多线程写入时可以使用这个对象:多个线程同时写入内容,分别给每个线程指定从哪个位置开始写数据即可;
public static void writeFile() throws IOException { //使用RandomAccessFile对象写入一些人员信息,比如姓名和年龄
	// 如果文件不存在,则创建,如果文件存在,不创建;第二个参数指定对文件的操作方式
	RandomAccessFile raf = new RandomAccessFile("e:\\random.txt","rw"); //
	raf.write("张三".getBytes()); // 参数是字节数组类型的;
	raf.write(609); // 四个字节,只写最低位的一个字节97 - a;
	raf.writeInt(609); // 接收四个字节将int写入该文件,先写高字节;
	raf.close();
}
public static void readFile() throws IOException {
	RandomAccessFile raf = new RandomAccessFile("ranacc.txt", "r");
	raf.seek(1*8); //随机读取;只要指定指针位置即可;通过seek设置指针的位置
	byte[] buf = new byte[4];
	raf.read(buf);
	String name = new String(buf);
	int age = raf.readInt();
	System.out.println("pos:"+raf.getFilePointer()); // 获取指针当前位置
	raf.close();
}
public static void randomWrite() throws IOException{
	// 若ranacc.txt存在,不覆盖;会覆盖文件内容;
	RandomAccessFile raf = new RandomAccessFile("ranacc.txt", "rw");
	raf.seek(3*8); //将指针指向24位置,往指定位置写入数据
	raf.write("哈哈".getBytes());
	raf.writeInt(108);
	raf.close();
}
~ 管道流 PipedStream
1、管道输入流PipedInputStream / 管道输出流PipedOutputStream : 输入输出可以直接进行连接,通过结合线程使用;
2、管道输入流应该连接到管道输出流(write–>read),管道输入流提供要写入管道式输出流的所有数据字节;通常数据由某个线程从管道输入流对象读取,并由其他线程将其写入到相应的管道输出流PipedOutputStream;不建议对这两个对象使用单线程,因为单线程容易出现死锁:当输出流连接到输入流时(read–>write),若输入流先去读取数据,但是又读取不到数据就会一直等待数据读取,因为read是阻塞式方法,这样write就一直执行不到,就会死锁;
3、关联管道输入流与管道输出流的方法:
(1)在管道输入流初始化时就明确与它相连的管道输出流;
(2)使用connect方法:连接一个输出流;
4、管道流什么时候使用: 若想指定数据来源,就使用管道流将输入流输出流对接上;
class test {
	public static void main(String[] args) throws Exception {
		 PipedInputStream input = new PipedInputStream();
		 PipedOutputStream output = new PipedOutputStream();
		 input.connect(output);
		 new Thread(new input(input)).start();
		 new Thread(new output(output)).start();
	}
}
class input implements Runnable{ // 通过实现Runnable的方式创建多线程
	private PipedInputStream in; // 属性值通过构造函数传入
	public input(PipedInputStream in){ this.in = in; }
	public void run() {
		try {
			byte[] buf = new byte[1024];
			int len = in.read(buf);
			String s = new String(buf,0,len);
			System.out.println("s = "+s);
			in.close();
		} catch (Exception e) { }
	}
}
class output implements Runnable{ // 通过实现Runnable的方式创建多线程
	private PipedOutputStream out;
	public output(PipedOutputStream out){ this.out = out; }
	public void run() {
		try { // 字节流不能直接写入字符串数据,需要转换成字节形式
			out.write("管道来了!".getBytes());
		} catch (Exception e) { }
	}
}
~ 操作基本类型数据的流对象 DataStream
通过dos.writeUTF("你好");写入的文件使用转换流读取不出来,只能使用相对应的读取流的方法String str = dis.readUTF();读取数据;因为写入的文件内容是数据+编码标识头,表示文件是使用UTF-8修改版的编码格式存储数据的;
public static void readData() throws IOException {
	DataInputStream dis = new DataInputStream(new FileInputStream("data.txt"));
	String str = dis.readUTF();
	System.out.println(str);
}
public static void writeData() throws IOException {
	DataOutputStream dos = new DataOutputStream(new FileOutputStream("data.txt"));
	dos.writeUTF("你好");
	dos.close();
}
~ 操作数组的流 ByteArrayInputStream / ByteArrayOutputStream
1、ByteArrayOutputStream: 字节数组输出流;此类实现了一个输出流,因为继承了OutputStream,其中的数据被写入一个byte数组,所以说目的是内存;
缓冲区会随着数据的不断写入而自动增长(长度可变的数组),可使用toByteArray和toString获取数据;
注意:关闭这个流是无效的,因为它没有调用底层资源,而关闭流关闭的是底层的资源,只是在内存中操作资源;但是此类中的关闭方法仍然可被调用,但是方法体什么都没做,关闭流之后流中的方法仍然可被调用,而不会产生任何IOException;
2、操作数组的流对象 源和目的 都是内存;
File类的流对象 源和目的 都是硬盘;
System.in System.out 源和目的 都是键盘控制台;
public static void main(String[] args) throws Exception {
	ByteArrayInputStream bis = new ByteArrayInputStream("abcedf".getBytes());
	ByteArrayOutputStream bos = new ByteArrayOutputStream();
	int ch = 0;
	while ((ch = bis.read()) != -1) {
		bos.write(ch);
	}
	System.out.println(bos.toString());
}
~ 编码表 - 编码解码问题
2、字符串 --> 字节数组:编码
字节数组 --> 字符串:解码
你好:GBK: -60 -29 -70 -61
你好:utf-8: -28 -67 -96 -27 -91 -67
如果你编错了,解不出来,如果编对了,解错了,有可能有救;
class test {
	public static void main(String[] args) throws Exception {
		String str = "谢谢"; // 定义字符串
		byte[] buf = str.getBytes("gbk");     // 编码
		String s1 = new String(buf, "UTF-8"); // 解码
		System.out.println("s1=" + s1);
		byte[] buf2 = s1.getBytes("UTF-8");   // 获取源字节(再编码)
		printBytes(buf2);// -17 -65 -67 -17 -65 -67 -17 -65 -67
						 // -17 -65 -67 -17 -65 -67 -17 -65 -67 -17 -65 -67
						 // -48 -69 -48 -69
		String s2 = new String(buf2, "GBK"); // 再解码
		System.out.println("s2=" + s2);
		// encodeDemo(str);
	}
	public static void encodeDemo(String str) throws UnsupportedEncodingException {
		byte[] buf = str.getBytes("UTF-8"); // 编码
		String s1 = new String(buf, "UTF-8"); // 解码
		System.out.println("s1=" + s1);
	}
	private static void printBytes(byte[] buf) {
		for (byte b : buf) {
			System.out.print(b + " ");
		}
	}
}
3、练习 - 按字节截取字符串:
在java中,字符串“abcd”与字符串“ab你好”的长度是一样,都是四个字符,但对应的字节数不同,一个汉字占两个字节;
定义一个方法,按照最大的字节数来取子串;
如:对于“ab你好”,如果取三个字节,那么子串就是ab与“你”字的半个,那么半个就要舍弃;如果去四个字节就是“ab你”,取五个字节还是“ab你”;
class test {
	public static void main(String[] args) throws Exception {
		String str = "ab你好cd谢谢"; // str = "ab琲琲cd琲琲";
		int len = str.getBytes("gbk").length;
		for (int x = 0; x < len; x++) {
			System.out.println("截取" + (x + 1) + "个字节结果是:" + cutStringByByte(str, x + 1));
		}
		int len1 = str.getBytes("utf-8").length;
		for (int x = 0; x < len1; x++) {
			System.out.println("截取" + (x + 1) + "个字节结果是:" + cutStringByU8Byte(str, x + 1));
		}
	}
	public static String cutStringByByte(String str, int len) throws UnsupportedEncodingException {
		byte[] buf = str.getBytes("gbk"); // 编码
		int count = 0;
		for(int x=len-1; x>=0; x--){
			if(buf[x]<0)	count++;
			else	break;	}
		if(count%2==0)	return new String(buf,0,len,"gbk");
		else	return new String(buf,0,len-1,"gbk");
	}
	public static String cutStringByU8Byte(String str, int len) throws UnsupportedEncodingException {
		byte[] buf = str.getBytes("utf-8");
		int count = 0;
		for(int x=len-1; x>=0; x--){
			if(buf[x]<0)	count++;
			else	break;	}
		if(count%3==0)	 return new String(buf,0,len,"utf-8");
		else if(count%3==1)	 return new String(buf,0,len-1,"utf-8");
		else   	return new String(buf,0,len-2,"utf-8");
	}
}
>> 网络编程
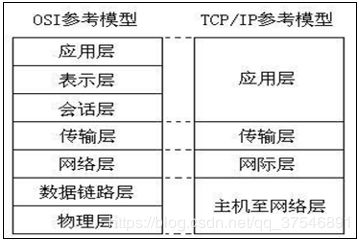
~ 网络模型概述
1、层物理:
主要定义物理设备标准,如网线的接口类型、光纤的接口类型、各种传输介质的传输速率等;
它的主要作用是传输比特流(就是由1、0转化为电流强弱来进行传输,到达目的地后再转化为1、0,也就是我们常说的数模转换与模数转换) ,这一层的数据叫做比特;
2、数据链路层:
主要将从物理层接收的数据 进行MAC地址(网卡的地址,即物理地址,全球唯一) 的封装与解封装;常把这一层的数据叫做帧;在这一层工作的设备是交换机,数据通过交换机来传输;
3、网络层: 网际层 - IP
主要将从下层接收到的数据进行IP地址(例192.168 0 .1)的封装与解封装;在这一层工作的设备是路由器,常把这一层的数据叫做数据包;
4、传输层: TCP、UDP
定义了一些传输数据的协议和端口号(WWW端口80等),如:TCP、UDP;主要是将从下层接收的数据进行分段和传输,到达目的地址后再进行重组;常常把这一层数据叫做段;
5、会话层:
通过传输层(端口号:传输端口与接收端口) 建立数据传输的通路;主要在你的系统之间发起会话或者接受会话请求(设备之间需要互相认识可以是IP也可以是MAC或者是主机名)
6、表示层:
主要是进行对接收的数据进行解释、加密与解密、压缩与解压缩等(也就是把计算机能够识别的东西转换成人能够能识别的东西(如图片、声音等) ;
7、应用层: http FTP–文件传输协议:用于上传、下载文件
主要是一些终端的应用,比如说FTP (各种文件下载),WEB (IE浏览),QQ之类的(可以把它理解成我们在电脑屏幕上可以看到的东西,就是终端应用);
装的是应用软件;

(1)数据被应用层的应用程序进行发送的时候,应用程序将数据进行封装,给数据加上自己的标记:这个数据是要用什么应用(软件)来解析?
(2)表示层解析数据是什么数据,然后进行封装:加上标记
(3)会话层建立会话,加标记:跟谁会话
(4)传输层:通过什么样的传输方式传输数据?加标记TCP或UDP
(5)网络层:发给哪一个IP地址?
(6)数据链路层:IP地址对应哪个MAC地址?
~ 网络要素 - IP地址、端口、传输协议
1、IP地址: 网络中设备的标识;
本地回环地址:127.0.0.1, 主机名:localhost
访问本地用,每台计算机都有;
2、端口号: 用于标识进程的逻辑地址,不同的进程有不同的标识,数字表示;
物理端口:机箱后面的端口,看得见摸得着;
逻辑端口:给应用程序分配数字标识,用于标识应用程序的;
有效端口:0~65535;其中0~1024系统(Windows)使用,或保留端口;
3、传输协议: 通讯的规则,TCP、UDP (传输层的协议)
(1)UDP:用户数据报协议;
- 将数据及源和目的封装成数据包,不需要建立连接,每个数据报的大小限制在64K内;
- 因为无连接,所以是不可靠的协议,但是传输速度快;
- 用于传输可靠性要求不高,数据量小的数据,如小区保安对讲机,QQ,在线视频等;
- 就像邮局有地包裹,将东西、地址、目的地址一起封装,直接邮寄,若地址不存在,直接丢弃;
(2)TCP:传输控制协议;
- 建立连接,形成传输数据的通道,在连接中进行大数据量传输;
- 因为是通过三次握手完成连接,所以是可靠协议,但是因为建立连接,效率会稍低;
- 用于传输可靠性要求高,数据量大的数据,如打电话:拨号等待即建立连接;下载数据等;
- 三次握手:老师问你在吗?老师我在;老师说我知道你在了;
~ IP对象 InetAddress
1、InetAddress类 没有构造函数,通过静态方法创建对象;
public static void main(String[] args) throws Exception {
	// 获取本地主机ip地址对象,zxj-PC/192.168.56.1
	InetAddress ip1 = InetAddress.getLocalHost();
	// 获取其他主机的ip地址对象,/192.169.31.52
	InetAddress ip2 = InetAddress.getByName("192.169.31.52"); //
	// InetAddress.getByName("my_think");
	System.out.println(ip2.getHostAddress()); // 192.168.56.1
	System.out.println(ip2.getHostName());    // zxj-PC
}
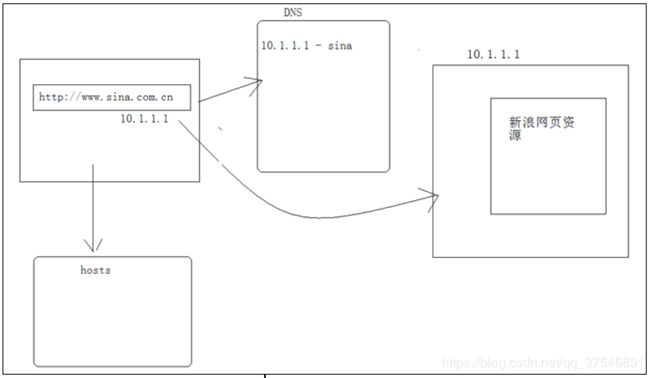
~ 域名解析
http://www.sina.com.cn、http://10.1.1.1 ,(前面的是给这个取的名字)
www:主机名称;
.sina:新浪的域名;
.com:代表商业化组织,以营利为主;
.org:非商业组织,非盈利;
.cn:标识其所属国家类别;
DNS:域名解析服务器;
~ UDP传输
1、Socket: 就是网络服务提供的一种机制,通信两端都有Socket(eg:港口==Socket)
网络通信 其实就是Socket间的通信,数据在两个Socket间通过IO传输;
Socket是一个网络服务端点,不同的传输方式有不同的socket;
2、DatagramSocket: UDP传输协议所对应的端点服务对象,此类表示用来发送和接收数据报包的套接字;
3、DatagramPacket: DatagramSocket对象发送或接收数据报包时都需要一个参数DatagramPacket对象;DatagramPacket此类表示数据报包,用来实现无连接包投递服务;每条报文仅根据包中包含的信息从一台机器路由到另一台机器;从一台机器发送到另一台机器上多个包可以选择不同的路由,也可能按照不同的顺序到达;
数据报包 封装的内容: 要传输的数据、数据长度、目的地址、端口号等;
4、UDP传输的发送端 代码:
思路:
(1)建立udp的socket服务对象;
(2)将要发送的数据封装到数据包中;
(3)将将数据包封装到socket对象中;
(4)通过udp的socket服务将数据包发送出去;
(5)关闭socket服务;
public static void main(String[] args) throws Exception {
	System.out.println("发送端启动......");
	// 使用DatagramSocket对象创建udpsocket服务,指定端口号
	DatagramSocket ds = new DatagramSocket(8888); // 接收端就收的数据解析出的端口号是这个
	// 将要发送的数据封装到数据包中
	String str = "udp传输演示:哥们来了!";
	byte[] buf = str.getBytes();  // 传输的是字节
	// 封装数据包:使用DatagramPacket将数据封装到的该对象包中
	DatagramPacket dp = new DatagramPacket(
			buf, buf.length, InetAddress.getByName("192.168.43.15"), 10000);
	// 通过udp的socket服务将数据包发送出去
	ds.send(dp);
	ds.close(); // 关闭socket服务;
}
5、UDP传输的接收端 代码:
思路:
(1)建立udp socket服务,因为是要接收数据,必须要明确一个端口号;
(2)创建数据包,用于存储接收到的数据,方便用数据包对象的方法解析这些数据;
(3)使用socket服务的receive方法将接收的数据存储到数据包中;
(4)通过数据包的方法解析数据包中的数据;
(5)关闭资源;
public static void main(String[] args) throws IOException {
	System.out.println("接收端启动......");
	// 建立udp socket服务
	DatagramSocket ds = new DatagramSocket(10000); // 对应发送端dp里面封装的端口号
	// 创建数据包
	byte[] buf = new byte[1024];
	DatagramPacket dp = new DatagramPacket(buf, buf.length);
	// 使用接收方法将数据存储到数据包中
	ds.receive(dp); // 阻塞式的,没有数据包就一直等待接收
	// 通过数据包对象的方法,解析其中的数据,比如,地址,端口,数据内容
	String ip = dp.getAddress().getHostAddress(); // 发送端(源)地址
	int port = dp.getPort(); // 发送端(源)端口
	String text = new String(dp.getData(),0,dp.getLength());
	System.out.println(ip+":"+port+":"+text);
	System.out.println("///");
	ds.close();
}
6、发送端、接收端启动顺序: 先启动谁都行,因为UDP传输是面向无连接,不可靠,速度快,发送数据之后不管有没有人接收,接收数据不管有没有人发送,没人发送数据就一直等待(阻塞式的方法);
本例先启动接收端,再在另一个控制台启动发送端;因为如果先启动发送端,发送端把数据发送完就结束了,再启动接收端,接收端接收不到数据,就一直处于等到状态;
7、实现一个聊天程序 - 两个窗口:
public static void main(String[] args) throws Exception {
	System.out.println("发送端启动......");
	DatagramSocket ds = new DatagramSocket(8888);
	BufferedReader bufr = new BufferedReader(new InputStreamReader(System.in));
	String line = null;
	while((line=bufr.readLine())!=null){
		byte[] buf = line.getBytes(); // 将字符串转换为字节数组
		DatagramPacket dp = new DatagramPacket(buf, buf.length,InetAddress.getByName("192.168.43.15"),10000);
		ds.send(dp);
		if("886".equals(line)) break;
	}
	ds.close();
}
public static void main(String[] args) throws IOException {
	System.out.println("接收端启动......");
	DatagramSocket ds = new DatagramSocket(10000);
	while(true){
		byte[] buf = new byte[1024];
		DatagramPacket dp = new DatagramPacket(buf, buf.length);
		ds.receive(dp);
		String ip = dp.getAddress().getHostAddress();
		int port = dp.getPort();
		String text = new String(dp.getData(),0,dp.getLength());
		System.out.println(ip+":"+port+":"+text);
	}
	// ds.close(); // 一直接收信息,不关闭;
}
8、实现一个聊天程序 - 两个窗口合并一个窗口:
class test {
	public static void main(String[] args) throws Exception {
		DatagramSocket send = new DatagramSocket();
		DatagramSocket receive = new DatagramSocket(10001);
		new Thread(new Send(send)).start();
		new Thread(new Receive(receive)).start();
	}
}
class Send implements Runnable{
	private DatagramSocket ds;
	public Send(DatagramSocket ds){ this.ds = ds; }
	public void run() {
		try {
			BufferedReader bufr = new BufferedReader(new InputStreamReader(System.in));
			String line = null;
			while((line=bufr.readLine())!=null){
				byte[] buf = line.getBytes();
				DatagramPacket dp = new DatagramPacket(buf, buf.length,InetAddress.getByName("192.168.43.15"),10001);
				ds.send(dp);
				if("886".equals(line))	break;
			}
			ds.close();
		} catch (Exception e) { }
	}
}
class Receive implements Runnable{
	private DatagramSocket ds;
	public Receive(DatagramSocket ds){ this.ds = ds; }
	public void run() {
		try {
			while(true){
				byte[] buf = new byte[1024];
				DatagramPacket dp = new DatagramPacket(buf, buf.length);
				ds.receive(dp);
				String ip = dp.getAddress().getHostAddress();
				int port = dp.getPort();
				String text = new String(dp.getData(), 0, dp.getLength());
				System.out.println(ip + "::" + text);
				if(text.equals("886")){ System.out.println(ip+"....退出聊天室"); }
			}
		} catch (Exception e) { }
	}
}
~ TCP传输
1、 TCP传输需要先建立连接,中间形成通路之后进行数据传输,TCP在进行对象区分时与UDP不一样,UDP的DatagramSocket对象既能发送数据也能接收数据报包的套接字,而TCP是在通道中进行数据的传输,所以TCP传输数据分两个端点,涉及两个对象:Socket/ServerSocket;
Socket:实现客户端套接字,
ServerSocket:实现服务器端套接字,服务器套接字等待请求通过网络传入;
TCP是面向连接的,所以需要先开启服务端;
2、客户端与服务器端交互: 客户端发数据到服务端,并接收服务端发回的回应信息;
客户端建立的过程:
(1)创建tcp客户端socket服务:使用的是Socket对象; 建议该对象一创建就明确目的地及端口号:要连接的主机;
(2)如果连接建立成功,说明数据传输通道已建立;
该通道就是socket流,是底层建立好的,既然是流,说明这里既有输入,又有输出,所以想要输入或者输出流对象,可以找Socket来获取;
可以通过getOutputStream()和getInputStream()来获取两个字节流;
(3)使用输出流,将数据写出;
(4)关闭资源;
public static void main(String[] args) throws Exception {
	// 使用Socket对象创建客户端socket服务,并将其连接到指定IP地址的指定端口号;
	Socket s = new Socket("192.168.43.15", 10001);
	// 通过socket对象获取输出流对象
	OutputStream out = s.getOutputStream();
	// 使用输出流将指定的数据写出去
	out.write("客户端发送的数据!".getBytes());
	// 使用socket读取流 读取服务端返回的信息
	InputStream in = s.getInputStream();
	byte[] buf = new byte[1024];
	int len = in.read(buf);
	String str = new String(buf, 0, len);
	System.out.println("服务端返回的信息:" + str);
	// 关闭资源:socket服务关闭,客户端的输入流输出流也随之关闭了;
	s.close();
}
3、客户端与服务器端交互: 服务端接收客户端发送的数据,并作出回应;
服务端建立的过程:
(1)创建服务端socket服务:通过ServerSocket对象;
(2)服务端必须对外提供一个监听的端口,否则客户端无法连接;
(3)获取连接过来的客户端对象;
(4)通过客户端对象获取socket流读取客户端发来的数据,并打印在控制台上;
(5)关闭2个资源:关客户端,关服务端;
public static void main(String[] args) throws IOException {
	// 使用ServerSocket对象创建服务端socket服务,并指定监听的端口号
	ServerSocket ss = new ServerSocket(10001);
	// 获取连接过来的客户端对象
	Socket s = ss.accept(); // 阻塞式方法:一直等待客户端连接;
	String clientIP = s.getInetAddress().getHostAddress();
	// 通过客户端socket服务对象获取读取流读取客户端发送过来的数据
	InputStream in = s.getInputStream();
	byte[] buf = new byte[1024];
	int len = in.read(buf);
	String str = new String(buf, 0, len);
	System.out.println(clientIP + ":" + str);
	// 使用客户端的socket对象的输出流对象给客户端作出回应
	OutputStream out = s.getOutputStream();
	out.write("服务端已收到信息;".getBytes());
	// 关闭资源
	s.close(); // 与客户端交互完信息后要断开客户端的链接,以便其它客户端与服务端进行连接;
	ss.close(); // 服务端一般不关闭
}
4、练习 - 文本转换:
创建一个英文大写转换服务器:客户端输入字母数据,发送给服务端,服务端收到后显示在控制台,并将该数据转成大写返回给客户端,直到客户端输入over 转换结束;
分析:有客户端和服务端,使用tcp传输;
(1)转换客户端实现:
思路:
①需要先有socket端点 ;
②客户端的数据源:键盘;
③客户端的目的:socket;
④接收服务端的数据,源:socket(从socket获取数据);
⑤将数据显示在打印出来:目的:控制台;
⑥在这些流中操作的数据,都是文本数据;
步骤:
①创建socket客户端对象 ;
②获取键盘录入;
③将录入的信息发送给socket输出流;
实现:
public static void main(String[] args) throws Exception {
	// 创建Socket服务客户端对象
	Socket s = new Socket("192.168.43.15",10001);
	// 获取键盘录入,直接写入socket输出流
	BufferedReader bufr = new BufferedReader(new InputStreamReader(System.in));
	// socket输入流:将录入的信息发送给socket输出流:使用PrintWriter直接打印到控制台
	// new BufferedWriter(new OutputStreamWriter(s.getOutputStream())); // 麻烦
	PrintWriter out = new PrintWriter(s.getOutputStream(),true); // 直接使用PrintWriter原样输出即可
	// socket输入流:读取服务端返回的大写数据
	BufferedReader bufIn = new BufferedReader(new InputStreamReader(s.getInputStream()));
	//bufr是从键盘读取数据(小写),bufIn是从服务器读取数据(返回来的大写)
	String line = null;
	while((line=bufr.readLine())!=null){
		if("over".equals(line)) break;
		out.println(line); // 将数据读取到socket的输出流发送给服务端;
		// out.print(line.toUpperCase()+"\r\n");
		// out.flush();
		// 读取服务端发回的一行大写数
		String upperStr = bufIn.readLine();
		System.out.println(upperStr);
	}
	s.close();
}
(2)转换服务端实现:
思路:
①serversocket服务;
②获取socket对象;
③源:socket,读取客户端发过来的需要转换的数据;
④目的:显示在控制台上;
⑤将数据转成大写发给客户端;
实现:
public static void main(String[] args) throws IOException {
	ServerSocket ss = new ServerSocket(10001);
	// 获取连接的客户端的socket对象;
	Socket s = ss.accept();
	String clientIP = s.getInetAddress().getHostAddress();
	System.out.println(clientIP+"......connection");
	// 获取socket读取流,并装饰
	BufferedReader bufIn = new BufferedReader(new InputStreamReader(s.getInputStream()));
	// 获取socket的输出流,并装饰
	PrintWriter out = new PrintWriter(s.getOutputStream(),true);
	String line = null;
	while((line=bufIn.readLine())!=null){
		System.out.println(line);
		out.println(line.toUpperCase()); // 使用客户端的out输出
		// out.print(line.toUpperCase()+"\r\n");
		// out.flush();
	}
	s.close();
	ss.close();
}
(3)代码需要注意的问题:
问题1:
在客户端代码中,while循环的结束标记是输入的内容=over,然后break中断进程;在服务端代码中,while循环结束是因为:客户端中的while循环结束后,执行的下一个语句s.close(),然后在服务端的循环中,bufIn.reanLine读入-1,等于空,所以退出循环;
问题2:
PrintWriter out = new PrintWriter(s.getOutputStream(),true);
客户端、服务端都不加参数true,导致客户端输入数据,服务端没有接收到数据;
原因:客户端、服务端都没有加true,客户端写入数据时,没有做自动刷新动作,只是把数据写到out中去了,没有刷新到socket的输入流中去,服务器端一直处于等待数据读入状态;
解决:可以在PrintWriter创建对象时指定第二个参数为true:自动刷新,也可以在客户端代码的while循环写入数据后执行out.flush();方法进行刷新;
问题3:
out.println(line.toUpperCase());
两端都指定实时刷新之后,客户端发送的数据发送到服务端,但是服务端仍然没有数据输出;
原因:服务端确实读到了客户端发来的数据了,但是因为客户端发送数据到socket输出流时使用的方法是out.print(line.toUpperCase());,print不带换行标记,使得服务端bufIn.readLine()读到的数据没有换行标记,认为一行还没有没有读完,继续等待读取数据,因而没有输出;
解决:out.print(line.toUpperCase()+"\r\n"); 或 out.println(line.toUpperCase());
5、练习 - 上传文本文件: 将客户端的一个文本文件传输到服务端;
(1)客户端实现:
public static void main(String[] args) throws Exception {
	System.out.println("上传客户端......");
	// 创建客户端的socket服务
	Socket s = new Socket("192.168.43.15",10001);
	// 创建读取流对象:从文件中读取数据
	BufferedReader bufr = new BufferedReader(new FileReader("e:\\client.txt"));
	// 创建输出流对象:将从文件中读取到的数据原样打印到socket的输出流中;
	PrintWriter out = new PrintWriter(s.getOutputStream(),true);
	String line = null;  // 频繁读写
	while((line=bufr.readLine())!=null){
		out.println(line);
	}
	// 输出-1到socket的输出流,告诉服务端,客户端读取、写入数据结束
	s.shutdownOutput();
	// 读取服务端返回的信息
	BufferedReader bufIn = new BufferedReader(new InputStreamReader(s.getInputStream()));
	String str = bufIn.readLine();
	System.out.println(str);
	bufr.close();
	s.close();
}
(2)服务端实现:
public static void main(String[] args) throws IOException {
	System.out.println("上传服务端......");
	ServerSocket ss = new ServerSocket(10001);
	Socket s = ss.accept();
	System.out.println(s.getInetAddress().getHostAddress()+"...connected");
	// 获取socket读取流
	BufferedReader bufIn = new BufferedReader(new InputStreamReader(s.getInputStream()));
	BufferedWriter bufw = new BufferedWriter(new FileWriter("e:\\server.txt"));
	String line = null;
	while((line=bufIn.readLine())!=null){
		bufw.write(line);
		bufw.newLine();    //换行
		bufw.flush();
	}
	PrintWriter out = new PrintWriter(s.getOutputStream(),true);
	out.println("上传成功!");
	bufw.close();
	s.close();
	ss.close();
}
(3)注意问题:
问题1:
TCP传输又出现了两端的等待的情况:
客户端的while循环能结束,因为它读取的是文件;循环结束之后就等着读服务端返回的数据;bufIn.readLine();方法是阻塞式的,服务端没有返回数据,就一直等待;
服务端的while循环不能结束,因为服务端的bufIn读取的是Socket的流,所以客户端发过来一句,服务端while循环就读取一句,读完就写入缓冲区中区;服务端的while循环不断读取从客户端传来的数据并不断写入缓冲区,但是客户端while循环中打印完数据没有告诉服务端while循环读该结束了,因为客户端循环读到-1后自己结束循环,没有把-1写出去;所以服务端还在等着读数据;
产生原因:阻塞式方法缺少结束标记导致两端都在等;
解决办法:客户端结束while循环后,给服务端发送一个结束标记:s.shutdownOutput();,告诉服务端,客户端写完了;
问题2:
服务端的while循环把从客户端读取的数据读到缓冲区,没有刷新,但是目的地文件中有数据;文件大小是8192字节:1024*8字节;
8192是默认缓冲区的大小,缓冲区中的数据装满就会自动刷到目的地中;
6、练习 - 上传图片:
(1)上传图片客户端:
public static void main(String[] args) throws Exception {
	System.out.println("上传客户端......");
	Socket s = new Socket("192.168.43.15",10001);
	FileInputStream fis = new FileInputStream("e:\\1.png");
	OutputStream out = s.getOutputStream();
	byte[] buf = new byte[1024];
	int len = 0;
	while((len=fis.read(buf))!=-1){
		out.write(buf,0,len);
	}
	s.shutdownOutput(); // 告诉服务端 客户端写操作完毕,让服务端停止读取
	InputStream in = s.getInputStream();
	byte[] bufIn = new byte[1024];
	int lenIn = in.read(bufIn);
	String str = new String(bufIn,0,lenIn);
	System.out.println(str);
	fis.close();
	s.close();
}
(2)上传图片服务端:
public static void main(String[] args) throws IOException {
	System.out.println("上传服务端......");
	ServerSocket ss = new ServerSocket(10001);
	Socket s = ss.accept();
	String clientIp = s.getInetAddress().getHostAddress();
	System.out.println(clientIp+"......connection");
	InputStream in = s.getInputStream();
	File dir = new File("e:\\pic");
	if(!dir.exists()) dir.mkdirs();
	File file = new File(dir,clientIp+".png");
	FileOutputStream fos = new FileOutputStream(file);
	byte[] buf = new byte[1024];
	int len = 0;
	while((len=in.read(buf))!=-1){
		fos.write(buf, 0, len);
	}
	OutputStream out = s.getOutputStream();
	out.write("上传成功".getBytes());
	fos.close();
	s.close();
	ss.close();
}
(3)单线程上传图片,服务端存在的问题:
上面的代码只能给一个客户端提供服务,因为ss.accept();获取一个客户端之后就完事了,不再获取客户端;可以将获取客户端以及流对象的不断读写操作放到while循环中,一个客户端上传图片之后,继续循环获取下一个客户端连接;
while循环没有结束标记,一般时候是禁止的,因为无限循环空转出现死循环会死机,但是若循环体中有阻塞式方法(ss.accept();)就没事,不会死机,这也是阻塞式方法的一个好处;
加上while循环之后,一个客户端上传照片给客户端没有问题,若是有多个客户端向服务端上传图片就会出现问题:
client1进入while循环,被ss.accept();获取赋值给socket,这时服务端的主线程就在处理客户端发过来的数据,比如处理到“频繁读取操作”,主线程频繁读取client1数据的时候,client2就连接进来while循环了,但是服务端没有获取到client2对象,因为就一个线程,正在处理client1发过来的数据,没有时间执行ss.accept();获取client2对象;所以这时候client2就在等待连接服务端,直到主线程处理完client1,执行s.close操作之后再次循环获取客户端对象;这就导致客户端上传图片需要排队;
解决:服务端使用多线程;
每进来一个客户端对象,就封装到一个单独的线程里面去,每个线程都有一个单独的任务,每个任务处理的都是一个单独的socket;

(4)上传图片服务端使用多线程:
public class server {
	public static void main(String[] args) throws IOException {
		System.out.println("上传服务端......");
		ServerSocket ss = new ServerSocket(10001);
		while(true){
			Socket s = ss.accept();
			new Thread(new UploadTask(s)).start();
		}
		// ss.close(); // while无线循环就不需要关闭了
	}
}
class UploadTask implements Runnable{
	private static final int SIZE = 1024*1024*2;
	private Socket s;
	public UploadTask(Socket s){ this.s = s; }
	public void run() {
		int count = 0; // 文件上传重复时,按名称+1命名;
		String clientIp = s.getInetAddress().getHostAddress();
		System.out.println(clientIp+"......connection");
		try {
			InputStream in = s.getInputStream(); // 读取客户端发来的数据
			File dir = new File("e:\\pic"); // 将读取到数据存储到一个文件中
			if(!dir.exists()) dir.mkdirs();
			File file = new File(dir,clientIp+".jpg");
			while(file.exists()){ // 如果文件已经存在于服务端,则名称(+1)
				file = new File(dir,clientIp+"("+(++count)+").jpg");
			}
			FileOutputStream fos = new FileOutputStream(file);
			byte[] buf = new byte[1024];
			int len = 0;
			while((len=in.read(buf))!=-1){
				fos.write(buf, 0, len);
				if(file.length()>SIZE){
				    System.out.println(clientIp+"文件体积过大");
				    fos.close();
				    s.close();
				    System.out.println(clientIp+"...."+file.delete());
				    return ;
			    }
			}
			OutputStream out = s.getOutputStream();
			out.write("上传成功".getBytes());
			fos.close();
			s.close();
		} catch (Exception e) {
			// TODO: handle exception
		}
	}
}
~ 常见客户端和服务端
1、任何能进行通讯的软件,都内置socket;
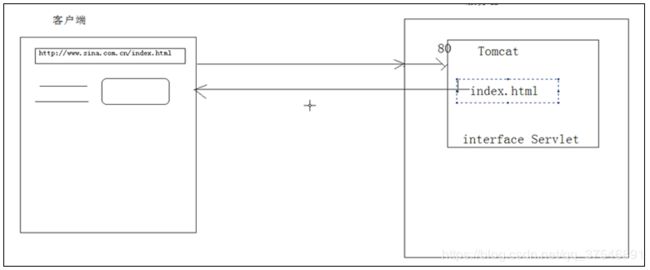
2、最常见的客户端: 浏览器 :IE,搜狗…
最常见的服务端: 服务器:Tomcat:对外提供web资源访问
3、服务器: 能对外提供服务的机器;
服务器硬件里面装有应用程序(软件):
orecal - 数据库服务器;
Tomcat - web服务器;
网络硬盘 - 存储服务器
4、web服务器默认的端口80;url不指定端口时默认使用80端口;
5、Tomcat服务器 做两个动作:处理请求,并作答;
Tomcat对外提供一个接口:interface Servlet
~ 客户端和服务器端原理
1、自定义服务端: 使用已有的客户端IE,了解一下客户端给服务端发了什么请求;
浏览器把客户端的信息发送给了服务器,所以自己模拟一个Tomcat服务器接收客户端发送过来的信息,分析客户端发送过来的信息都包含哪些数据,以便自己模拟一个浏览器;
2、服务端代码:
public static void main(String[] args) throws IOException {
	ServerSocket ss = new ServerSocket(9090); // 服务器监听9090端口
	Socket s = ss.accept();
	System.out.println(s.getInetAddress().getHostAddress()+"......connection");
	InputStream in = s.getInputStream(); // 读取客户端发来的请求内容
	byte[] buf = new byte[1024];
	int len = in.read(buf);
	String text = new String(buf,0,len);
	System.out.println(text);
	PrintWriter out = new PrintWriter(s.getOutputStream(),true); //给客户端一个反馈信息
	out.println("欢迎光临");
	s.close();
	ss.close();
}
3、服务端收到的来自客户端发送的请求信息:
客户端和服务端不是同一厂商写的,所以这两个厂商做的软件为了能够相互通讯,要遵循同一规则,浏览器在发送一个请求行的同时 还发送请求消息头,告诉服务器自己都允许什么应用程序来解析;
请求行,包含三段信息:
(1)GET:请求方式;GET、POST
(2) /favicon.ico:请求的资源路径;
(3)HTTP/1.1:http协议的版本;目前有两个版本:1.0和1.1;
GET /favicon.ico HTTP/1.1   // 请求行
// 请求消息头, 属性名:属性值
Accept: image/gif, image/x-xbitmap, image/jpeg, image/pjpeg, application/x-shockwave-flash,
        application/vnd.ms-excel, application/vnd.ms-powerpoint, application/msword, */*  //接受的内容类型
Accept: */*                      //接受任何类型的数据
Accept-Language: zh-cn,zu;q=0.5  //支持的语言
Accept-Encoding: gzip, deflate   //接受的压缩的方式
User-Agent: Mozilla/4.0 (compatible; MSIE 6.0; Windows NT 5.1; SV1; InfoPath.2)
Host: 192.168.1.100:9090      //Host: www.huyouni.com:9090
Connection: Keep-Alive/close
// 空行:请求消息头与请求体之间必须有一行空行
// 请求体
4、模拟一个浏览器获取信息:
D:\Tomcat\bin\startup.bat启动Tomcat服务器;
浏览器访问:http://192.168.43.15:8080/myweb/1.html效果与代码运行效果一样;
public static void main(String[] args) throws Exception {
	Socket s = new Socket("192.168.43.15",8080);
	// 模拟浏览器,给tomcat服务端发送符合http协议的请求消息
	PrintWriter out = new PrintWriter(s.getOutputStream(),true);
	out.println("GET /myweb/1.html HTTP/1.1");
	out.println("Accept: */*");
	out.println("Host: 192.168.43.15:8080");
	out.println("Connection: close");
	out.println(""); // 空行
	out.println(""); // 请求体
	InputStream in = s.getInputStream();
	byte[] buf = new byte[1024];
	int len = in.read(buf);
	System.out.println(new String(buf,0,len));
	s.close();
}
5、服务端发回应答消息:
①应答行
HTTP/1.1 200 OK         //http的协议版本   应答状态码   应答状态描述信息
②应答消息属性信息; 属性名:属性值
Server: Apache-Coyote/1.1
ETag: W/"199-1323480176984"
Last-Modified: Sat, 10 Dec 2011 01:22:56 GMT
Content-Type: text/html
Content-Length: 199
Date: Fri, 11 May 2012 07:51:39 GMT
Connection: close
//空行
③应答体
<html>
	<head>
		<title>这是我的网页</title>
	</head>
	<body>
		<h1>欢迎光临</h1>
		<font size='5' color="red">这是一个tomcat服务器中的资源,是一个html网页;</font>
	</body>
</html>
6、模拟浏览器存在的问题:从服务器返回来的信息包含应答行、应答消息头、应答体三部分,而IE浏览器只返回应答体;这是因为浏览器有一个http解析引擎,将应答消息头解析了,而模拟浏览器缺少解析http协议的东西;
~ URL对象、URLConnection 对象
public static void main(String[] args) throws Exception {
	String str_url = "http://192.168.43.15:8080/myweb/1.html?name=lisi";
	URL url = new URL(str_url);   // 将上面字符串封装成对象
	System.out.println("getProtocol:" + url.getProtocol()); // 协议, http
	System.out.println("getHost:" + url.getHost()); // 主机,192.168.43.15
	System.out.println("getPort:" + url.getPort()); // 端口,8080
	System.out.println("getFile:" + url.getFile()); // 文件,/myweb/1.html?name=lisi
	System.out.println("getPath:" + url.getPath()); // 路径,/myweb/1.html
	System.out.println("getQuery:" + url.getQuery()); // 参数信息部分,name=lisi

	InputStream in = url.openStream(); // 打开一个url的连接,并返回一个用于从该连接读入的InputStream
	byte[] buf = new byte[1024];
	int len = in.read(buf);
	String text = new String(buf, 0, len);
	System.out.println(text);
	in.close();

	// 下面三行代码是InputStream in = url.openStream();的原理;作用等价
	// 获取url对象的Url连接器对象,将连接封装成了对象:java中内置的可以解析的具体协议的对象+socket;
	// URLConnection conn = url.openConnection();
	// System.out.println(conn); // sun.net.www.protocol.http.HttpURLConnection:http://192.168.1.100:8080/myweb/1.html
	// InputStream in = conn.getInputStream();
}
~ 常见网络结构 - C/S、B/S
1、C/S : client/server
特点:该结构的软件,客户端和服务端都需要编写;可发成本较高,维护较为麻烦;
好处:客户端在本地可以分担一部分运算;
2、B/S : browser/server
特点:该结构的软件,只开发服务器端,不开发客户端,因为客户端直接由浏览器取代;开发成本相对低,维护更为简单;
缺点:所有运算都要在服务端完成;
>> 反射机制
~ 概述、应用场景
1、JAVA反射机制: 是在运行状态中,对于任意一个类 (class文件),都能够知道这个类的所有属性和方法;对于任意一个对象,都能够调用它的任意一个方法和属性;这种动态获取的信息以及动态调用对象的方法的功能称为java语言的反射机制;
动态获取类中信息,就是java反射 ,可以理解为对类的解剖;
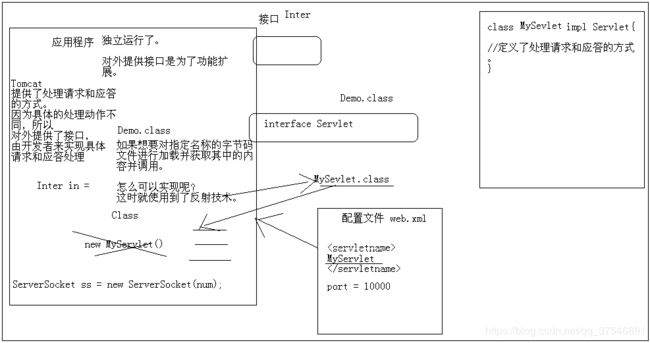
2、一个已完成的,可以独立运行的应用程序,想在后期扩展功能,前期在设计的时候,都会对外提供一个接口;对外暴露接口,后期再实现接口,然后应用程序使用符合该接口的对象,就可以完成功能的扩展;
当需要额外功能的时候,需要在程序外面定义一个类,实现应用程序对外暴露的接口(按照接口的规则实现接口的功能),但是在程序中不能直接new对象,调用对象的方法;
在应用程序对外暴露接口的同时,获取后期可能产生的功能性的类、对象、或者类文件,将符合接口规则的子类对象名称存储在对外提供的配置文件中,而应用程序就在读这个配置文件;应用程序读取到类名之后,就可以根据类的名称找到对应的class文件,找到class文件之后,就加载文件进应用程序,并获取该文件中所有的内容,获取之后就可以对其进行调用;可以根据这个字节码文件创建对象,因为字节码文件中有构造函数;
如果想要对指定名称的字节码文件进行加载并获取其中的内容并调用,就需要使用反射机制;
3、反射机制好处: 大大提高了程序的扩展性,
4、Tomcat原理:使用到的技术有ServerSocket,监听8080端口,IO多线程;Tomcat服务器软件提供的最简单的动作是提供了处理请求和应答的方式;至于如何处理请求,如何做出应答开发者说了算,对于不同请求有不同的处理方式;因为具体的处理动作不同,所以对外提供了接口,由开发者来实现具体请求和应答处理;这个对外提供的接口是Servlet;开发者定义一个子类实现Servlet接口,类中定义处理请求的应答的方式,然后将类名写到web.xml文件中,Tomcat服务启动时,就加载配置文件,根据配置文件获取类名称,读取到类名之后,就将class文件加载进应用程序,然后通过反射技术动态获取并调用类的所有信息;
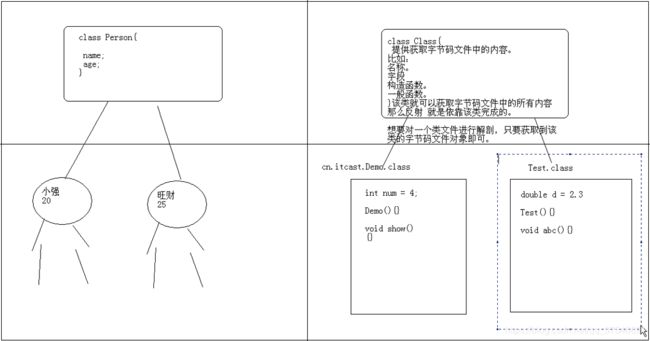
5、Class类: 用于描述字节码文件的类,里面提供方法可以获取到任何字节码文件中成员,比如:名称、字段、构造函数、一般函数;
该类就可以获取字节码文件中的所有内容,反射技术就依靠这个类完成的;想要对一个类文件进行解剖,只要获取到该类的字节码文件对象即可;
~ 获取Class对象的三种方式
1、使用Object类中的getClass()方法的;
但是想要用这种方式,必须要明确具体的类,并创建对象,麻烦;
2、任何数据类型都具备一个静态的属性.class来获取其对应的Class对象;
相对简单,但是还是要明确用到类中的静态成员,还是不够扩展;
3、使用Class类中的forName方法,传入 给定的类的 字符串名称 即可;
这种方式只要有名称即可,更为方便,扩展性更强;
class test {
	public static void main(String[] args) throws Exception { getClassObject_3(); }
	public static void getClassObject_1(){
		Person p1 = new Person();
		Class clazz1 = p1.getClass();
		Person p2 = new Person();
		Class clazz2 = p2.getClass();
		System.out.println(clazz1 == clazz2); // true
	}
	public static void getClassObject_2(){
		Class clazz1 = Person.class;
		Class clazz2 = Person.class;
		System.out.println(clazz1 == clazz2); // true
	}
	public static void getClassObject_3() throws ClassNotFoundException{
		String className = "cn.itcast.bean.Person"; // 注意这里的类名需要带包名;
		Class clazz = Class.forName(className);
		System.out.println(clazz); // class Person
	}
}
class Person{
	private String name;
	private int age;
	public Person() { super();  System.out.println("person run......");  }
	public Person(String name, int age) {
		super();  this.name = name;  this.age = age;
		System.out.println("personparm run......"+this.name+":"+this.age);
	}
	public void show(){ System.out.println(name+"...show run..."+"age"); }
	public void method(){ System.out.println(" method run "); }
	public void paramMethod(String str,int num){ System.out.println("paramMethod run..."+str+":"+num);}
	public static void staticMethod(){ System.out.println("static method run.....");}
}
~ 获取Class中的构造函数、字段、方法
1、获取Class中的构造函数:
// InstantiationException初始化异常:没有空参数构造函数
// IllegalAccessException无效访问异常:无参构造函数是private
public static void createNewObject1() throws ClassNotFoundException
, InstantiationException, IllegalAccessException{
	// 早期:new时候,先在classpath路径下寻找名称为cn.itcast.bean.Person的类,并将其加载进内存,
	// 创建该字节码文件对象,然后在堆内存中开辟空间创建该字节文件的对应的Person对象;
	// cn.itcast.bean.Person p = new cn.itcast.bean.Person();
	// 现在:只有类名称字符串
	String name = "cn.itcast.bean.Person";
	// 找寻该名称类文件,并加载进内存,并产生Class对象;
	Class clazz = Class.forName(name);
	// 创建产生该类的对象;如同用一个带有一个空参数列表的new表达式实例化该类,若该类尚未初始化,则初始化该类;
	// 也就是使用new Instance方法调用Class类中的空参构造函数;
	Object obj = clazz.newInstance();
}
public static void createNewObject2() throws Exception{
	// cn.itcast.bean.Person p = new cn.itcast.bean.Person("小强",39);
	// 当获取指定名称对应类中的所体现的对象时,而该对象初始化不使用空参数构造该怎么办呢?
	// 既然是通过指定的构造函数进行对象的初始化,就应该先获取到该构造函数,通过字节码文件对象即可完成;
	// 该方法是:getConstructor(paramterTypes);
	String name = "cn.itcast.bean.Person";
	// 找寻该名称类文件,并加载进内存,并产生Class对象;
	Class clazz = Class.forName(name);
	// 获取到了指定的构造函数对象;
	Constructor constructor = clazz.getConstructor(String.class,int.class);
	// 通过该构造器对象的newInstance方法进行对象的初始化;
	Object obj = constructor.newInstance("小明",38);
}
2、获取Class中的字段:
public static void getFieldDemo() throws Exception{
	Class clazz = Class.forName("cn.itcast.bean.Person");
	// Field field = clazz.getField("age"); // 只能获取共有的属性,包括父类;
	Field field = clazz.getDeclaredField("age");// 只获取本类中属性,但是包括私有的;
	field.setAccessible(true);// 对私有字段的访问取消权限检查,暴力访问;
	Object obj = clazz.newInstance(); // 根据class文件创建实例对象;
	field.set(obj, 23);
	Object o = field.get(obj); // 获取或设置属性值都是针对具体对象操作的,所以需要指定要操作的对象;
	System.out.println(o);
}
13、获取Class中的方法:
// 获取指定Class中的所有公共函数
public static void getMethodDemo1() throws Exception{
	Class clazz = Class.forName("cn.itcast.bean.Person");
	Method[] methods = clazz.getMethods(); // 获取的都是公共方法
	methods = clazz.getDeclaredMethods(); // 只获取本类中所有方法,包括私有
	for(Method method:methods){ System.err.println(method); }
}
// 获取不带参数列表的方法
public static void getMethodDemo2() throws Exception{
	Class clazz = Class.forName("cn.itcast.bean.Person");
	Method method = clazz.getMethod("show", null); // 获取空参数一般方法
	Constructor constructor = clazz.getConstructor(String.class,int.class);// 获取带参构造函数
	Object obj = constructor.newInstance("xiaoqiang",23);
	method.invoke(obj, null);
}
// 获取带参数列表的方法
public static void getMethodDemo3() throws Exception{
	Class clazz = Class.forName("cn.itcast.bean.Person");
	Method method = clazz.getMethod("paramMethod", String.class,int.class); // 获取带参方法
	Object obj = clazz.newInstance();
	method.invoke(obj, "zhangsan",12);
}
4、练习:电脑运行
定义一个主板类Mainboard,后期往主板上集成声卡类SoundCard,网卡类NetCard;主板类需要对外提供接口:定义一个方法接收接口类型的实例对象;
步骤:
1、定义一个接口PCI,里面有两个方法:open、close;只定义方法声明,没有方法体;
2、定义两个子类SoundCard、NetCard,实现PCI接口;
3、定义主板类MainBoard,里面有一个自己的run方法,和一个对外提供的接口方法usePCI;接口方法参数接收实现了PCI接口的类创建的实例对象:父类接口类型的引用执行子类对象;父类的引用可以调用子类的非特有方法;因为子类实现PCI接口的open、close两个方法,所以PCI类型的引用可以直接调用子类实现的这两个方法;
4、创建配置文件,属性值记录实现了PCI接口的类的全限定名;
5、主函数中使用IO流读取配置文件,并将流对象与Properties对象关联,通过properties对象获取属性值,根据属性值获取Class文件对象,然后再根据类文件对象创建实例对象传入MainBoard对象的usePCI方法;
public class test {
	public static void main(String[] args) throws Exception {
		Mainboard mb = new Mainboard();
		mb.run();
		// 每次添加一个设备都需要修改代码传递一个新创建的对象 mb.usePCI(new SoundCard());
		// 能不能不修改代码就可以完成这个动作? 不用new来完成,而是只获取其class文件,在内部实现创建对象的动作;
		Properties prop = new Properties();
		File config = new File("src/cn/itcast/bean/pci.properties");
		FileInputStream fis = new FileInputStream(config);
		prop.load(fis); // 将流对象与集合关联
		for(int i=0; i<prop.size(); i++){
			String pciName = prop.getProperty("pci"+(i+1));
			Class clazz = Class.forName(pciName); //用Class去加载这个pci子类
			PCI p = (PCI)clazz.newInstance(); // 根据类文件创建对象,赋值给PCI接口引用;
			mb.usePCI(p);
		}
		fis.close();
	}
}
interface PCI { // PCI是一个接口,只定义方法的声明,没有方法体;
	public void open();
	public void close();
}
class Mainboard{
	public void run(){ System.out.println("Mainboard run......"); }
	// 父类引用指向子类对象,可以调用子类的非特有方法;
	public void usePCI(PCI p){ // PCI p = new SoundCard();
		if(p != null){
			p.open();
			p.close();
		}
	}
}
class SoundCard implements PCI{
	public void open() { System.out.println("Sound Card open..."); }
	public void close() { System.out.println("Sound Card close..."); }
}
class NetCard implements PCI{
	public void open() { System.out.println("Net Card open..."); }
	public void close() { System.out.println("Net Card close..."); }
}
>> GUI 图形用户界面
1、概述:

absolute:任意布局;
Component:构件,所有组建中的一个顶层父类之一;
Container:容器;
windows:窗体,能独立存在;里面不能写文件,里面只能存放组件;
Panel:面板,附在窗体之上,不能独立存在,上面附上其他小组件;
Frame:框架;
Dialog:对话框;
FileDialog:文件对话框;
TestArea:文本区域,多行,内容;
TestFiled:文本框,一行,标题;
2、Frame演示 - 事件监听机制、ActionListener演示:
创建窗体基本步骤:
①创建窗体并做基本设置;
②建立其基本组件;
③将组件添加到窗体中;
④将窗体显示;
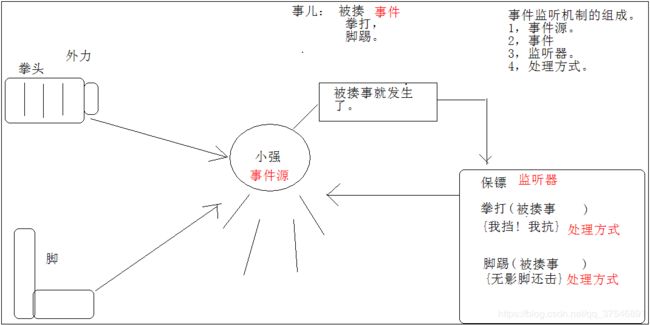
public static void main(String[] args) throws Exception {
	Frame f = new Frame("my frame"); // 创建窗体
	// f.setSize(500, 400);          //设置窗体大小
	// f.setLocation(400, 200);      //设置窗体位置
	f.setBounds(400, 200, 500, 400); // 先设置Location,再设置Size
	f.setLayout(new FlowLayout());   // 设置流式布局
	Button but = new Button("一个按钮"); // 创建按钮
	f.add(but);                       // 将按钮添加到窗体中
	f.addWindowListener(new WindowAdapter() { // 注册监听事件
		public void windowClosing(WindowEvent e) {
			System.out.println("closing......." + e);
			System.exit(0); // 退出虚拟机(系统)
		}
	}); // 注册监听事件传入的对象的形式是创建匿名内部类
	// 在按钮上加上一个监听
	but.addActionListener(new ActionListener() { // 注册监听事件
		public void actionPerformed(ActionEvent e) {
			System.out.println("button run .....");
			System.exit(0);
		}
	});
	f.setVisible(true); // 设置窗体可见
	System.out.println("over");
}
3、鼠标事件、键盘事件:
class MouseAndKeyDemo {
	private Frame f; // 先定义需要的控件,创建方法的时候再进行初始化
	private TextField tf;
	private Button but;
	public MouseAndKeyDemo(){ init(); } // 自定义方法-键盘和鼠标; 主函数调用调用时直接创建该对象即可
	private void init() { // 实现自定义方法
		f = new Frame("演示鼠标和键盘监听");  // 初始化框架f
		f.setBounds(400, 200, 500, 400);// 设置框架属性
		f.setLayout(new FlowLayout());
		tf = new TextField(35);         // 初始化文本框tf
		but = new Button("一个按钮");      // 初始化按钮but
		f.add(tf);  // 将文本框、按钮添加到框架上
		f.add(but);
		myEvent();  // 我的事件方法,单独封装单独实现
		f.setVisible(true); // 设置框架可见
	}
	private void myEvent() {  //实现我的事件方法
		//给文本框添加键盘监听
		tf.addKeyListener(new KeyAdapter() {   //给文本框注册键盘监听事件
			public void keyPressed(KeyEvent e) {   //键盘按击事件
				// sop("key run..."+KeyEvent.getKeyText(e.getKeyCode())+"::::"+e.getKeyCode());
                // 获取键盘码对应的文本
				// int code = e.getKeyCode();   //获取键盘码
				// if(!(code>=KeyEvent.VK_0 && code<=KeyEvent.VK_9)){
				// System.out.println("必须是数字");
				// e.consume();//不按默认方法处理,即输入不是数字时,不输入内容
				// }
				if(e.isControlDown() && e.getKeyCode()==KeyEvent.VK_ENTER){
					System.out.println("enter run ...");
				}
			}
		});//创建匿名内部类
		f.addWindowListener(new WindowAdapter() { //给框架注册窗口监听事件
			public void windowClosing(WindowEvent e) { System.exit(0); } });
		but.addActionListener(new ActionListener() { //给按钮添加活动监听
			public void actionPerformed(ActionEvent e) { System.out.println("action run....."); }
		});
		//在按钮上添加一个鼠标监听
		but.addMouseListener(new MouseAdapter() {
			private int count = 1;
			public void mouseEntered(MouseEvent e) {		//鼠标进入事件
//				System.out.println("mouse enter..."+count++);
//				tf.setText("mouse enter..."+count++);
			}
			public void mouseClicked(MouseEvent e) {     //鼠标点击事件
				if(e.getClickCount()==2)
				tf.setText("mouse double click..."+count++);
//				System.out.println("mouse click..."+count++);
//				System.out.println(e);
			}
		});
	}
}
but.addActionListener(new ActionListener()) 活动监听里面只有一个方法,没有Adapter;
4、Swing演示&装插件:
(1)添加插件:
①下载插件,插件包里面应该包括eclipse文件夹,若没有,自己创建;
②在自己电脑上的eclipse主目录下,创建一个links文件夹;在里面创建一个文本文档,任意名称都行(GUI.txt),里面文本内容:path=E:\\.......下载的插件包eclipse所在父目录
③eclipse重新启动即可;
④验证插件是否添加成功:右键—新建—other;
⑤安装插件步骤;

(2)打开/关闭 画布:
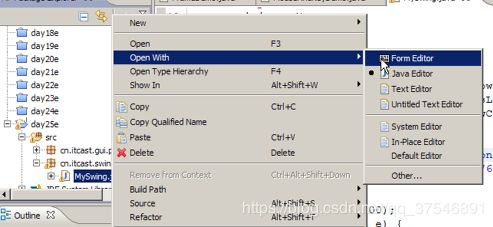
5、练习-列出目录内容:
class MyWindow extends javax.swing.JFrame {
	private static final String LINE_SEPARATOR = System.getProperty("line.separator");
	private JTextField jTextField1;
	private JButton jButton1;
	private JTextArea jTextArea1;
	private JScrollPane jScrollPane1;
	public static void main(String[] args) {
		SwingUtilities.invokeLater(new Runnable() {
			public void run() {
				MyWindow inst = new MyWindow();
				inst.setLocationRelativeTo(null);
				inst.setVisible(true);
			}
		});
	}
	public MyWindow() { initGUI(); }
	private void initGUI() {
		try { setDefaultCloseOperation(WindowConstants.DISPOSE_ON_CLOSE);
			  getContentPane().setLayout(null);
			 {  jTextField1 = new JTextField();
				getContentPane().add(jTextField1, "Center");
				jTextField1.setBounds(12, 41, 368, 34);
				jTextField1.addKeyListener(new KeyAdapter(){ public void keyPressed(KeyEvent evt){ jTextField1KeyPressed(evt); } });
			 }
			 {  jButton1 = new JButton();
				getContentPane().add(jButton1);
				jButton1.setText("\u8f6c\u5230");
				jButton1.setBounds(397, 41, 99, 34);
				jButton1.addActionListener(new ActionListener(){public void actionPerformed(ActionEvent evt){ jButton1ActionPerformed(evt);}});
			}
			{ jScrollPane1 = new JScrollPane();
				getContentPane().add(jScrollPane1);
				jScrollPane1.setBounds(12, 87, 484, 356);
				{   jTextArea1 = new JTextArea();
					jScrollPane1.setViewportView(jTextArea1);
				}
			}
			pack();
			this.setSize(523, 482);
		} catch (Exception e) { e.printStackTrace(); }
	}
	private void jButton1ActionPerformed(ActionEvent evt) { showDir(); }
	public void showDir() {// 通过点击按钮获取文本框中目录,  将目录中的内容显示在文本区域中;
		String dir_str = jTextField1.getText();
		File dir = new File(dir_str);
		if(dir.exists() && dir.isDirectory()){
			jTextArea1.setText("");
			String[] names = dir.list();
			for(String  name : names){ jTextArea1.append(name+LINE_SEPARATOR); }
		}
	}
	private void jTextField1KeyPressed(KeyEvent evt) {
		if (evt.getKeyCode() == KeyEvent.VK_ENTER) showDir();
	}
}
6、菜单:
class MyMenu extends javax.swing.JFrame {
	private static final String LINE_SEPARATOR = System.getProperty("line.separator");
	private JMenuBar jMenuBar1;
	private JScrollPane jScrollPane1;
	private JMenuItem jMenuItem2;
	private JTextArea jTextArea1;
	private JMenuItem jMenuItem1;
	private JMenu jMenu1;
	private JFileChooser chooser;
	private JDialog dialog;
	public static void main(String[] args) {
		SwingUtilities.invokeLater(new Runnable() {
			public void run() {
				MyMenu inst = new MyMenu();
				inst.setLocationRelativeTo(null);
				inst.setVisible(true);
			}
		});
	}
	public MyMenu(){ initGUI(); }
	private void initGUI() {
		try {   setDefaultCloseOperation(WindowConstants.EXIT_ON_CLOSE);
			{   jScrollPane1 = new JScrollPane();
				getContentPane().add(jScrollPane1, BorderLayout.CENTER);
				{   jTextArea1 = new JTextArea();
					jScrollPane1.setViewportView(jTextArea1);
				}
			}
			{   jMenuBar1 = new JMenuBar();
				setJMenuBar(jMenuBar1);
				{   jMenu1 = new JMenu();
					jMenuBar1.add(jMenu1);
					jMenu1.setText("\u6587\u4ef6");
					{   jMenuItem1 = new JMenuItem();
						jMenu1.add(jMenuItem1);
						jMenuItem1.setText("\u6253\u5f00");
						jMenuItem1.addActionListener(new ActionListener() {
							public void actionPerformed(ActionEvent evt) {
								try { jMenuItem1ActionPerformed(evt); }
								catch (IOException e) { e.printStackTrace(); }
							}
						});
					}
					{   jMenuItem2 = new JMenuItem();
						jMenu1.add(jMenuItem2);
						jMenuItem2.setText("\u4fdd\u5b58");
						jMenuItem2.addActionListener(new ActionListener() {
							public void actionPerformed(ActionEvent evt) {
								try { jMenuItem2ActionPerformed(evt); }
								catch (IOException e) { e.printStackTrace(); }
							}
						});
					}
				}
			}
			pack();
			this.setSize(610, 402);
		} catch (Exception e) { e.printStackTrace(); }
	}
	private void jMenuItem1ActionPerformed(ActionEvent evt) throws IOException {
		chooser = new JFileChooser();
		// FileNameExtensionFilter filter = new FileNameExtensionFilter(
		// "JPG & GIF Images", "jpg", "gif");
		// chooser.setFileFilter(filter);
		int returnVal = chooser.showOpenDialog(this);
		if (returnVal == JFileChooser.CANCEL_OPTION) {
			System.out.println("没有选取文件,取消了");
			return;
		}
		File file = chooser.getSelectedFile();
		BufferedReader bufr = new BufferedReader(new FileReader(file));
		String line = null;
		while ((line = bufr.readLine()) != null) { jTextArea1.append(line + LINE_SEPARATOR); }
		bufr.close();
	}
	private void jMenuItem2ActionPerformed(ActionEvent evt) throws IOException {
		chooser = new JFileChooser();
		int returnVal = chooser.showSaveDialog(this);
		if (returnVal == JFileChooser.CANCEL_OPTION) { System.out.println("没有指定文件,取消了"); return; }
		File file = chooser.getSelectedFile();
		String text = jTextArea1.getText();
		BufferedWriter bufw = new BufferedWriter(new FileWriter(file));
		bufw.write(text);
		bufw.close();
	}
}
>> 正则表达式
~ 概述、常见的规则
正则表达式用于操作字符串数据;通过一些特定的符号来体现的;所以我们为了掌握正则表达式,必须要学习一些符号;虽然简化了,但是阅读性差;
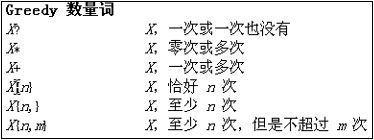
public class test {
	public static void main(String[] args) throws Exception {
		String str1 = "123k4567";
		String regex1 = "[1-9][0-9]{4,14}"; // 正则表达式
		boolean b1 = str1.matches(regex1);    // false
		String str2 = "aoooooooob";
		String regex2 = "ao{4,6}b";
		boolean b2 = str2.matches(regex2);  // false
		checkQQ(str1);
	}
	// 需求:定义一个功能对QQ号进行校验;  要求:长度5~15,只能是数字, 0不能开头;
	public static void checkQQ(String qq) {
		int len = qq.length();
		if (len >= 5 && len <= 15) {
			if (!qq.startsWith("0")) {
				try { long l = Long.parseLong(qq); System.out.println(l + ":正确"); }
				catch (NumberFormatException e) { System.out.println(qq + ":含有非法字符"); }
			}
			else { System.out.println(qq + ":不能0开头"); }
		}
		else { System.out.println(qq + ":长度错误"); }
	}
}
**~ 常见的功能 **
1、匹配 - String.matches(): 其实使用的就是String类中的matches方法;
public static void functionDemo_1(){  //匹配手机号码是否正确
	String tel = "15800001111";
	String regex = "1[358]\\d{9}";   // \在“”字符串中转义
	boolean b = tel.matches(regex);  // true
}
// 1[358]\\d{9}:1代表第一位数字是1; [358]代表第二位是3、5、8
// \将后面反斜杠转移成普通反斜杠,\d组合代表数字;{9}代表重复9次
2、切割 - String.split(): 其实使用的就是String类中的split方法;
组:((A)(B(C)))
public static void functionDemo_2(){
		String str = "zhangsanttttxiaoqiangmmmmmmzhaoliu";
		String[] names = str.split("(.)\\1+");//str.split("\\.");
		for(String name : names){ System.out.println(name); }
}
// .代表任意字符,用()括起来代表封装成组,\\1将1转义成普通的1 ,+至少一次
3、替换 - String.replaceAll(): 其实使用的就是String类中的replaceAll()方法;
public static void functionDemo_3() {
	String str = "zhangsanttttxiaoqiangmmmmmmzhaoliu";
	str = str.replaceAll("(.)\\1+", "$1");
	System.out.println(str);
	String tel = "15800001111";// 158****1111;
	tel = tel.replaceAll("(\\d{3})\\d{4}(\\d{4})", "$1****$2");
	System.out.println(tel);
}
// $1获取组1的内容
4、获取:
(1)将正则规则进行对象的封装 Pattern p = Pattern.compile("a*b");
(2)通过正则对象的matcher方法与字符串相关联,获取要对字符串操作的匹配器对象Matcher ; Matcher m = p.matcher("aaaaab");
(3)通过Matcher匹配器对象的方法对字符串进行操作;boolean b = m.matches();
public static void functionDemo_4() {
	String str = "da jia hao,ming tian bu fang jia!";
	String regex = "\\b[a-z]{3}\\b"; // \\b代表单词边界
	// 1,将正则封装成对象
	Pattern p = Pattern.compile(regex);
	// 2, 通过正则对象获取匹配器对象
	Matcher m = p.matcher(str);
	// 使用Matcher对象的方法对字符串进行操作
	// 既然要获取三个字母组成的单词 ,先 查找 find();
	System.out.println(str);
	while (m.find()) {
		System.out.println(m.group()); // 获取匹配的子序列
		System.out.println(m.start() + ":" + m.end());
	}
}
**~ 练习 **
1、练习 - 治疗口吃:
public static void test_1() {
	String str = "我我...我我...我我我要...要要要要...要要要要..学学学学学...学学编编...编编编编..编..程程...程程...程程程";
	// 1,将字符串中.去掉; 用替换
	str = str.replaceAll("\\.+", "");
	System.out.println(str);
	// 2,替换叠词
	str = str.replaceAll("(.)\\1+", "$1");
	System.out.println(str);
}
2、对邮件地址校验:
public static void test_3() {
	String mail = "[email protected]";
	String regex = "[a-zA-Z0-9_]+@[a-zA-Z0-9]+(\\.[a-zA-Z]{1,3})+";
	regex = "\\w+@\\w+(\\.\\w+)+";// [email protected]
	boolean b = mail.matches(regex);
	System.out.println(mail + ":" + b);
}
3、对ip地址排序: 192.168.10.34、127.0.0.1 、3.3.3.3 、 105.70.11.55;
public static void test_2() {
	String ip_str = "192.168.10.34  127.0.0.1  3.3.3.3  105.70.11.55";
	// 1,为了让ip可以按照字符串顺序比较,只要让ip的每一段的位数相同
	// 所以,补零,按照每一位所需做多0进行补充,每一段都加两个0.
	ip_str = ip_str.replaceAll("(\\d+)", "00$1");
	System.out.println(ip_str);
	// 然后每一段保留数字3位
	ip_str = ip_str.replaceAll("0*(\\d{3})", "$1");
	System.out.println(ip_str);
	// 1,将ip地址切出,
	String[] ips = ip_str.split(" +");
	TreeSet<String> ts = new TreeSet<String>();
	for (String ip : ips) {
		// System.out.println(ip);
		ts.add(ip);
	}
	for (String ip : ts) { System.out.println(ip.replaceAll("0*(\\d+)", "$1")); 	}
}
4、爬虫:
网页爬虫:其实就一个程序用于在互联网中获取符合指定规则的数据,
爬取邮箱地址;
public class test {
	public static void main(String[] args) throws Exception {
		List<String> list = getMailsByWeb();
		for (String mail : list) { System.out.println(mail); }
	}
	public static List<String> getMailsByWeb() throws IOException {
		URL url = new URL("http://192.168.1.100:8080/myweb/mail.html");
		BufferedReader bufIn = new BufferedReader(new InputStreamReader(url.openStream()));
		// 2,对读取的数据进行规则的匹配,从中获取符合规则的数据.
		String mail_regex = "\\w+@\\w+(\\.\\w+)+";
		List<String> list = new ArrayList<String>();
		Pattern p = Pattern.compile(mail_regex);
		String line = null;
		while ((line = bufIn.readLine()) != null) {
			Matcher m = p.matcher(line);
			while (m.find()) { list.add(m.group());} // 将符合规则的数据存储到集合中
		}
		return list;
	}
	public static List<String> getMails() throws IOException {
		// 1,读取源文件;
		BufferedReader bufr = new BufferedReader(new FileReader("c:\\mail.html"));
		// 2,对读取的数据进行规则的匹配,从中获取符合规则的数据;
		String mail_regex = "\\w+@\\w+(\\.\\w+)+";
		List<String> list = new ArrayList<String>();
		Pattern p = Pattern.compile(mail_regex);
		String line = null;
		while ((line = bufr.readLine()) != null) {
			Matcher m = p.matcher(line);
			while (m.find()) { list.add(m.group());} // 将符合规则的数据存储到集合中
		}
		return list;
	}
}
>> HTML
~ 概述、标签的操作思想
1、Html 就是超文本标记语言的简写,是最基础的网页语言;
2、Html 是通过标签来定义的语言,代码都是由标签所组成;
3、Html 代码不用区分大小写;
4、Html代码由开始结束,里面由头部分和体部分两部分组成;
头部分是给Html 页面增加一些辅助或者属性信息,它里面的内容会最先加载,体部分是真正存放页面数据的地方;
5、常用工具 - Aptana;
6、注意:
①多数标签都是有开始标签和结束标签,其中有个别标签因为只有单一功能,或者没有要修饰的内容可以在标签内结束:
、
②想要对被标签修饰的内容进行更丰富的操作,就用到了标签中的属性,通过对属性值的改变,增加了更多的效果选择;
③属性与属性值之间用"="连接,属性值可以用双引号或单引号或者不用引号,一般都会用双引号,或公司规定书写规范;
④格式:<标签名 属性名='属性值’>数据内容< /标签名>、<标签名 属性名='属性值' />
7、操作思想:
为了操作数据,都需要对数据进行不同标签的封装,通过标签中的属性对封装的数据进行操作;标签就相当于一个容器,对容器中的数据进行操作,就是在在不断的改变容器的属性值;
~ 列表标签
<html>
	<head>
		<meta http-equiv="Content-Type" content="text/html; charset=GBK">
		<title>Untitled Documenttitle>
	head>
	<body>

		<dl>
			<dt>上层项目内容dt>
			<dd>下层项目内容dd>
			<dd>下层项目内容dd>
			<dd>下层项目内容dd>
		dl>
		<hr/>

		<ul type="square">
			<li>无序项目列表li>
			<li>无序项目列表li>
			<li>无序项目列表li>
			<li>无序项目列表li>
		ul>
		<ol type="a">
			<li>有序的项目列表li>
			<li>有序的项目列表li>
			<li>有序的项目列表li>
			<li>有序的项目列表li>
		ol>
	body>
html>
**~ 图像标签 - img **

alt:图片说明文字,图片不显示的时候,显示文字;
~ 表格标签
表格table下一级tbody(默认存在),里有行tr(th:内容居中加粗),行里有单元格td;
cellpadding:单元格内边距;
cellspacing:单元格之间的距离;
		<table border=1 bordercolor="#0000EE" cellpadding=10 cellspacing=0 width=500>
			<caption>表格标题caption>
			<tr>
				<th>姓名:th>
				<th>年龄:th>
			tr>
			<tr>
				<td>张三td>
				<td>39td>
			tr>
		table>
		<table border=1 bordercolor="#0000EE" cellpadding=10 cellspacing=0 width=500>
			<tr> <th colspan=2>个人信息th> tr>
			<tr>
				<td>张三td>
				<td>30td>
			tr>
		table>
		<table border=1 bordercolor="#0000EE" cellpadding=10 cellspacing=0 width=500>
			<tbody>
				<tr>
					<th rowspan=2>个人信息th>
					<td>张三td>
				tr>
				<tr> <td>30td> tr>
			tbody>
		table>
~ 超链接 - href、定位标记 - 锚
1、作用:连接资源;
2、当有了href属性才有了点击效果;href属性的值的不同,解析的方式也不一样;
3、如果在该值中没有指定过任何协议,解析时,是按照默认的file协议来解析该值的;
<body>

	<a href="http://www.sohu.com.cn" target="_blank">新浪网站a>
	<a href="imgs/1.jpg">美女图片a>
	<a href="mailto:[email protected]">联系我们a>
	<a href="http://www.xunlei.com/movies/fczlm.rmvb">复仇者联盟a> <br />

	<a href="thunder://wertyuioasdfghjklwertyuio==">复仇者联盟a>

	<a href="javascript:void(0)" onclick="alert('我弹')">这是一个超链接a>
body>
<body>
	<a name=top>顶部位置a> <hr />
	<img src="111.jpg" height=900 width=400 border=10 /> <hr />
	<a name=center>中间位置a> <hr />
	<img src="111.jpg" height=900 width=400 border=10 />
	<a href="#top">回到顶部位置a>
	<a href="#center">回到中间位置a>
body>
~ 框架
<head> head>

<frameset rows="30%,*">

	<frame src="top.html" name="top" />
	<frameset cols="30%,*">
		<frame src="left.html" name="left" />
		<frame src="right.html" name="right" />
	frameset>
frameset>
<body> body>

<body> <h1>这是我的网站LOGOh1>body>

<body>
	<H3>左边栏连接H3>
	<a href="../img.html" target="right">链接一a>
	<a href="../table.html" target="right">链接一a>
	<a href="../link.html" target="right">链接一a>
body>

<body> <h2>内容显示区域h2>body>


