centos7部署gitlab+jenkins (gitlab篇)
这是一个系列文章,下面几章主要是工作中搭建的git客户端+gitlab+jenkins的一些简单总结,目前工作中在使用,个人认为还是比较有参考性,希望帮助到大家。
我会把gitlab和jenkins分成两个文章写,尽量详细一些。
gitlab搭建
- 部署环境
10.0.13.102  gitlab
10.0.13.103  jenkins
10.0.13.104 git客户端
-
代码发布流程:
git客户端 ----> gitlab —> jenkins —> web服务器
-
gitlab配置(102主机上操作)
1.下载epel源
wget http://mirrors.aliyun.com/epel/epel-release-latest-7.noarch.rpm
wget -O /etc/yum.repos.d/CentOS-Base.repo http://mirrors.aliyun.com/repo/Centos-7.repo
2.关闭 NetworkManager 和防火墙
systemctl stop firewalld.service
systemctl disable firewalld
systemctl disable NetworkManager
3.关闭SELinux并确认处于关闭状态
sed -i ‘s/SELINUX=enforcing/SELINUX=disabled/’ /etc/selinux/config
grep SELINUX=disabled /etc/selinux/config
setenforce 0
4.更新系统并重启(也可选择不重启)
[root@linux-node1 ~]# yum update -y && reboot
5.安装必要插件
yum install curl policycoreutils openssh-server openssh-clients postfix -y
6.启动postfix邮件服务(后续需要用到)
systemctl start postfix
systemctl enable postfix
7.下载gitlab源
wget https://mirrors.tuna.tsinghua.edu.cn/gitlab-ce/yum/el7/gitlab-ce-11.7.12-ce.0.el7.x86_64.rpm
(也可以直接去这个网址下载 https://mirrors.tuna.tsinghua.edu.cn/gitlab-ce/yum/el7/)
8.安装gitlab
yum install -y gitlab-ce
9.修改gitlab访问地址和端口
ip后面不加端口默认是80端口,后面可以加端口改成其他的
vim /etc/gitlab/gitlab.rb

10.启动gitlab-ce
gitlab-ctl reconfigure
时间可能比较长,耐心等待即可!
注意:第一次装不会出错,但是要是以前装过gitlab,现在是重装,那启动过程可能会报错。
如果卸载gitlab然后再次安装执行 gitlab-ctl reconfigure的时候往往会出现:ruby_block[supervise_redis_sleep] action run,会一直卡住无法往下进行!
解决方案:
1、按住CTRL+C强制结束;
2、运行: systemctl restart gitlab-runsvdir;
3、再次执行: gitlab-ctl reconfigure
11.gitlab常用命令:
关闭gitlab: gitlab-ctl stop
启动gitlab: gitlab-ctl start
重启gitlab: gitlab-ctl restart
查看状态:gitlab-ctl status
重载配置文件: gitlab-ctl reconfigure
12.网页访问你配置的ip (网页访问10.0.13.102)
设置密码,这个密码是gitlab管理员的密码
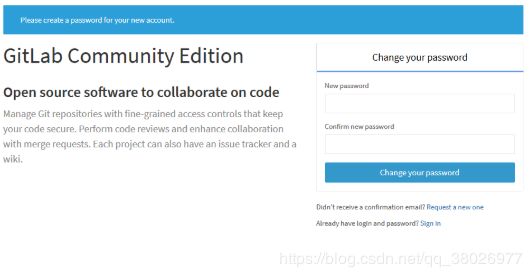 13.登陆之后要做一些操作(安全考虑)
第一步:我们关闭自动注册,因为我们内部使用不需要用户自己注册,由运维分配用户即可


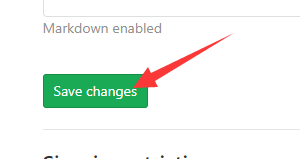
记得 保存。
14.gitlab上面有一个项目跟组的概念
我们要创建一个组,才可以在里面创建一个项目。因为gitlab的路径上首先是ip地址,其次是组。
现在创建一个组,再创建一个项目,该项目包含在组里
很简单,不演试了。
创完之后,我们点击上面的README,然后我们随便在里面写点东西。
15.创建用户
gitlab新增新用户有两种方式,第一种可以用户主动注册(自己设置密码)(已经被我们禁用);第二种也可以通过root管理员用户直接添加用户,发个邮件到用户的邮箱里,收到邮件后激活。
如果是第二种方式添加新用户的话,就需要配置gitlab邮箱了
相关环境
postfix
gitlab
systemctl status postfix 我们之前已经安装过,查看是否正常运行
vim /etc/gitlab/gitlab.rb
添加我们发邮件的地址,我设置为QQ邮箱,也就是以后创建用户,我们都是从这个qq邮箱发送信息给其他人的邮箱,让用户激活
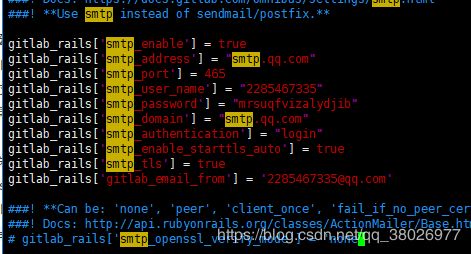 smtp_port端口465 (注意,不要用25端口)
smtp_user_name 配置自己的QQ邮箱
gitlab_rails[‘smtp_password’] 后面的是qq授权码,不是QQ密码,如何获取QQ邮箱授权码自己百度
配置完成后执行gitlab-ctl reconfigure 让配置生效
现在我们添加用户,写入用户接受信息的邮箱,保存后用户会收到修改密码的邮件,至此设置完成。这里就不截图了。
16.还有关键一点是ssh密钥
git客户端上传代码到gitlab首先需要先把自己的公钥上传到gitlab,实现传输免密。
首先,在客户端104主机上生成密钥
ssh-keygen 一直回车就行
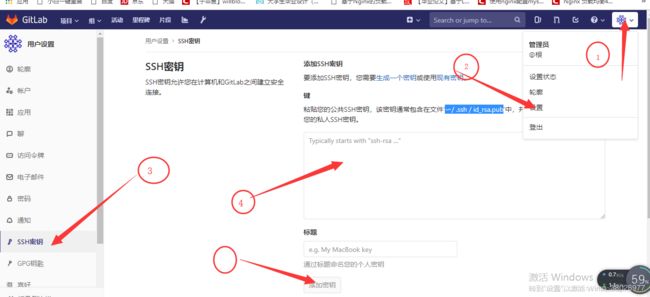
cat .ssh/id_rsa.pub 把显示的密钥复制下来,打开gitlab页面
按顺序找到位置,粘贴保存
(同样的,jenkins服务器要拉取gitlab的代码也要把公钥上传到这里)
git客户端安装
1.安装git
yum install -y git
2.克隆gitlab项目到本地
git clone [email protected]:test/web_test.git
cd web_test/
ls
echo 1112344 > 1.txt 随便写一个文件
git add .
git commit -m “第一次提交测试”
如果报错就执行下面两条命令,名字,邮箱可以乱写
git config --global user.email “[email protected]”
git config --global user.name “Your Name”
git push -u origin master
这样代码就上传成功了,可以到gitlab上查看
排错
假如你的访问地址不是默认的80,是你自定义的,可能会报如下错误
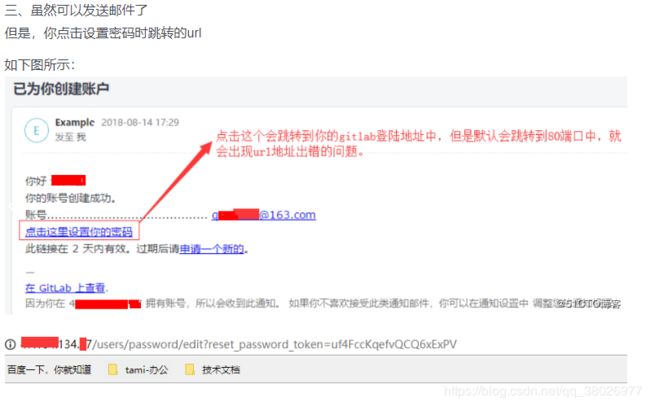
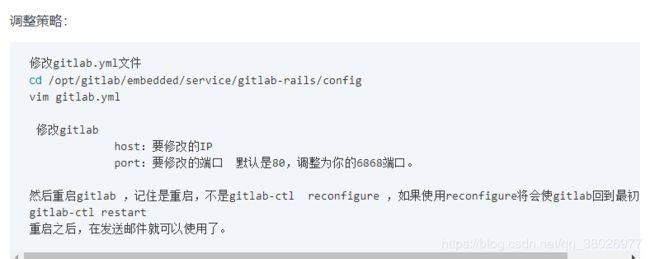 至此gitlab初步简单的安装基本结束,能提供正常服务,下一篇写jenkins。