Angular8入门学习笔记
Angualr入门扫盲必备
- 声明:这篇是我学习angualr的笔记,可以转载,但必须注明来源作者 kone 并附上本文链接
- A:环境,工具
- 1:先确保安装了nodejs和npm
- Nodejs
- npm 包管理器
- cnpm(淘宝的镜像)
- 2:安裝angualr cli
- 3:工具
- VSCode的angular插件
- VSCode快捷键:
- VSCode调试Angular代码:
- B:新建Angualr项目
- 1:新建项目angualrDemo
- 2:VSCode操作项目
- VSCode导入项目
- cnpm 安装依赖
- 根模块app.module.ts
- 根组件app.component.ts
- 创建新的組件news
- 在跟组件里面引用news组件
- 启动项目
- C:属性操作,元素操作,指令
- 1:定义普通数据
- 2:定义数组及用*ngFor循环
- 3:图片的引入
- 4:ngSwitch, ngIf
- 5:ngClass,ngStyle
- 6:管道
- D:事件
- 1:普通点击事件
- 2:表单事件,事件对象
- E:双向数据绑定(!!!)
- F:双向数据绑定获取各种表单值实现一个小项目1
- 1:创建组件form
- 2:form.component.html
- 3:form.component.ts
- 4:form.component.css
- 5:全局样式style.css
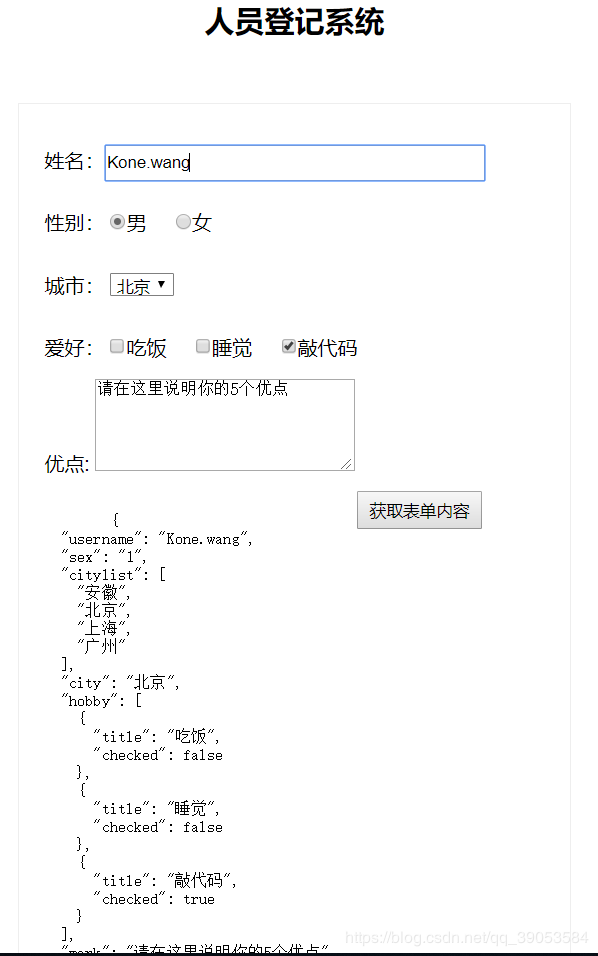
- 6:阶段成果
- G:类似京东做搜索缓存数据功能
- 1:search.component.html
- 2:search.component.ts
- 3:search.component.css
- 4:阶段成果
- H:TodoList(待办事项和已完成事项)
- 1:todolist.component.html
- 2:todolist.component.ts
- 3:todolist.component.css
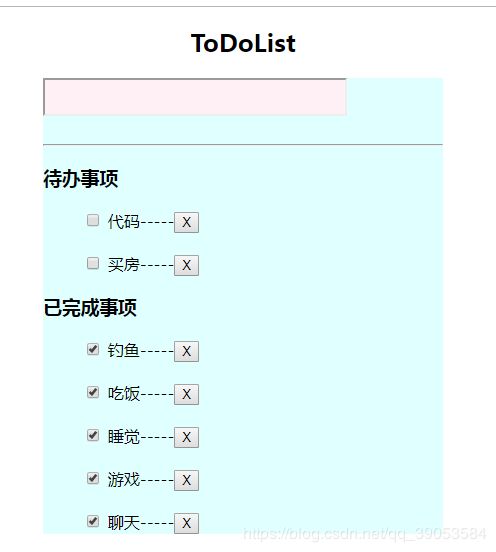
- 4:阶段成果
- I:服务
- 1:准备
- 2:创建服务
- 3:定义服务的方法给其他两个组件使用
- 首先在stroage.service.ts写测试方法
- 组件里使用service
- 测试服务引用
- J:数据持久化到localStroage
- 1:先在服务里定义方法
- 2:组件里调用service的方法
- 4:阶段成果
- K:父子或非父子组件之间的通信,传值
- 1:父组件给子组件传值@input
- 子组件给父组件传值
- 父组件通过@ViewChild主动获取子组件的数据和方法
- 子组件通过@OutPut触发父组件
- L:数据交互(Get,Post,jsonp)
- 1:Get
- 2:Post
- 后台接口
- angular中引入相关模块
- 效果
- M:路由
- 1:创建路由
- 2:准备几个组件
- 3:配置路由
- 4:测试配置,解释
- routerLink配置动态路由
- 默认组件
- N:路由传值以及JS跳转路由
- 0:准备详情组件及新闻数据和页面
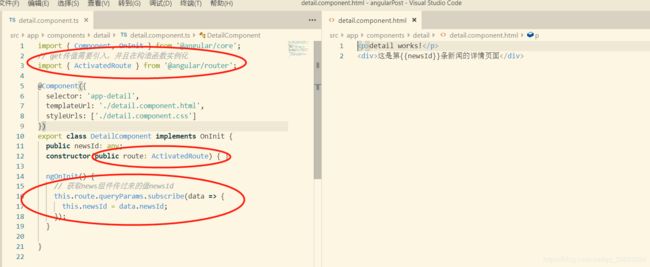
- 1:路由的get传值:
- 传值
- detail接受传过来的值并展示
- get路由传值效果
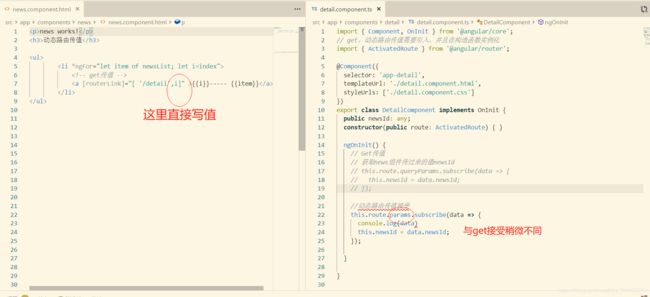
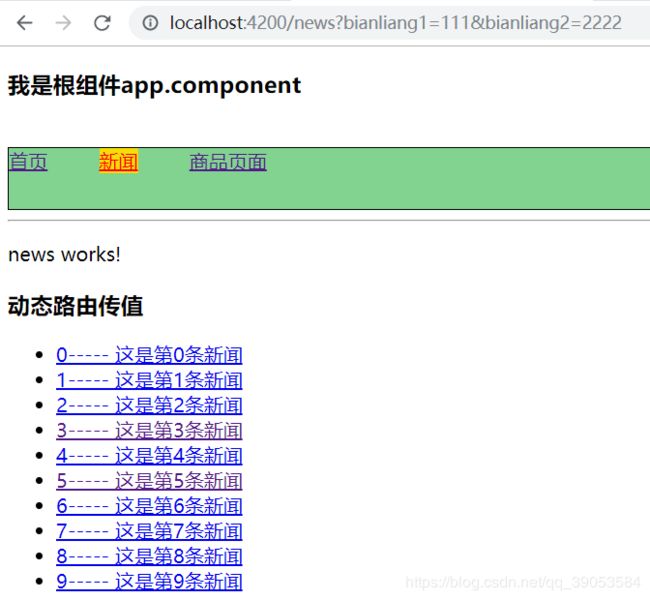
- 2:动态路由传值
- 修改路由配置
- 传值,接收
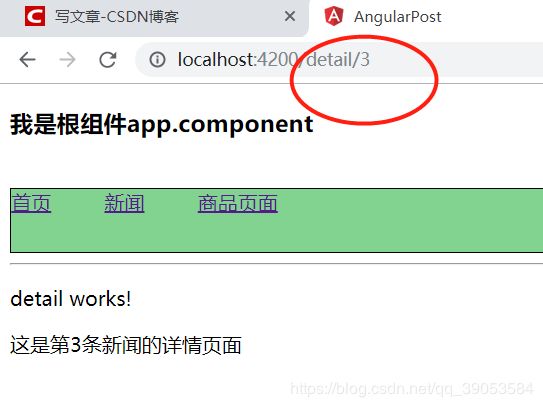
- 动态路由传值测试
- 3:JS路由跳转
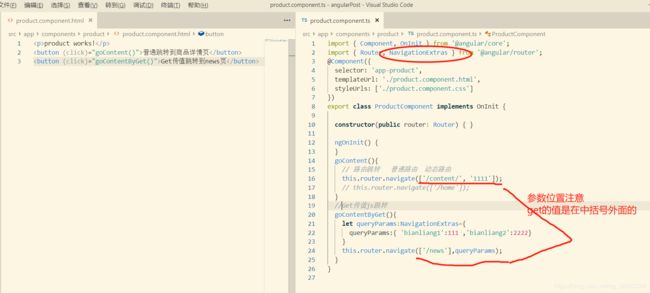
- 1:普通路由,动态路由跳转
- 2:get传值JS跳转
- 代码
- 点击按钮后的效果
- O:路由守卫
- 1:创建公共服务类ServeService
- 2:路由配置
- 3:测试
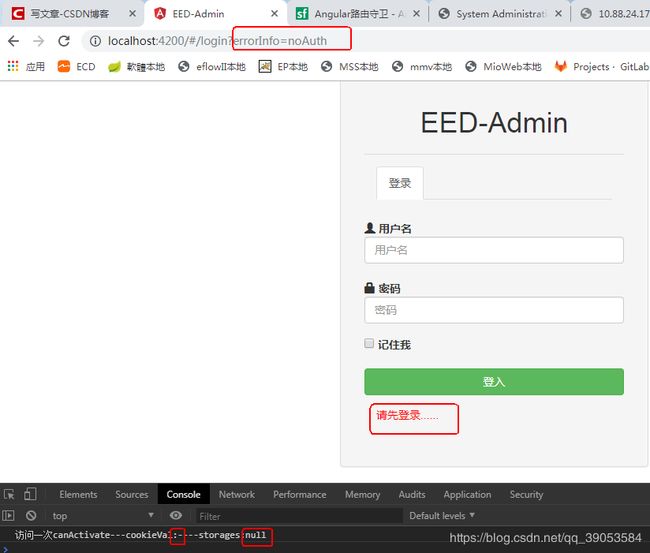
- cookie和缓存中没值
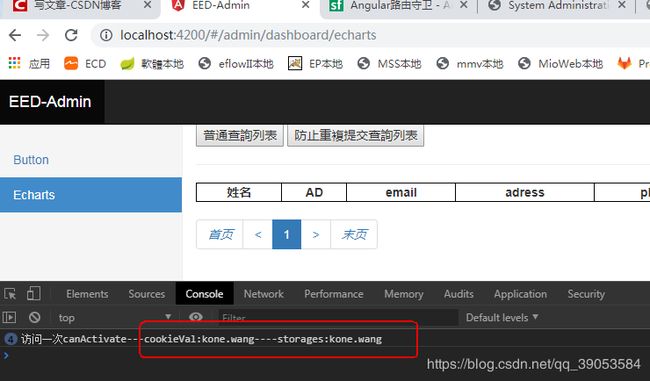
- cookie或者缓存中有值
- 分页查询,文件上传
- 问题处理记录:
- 缺点:
声明:这篇是我学习angualr的笔记,可以转载,但必须注明来源作者 kone 并附上本文链接
A:环境,工具
1:先确保安装了nodejs和npm
在开始之前,请确保你的开发环境中包括 Node.js和 npm 包管理器
Nodejs
Angular 需要 Node.js 版本 10.9.0 或更高版本。要检查你的版本,请在终端/控制台窗口中运行 node -v 。
windows更新版本不能通过网上说的安装n模块更新,只能重新下载新版的nodejs重新安装覆盖.
要获取 Node.js,请转到 nodejs.org。
npm 包管理器
Angular、Angular CLI 和 Angular 应用都依赖于 npm 包中提供的特性和功能。要想下载并安装 npm 包,你必须拥有一个 npm 包管理器。
本搭建指南使用 npm 客户端命令行界面,Node.js 已经默认安装了它。
要检查你是否安装了 npm 客户端,请在终端/控制台窗口中运行 npm -v 。
cnpm(淘宝的镜像)
一般的项目通过npm install(npm 是干啥的等会再说)项目时不会有什么错误,只会时间比较长,这时候有人推荐用cnpm,下面是如何安装cnpm:
npm install -g cnpm --registry=https://registry.npm.taobao.org
通过 cnpm -v 可以检查是否安装成功
2:安裝angualr cli
你可以使用 Angular CLI 来创建项目、生成应用和库代码,以及执行各种持续开发任务,比如测试、打包和部署。
https://www.angular.cn/guide/setup-local#step-1-install-the-angular-cli
- 查看angualr的版本命令:ng --version
- 卸載當前的cli並安裝指定版本的angular: https://www.jianshu.com/p/268dd2a94471
- 我裝的最新版用的是:npm install -g @angular/cli
3:工具
VSCode的angular插件
VSCode的下载安装就不说了,安装angualr 插件直接在VSCode里面搜索Angualr,点击下载量多的就可以.下面列举一点:
- TSLint:Typescript语法检查 Prettier:代码格式化 IntelliJ IDEA
- Keybindings:IDEA风格的快捷键
- Angular 7 Snippets:Angular语法填充(标签)
- Angular Files:生成Angular的文件模板(Component、Module、Pipe等等)
- Angular Follow Selector:文件跳转(Component跳转到html、scss文件)
- Angular Language Service:引用填充和跳转到定义(html中进行引用补全)
- Debugger for Chrome:调试Angular代码
VSCode快捷键:
vscod快捷鍵:https://code.visualstudio.com/docs/getstarted/keybindings
VSCode调试Angular代码:
https://www.cnblogs.com/cxd1008/p/7681522.html
B:新建Angualr项目
1:新建项目angualrDemo
ng new angualrDemo --skip-install
注:如果按照官网的教程只用输入 ng new 项目名 即可,但是这种情况下它会默认使用npm帮我们创建项目并且安装各种依赖,非常耗时间,所以我们后面加上-- skip-install跳过安装依赖的过程.
2:VSCode操作项目
VSCode导入项目
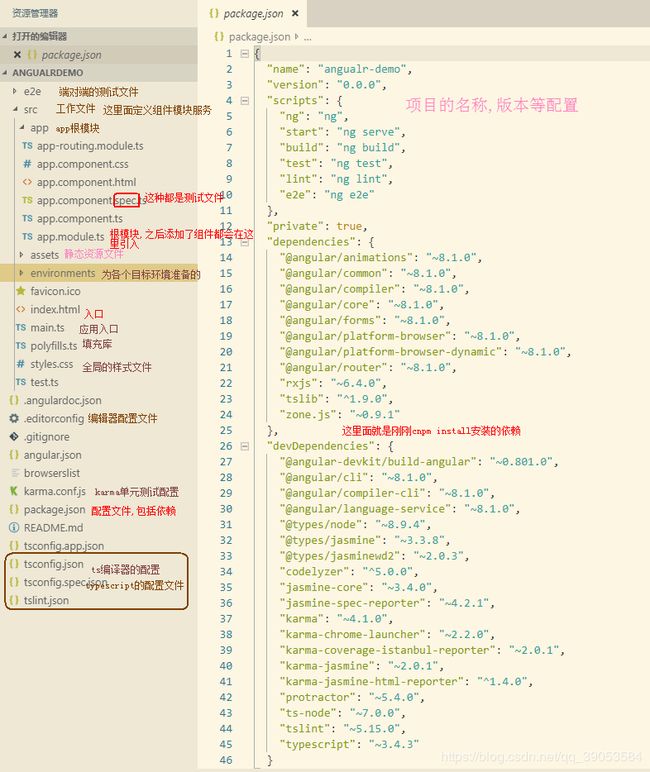
e2e文件夾:e2e測試用的 tsconfig.json ,这是TypeScript编译器配置文件 typings.json
文件用于在Angular应用程序中标识TypeScript定义文件 -core-js :它为我们的ES5浏览器带来ES2015 /
ES6功能。
-jasmine :这是Jasmine测试框架的类型。
-node :它用于引用nodejs环境中的对象的代码。 package.json 将包含我们的应用所需的包。 这些包使用npm(节点程序包管理器)进行安装和维护 environment_main.ts 文件告诉Angular加载组件
Angular-cli.json里面配置了项目的几本信息,包括版本名字之类的 package.json 是npm包配置
tslint是一种标准化代码检查的东西 polyfills.ts
这里面放项目所必须的第三方js,angular-cli监理的项目里面包括了一些东西,不用管,之后要用到的其他js库可以直接在这里面添加.
cnpm 安装依赖
创建之后我用cnpm安装依赖(上面讲了如何安装cnpm)
cnpm install
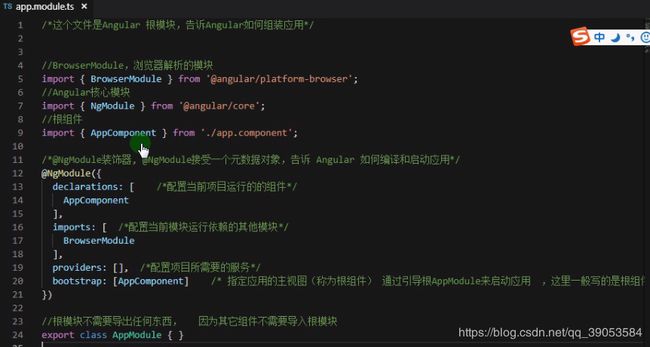
根模块app.module.ts
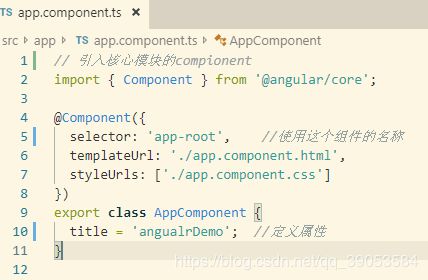
根组件app.component.ts
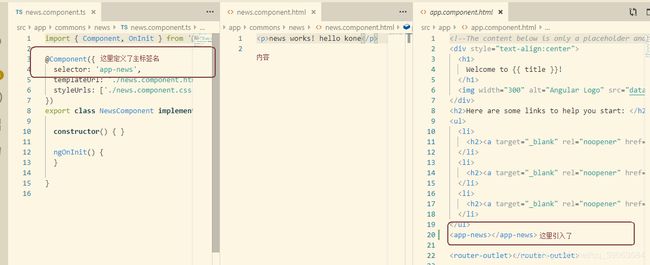
创建新的組件news
生成組件:
ng g component commons/news
例如: ng g component commons/news(文件夾/組件名)
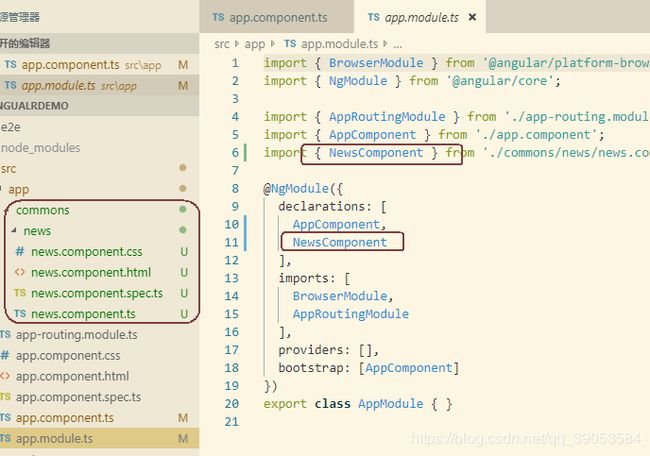
這樣會自動在app下面創建一個commons文件夾並且在commons文件夾下面創建一個news組件,並且自動在app.moudle.ts裡面添加news組件的引入.
在跟组件里面引用news组件
启动项目
ng serve 默认启动在端口4200
ng serve – open,启动并打开浏览器
ng serve --port 端口
C:属性操作,元素操作,指令
我们先把app.component.html里面的自动生成的内容删掉,以免干扰
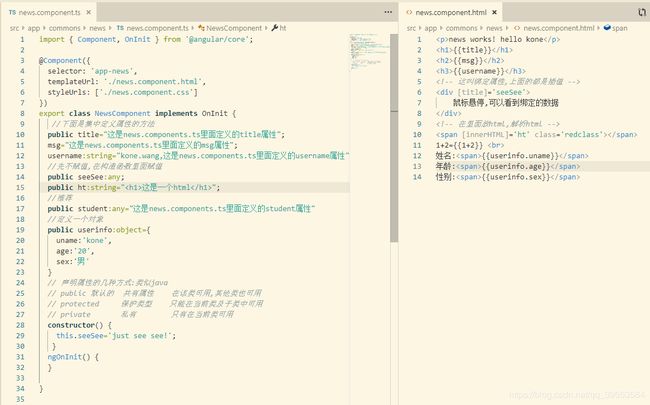
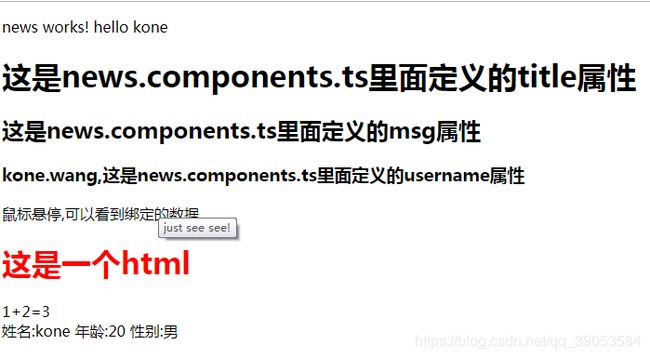
1:定义普通数据
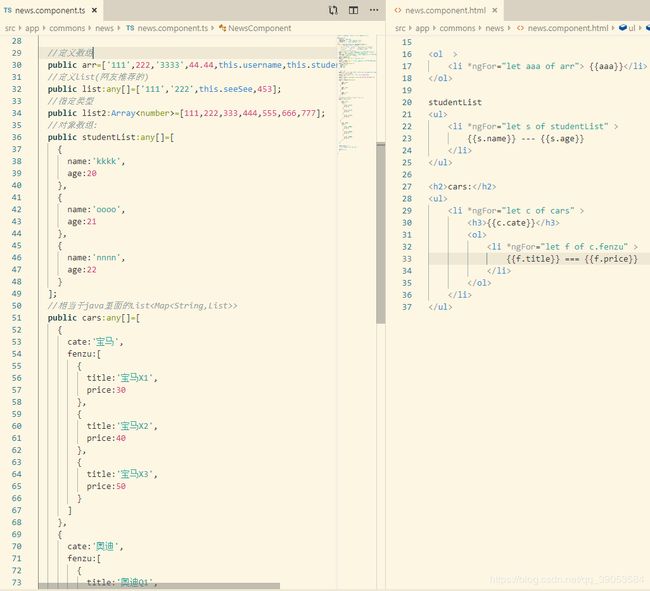
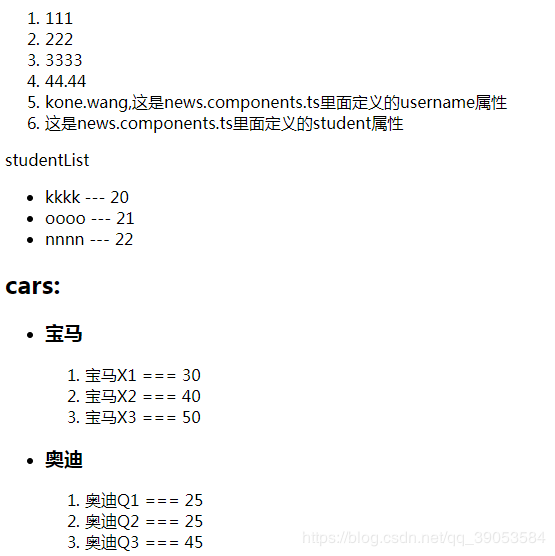
2:定义数组及用*ngFor循环
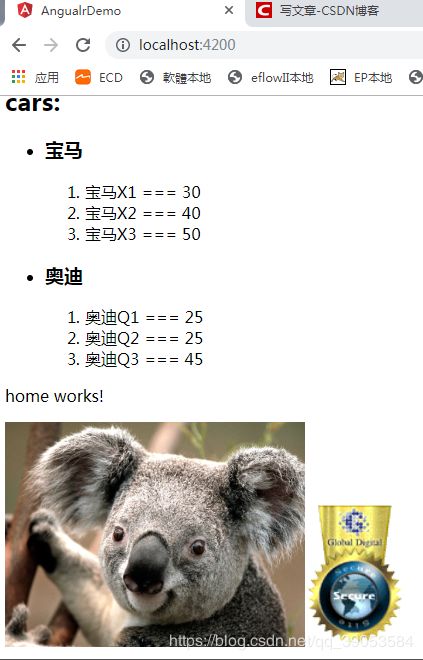
3:图片的引入
新建一个home的组件:
ng g component commons/home
4:ngSwitch, ngIf
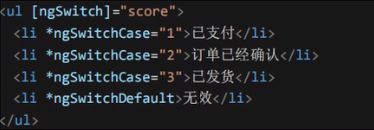
ngif查看该问文章:https://www.jianshu.com/p/33bbe72a682e
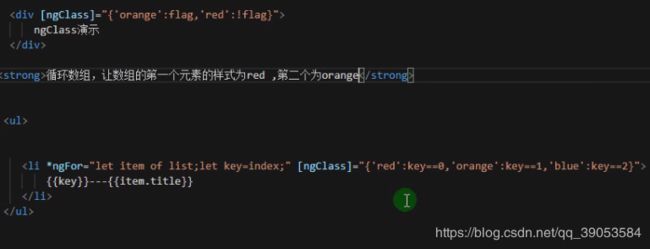
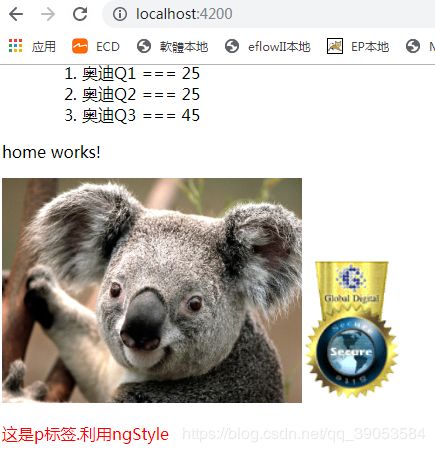
5:ngClass,ngStyle
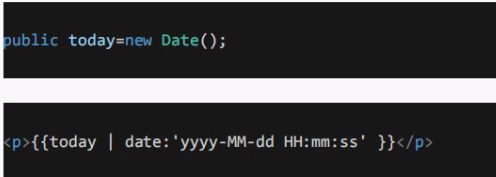
6:管道
比如说很多时候我们需要把数字显示成金额、大小写转换、日期小数转换等等。 Angular管道对于象这样小型的转换来说是个很方便的选择。
管道是一个简单的函数,它接受一个输入值,并返回转换结果。
常见管道:http://bss.itying.com/topic/5bf519657e9f5911d41f2a34
D:事件
1:普通点击事件
2:表单事件,事件对象
E:双向数据绑定(!!!)
- 首先在app.module.ts里面引入并声明;
- 再在input里使用[(ngModel)]="inputVal"双向绑定数据
- home.component.ts里面的方法为了测试通过model来改变视图
如下图
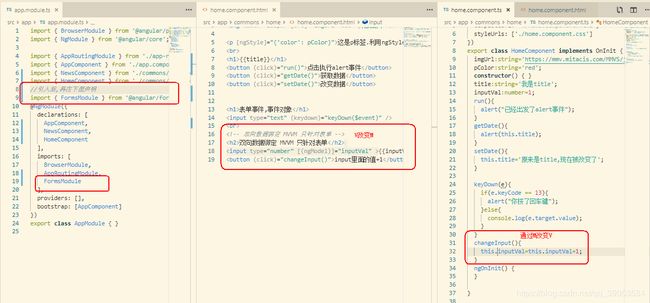
打开页面,input框和后面显示的值是1,点击按钮几下,两个地方的值一起变化

F:双向数据绑定获取各种表单值实现一个小项目1
之前的项目里面杂碎太多,页面显示太混乱,现在把app.component.html里面的东西全部注释掉。
再次提醒: 因为要使用双向数据绑定,所以别忘了在app.module.ts里面引入相应模块。
下面的内容包括input,checkbox,radio,select,textarea
1:创建组件form
ng g component common/form
在app.component.html里面引用刚创建的组件,加上
2:form.component.html
人员登记系统
- 姓名:
- 性别:
- 城市:
- 爱好:
- 优点:
{{peopleInfo | json}}
3:form.component.ts
import { Component, OnInit } from '@angular/core';

@Component({
  selector: 'app-form',
  templateUrl: './form.component.html',
  styleUrls: ['./form.component.css']
})
export class FormComponent implements OnInit {
  public peopleInfo : any = {
    username : 'Kone.wang',
    sex:'1',
    citylist:['安徽','北京','上海','广州'],
    city:'上海',
    hobby:[{
      title:'吃饭',
      checked:false
    },
    {
      title:'睡觉',
      checked:false
    },
    {
      title:'敲代码',
      checked:true
    }],
    mark:'请在这里说明你的5个优点'
  }

  constructor() { }
  doSubmit(){
  /**
   * jquery操作:可用,但不推荐
   * let usernameDom:any=document.getElementById('username');
   * console.log(usrnameDom.value);
   * 推荐下面的利用双向数据绑定获取值
   */
    console.log(this.peopleInfo);
  }
  ngOnInit() {
  }
}
4:form.component.css
h2{
    text-align: center;
}
.people_list{
    width:400px;
    margin:50px auto;
    padding: 20px;
    border: 1px solid #eee;
}
li{
    height: 50px;
    line-height: 50px;

}
li .form_input{
    width:300px;
    height: 25px;
}
.submitbtn{
    width: 100px;
    height: 30px;
    float: right;
    margin-right: 50px;
    margin-top: 40px;

}
5:全局样式style.css
*{
    margin: 0px;
    padding: 0px;
}
ol,ul{

    list-style-type: none;
}
6:阶段成果
G:类似京东做搜索缓存数据功能
为了避免F中的项目文件干扰,我在app.component.html里面引入的
我们接下来的功能就是类似各种网站搜索的历史记录,搜索框输入的内容点击搜索之后,会在下方的搜索历史里展示出来,并且实现删除单条搜索记录的功能
接下来我再新建一个组件:ng g component commons/search
并在app.component.html里引入:
1:search.component.html
搜索历史
- {{item}}
2:search.component.ts
export class SearchComponent implements OnInit {
  public keyword:string='';
  public historyList:any[]=[];

  doSearch(){
    if(this.historyList.indexOf(this.keyword) == -1){
      this.historyList.push(this.keyword);
    }
    this.keyword='';
  }
  deleteHistory(k){
    this.historyList.splice(k,1);
  }
  constructor() { }
  ngOnInit() {
  }
}
3:search.component.css
.search{
    width: 400px;
    margin: 20px auto;
    background-color: lightcyan;
}
input{
    margin-bottom: 20px;
    width: 300px;
    height: 32px;
    background-color: lavenderblush;
}
.searchbtn{
    height: 32px;
    width: 80px;
}
4:阶段成果
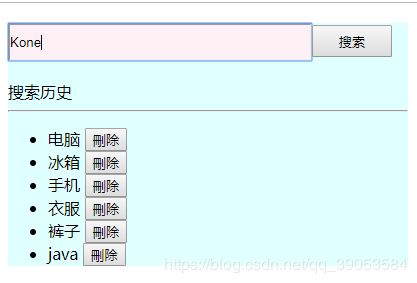
当然这里的数据会在刷新页面之后丢失,没能持久化,持久化会在后面讲到.
H:TodoList(待办事项和已完成事项)
这一个demo完成一个记录当前未做的任务,并且可以实现把已完成任务变成未完成任务的功能.也是用来练习数据双向绑定和属性绑定[hidden]="item.status==1"
注释掉上一个功能在app.component.html里面的引入.
创建一个新的组件:ng g component commons/todolist
1:todolist.component.html
ToDoList
待办事项
-
{{item.title}}-----
已完成事项
-
{{item.title}}-----
2:todolist.component.ts
import { Component, OnInit } from '@angular/core';

@Component({
  selector: 'app-todolist',
  templateUrl: './todolist.component.html',
  styleUrls: ['./todolist.component.css']
})
export class TodolistComponent implements OnInit {
  keyword:string='';
  todolist:any[]=[];
  //添加任务
  doAdd(e){
    if(e.keyCode == '13'){
      if(!this.isChongfu(this.keyword,this.todolist)){
        this.todolist.push({
          title:this.keyword,
          status:0  //默认写0,表示待办事项.1为已完成事项
        });
        this.keyword=''
      }else{
        alert("不要重复添加");
      }
    }
  }
  //删除单项任务
  deletejob(k){
    this.todolist.splice(k,1);
  }
  //封装一个方法,过滤重复的keyword
  isChongfu(keyword:any,todolist:any){
    //异步的,存在问题,导致每次都返回false
    // todolist.forEach(v => {
    //   if(v.title == keyword){
    //     return true;
    //   }
    // });
    if(! keyword) return true;
    for(var i=0;i
3:todolist.component.css
h2{
    text-align: center;
}
.todolist{
    width: 400px;
    margin: 20px auto;
    background-color: lightcyan;
}
.form_input{
    margin-bottom: 20px;
    width: 300px;
    height: 32px;
    background-color: lavenderblush;
}
.searchbtn{
    height: 32px;
    width: 80px;
}
ul,ol{
    list-style-type: none;
}
li{
    margin-top: 20px;
}
4:阶段成果
I:服务
1:准备
把之前F功能和G功能的代码注释去掉,这样的话我们的app.component.html里面就放了
2:创建服务
cli指令创建服务:ng g service 服务名
我为了方便管理,指定一下service存放的目录,所以我直接在后面追加路径:
ng g service services/storage
自动生成了两个文件storage.service.ts和另外一个测试文件
然后在app.module.ts里面import这个服务.(只是列增加的代码)
//引入并配置服务
import { StorageService } from './services/storage.service';
providers: [StorageService],//配置服务
3:定义服务的方法给其他两个组件使用
首先在stroage.service.ts写测试方法
stroage.service.ts
import { Injectable } from '@angular/core';

@Injectable({
  providedIn: 'root'
})
export class StorageService {
  //测试方法
  test1(){
    return 'this just a test by kone';
  }
  constructor() { }
}
组件里使用service
我们在之前的两个组件:search.component.ts和todolist.component.ts里面使用这哥服务的test1方法.
先在上面两个文件中引入这个服务
import { StorageService } from './../../services/storage.service';
然后在构造函数中实例化并且调用test1方法
/**
  可用,但不推荐
  var newSS=new StorageService();
  console.log(newSS.test1());
 */
  constructor(public ss:StorageService) {
    console.log(ss.test1() );
 }
测试服务引用
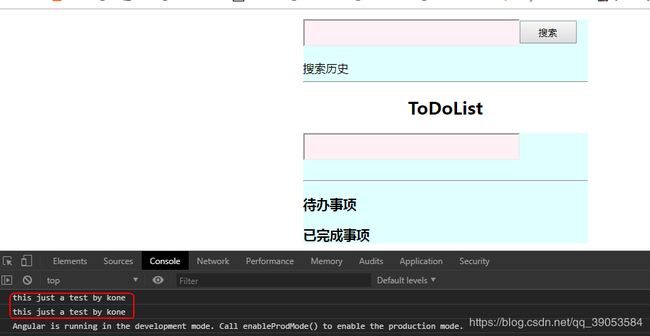
可以看到两个组件都成功调用了stroage.service.ts中test1方法
J:数据持久化到localStroage
之前的search和todolist两个组件的数据在刷新页面之后数据就没有了.接下来我们在service里面创建公共的持久化数据方法(这种数据放到H5的localStroage里面即可),
1:先在服务里定义方法
stroage.service.ts增加下面三个方法
  set(key:string,value:any){
    localStorage.setItem(key,JSON.stringify(value));
  }
  get(key:string){
    return JSON.parse(localStorage.getItem(key));
  }
  remove(key:string){
    localStorage.removeItem(key);
  }
2:组件里调用service的方法
search.component.ts和todolist.component.ts两个组件的里面引入和实例化service上一阶段已经讲过了.下面直接在这两个文件中调用这个方法.
search.component.ts:
import { Component, OnInit } from '@angular/core';
import { StorageService } from './../../services/storage.service';
@Component({
  selector: 'app-search',
  templateUrl: './search.component.html',
  styleUrls: ['./search.component.css']
})
export class SearchComponent implements OnInit {
  public keyword:string='';
  public historyList:any[]=[];
  constructor(public ss:StorageService) {
    console.log(ss.test1() );
  }
  ngOnInit() {
    var searchlist=this.ss.get('searchlist');
    this.historyList=searchlist;
  }
  doSearch(){
    if(this.historyList.indexOf(this.keyword) == -1){
      this.historyList.push(this.keyword);
      this.ss.set('searchlist',this.historyList);
    }
    this.keyword='';
  }
  deleteHistory(k){
    this.historyList.splice(k,1);
    this.ss.set('searchlist',this.historyList);
  }
}
todolist.component.ts
import { Component, OnInit } from '@angular/core';
import { StorageService } from './../../services/storage.service';
/**
  可用,但不推荐
  var newSS=new StorageService();
  console.log(newSS.test1());
 */

@Component({
  selector: 'app-todolist',
  templateUrl: './todolist.component.html',
  styleUrls: ['./todolist.component.css']
})

export class TodolistComponent implements OnInit {
  keyword:string='';
  todolist:any[]=[ ];
  constructor(public ss:StorageService) {
    console.log(ss.test1());
  }
  //页面初始化就触发这个方法
  ngOnInit() {
    var lists=this.ss.get('todolist');
    if(lists)
      this.todolist=lists;
  }
  //添加任务
  doAdd(e){
    if(e.keyCode == '13'){
      if(!this.isChongfu(this.keyword,this.todolist)){
        this.todolist.push({
          title:this.keyword,
          status:0  //默认写0,表示待办事项.1为已完成事项
        });
        this.ss.set('todolist',this.todolist);
        this.keyword=''
      }else{
        alert("不要重复添加");
      }
    }
  }
  //删除单项任务
  deletejob(k){
    this.todolist.splice(k,1);
    //删除之后要重新更新localStroage里面数据
    this.ss.set('todolist',this.todolist);
  }
  //改变checkbox之后也要舒心缓存
  changebox(){
    this.ss.set('todolist',this.todolist);
  }
  //封装一个方法,过滤重复的keyword
  isChongfu(keyword:any,todolist:any){
    //异步的,存在问题,导致每次都返回false
    // todolist.forEach(v => {
    //   if(v.title == keyword){
    //     return true;
    //   }
    // });
    if(! keyword) return true;
    if(todolist==null) return false;
    for(var i=0;i
这个todolist.component.ts里面增加了一个changebox()方法,所以在todolist.component.html里面的checkbox上增加方法调用(change)=“changebox()”
4:阶段成果
K:父子或非父子组件之间的通信,传值
重新建一个项目,然后cnpm install之后再新建4个组件:news,home,header,footer.
这里,news和header是父子组件关系,home和footer是父子组件关系.
1:父组件给子组件传值@input
news和header是父子组件关系
父组件可以把属性,方法,甚至整个父组件传递给子组件
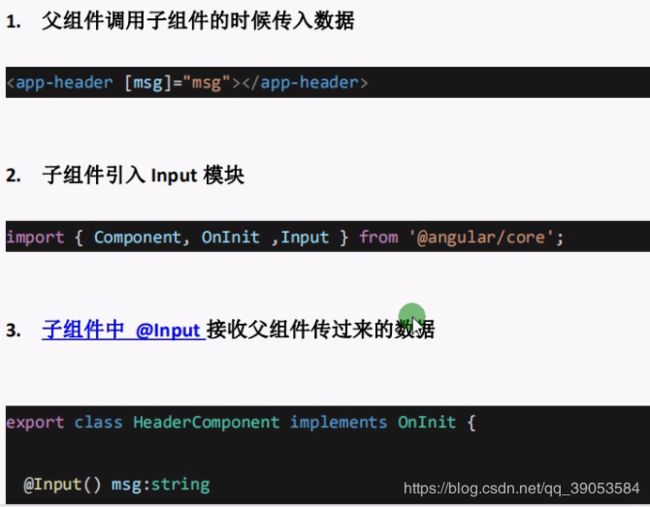
我们先看一下上面流程,再做.
先把app.component.html里面自动生成的代码去掉并引入news组件,然后在news组件的html里面引入header组件.
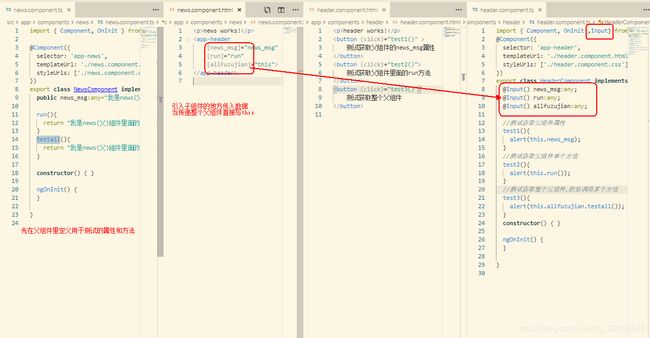
父组件给子组件传值,也就是子组件需要使用父组件的属性和方法,按照三步走:
父组件给子组件传数据
子组件引入Input模块
子组件@Input接受传过来的数据
子组件给父组件传值
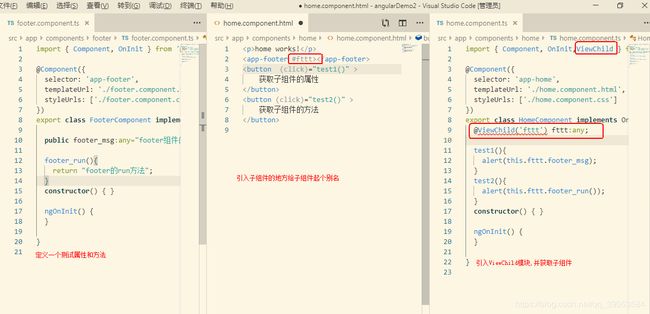
父组件通过@ViewChild主动获取子组件的数据和方法
home和footer是父子组件关系.我们把app.component.html里面的引入替换成
子组件通过@OutPut触发父组件
没了解,用到的时候再百度吧.
L:数据交互(Get,Post,jsonp)
这里我只记录angular内置的HttpClientModule的数据交互方式
1:Get
2:Post
先准备好后台服务的接口:
很显然,我写了两个post的方法,一个是用RequestBody接受参数,另一个是用RequestParam接受参数的。
后台接口
package com.example.angulartest;
import com.sun.org.apache.xpath.internal.operations.String;
import org.springframework.web.bind.annotation.*;

import java.util.HashMap;
import java.util.Map;
@RestController
@CrossOrigin(origins = "http://localhost:4200")
public class TestController {
    //用RequestBody接受数据
    @RequestMapping(value = "/testPostBody",method = RequestMethod.POST)
    public Map testPostBody(@RequestBody  Map jsonString){
        System.out.println("jsonString : "+jsonString.get("uname")+"---------"+jsonString.get("pword") );
        return jsonString;
    }
    //@RequestParam接受数据
    @RequestMapping(value = "/testPostPara",method = RequestMethod.POST)
    public Map testPostPara(@RequestParam Object uname,
                                            @RequestParam Object pword){
        System.out.println("jsonString : "+uname+"---------"+pword );
        Map map=new HashMap();
        map.put("uname",uname);
        map.put("pword",pword);
        return map;
    }
}
angular中引入相关模块
ap.module.ts中引入
import { HttpClientModule } from '@angular/common/http';
  imports: [
    BrowserModule,
    AppRoutingModule,
    HttpClientModule
  ],
然后在使用的地方再引入
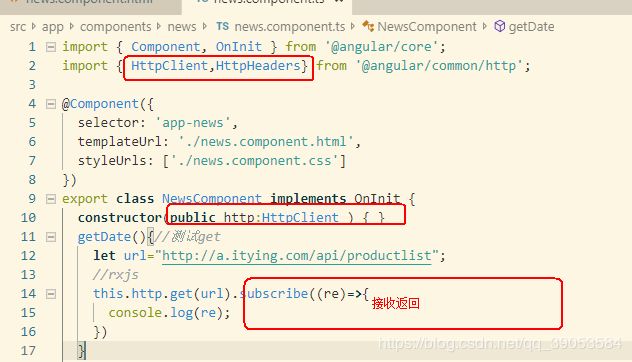
import { HttpClient, HttpHeaders } from '@angular/common/http';
并且再构造函数中实例化HtpClient,
测试代码:
import { Component, OnInit } from '@angular/core';
import { HttpClient, HttpHeaders } from '@angular/common/http';

@Component({
  selector: 'app-news',
  templateUrl: './news.component.html',
  styleUrls: ['./news.component.css']
})
export class NewsComponent implements OnInit {
  constructor(public http: HttpClient) { }

  testPostBody() {//post请求,参数在body中
    const header = {headers: new HttpHeaders({'Content-Type': 'application/json'})};
    let url = "http://localhost:8080/testPostBody";
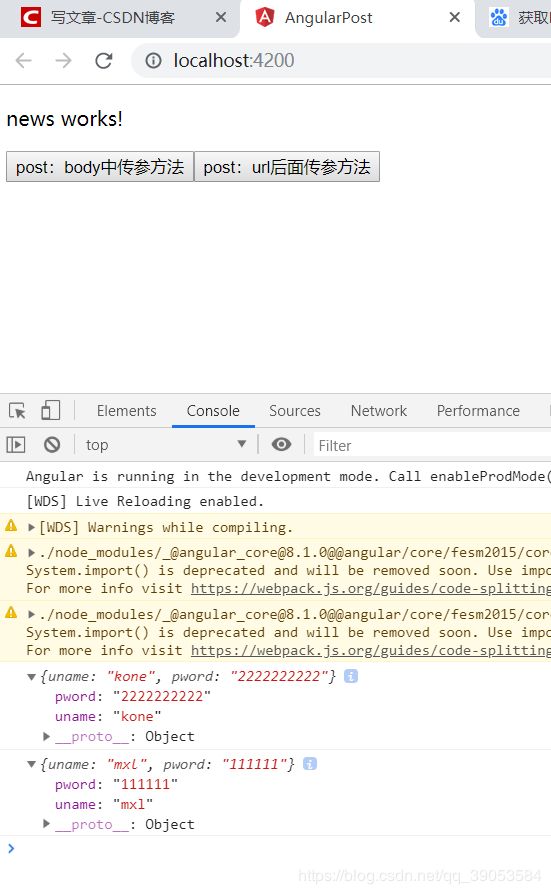
    this.http.post(url,{ 'uname': 'kone', 'pword': '2222222222'},header).subscribe(re=>{
        console.log(re);
    });
  }
  testPostPara(){//post请求,参数在url后面
    const header = {headers: new HttpHeaders({'Content-Type': 'application/json'})};
    let url = "http://localhost:8080/testPostPara?uname=mxl&pword=111111";
    //body中就不放入参数,直接拼接到url后面
    this.http.post(url,{},header).subscribe(re=>{
        console.log(re);
    });
  }
  ngOnInit() {
  }
}
效果
M:路由
我现在对路由作用的理解是:
1:根据不同的url地址,动态的让根组件(父组件)挂载其他组件来实现一个单页面应用
2:在分页的查询的情况下能通过url栏分享出当前的页数或者detail信息
1:创建路由
在用 ng new 新项目时,第一步问你要不要加入路由:
Would you like to add Angular routing? (y/N)
此时,我们输入y创建。然后在生成的文件中看到下图,并且在app.module.ts里面也自动引入了路由模块。
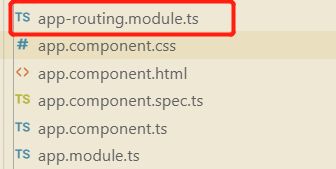
在app-routing.module.ts里面配置项目的路由即可
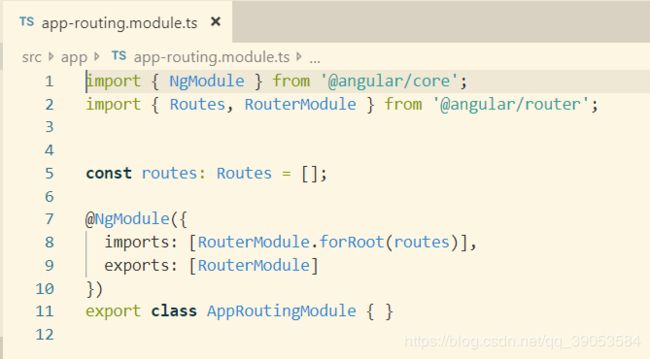
还有app.component.html底部多了一行标签
2:准备几个组件
ng g component components/product
ng g component components/news
ng g component components/home
然后在app-routing.module.ts中引入这几个组件
3:配置路由
打开app-routing.module.ts,此时你应该在这里面引入了这几个组件,然后开始配置
import { NgModule } from '@angular/core';
import { Routes, RouterModule } from '@angular/router';
import { HomeComponent } from './components/home/home.component';
import { NewsComponent} from './components/news/news.component';
import { ProductComponent } from './components/product/product.component';

// 这里配置路由
const routes: Routes = [
  {path: 'home', component: HomeComponent},
  {path: 'news', component: NewsComponent},
  {path: 'product', component: ProductComponent}
];
@NgModule({
  imports: [RouterModule.forRoot(routes)],
  exports: [RouterModule]
})
export class AppRoutingModule { }
4:测试配置,解释
打开浏览器输入http://localhost:4200/home
后面的/home也是我在上面配置的一个路径,看是否能够显示home组件的内容
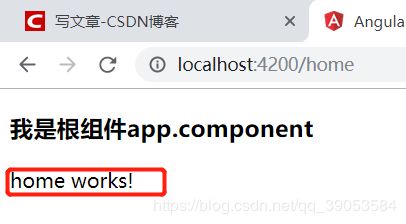
从上图中看到这里红色部分就是home组件的html内容。路由配置成功。但是他是在什么地方显示出来的呢。我们打开app.component.html看到
至于他是什么时候生成的,在你新建项目Would you like to add Angular routing? (y/N),你输入y即可。剩下的路由引入就是Angualr的事情了。
可以简单把它理解为: 页面的占位符,动态加载,会被替换掉的。
当点击 home、about、 dashboard 时,在导航栏的下方,
会被对应的 XX.component.html 替换掉。 这就是单页面路由的原理。
这个地方解释的比较易懂:https://www.jianshu.com/p/d2e0223a337d
但是我们不能总是通过手动改变url地址来跳转到相应的组件。所以接下来。。。。
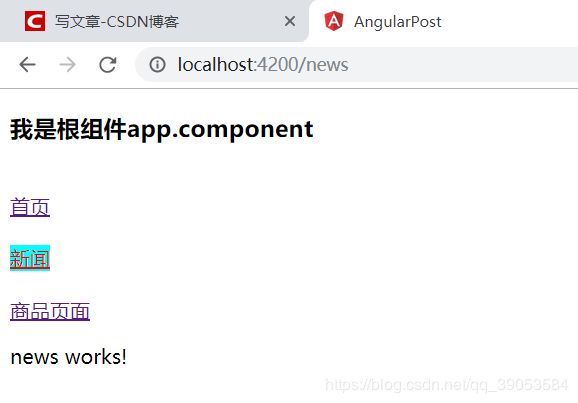
routerLink配置动态路由
app.component.html
我是根组件app.component

首页


新闻


商品页面
这里面routerLink里面用到的path就是在app-routing.module.ts里配置的。当你点击首页时,首页组件会被替换到
默认组件
一开始打开页面并没有点击那哪个组件的时候,下面没有显示任何组件的信息,是很不友好的,所以要配置一个默认显示的组件。
在app-routing.module.ts加配置:
// 匹配不到的时候显示的组件
  {path: '**',  redirectTo : 'home'}
这样的话,刚进入页面就可以加载首页的组件。
N:路由传值以及JS跳转路由
新闻组件里面有几条新闻,希望通过点击新闻到新闻详情页查看该新闻详情。
0:准备详情组件及新闻数据和页面
ng g component components/detail
然后在路由配置里面配置{path: 'detail', component: DetailComponent}
然后在新闻组件里面定义几条数据并展示

1:路由的get传值:
传值
detail接受传过来的值并展示
get路由传值效果
2:动态路由传值
修改路由配置
传值,接收
动态路由传值测试
3:JS路由跳转
前面讲的两个路由都是在页面上用户主动点击跳转的,那么当需要有业务逻辑跳转的时候就要用到js路由跳转。
先新建一个组件商品详情页,上面已经创建了商品的组件ng g component components/productContent
在app-routing.module.ts里配置组件路由
import { ProductContentComponent } from './components/product-content/product-content.component';

  {path: 'content/:pid', component: ProductContentComponent},
1:普通路由,动态路由跳转
2:get传值JS跳转
先多引入一个NavigationExtras,其实不引入跑起来也可以,应该是标准的问题吧。。
代码
点击按钮后的效果
O:路由守卫
路由守卫有几种,可以参考 [这个链接]
我这里这讲其中的两种:CanActivate,CanActivateChild
他们俩的目的是一样的:就是在跳转到目标路由之前先判断是否符合设置的逻辑(canActivate()的返回值,返回true就可以跳转到目标路由,返回false则做其他自定义处理),只不过CanActivateChild针对是所有子路由.
1:创建公共服务类ServeService
这个服务实现了CanActivate ,CanActivateChild,并重写canActivate和canActivateChild方法.我这里的目的是如果用户信息不存在于cookie中,则判断用户信息是否在缓存中,两者都不在,则跳转到登录页,并且返回false;否则,返回true,也就是跳转到目标路由.
import { Injectable } from '@angular/core';
import { CookieService } from 'ngx-cookie-service';
import { Router,CanActivate,CanActivateChild ,RouterStateSnapshot,ActivatedRouteSnapshot } from '@angular/router';

@Injectable()
export class ServeService  implements CanActivate ,CanActivateChild{
  //跳轉到目標路由前檢查有沒有登錄
  canActivate(
    route: ActivatedRouteSnapshot,
    state: RouterStateSnapshot,
  ): boolean {
    let cookieVal=this.cookieService.get("userName");
    let storages=this.get("userName");
    console.log("访问一次canActivate---cookieVal:"+cookieVal+"----storages:"+storages);
    if(cookieVal != null && cookieVal != ""){
      return true;
    }else if(storages != null && storages != ""){
      return true;
    }else{
      this.router.navigate(['login'],{ queryParams: { 'errorInfo': 'noAuth'}} );
      return false;
    }
  }

  canActivateChild(
    route: ActivatedRouteSnapshot,
    state: RouterStateSnapshot,
  ): boolean {
    return this.canActivate(route, state);
  }

  //保存到緩存
  set(key:string,value:any){
    localStorage.setItem(key,JSON.stringify(value));
  }
  //取緩存值
  get(key:string){
    return JSON.parse(localStorage.getItem(key));
  }
  //刪除緩存
  remove(key:string){
    localStorage.removeItem(key);
  }
  constructor(private router: Router,private cookieService: CookieService) {}
}
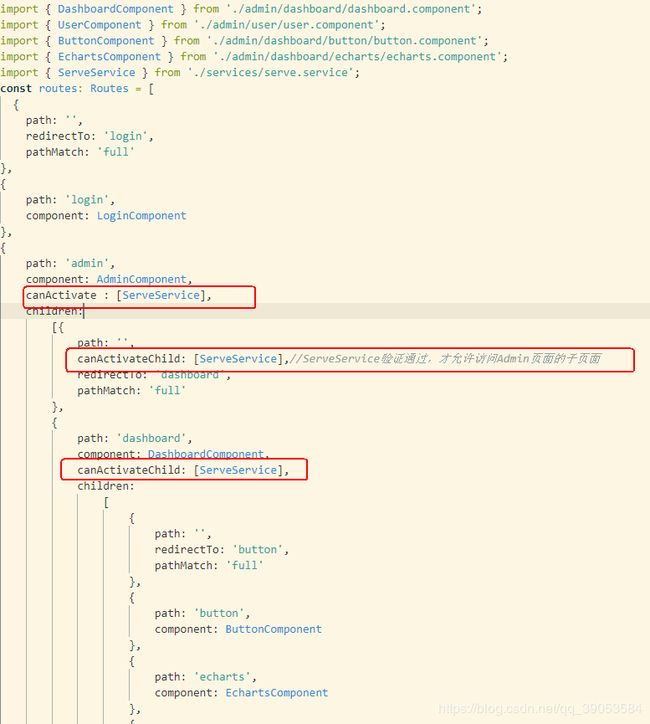
2:路由配置
这里实际上配置哪些路由在跳转之前需要经过这个路由守卫,雷士于java的filter
3:测试
cookie和缓存中没值
cookie或者缓存中有值
分页查询,文件上传
这一片篇幅太长,转到Angualr分页查询及文件上传
问题处理记录:
1:Cannot find module '@angular-devkit/core’
(我再第一步就可以解決,所以沒尝试重装cli)
https://blog.csdn.net/u011389297/article/details/80296444
缺点:
1:因为是单页面,不利于SEO优化
。。。
