原文链接:https://yuchao.wang/article?id=42
Android中的Handler机制,每次整理都会有新的发现。
常见用法
- 方式一:send
查看源码我们会发现,无论是 handler.sendXXX 还是 message.sendXXX 最后都会调用
handler.sendMessageAtTime(Message msg, long uptimeMillis)
- 方式二:post
查看源码我们会发现,所有的 handler.postXXX 方法 都是先通过
handler.getPostMessage(Runnable r)
将 Runnable 封装为 Message 最后同样调用
handler.sendMessageAtTime(Message msg, long uptimeMillis)
- 方式三:looper(官方推荐)
    class LooperThread extends Thread {
        public Handler mHandler;
        public void run() {
            Looper.prepare();
            mHandler = new Handler() {
                public void handleMessage(Message msg) {
                    // process incoming messages here
                }
            };
            Looper.loop();
        }
    }
Handler
public class Handler{
    final MessageQueue mQueue; // 消息队列
    final Looper mLooper; // 消息泵
    final Callback mCallback; // 消息回调
    ...
    public interface Callback {
        public boolean handleMessage(Message msg);
    }
    ...
}
通过源码我们会发现,每个Handler绑定了一个MessageQueue和Looper
Message
public final class Message implements Parcelable {
    public Messenger replyTo; // 进程间通信 Reference to a Handler, which others can use to send messages to it.
    long when; // 时间
    Bundle data; // 数据
    Handler target; // 绑定的Handler
    Runnable callback; // 回调
    Message next; // Message中一直多缓存一个Message对象
}
通过源码我们会发现,每个Message都会关联到发送消息的Handler上
MessageQueue
    private native static long nativeInit();
    private native static void nativeDestroy(long ptr);
    private native static void nativePollOnce(long ptr, int timeoutMillis);
    private native static void nativeWake(long ptr);
    Message next() {
        ...
        for (;;) {
            if (nextPollTimeoutMillis != 0) {
                Binder.flushPendingCommands();
            }
            nativePollOnce(ptr, nextPollTimeoutMillis);
            ...
        }
    }
    boolean enqueueMessage(Message msg, long when) {
        ...
        synchronized (this) {
            ...
            // We can assume mPtr != 0 because mQuitting is false.
            if (needWake) {
                nativeWake(mPtr);
            }
        }
        return true;
    }
通过源码我们发现,如果通过queue.next()获取消息,方法中用了一个死循环来处理,这样一旦MessageQueue中有Message,那么queue.nativeWake(),如果消息为空,那么queue.nativePollOnce()就会阻塞。
Looper
public final class Looper {
    // sThreadLocal.get() will return null unless you've called prepare().
    static final ThreadLocal sThreadLocal = new ThreadLocal();
    private static Looper sMainLooper;  // guarded by Looper.class
    final MessageQueue mQueue;//消息队列
    final Thread mThread;//关联线程
    public static void prepare() {
        prepare(true);
    }
    private static void prepare(boolean quitAllowed) {
        if (sThreadLocal.get() != null) {
            throw new RuntimeException("Only one Looper may be created per thread");
        }
        sThreadLocal.set(new Looper(quitAllowed));
    }
    public static Looper myLooper() {
        return sThreadLocal.get();
    }
}
通过源码我们发现,Looper里面没有关联Handler,其实Looper的静态变量sThreadLocal通过prepare()和myLooper()可以关联Looper和Handler。因为Handler的非Looper构造方法如下
    public Handler(Callback callback, boolean async) {
        ...
        mLooper = Looper.myLooper();
        ...
    }
通过Looper源码我们还发现,每个Looper都会关联一个Thread和一个MessageQueue,那么 Handler 到底是怎么处理消息的呢?这里就需要Looper.prepare()和Looper.loop()来启动这一切了。
    public static void loop() {
        final Looper me = myLooper();
        if (me == null) {
            throw new RuntimeException("No Looper; Looper.prepare() wasn't called on this thread.");
        }
        final MessageQueue queue = me.mQueue;
        ...
        for (;;) {
            Message msg = queue.next(); // might block
            if (msg == null) {
                // No message indicates that the message queue is quitting.
                return;
            }
            ...
            msg.target.dispatchMessage(msg);
            ...
            msg.recycleUnchecked(); // 回收消息
        }
    }
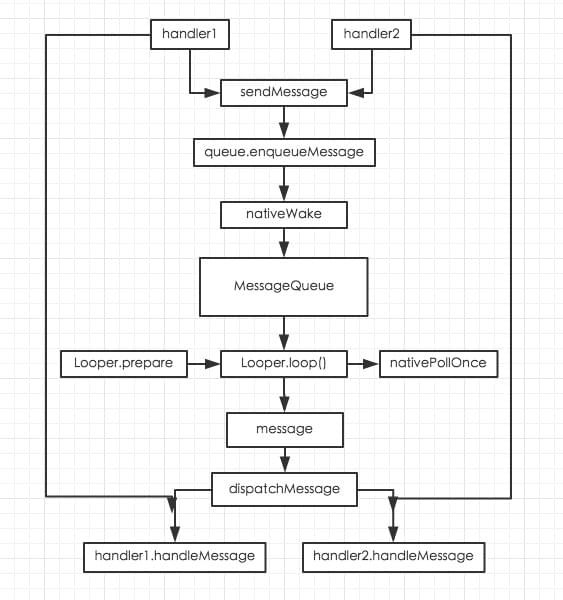
通过源码我们了解到,一个Thread中的Handler发送Message到MessageQueue中,Looper启动以后,循环从MessageQueue中取出Message并分发到对应的handler中进行处理handlerMessage。
UI主线程
我们继续查看Looper源码
    public static void prepareMainLooper() {
        prepare(false);
        synchronized (Looper.class) {
            if (sMainLooper != null) {
                throw new IllegalStateException("The main Looper has already been prepared.");
            }
            sMainLooper = myLooper();
        }
    }
    public static Looper getMainLooper() {
        synchronized (Looper.class) {
            return sMainLooper;
        }
    }
上述两个方法貌似是UI主线程调用的方法,我们继续查看ActivityThread里面的main方法
    public static void main(String[] args) {
        ...
        Looper.prepareMainLooper();
        ActivityThread thread = new ActivityThread();
        thread.attach(false);
        if (sMainThreadHandler == null) {
            sMainThreadHandler = thread.getHandler();
        }
        if (false) {
            Looper.myLooper().setMessageLogging(new
                    LogPrinter(Log.DEBUG, "ActivityThread"));
        }
        Looper.loop();
        throw new RuntimeException("Main thread loop unexpectedly exited");
    }
}
通过源码我们发现,应用在启动完成后,就已经启动了UI主线程的Looper和Handler,并且启动了Handler机制的心脏,消息泵Looper.loop(),因此我们可以在UI主线程直接或者使用Handler调用postXXX方法来更新UI。
总结
- 每个
Thread只对应一个Looper - 每个
Looper对应一个MessageQueue - 每个
MessageQueue中有N个Message - 每个
Message最多对应一个Handler来处理事件 - 每个
Thread可以对应多个Handler
Handler机制是Android设计的相当精巧的一个机制,还有很多代码可以深入研究,比如remove、消息销毁、消息回收、并发处理等,这里就不再赘述了。
